Potensic Wisp Manual de usuario

User Manual
DANGER
Only suitable
for age 14+
Email: [email protected]
Web: www.potensic.com
FB: www.facebook.com/Potensic
Email: [email protected]
Email: [email protected]
Email: [email protected]
Email: [email protected]
Wisp

02 Drone Overview
04 About Aircraft
06 Battery
06 Propellers Installation
07 Remote Control
01 Package List
01 Download Potensic Toy
09 Potensic Toy APP
10 Specification
FAQ
Disclaimer and Notice
Flight Precautions
Flight Environment Requirement
Warning and Tips
Drone Diagram
Remote Control Diagram
Aircraft Overview
Drone Indicator Status
Intelligent Flight
Battle Mode
Connecting with Smart Phone
Operation Interface
Phone Control
Contents
11 Appendix

- 01 -
Package List
Download Potensic Toy
Drone x 1 Smart battery x 2 Remote control x1
Extra blades x 2 pair
(CCW & CW) Drone charger x1 Screw driver x1
User manual x1
For smart phone with Android 5.0+ or windows system:
Search and download "Potensic Toy" from Google Play.
For smart phone with iOS 9.0+:
Search and download "Potensic Toy" from App Store.
AAA battery x3

- 02 -
Drone Overview
Drone Diagram
Thank you for purchasing Potensic products. This chapter mainly introduces the
features of Wisp and the names of various parts of aircraft and remote control. In
order to make it easier for you to use the aircraft, please read this instructions
carefully before you operate the aircraft. Meanwhile, please keep this instruction
properly as a reference for future use.
Note: It is suitable for indoor and outdoor places with force-3 wind(Gentle Breeze)
or below.
Battery
Propeller
Motor
Camera
Infrared Transmitter
Infrared Receiver
Propellers Guard
Power Button
(Long press 1S to turn on/off)
- 03 -
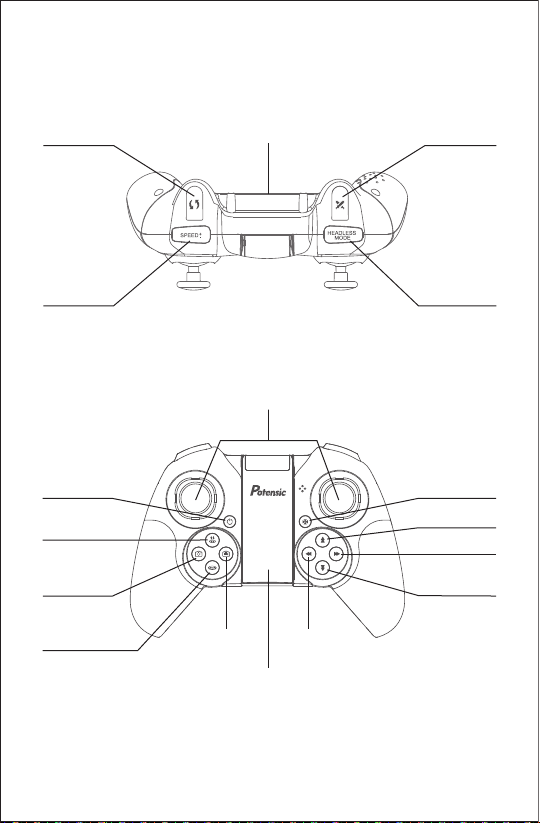
Remote Control Diagram
Fast 360° Rotate Battle Mode
Control Stick
One-key
Take off/Land
Power Button Level Calibration
Front Trimming
Right Trimming
Back Trimming
Left Trimming
Phone Clip
Speed Switch Headless Mode
Emergency Stop
(Hold and press 2s)
Battery Slot
Take a Picture
Take a Video

- 04 -
About Aircraft
Aircraft Overview
Wisp is mainly composed of flight control, communication system, infrared transceiver
system, power system, and flight battery. The flight time can be up to 10 minutes.
This chapter will introduce the basic functions of the aircraft.
Attitude Hold: The aircraft only provides attitude stabilization and fixed altitude flight.
Drone Indicator Status
LED Lights
Normal flight
Headless mode
Geomagnetic calibration
Aircraft low power
No connection
Light green stably
The green indicator light is on for
2 seconds and off for 1 second
Light green and red alternately
Light flashes red slowly
Light red stably
Intelligent Flight
Headless Mode
After switching to the headless mode, no matter where the front of your drone is
pointing, controlling the right stick of the remote control, the drone fly forward from
your current perspective. In other words, headless mode enables the aircraft to fly
according to the current orientation of the operator instead of its own direction.
Hand Gesture
Photo Taking:
Hold a “YEAH” gesture 3s and leave about 1.5m from the camera to take a
picture.
Video Recording:
Hold a “PLAM” gesture 3s and leave about 1.5m from the camera to start
recording a video.

- 05 -
Land Protection
The aircraft has two landing-protection functions:
Low power landing protection:
when the aircraft has 20% power, the low power alarm will be triggered, and rear
light will flash red slowly. When the aircraft has 10% power, it will trigger low power
landing and drone will fly on the ground at a constant speed and the propellers stop
turning.
Lost-of-control landing protection:
when the aircraft fly exceeds the acceptance distance of remote control signal (50m
without interference), the aircraft will land on the ground at a constant speed and the
motors stop.
Battle Mode
Press the "X" button on the remote control, and the remote control sounds like a
gun shooting. The infrared transmitter of the aircraft emits infrared waves (emission
range: ±30° in front of the drone nose), and the aircraft can fight in the air. Two or
more aircraft can fight against each other.
1. When hitting the aircraft for the first time: the remote controller of the being hit
party emit “hit” sound and the aircraft rotates to the left.
2. For the second time: The remote controller of the being hit party emits a "hit"
sound and the aircraft rotates to the right.
3. For the third time: The remote controller of the being hit party emits a "hit" sound
and the aircraft rotates three times to the left.
4. For the fourth time: The remote controller of the being hit party emits a "hit"
sound, the aircraft rotates once to the right and then rotates to the left, and then
land slowly.

- 06 -
Battery
Propellers Installation
When the aircraft's power is too low, it should land in time and the battery be charged.
As shown in the Picture, connect the adapter correctly to charge the battery. When
charging, the indicator lights red, and after full charging, the indicator lights green.
The charging time is about 2 hours.
Note
1. Please use the original charger to charge the battery.
2. Do not charge on a carpet to avoid fire.
3. Recharge every 3 months to keep battery active.
4. Do not put a charged battery under high temperature, such as open fire or electric heating device,
otherwise it will be damaged or exploded.
5. Do not strike or knock surface of hard objects with a battery.
6. Do not disassemble a battery.
7. Do not leave the battery alone during charging.
1. Hold the arm of the machine with your left hand, and pull out the 3 fixed points of the blade
guard in turn with your right hand (Figure 1)
2. Pull out the propeller upwards (Figure 2)
Figure1Figure2
Figure 3
Camera
3. There are two types of blades, choose the corresponding A blade or B blade (Figure 3)
4. Align the corresponding blade with the motor shaft and press down firmly, the blade
replacement is completed.
B
B
A
A

- 07 -
Remote Control
Wisp adopts a 2.4Ghz remote controller with complete function buttons, which can
complete various operations and settings between the aircraft and the camera within
the maximum communication distance of 50 meters. It can also display high-defini-
tion images on mobile devices in real time through Potensic-Toy app (smoothly
image transmission within 30m with no interference environment). The remote
control is powered by 3 * AAA battery that included in the package.
Installation the Remote Control Batteries
Open the back cover of the battery compartment of the remote control with a
screwdriver, and correctly install the 3 * AAA batteries.
Note:
1. Please confirm the position of positive and negative poles during installation, and
the power supply terminal cannot be short circuited. Different types of batteries
and old and new batteries should not be mixed.
2. To prolong the battery life, the exhausted battery should be removed from the
product if the product is not used for a long time.
3. If the battery has leakage, please do not use it again. Please follow the use the
national or regional waste cleaning laws and regulations for recycling, do not
arbitrarily discard, so as to avoid environmental pollution.
Connecting with the Remote Control
Step 1: Press and hold the remote control power on button for 1 second to start it.
Then, the remote control will make two "beep" sounds.
Step 2: Press and hold the aircraft power button for 1 second to start the engine,
and the red light of the aircraft is always on.(Step 1 and step 2 can be reversed).
Step 3: When the left stick of the remote control is pushed up to the top, the remote
control will give a "beep" sound(as shown in Picture 1). When the left stick of the
remote control is pulled down to the bottom, the buzzer will give a long "beep" (as
shown in Picture 2). After the red light of the aircraft turns green after releasing the
stick, the frequency linking is successful.
Picture 1 Picture 2

One button take-off: Short press the "take off and landing" button on the remote
control, hear a short "beep" ; or click the "on/off" icon on the App to start the
virtual rocker, and click the icon " ";
Then, the aircraft will take off slowly and hover at an altitude of about 1.2 meters.
Manual landing: Pull down the throttle lever, push the throttle lever to the lowest
position and hold it, and the motor will stop after 3 seconds.
One button landing: Short press the "take off and landing" button on the remote
control, hear a short "beep"; or click the "on/off" icon on the App to start the
virtual rocker and click the icon " ";
Then, the aircraft will land on the ground at a constant speed and the motors stop
rotating.
- 08 -
Level Calibration
After frequency linking, place the aircraft on the horizontal ground and press the
level calibration key of the remote control for calibration. Then, the drone tail light
"flashes alternately red and green" and turns green after calibration.
Taking Off and Landing
Manual take-off: Turn the left and right stick to the inside downwards at the same
time (Picture 1), and push the throttle stick(left stick) upward.
Picture 1
Tabla de contenidos
Otros manuales de Zumbido de Potensic

Potensic
Potensic T25 Manual de usuario

Potensic
Potensic D88 Manual de usuario

Potensic
Potensic P7 Manual de usuario

Potensic
Potensic A20 Manual de usuario

Potensic
Potensic ATOM SE Manual de usuario

Potensic
Potensic Dreamer Mini Manual de usuario

Potensic
Potensic U47 Manual de usuario

Potensic
Potensic Dreamer Mini Manual de usuario

Potensic
Potensic D60 Manual de usuario

Potensic
Potensic Dreamer 4K Manual de usuario


 Manual de usuario")


