Planet NAS-7450 Manual de usuario

NAS-7450/NAS-7850
Quick Installation Guide
Version 1.0

Table of Contents
Chapter 1 Package Contents............................................................................. 3
1.1 NAS-7450 Package Content ................................................................... 3
1.2 Physical Detail ...................................................................................... 3
1.3 NAS-7850 Package Content ................................................................... 5
1.4 Physical Detail ...................................................................................... 5
Chapter 2 Installing and Starting NAS system .................................................... 7
2.1 Installing the NAS-7450 / NAS-7850 rack-mount Model............................ 7
2.2 Sliding Rails Installation......................................................................... 9
Chapter 3 Basic Conguration .........................................................................15
3.1. Web conguration access.....................................................................15
3.2. HDD Formation and RAID Setting.........................................................16
Further Information ........................................................................................16

3
Chapter 1 Package Contents
1.1 NAS-7450 Package Content
NAS-7450 x 1l
Key x 2l
Power Cord x 1l
Screw Package x 1l
User’s Manual CD x 1l
Quick Installation Guide x 1l
Sliding Rail x 1 setl
Note
If any of above items are damaged or missing, please contact your
dealer immediately.
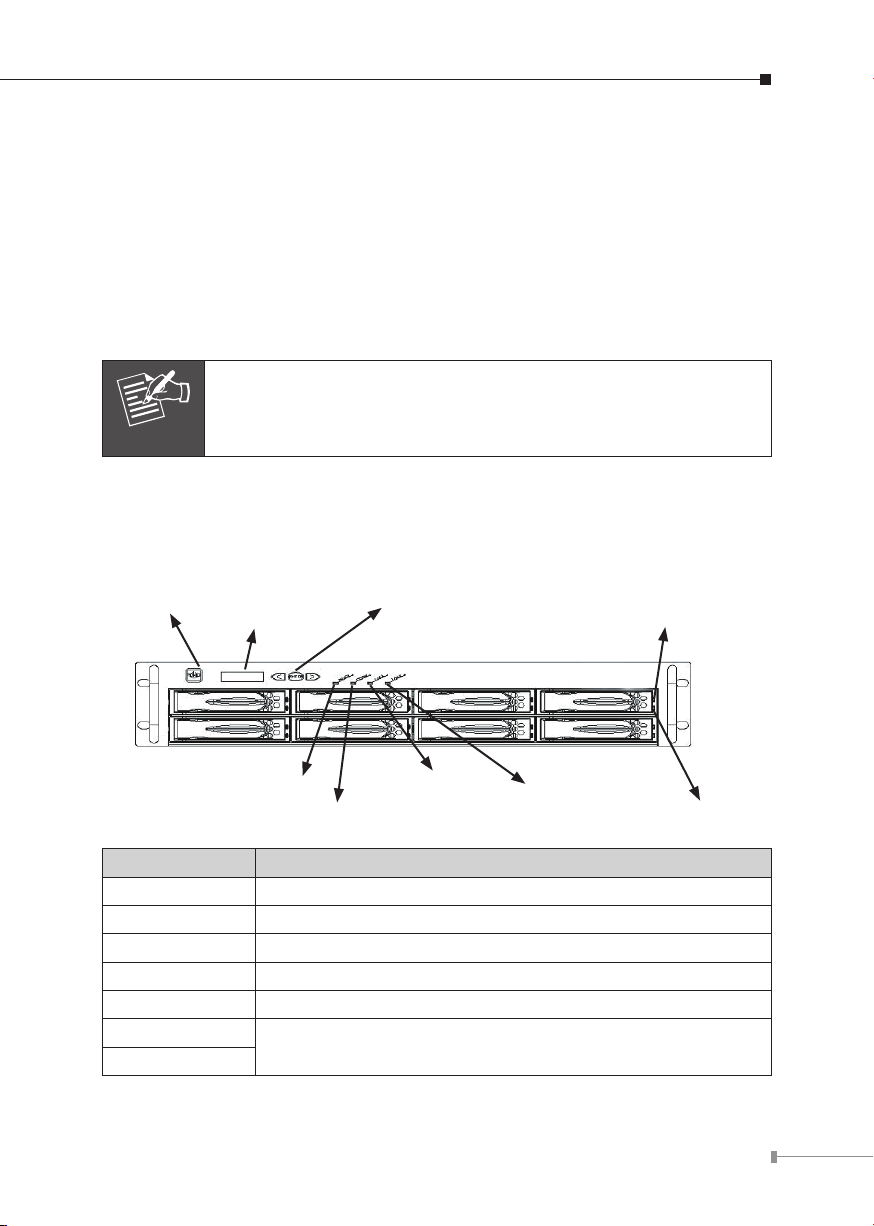
1.2 Physical Detail
NAS-7450 Front View
LAN1 / LAN2 LED
HD LED (Power/Fault)
HD Access LED
Control Button
LCD Panel
Power Button

4
Interface Description
Power Button Green(power on), Yellow(default)
LCD Panel Display LAN1/LAN2 IP Information
Control Button Press the Control button to congure LAN1/LAN2 IP address.
LAN1 Yellow(10M link), Green(100M link), Amber(1000M link)
LAN2
HD Access LED HD LED (Power/Fault) Description
Red on Green Blinks Powering up
Red On
during access Green On HDD is being accessed
Red Blinks (Fast) Green Blinks (Fast) RAID building, rebuilding,
expanding
Red off Amber on Volume un-mounted and HDD is
ready for being hot-up plugged
Off Amber Blinks (Slowly)
Disk faulty.
Blinking interval is about 2
seconds
NAS-7450 Rear View
Power Jack
e-SATA
RS-232
LAN Jack
USB
PCI-E
Interface Description
Power Jack Connect the two power supply cord shipped with the
system
e-SATA Connect to External hard drive case
RS-232 Connect to UPS
LAN Jack (LAN1)
These RJ-45 ports support auto negotiating Fast Ethernet
10/100/1000 Base-TX networks. That allows your system
to be connected to an Internet Access device, e.g.
router, cable modem, ADSL modem, through a CAT.5
twisted pair Ethernet cable.
LAN Jack (LAN2)
USB Socket Connect to UPS and external HDD(FAT/FAT32)
PCI-E Port (optional) Connect to Tape Backup or Tape Library or Network card
5
1.3 NAS-7850 Package Content
NAS-7850 x 1l
Power Cord x 2l
Screw Package x 1l
User’s Manual CD x 1l
Quick Installation Guide x 1l
Sliding Rail x 1 setl
Note
If any of above items are damaged or missing, please contact your
dealer immediately.
1.4 Physical Detail
NAS-7850 Front View
Power LED LAN2 LED
LAN1 LED
Status LED LAN2 LED
HDD Access LED
Control Button
LCD Panel
Power Button
Interface Description
Power Button Power on/off
LCD Panel Display LAN1/LAN2 IP Information
Control Button Press the Control button to congure LAN1/LAN2 IP address.
Power LED Green(power on), Yellow(default)
Status LED Yellow(default)
LAN1 LED Yellow(10M link), Green(100M link), Amber(1000M link)
LAN2 LED

6
HDD Access LED HDD ready LED Description
Red on during
access Green Blinks Power is being accessed
Red on Green Blinks (FAST) RAID building, rebuilding,
expending
Off Amber on Volume un-mounted and HDD is
ready for being hot-unplugged
Off Amber Blink (Slowly) Disk fault Blinking interval is 2
second
Off Off Hard disk is absent or SATA
cable is not connected
NAS-7850 Rear View
Power Jack
e-SATA
RS-232
LAN Jack
USB
PCI-E
Interface Description
Power Jack Connect the two power supply cord shipped with the
system
e-SATA Connect to External hard drive case
RS-232 Connect to UPS
LAN Jack (LAN1)
These RJ-45 ports support auto negotiating Fast Ethernet
10/100/1000 Base-TX networks. That allows your system
to be connected to an Internet Access device, e.g.
router, cable modem, ADSL modem, through a CAT.5
twisted pair Ethernet cable.
LAN Jack (LAN2)
USB Socket Connect to UPS and external HDD(FAT/FAT32)
PCI-E Port (optional) Connect to Tape Backup or Tape Library or Network card

7
Chapter 2 Installing and Starting NAS system
This chapter covers the installation procedure of different form factors of NAS
server as well as the NAS-7450 / NAS-7850 Mobile Rack. Instruction on how to
startup the NAS server by setting up the basic conguration through the Admin
Home page or provided software tool – PLANET NAS Finder is also outlined in this
chapter.
2.1 Installing the NAS-7450 / NAS-7850 rack-mount Model
NAS-7450
NAS-7850
Hot swap hard disk tray installation
1. To unlock the hot swap hard disk tray, pull the tab behind the end of the lever
to release the latch and then lift the lever up as far as it can go to disengage
the hard disk tray from the chassis.
Figure 1
2. Pull the hard disk drive tray out.
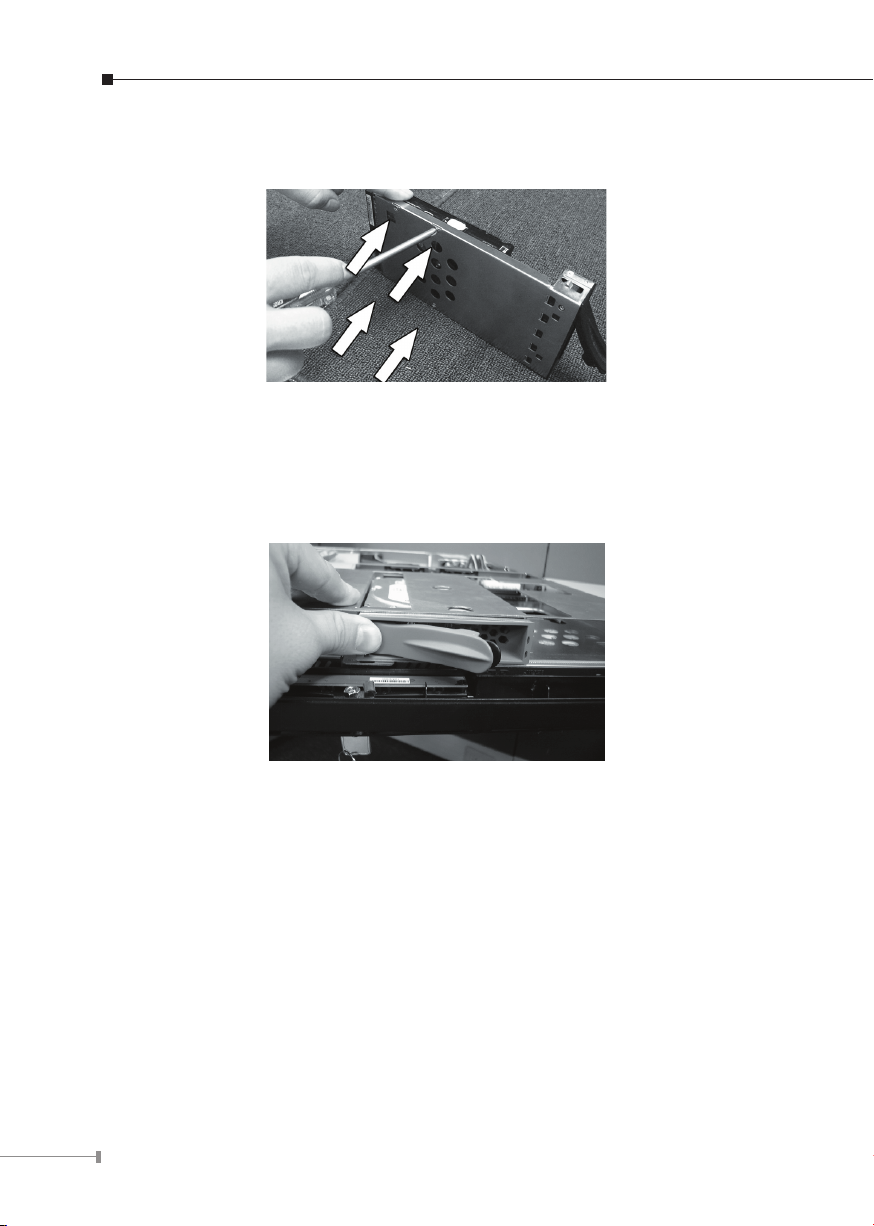
8
3. Attached the HDD to the hot swap hard disk tray with the screws provided
shown in Figure 2.
Figure 2
4. Slide the hot swap hard disk tray slowly into the chassis, push the outer rim
of the tray as shown in Figure 3 until the lever retract slowly toward the tray.
Then, push the level down as far as it can go to connect the hot swap hard disk
tray to the chassis.
Figure 3
NAS-7450 / NAS-7850 rack-mount server installation
1. Pull out a HDD tray from the server.
2. Secure and mount a hard disk onto the HDD tray using four screws under the
tray.
3. Insert the HDD tray back in the server. Make sure the lever of the HDD tray is
properly in place.
4. Repeat Step 1 to Step 3 if necessary for the other HDD tray.
5. Install the provide rack mounting handles at both side of the NAS server.
6. Install the NAS server in the rack. (Refer to the paragraph “Sliding Rails Installa-
tion” in Chapter 2 section 5)

9
7. Connect your NAS server to the network by attach a LAN cable from the LAN
port located at the back of your NAS server.(At least one network connection is
required)
8. Plug the power cord into the power connector on you NAS server.
9. Make sure the power switch on the power supply is in on position.
10. Press the power button on the left hand corner of your NAS server.
11. Wait for the server to boot up. The boot up process takes approximately 2
minutes.
2.2 Sliding Rails Installation
1. Make sure that you have the following the mounting parts for the sliding rails.
4 L-shaped brackets (see the left side of the photo)l
8 xl“M4” size screws, 8 x “M5” size screws and 6 x “#6-32” size screws.
#6-32
2. Take the sliding rail apart by sliding out the center slide. Push down the hook to
separate them. Pull the center slide all the way until it reaches the end.

10
3. Now install the center slide to the rack-mount chassis. Find the screw holes on
both sides of the rack-mount chassis, which are used for mounting the center
slide. Fasten the “#6-32” screws to x the center slides onto chassis. Later, the
center slides will be used for attaching to the sliding rail.
4.Next, attach the two L-shaped mounting brackets on to a sliding rail. Use the
“M4” screws to secure the L-shaped bracket on to the sliding rail.
5. Attach the sliding rail onto a rack-mount cabinet. Secure the sliding rail onto the
rack-mount cabinet via the screw holes on the L-shaped brackets
After properly attaching both sliding rails to the rack-mount cabinet, you may slide
the rack-mount chassis (mounting) in to the cabinet.
Otros manuales para NAS-7450
1
Este manual sirve para los siguientes modelos
1
Tabla de contenidos
Otros manuales de Servidor de almacenamiento en red de Planet


Manuales populares de Servidor de almacenamiento en red de otras marcas

HP
HP NetStorage 6000 Manual de usuario

Seagate
Seagate U10 ST320423A Manual de usuario

Synology
Synology RackStation RS816 Manual

D-Link
D-Link ShareCenter Pro DNS-1200-05 Manual de usuario

Avid Technology
Avid Technology VideoRAID ST Guía de seguridad

Western Digital
Western Digital My Cloud Home Duo Manual de usuario


