oticon NAU01 Manual de usuario

906 73 810 00 / 10.09 Printed in Denmark
INSTRUCTIONS FOR USE
AMIGO ARC

Contents
Introduction 4
Typical package content 5
Getting started 6
What does Amigo Arc connect to 6
Overview 7
Charging the battery 8
Wearing Amigo Arc 9
LED legend 10
Button functionality 12
On/O/Scan button 12
Volume up and down 13
Audible indicators 14
Intelligent memory for your convenience 15
Exchangeable shells 16
Synchronising Amigo Arc 17
Cleaning of Amigo Arc 18
Appendix A: Troubleshooting 20
Amigo Arc features 22
Warnings and precautions 23
Important notice
Please familiarise yourself with the entire contents of this booklet before using
your Amigo Arc. The booklet contains various statements, safety instructions and
important information about the use and handling of the Amigo Arc.

4 5
Typical package content
Introduction
Thank you for choosing Amigo Arc as your choice of neckloop receiver.
Amigo Arc belongs to the Amigo FM product family from Oticon – a company that strives to
provide superior solutions for school and home use.
The Amigo family is extremely versatile, making life much easier for users in academic,
professional and social listening situations.
The transmitters and receivers in the Amigo family are compatible with most types of
Behind-the-Ear hearing instruments, as well as cochlear implants, and Amigo Arc can also
be used for the ITE hearing instruments that have a telecoil.
usB cord ChargerusB cable IFU
Amigo Arc
Exchangeable shells

Exchangeable shell
Change plug
Aux plug
For audio equipment
or headphones
Volume up/down - HI program change
ON/OFF + scan
LED indicator
6 7
Overview
Getting started
What does Amigo Arc connect to
Amigo Arc can connect to all instruments with a telecoil, e.g. BTE, ITE, Cochlear Implants and
Bone Anchored hearing solutions.
Using an AUX cable, e.g. MP3 players can be connected to Amigo Arc through the AUX plug.
By changing the AUX plug to output, headphones can be attached, thus enabling Amigo Arc
to be used for CAPD.
Further, Amigo Arc works with all Amigo transmitters as well as other manufacturers’ trans-
mitters.

8 9
Charging the battery
The Amigo Arc uses a built-in rechargeable battery, which must be charged for 4 hours be-
fore being used for the first time. To charge the battery, remove the AUX plug and plug in the
charger as shown in the picture.
Note: It is also possible to charge Amigo Arc from a PC using the USB cable that is part of the
package. While charging, Amigo Arc will automatically shut o.
Wearing Amigo Arc
Amigo Arc is designed to be worn around the neck and it is possible to open the loop at the
jack, which is located at one side of the loop.
Simply open the jack, and pull the wire around the neck, and then close the jack again.
10 11
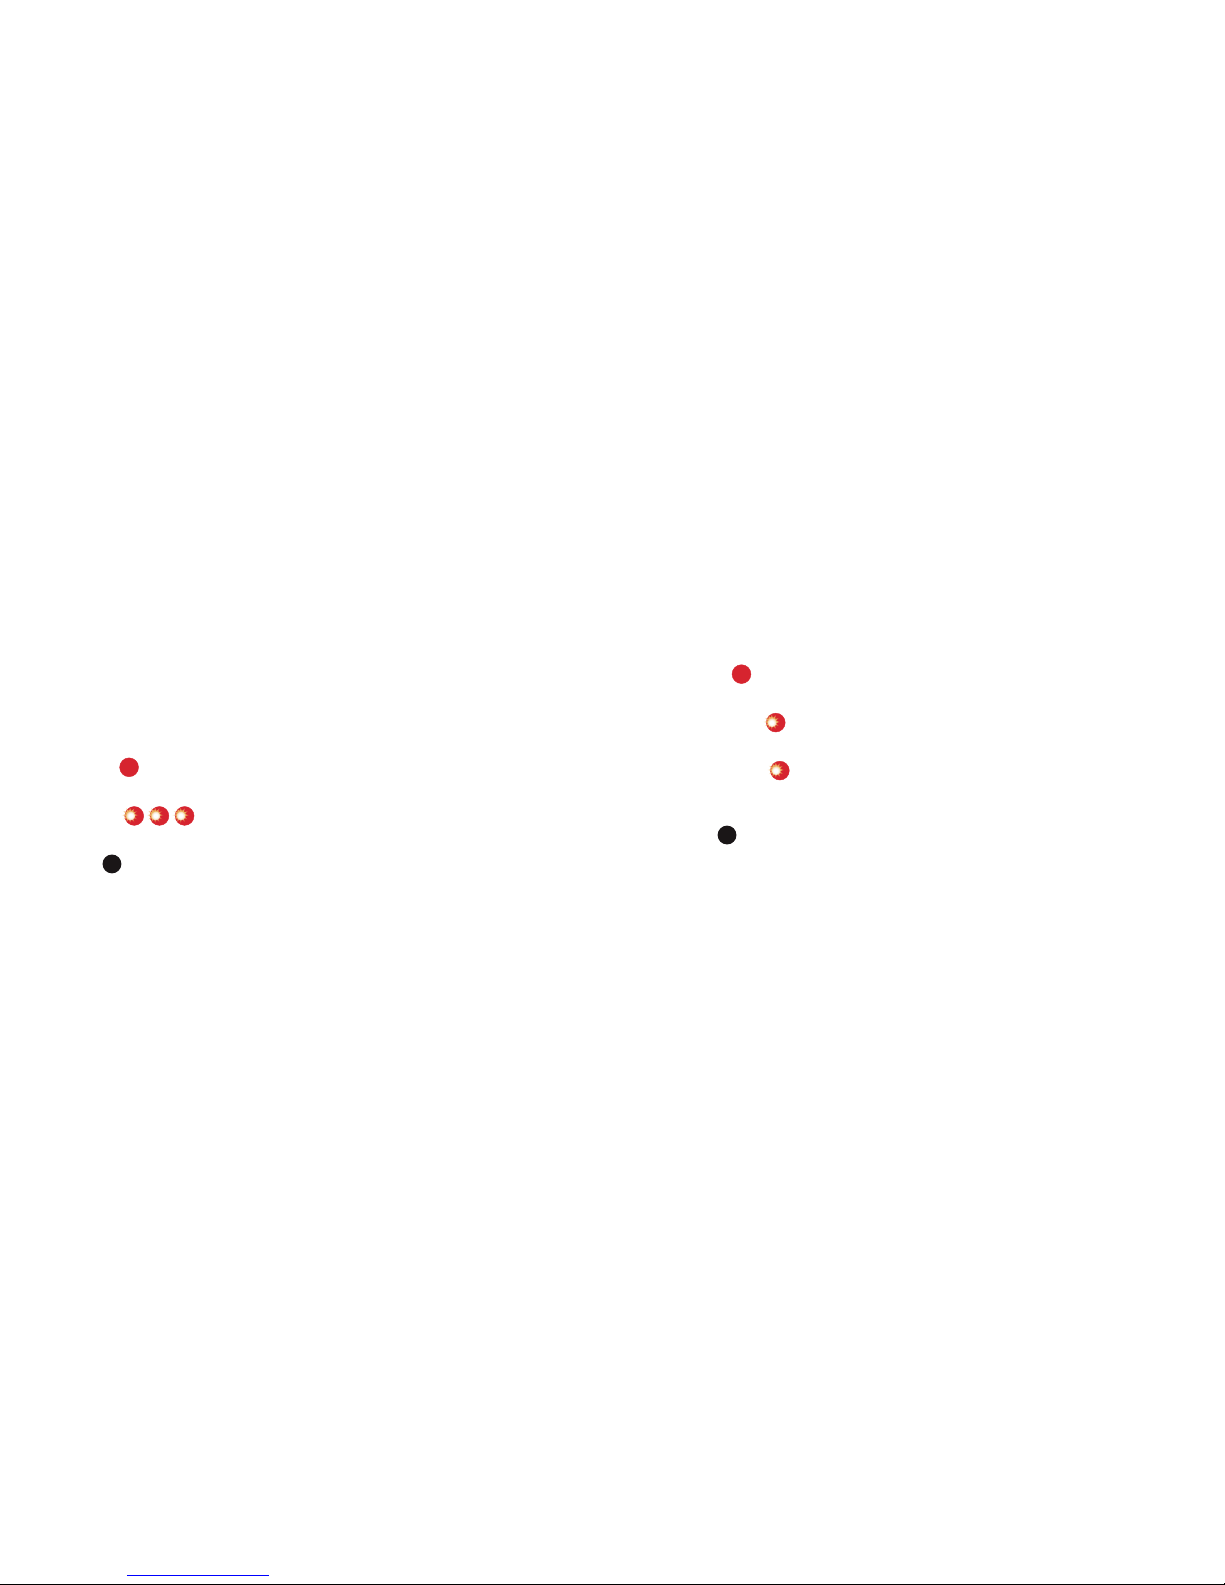
LED legend
On Amigo Arc there are two LEDs. One is indicating if Amigo Arc is receiving an FM signal,
and the other is displaying battery status.
FM LED:
Steady red
On and receiving
Triple blink
Synchronizing command accepted
No light
O, error, bad signal or audio plug connected
The battery shaped LED indicates the charge status of Amigo Arc.
Steady red
Battery charged and device is on
Blinking red fast
Low on battery
Blinking red slow
Battery charging, when fully charged LED changes to steady red.
Amigo Arc is 80% charged in 1 hour and 100% charged in 2½ hours.
No light
Battery empty – device turns o
Note: It is possible to disable the light in LEDs.
✷✥✲✴✹✵✩✯✰Å
✷✥✲✴✹✵✩✯✰Å
✷✥✲✴✹✵✩✯✰Å
✷✥✲✴✹✵✩✯✰Å
✷✥✲✴✹✵✩✯✰Å
✷✥✲✴✹✵✩✯✰Å
✷✥✲✴✹✵✩✯✰Å
✷✥✲✴✹✵✩✯✰Å
✷✥✲✴✹✵✩✯✰Å

12 13
Button functionality
On/O/Scan button
The On/O button turns Amigo Arc on and o as well as acting as scan button.
Push the ON/OFF button for 2 seconds to turn on. A start-up jungle will be played.
Battery LED will be turned on steady red
Push the ON/OFF button for 2 seconds to turn o.
Channel seek
One short press on the On/O/Scan button enables a scan for active FM channels. Beeps
will be played throughout the scan process, and a confirmation beep played, when Amigo
Arc locks onto an active FM channel.
Note: The scan functionality can be disabled for small children
Volume up and down
Press short on arrow up button for higher volume
Press short on arrow down button for lower volume
Turning the volume up/down will be indicated with beeps, and the default level
also be indicated with a beep if enabled.
A long press on the volume up/down button will change program on Oticon’s wire-
less enabled hearing instruments.
Note: Both functionalities of the buttons can be disabled for small children.
✷✥✲✴✹✵✩✯✰Å

14 15
Intelligent memory for your convenience
With Amigo Arc, there are three dierent volume setting possibilities that automatically
remember the user’s preference.
The three settings are:
1. Standard use, where the FM signal is transmitted to the telecoil
2. By connecting e.g. an MP3 player to the AUX jack
3. By connecting headphones to the AUX jack
If the user prefer the volume two steps up when listening to e.g. an MP3 player, Amigo Arc
remembers that from the last time it was used, and the user will need less handling.
Audible indicators
Amigo Arc has an audible indicator that informs the user with a beep, when a setting has
been changed.
Amigo Arc beeps once every time the volume is turned one step up or down. When the
default level is reached, a double beep is played.
Moreover, if the scan functionality is enabled, Amigo Arc will play a beep every second
during the scan operation. When locking on to an FM channel, two beeps will be played.
Note: Beeps can disabled.

16 17
Exchangeable shells
Your Amigo Arc is delivered with 5 dierent colour shells that easily can be changed.
By pressing a fingernail, into the gap on top of the Amigo Arc,
the faceplate on both sides can be twisted loose.
Note: Never use excessive force in your attempt to change the
faceplates.
Synchronising Amigo Arc
To synchronise Amigo Arc, make sure that that it is turned on.
Within a distance of approximately 50 cm, press the SYNC button on the Amigo T20/T21/
WRP. The LED on the transmitter will then blink three times, and the SYNC logo will appear
on the screen. If the synchronisation is successful, Amigo Arc will also blink three times.
Note: Amigo eZync can also synchronise Amigo Arc.

18 19
Cleaning of Amigo Arc
Amigo Arc is moisture repellent, making it very easy to clean with a damp cloth.
Do not immerse Amigo Arc in water or other liquids.
Visit www.amigo.com for a full compatibility guide.
Este manual sirve para los siguientes modelos
1
Tabla de contenidos
Otros manuales de Receptor de oticon


