Osoto PH-9500S Manual de usuario

MULTI-MEDIA HIGH RESOLUTION
DIGITAL PRESENTER
Operation Manual
Please read this manual carefully before operation.

NOTES☆:
Warning:
To avoid fire or leakage of electricity, please
keep this visual presenter dry. There is high-volt
accessories assembled inside. Refer service to
qualified personnel. Do not try to fix it yourself.
1. Check the voltage and frequency before any operation.
Please make sure that the supply power is dynatron, and
0-wire, live wire, and ground wire are correctly connected.
2. To avoid static high-volt strike, please connect ground
wires correctly. Do not move cables with power on.
3. Do not try to change the structure. Do not operate
when it is naked.
4. Keep this instrument from tinderbox, liquid, or metal.
Do not present tinderbox or liquid on the base board.
5. Do not use this instrument under situations like high
temperature, wet, caustic gases, dusty, or shaky. Please place
it on STABLE desk. Objects should be less than 1kg.
6. Remove power supply before cleaning. Please clean it
with dry cloth without thinner, volatile gas, or insecticide.
7. Release the plug when the instrument is unused.
8. Keep children away from this instrument.
9. Remove power supply when abnormal signals occur
like noise or smoke, and release the plug.
1

INSTRUCTIONS☆:
Thank you for using this instrument. Please read this manual
carefully for comfortable use later on.
Features:
Decent design with fashionable style.
With unique flectional arms, it controls light direction and
avoids light reflection. (Patent right achieved).
12x optical zoom and 8x digital zoom, camera helps to
display small characters clearly.
With 2,000,000 pixels line-by-line scan CCD, it output high
quality signals in 1920×1024 high resolution with no flicker or
shaking problems when displaying small characters. It can be
connected with a projector or displayed directly through RGB
ports, which is especially suitable for teaching and
presentation.
With ESD static protection function, it protects the
components when switching plug electriferously.
Strong image processing ability: Freeze, Division,
Color/B/W, Negative, Mirror, Image save, Brightness etc.
Several inputs and outputs help to combine multimedia
instruments freely.
Full direction camera which can be rotated horizontally and
vertically at 350°.
Control mode: control panel, remote control and software.
Volume adjustable microphone jack is available for wire
and wireless microphone.
2

☆CONTENTS:
SAFE NOTES ……………………………………….………1
BASIC INTRODUCTION……………………………………2
STRUCTURE & PARTS……………………….……………4
STRUCTURE………………………..………….………4
BACK…………………………………………….………4
CONNECTION…………………………………….…………5
BASIC OPERATION ………………………………..………6
SET UP …………..…………………………………….6
FOLD……………………………………………………6
OPERATION…………………………………………………7
CONTROL PANEL ……………….……………………7
REMOTE CONTROL…………………………………11
COMPUTER ……………………….…………………15
DAILY MAINTANCE ………………………………………16
F & A…………………………………………………………17
SPECIFICATIONS…………………………………………18
ACCESSORIES……………………………………………19
3

☆STRUCTURE & PARTS:
4
Note: BACK STRUCTURE sub
j
ects to the actual
p
roduct.
STRUCTURE:
1. Flexible pole;2. Flexible pole lock;3. Main pole;4.
Main pole lock;5. Power switch;6. Camera head;7.
Infrared port;8. Camera;9. Upper light;10. Upper light
arm;11. Base light;12. Control panel;13. Microphone plug
& volume
1
2
9
10
11
12
7
8
3 9
10
BACK
1 2 4 5 6
3 2 7
1. RGB In 2. RGB Out 3. RS-232 4. USB (optional) 5. AV
Input 6. AV Output 7. Input port of direct current 12V/1.5A
13
6
45

☆CONNECTION:
CONNECTION:
Computer Lap-top VCD、DVD、VCR
LCDProjector TV
Back-shoot
/ Digital TV
Notes: Please disconnect the visual presenter when
under assembling.
5
☆BASIC OPERATION:
1
2
3
45
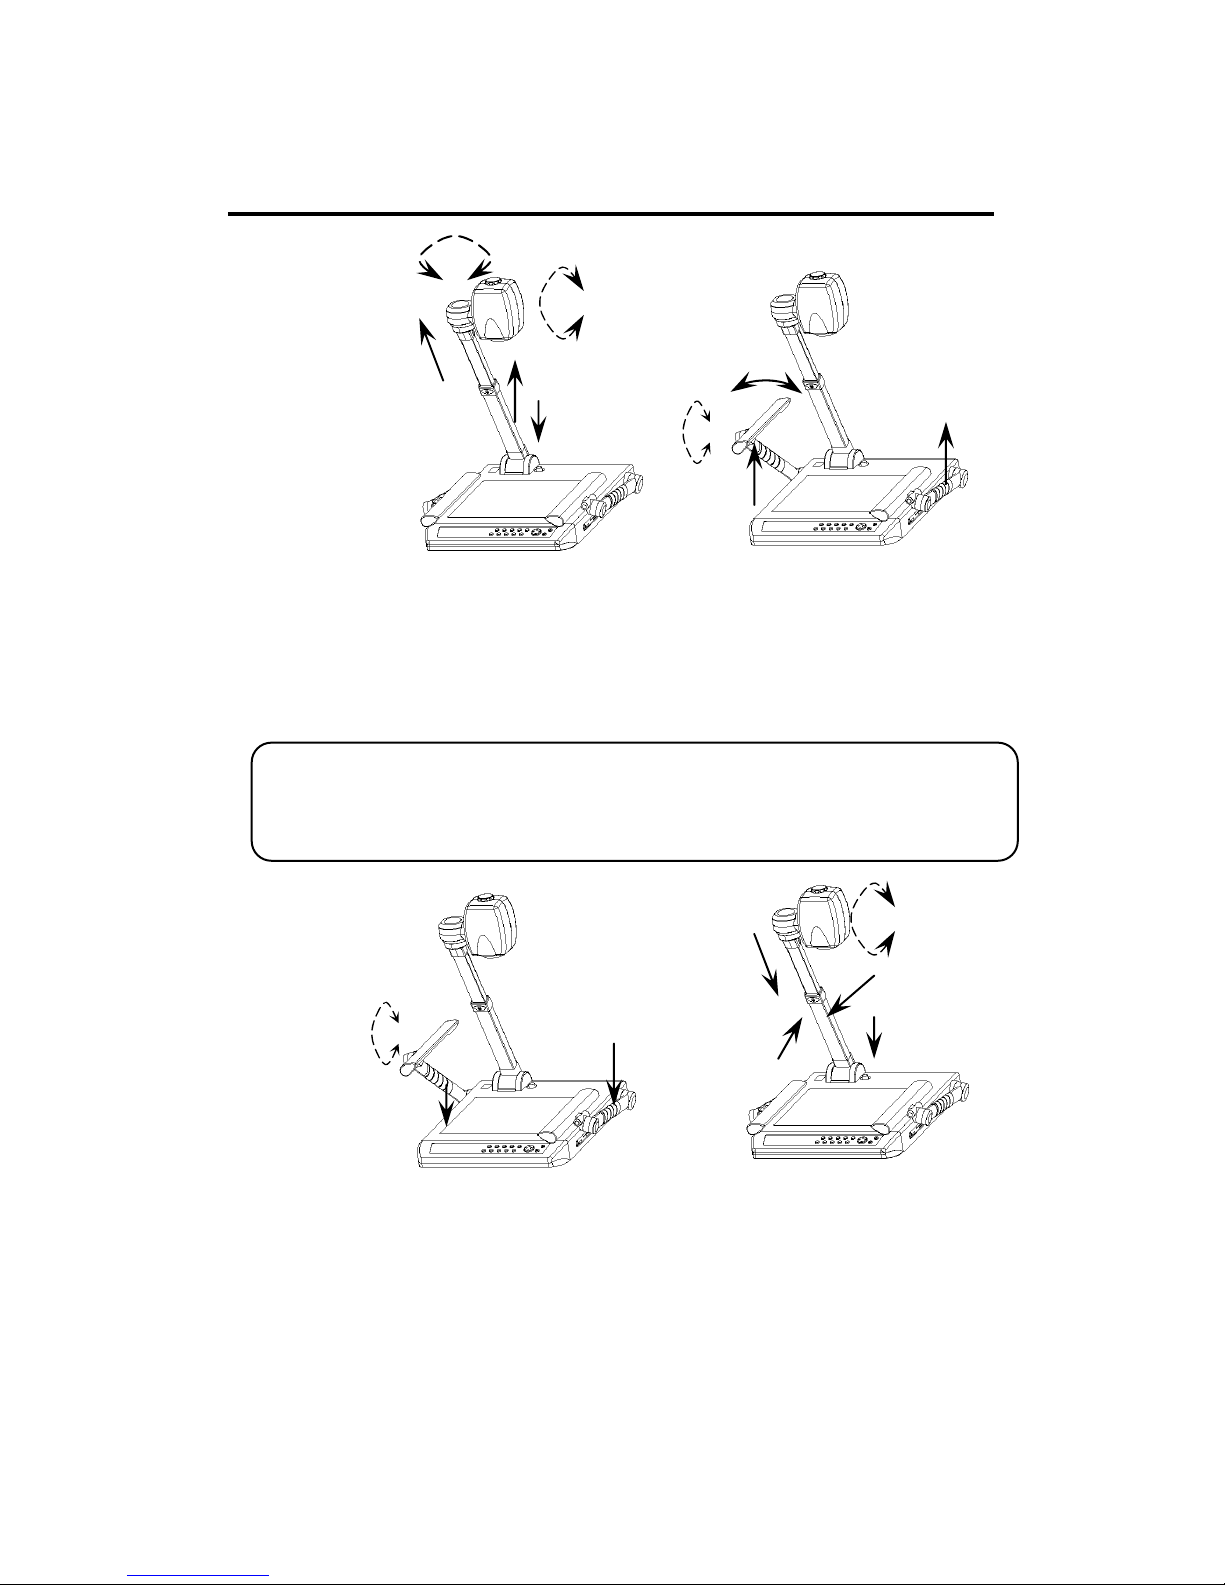
UNWRAP:
66
7
1-2. Press the “main role lock” button and pull up the main
pole; 3. Pull out the flexible pole; 4-5. Adjust camera
horizontally or vertically; 6-7. Pull up the upper light arms and
adjust the direction.
Notes:Do not press the “Flexible role button” when raise
the flexible role.
76
5
3
4
2
2
1
FOLD:
1. Make the upperlight arms vertically parallel ⒉Lay
down the arms 3-4. Press the “Flexible pole button” and lay
down the flexible pole 5. Make the camera head vertically
parallel to the main pole 6-7. Press the main pole button and
lay down the pole.
6

☆OPERATION:
Control mode :1. Control panel ;2. Infrared remote
control ;3. Computer. Each of them can be carried out
separately or combined.
1. CONTROL PANEL:
POWER:
Switch the button to “┃”, the indicator lights of
“RGB” and “AV” will twinkle to green. It means
“Power on”.
Switch the button to ”○” to shut off.
7
LIGHT:
Press “Light” to on/off the upperlight or
baselight.
RGB IN:
Repeatedly pressing “RGB switch” to select
machine signal and external PC RGB signal input.
When choosing machine RGB signal, ”RGB switch” indicator
light would comes green continually, when choosing external
PC RGB1 signal, ”RGB switch” indicator light would comes
orange continually, when choosing PC RGB2 signal, ”RGB
switch” indicator light would comes red continually. Note: If
current state was VGA signal output, there is no AV signal
outputed .

☆OPERATION:
AV IN:
Repeatedly pressing “AV switch” to select
camera signal and external AV signal. When
choosing camera signal, ”AV switch” indicator light
would comes green continually, when choosing external AV
signal 1, ”AV switch” indicator light would comes orange
continually, when choosing external AV signal 2, ”AV switch”
indicator light would comes red continually. Note: If current
state is AV signal output, there is no VGA signal outputed.
TELE/WIDE:
Press the “TELE/WIDE” button to zoom
in/out the image.
AF/FAR/NEAR:
Press “AF“ button for auto focus; press Tele or
WIDE button to adjust focus gradually and
constantly. Press this button for 3 seconds to enter into the
menu, where you can set up and operate the visualizer.
8

☆OPERATION:
BRT-/BRT+ :
The brightness can be adjusted with
“BRT-” & “BRT+” .
FREEZE:
Press “FREEZE” to freeze the current image for
detailed studying; re-press it to cancel.
DELETE:
Under the state of Preview to press “Delete”,
OSD shows “Delete?”, then press “Delete” again to
confirm deleting this image, press other keys to quit.
9
Tabla de contenidos
Otros manuales de Presentador digital de Osoto


Manuales populares de Presentador digital de otras marcas


Samsung
Samsung SDP-850 Manual de usuario

Dukane
Dukane DV-P303A Manual de usuario

RemotePoint
RemotePoint Presenter Global Manual de usuario

Kensington
Kensington Wireless Presenter with Laser Pointer Instrucciones de funcionamiento

NEC
NEC DS1-MP10RX2 Manual de funcionamiento

Logitech
Logitech R800 - Professional Presenter Presentation Remote... Manual de usuario