Organic Lighting Systems liniLED Top Manual de usuario

LED strip manual
liniLED® Top High Power
BEND
R
30 mm
F
FROST
RoHS
GLOW WIRE
850 °C
24
V D
C
SEA
IP40/IP68 UV POOL CL
CRI
80
+
IK08 CLEANING POOL CL
MAC
ADAM
2
S D C M


liniLED® Top High Power
Technical notes 4
Top High Power - Product drawings 5
Product information 5
Product specications 5
Cable selection 6
Area advice 7
Product care and handling 8
Cutting instructions 9
Solder 11
Connect IP40 13
Uninstalling the connector 15
Power supply 16
Symbols 17

4
LED strip manual | liniLED® Top High Power
Read the instructions and safety precautions before installation, usage and storage of the products to secure safety of the user and reliability of the product.
- Hand over the instructions to the end-user and those responsible for installation and usage.
- Triolight B.V. cannot be held responsible for improper handling, product installation, usage or storage.
Handling
- Handle with care.
- The product may not be modied or converted otherwise than prescribed.
- Products are transported in proper packaging. Products should remain packed until installation.
- Take ESD (Electrostatic Discharge) protection measures when handling liniLED® products.
- The products and their components may not be exposed to mechanical, static loads and other tension/compression other than from the product itself.
Installation
- Attention: The power has to be switched o the main power supply or the connection before installation. Not doing so may damage the product.
- Use a suitable LED power supply/driver: 24 V DC constant voltage. Do not drive the product on other voltages than described in their datasheet/products
specications.
- Installation has to be done by a certied professional with knowledge of electrical circuits or a specialised maintenance person known with valid directives.
- General and local construction-, safety- and installation regulations should be respected.
- Use only supplied parts, accessories and required tools as prescribed in the installation manual to guarantee a safe installation and use of the product.
- Products may solely be installed in the areas according to their prescribed IP-rating, IK-rating, temperature range and chemical resistances.
- Do not fasten anything on the product, same applies for hanging.
- Do not install the product in the following cases:
- Damage is visible on the product or its cables.
- The inside of the product is moistened or dirty.
- The product or its cables have been modied. It could lead to an electrical shock or a short circuit may occur.
- Children may not play unsupervised with electrical products as they cannot judge the dangers in dealing with electrical circuits correctly.
Operation and use
Solely use the product when its working correctly. If not, switch the power o immediately and advise an electrical specialist in the following cases:
- Damage is visible on the product.
- The product does not function.
- Smoke or steam rises from the product.
- Crackling sounds are noticeable.
- The product is overheating.
- Repairs on the installation may only be performed by qualied electricians. Product repairs may solely be done by Triolight B.V.
Cleaning and maintenance
- Attention: Disconnect the power before maintenance and cleaning.
- Dust and dirt accumulated over time should be removed from the light-emitting surface to assure optimal functioning of the product.
- Paints, solvents and corrosive cleaning chemicals may not contact and thus aect the product.
Environment and waste
- Exterior decorative lighting should only be used after sunset.
- This product may not be treated as household waste. Dispose of the material through the waste recycling of electrical and electronic equipment.
Warranty
This product comes with a 2 year warranty. Warranty void if:
- The installation guide has not been consulted (installation mistake).
- The installation is not done by a certied installer.
- Local rules and guidelines are not respected.
- The invoice cannot be shown and/or has been altered.
- Damage is caused by negligence, abnormal use or improper handling, use, maintenance and/or cleaning of the product.
Technical notes

5
LED strip manual | liniLED® Top High Power
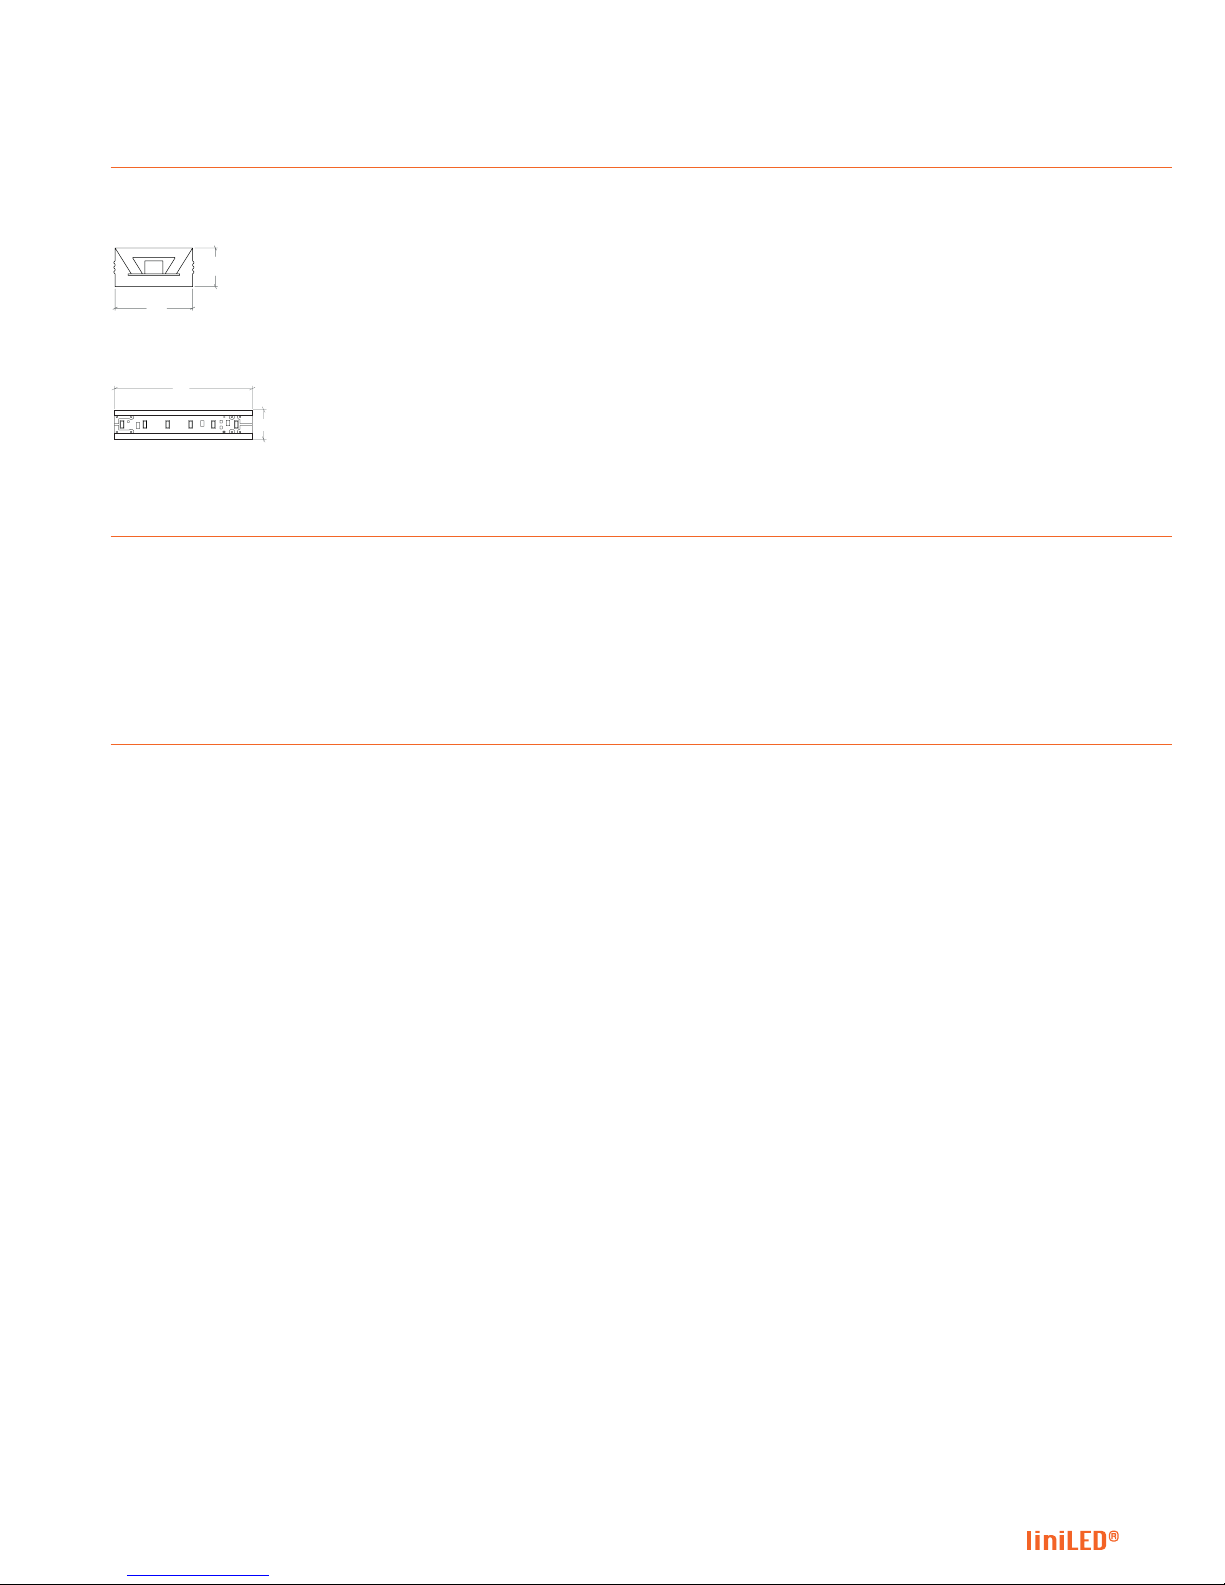
The liniLED® Top High Power (HP) LED strip (IP40/IP68*) is a high quality, exible LED strip with a unique co-extrusion
technology. The combination of high quality and exceptional exibility, allows for an endless range of indoor and outdoor applications.
*For usage in wet enviroments, use the liniLED® IP68 Kit or mirror welded.
LED strip top view
LED strip front view
6
12
50
12
Product information
Product specications
Colour LED/m V DC W/m lm/m Temp ˚C Max. Length B50/L70
2400K 120 24 8.9 623 -30...5510 m > 60.000 h
2700K 120 24 8.9 703 -30...5510 m > 60.000 h
3000K 120 24 8.3 617 -30...5510 m > 60.000 h
4000K 120 24 8.6 711 -30...5510 m > 60.000 h
6500K 120 24 8.6 693 -30...5510 m > 60.000 h
Max. connection length between -20 °C and -30 °C is 7 metres.
Top High Power - Product drawings

6
LED strip manual | liniLED® Top High Power
1. Colour temperature 2400K - 2700K
2. LED strip length 1 m 2 m 5 m 10 m
3. Voltage 24 V DC 25 V DC 24 V DC 25 V DC 24 V DC 25 V DC 24 V DC 25 V DC
4. Cable cross section 0.50 mm - 0.035 Ω/m 33.5 m 65.5 m 16.1 m 32.1 m 5.6 m 12.0 m 2.1 m 5.4 m
0.75 mm - 0.023 Ω/m 50.4 m 98.6 m 24.2 m 48.3 m 8.5 m 18.1 m 3.3 m 8.1 m
1.00 mm - 0.018 Ω/m 67.0 m 131.1 m 32.2 m 64.2 m 11.3 m 24.1 m 4.3 m 10.8 m
1.50 mm - 0.012 Ω/m 100.9 m 197.2 m 48.5 m 96.7 m 17.0 m 36.3 m 6.6 m 16.2 m
2.50 mm - 0.007 Ω/m 167.9 m 328.3 m 80.7 m 160.9 m 28.4 m 60.5 m 11.0 m 27.0 m
1. Colour temperature 3000K
2. LED strip length 1 m 2 m 5 m 10 m
3. Voltage 24 V DC 25 V DC 24 V DC 25 V DC 24 V DC 25 V DC 24 V DC 25 V DC
4. Cable cross section 0.50 mm - 0.035 Ω/m 36.0 m 70.4 m 17.3 m 34.5 m 6.1 m 13.0 m 2.4 m 5.8 m
0.75 mm - 0.023 Ω/m 54.2 m 105.9 m 26.1 m 51.9 m 9.3 m 19.6 m 3.6 m 8.8 m
1.00 mm - 0.018 Ω/m 72.1 m 140.8 m 34.7 m 69.1 m 12.3 m 26.1 m 4.8 m 11.7 m
1.50 mm - 0.012 Ω/m 108.4 m 211.8 m 52.3 m 103.9 m 18.6 m 39.2 m 7.3 m 17.7 m
2.50 mm - 0.007 Ω/m 180.5 m 352.5 m 87.0 m 173.0 m 30.9 m 65.3 m 12.2 m 29.4 m
1. Colour temperature 4000K - 6500K
2. LED strip length 1 m 2 m 5 m 10 m
3. Voltage 24 V DC 25 V DC 24 V DC 25 V DC 24 V DC 25 V DC 24 V DC 25 V DC
4. Cable cross section 0.50 mm - 0.035 Ω/m 34.7 m 67.9 m 16.7 m 33.3 m 5.9 m 12.5 m 2.3 m 5.6 m
0.75 mm - 0.023 Ω/m 52.2 m 102.1 m 25.1 m 50.1 m 8.9 m 18.8 m 3.4 m 8.4 m
1.00 mm - 0.018 Ω/m 69.5 m 135.8 m 33.4 m 66.6 m 11.8 m 25.1 m 4.6 m 11.2 m
1.50 mm - 0.012 Ω/m 104.5 m 204.3 m 50.3 m 100.2 m 17.8 m 37.7 m 6.9 m 16.9 m
2.50 mm - 0.007 Ω/m 174.0 m 340.0 m 83.7 m 166.7 m 29.6 m 62.8 m 11.6 m 28.2 m
Note: Calculations are based on a standard connector with 1 metre cable (0.5 mm).
1= Select colour temperature.
2 = Select LED strip length.
3= Select output voltage.
4= Select cable cross section.
Result = Maximum cable length based
on the cable thickness and power supply
voltage.
Cable selection
-+
Top/Side Connector (1000 mm)
1
2
3
4
Result
Cable selection

7
LED strip manual | liniLED® Top High Power
Depending on the area where the liniLED® LED strip is installed we oer a range of solutions to cope with external factors. The product portfolio includes a
range of IP40 and IP68 connectors. Below the dierent connectors are displayed for use in dierent environments.
Indoor environment | (IP20)
Solder
Submersible, chlorine resistant | (IP68) |Mirror Welded Connector
Product code: 11290
Indoor environment | (IP40) | liniLED® Top Connector set
Product code: 11200 (1m), 11201 (5m)
Wet environment | (IP67) | liniLED® Top IP67 Kit
Product code: 11506
Area advice

8
LED strip manual | liniLED® Top High Power
30 mm
30 mm
Maximum bending radius is 30 mm. Solely bend up or downward. Do not compress or stretch the LED strip.
Do not bend the LED strip sidewards. Do not twist the LED strip.
The LED strip has to be unreeled on a horizontal surface at the time of installation. Do not unreel the spool of LED strip before installation.
Product care and handling

9
LED strip manual | liniLED® Top High Power
Work in an ESD protected environment. Make use of an anti-static
strap.
Turn o the power before cutting the LED strip.
Side view | Make sure the cut is vertical as illustraded in the image
above.
Top view | Make sure the cut is vertical as illustraded in the image
above.
Top view | Only cut on the dotted lines to prevent damaging the LED
strip.
Dispose of the unnecessary material through waste recycling of
electrical and electronic equipment.
Cutting instructions
5
3
2
4
6
1

10
LED strip manual | liniLED® Top High Power
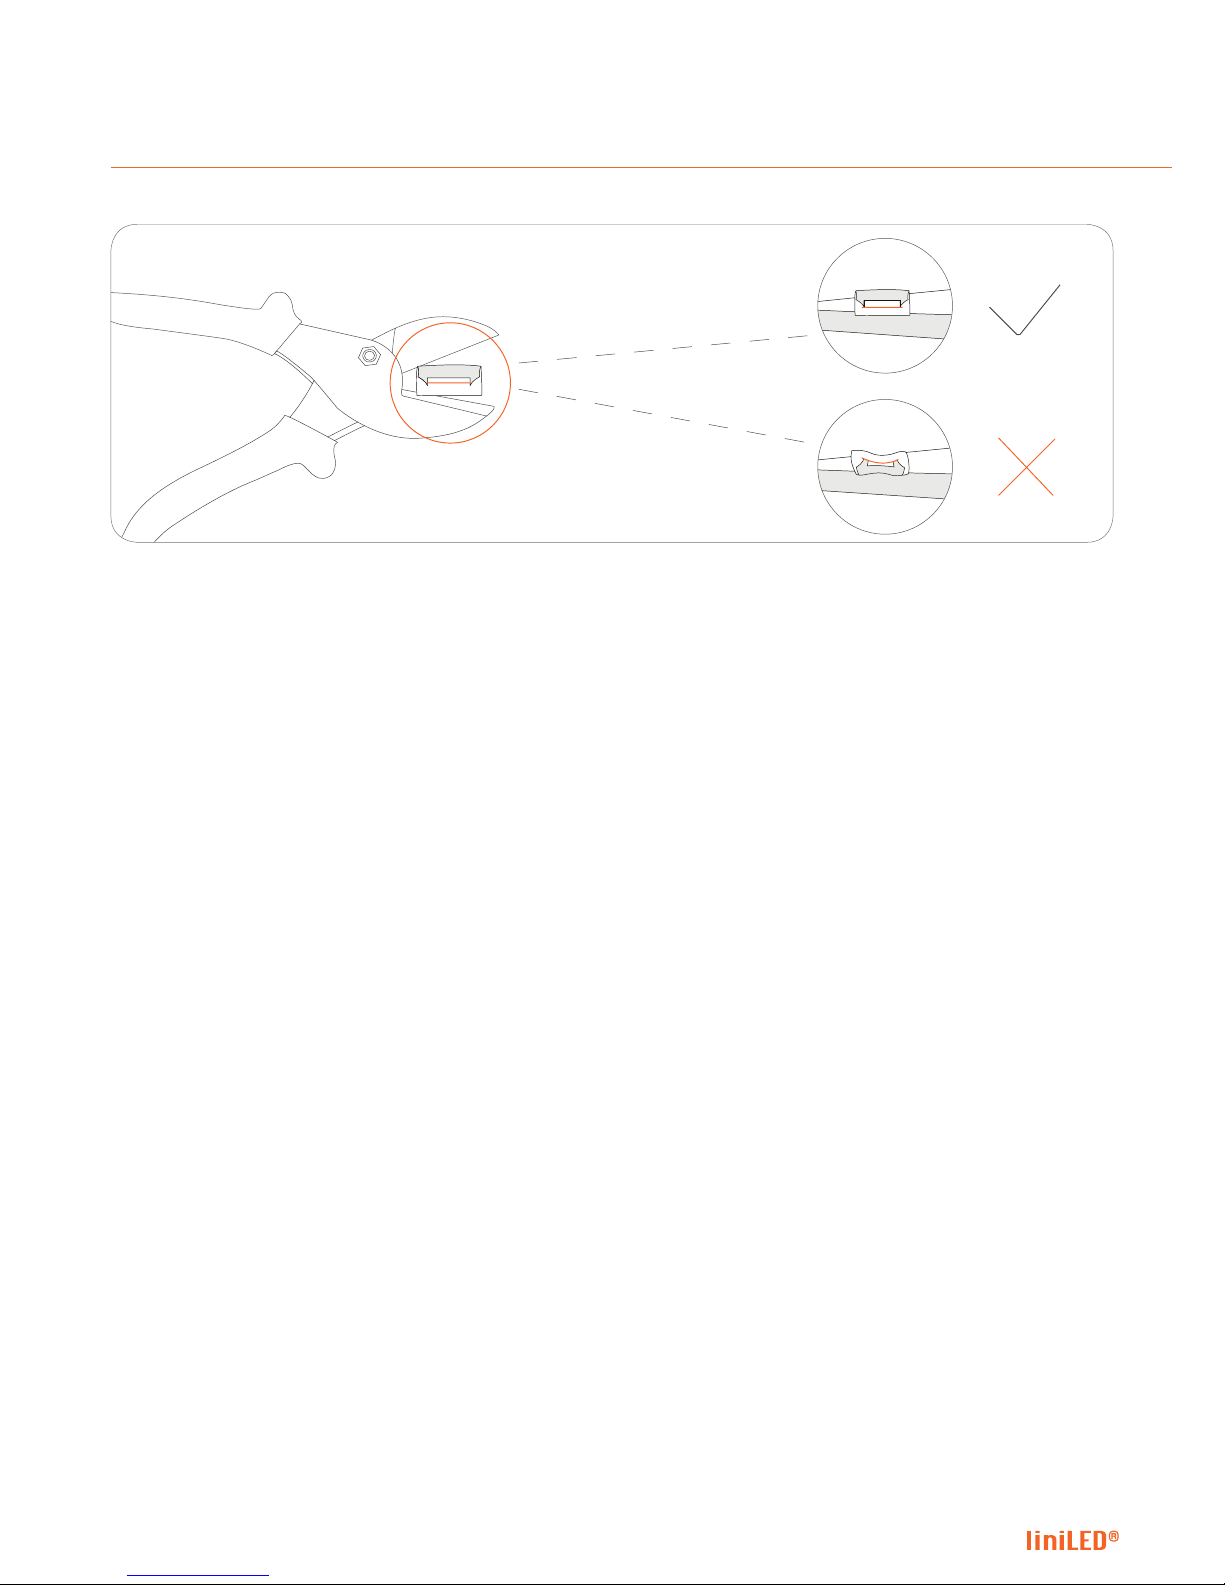
Place the liniLED® LED strip on the base of the cutting tool. Not doing so may result in a deformed LED strip.
Cutting instructions
7
Otros manuales para liniLED Top
1
Tabla de contenidos
Otros manuales de Equipo de iluminación de Organic Lighting Systems
Manuales populares de Equipo de iluminación de otras marcas

Qazqa
Qazqa Suplux SL 3 Black 103062 Manual de usuario

Commercial Electric
Commercial Electric 54568141 Manual de usuario

CREE LIGHTING
CREE LIGHTING 304 Series Manual de usuario

Goobay
Goobay 49867 Manual de usuario

ECOMAN ITALIA
ECOMAN ITALIA LED T8 Manual de usuario

Alkalite
Alkalite Krypton KT-81 Manual de usuario