Netgate 5100 Manual de usuario

Product Manual
TNSR 19.02
Netgate
Aug 25, 2022

Product Manual, TNSR 19.02
TNSR software is available pre-installed on Netgate hardware or as a Bare Metal Image (BMI) for use on Commercial
Off the Self (COTS) hardware or in virtual environments. For quotes, updates, and more information about TNSR,
please visit tnsr.com or contact TNSR sales.
General System Requirements
• 64-bit x86 processor with SSE4.2 extensions
• Minimum of 4GB RAM for basic routing functionality
RAM requirements increase significantly if the installation will need to handle large volumes of connections,
large volumes of routing data (e.g. full BGP feeds), or multiple worker threads.
See also:
See Memory Usage and Tuning for information on how to determine optimal memory sizes based on what the
router must handle.
• Minimum of 20GB Storage
• Minimum of two network interface ports, three network interface ports recommended (two for dataplane, one
for management)
• Option to disable Secure Boot if using UEFI, as it is incompatible with the TNSR dataplane
Compatibility
TNSR is a platform for high-speed packet processing, delivered as services that run on top of an operating system.
TNSR 21.11 and later are based on Ubuntu, currently the 20.04 LTS release for x86 processors. This platform has
been tested by Netgate, so that means most compatibility questions can be resolved by checking whether the hardware
can run Ubuntu Linux 20.04.
•Tested Platforms
•Untested Platforms
SOFTWARE DOCUMENTATION 1

CHAPTER
ONE
TESTED PLATFORMS
These systems and components have been tested extensively by Netgate and are known to work well with TNSR.
In addition to the support included with the TNSR license, Netgate warranty and technical support is available for
purchase for Netgate-branded appliances.
1.1 Netgate Appliances
•Netgate 5100
•Netgate 6100 MAX
•Netgate 1537-1U
•Netgate 1541-1U
1.1.1 Netgate 5100 Secure Router Manual
This Quick Start Guide covers the first time connection procedures for the Netgate 5100 Secure Router and also
provides information needed to stay up and running.
2

Product Manual, TNSR 19.02
Getting Started
Use the following steps to configure the TNSR Secure Router.
1. To configure the Network Interfaces and gaining access to the Internet, follow the instructions provided in the
Zero-to-Ping documentation.
Note: Not all steps in the Zero-to-Ping documentation will be necessary for every configuration scenario.
2. Once the Host OS is capable of reaching the Internet, check for updates (Updating TNSR) before proceeding.
This ensures the security and integrity of the router before TNSR interfaces are exposed to the Internet.
3. Finally, configure the TNSR instance to meet the specific use case. The topics are listed on the left column of
the TNSR Documentation site. There are also TNSR Configuration Example Recipes that might be of assistance
when configuring TNSR.
Input and Output Ports
Rear Side
Network Ports
Table 1: Netgate 5100 Network Interface Layout
Port Label Linux Label TNSR Label Port Type Port Speed
IGB0 enp3s0 GigabitEthernet3/0/0 RJ-45 1 Gbps
IGB1 enp4s0 GigabitEthernet4/0/0 RJ-45 1 Gbps
IX0 enp6s0f0 GigabitEthernet6/0/0 RJ-45 1 Gbps
IX1 enp6s0f1 GigabitEthernet6/0/1 RJ-45 1 Gbps
IX2 enp8s0f0 GigabitEthernet8/0/0 RJ-45 1 Gbps
IX3 enp8s0f1 GigabitEthernet8/0/1 RJ-45 1 Gbps
Note: Default Host OS Interface is enp3s0. The Host OS Interface is one network interface that is only available to
1.1. Netgate Appliances 3

Product Manual, TNSR 19.02
the host OS and not available in TNSR. Though technically optional, the best practice is to have one for accessing and
updating the host OS.
Status LED State Description
Left LED
(Link Status)
Solid Amber Link has been established and there
is no activity on this port
Blinking Amber Link has been established and there
is activity on this port
Off No link has been established
Right LED
(Speed)
Solid Green Operating as a 100 Mbps connection
Blinking Amber Operating as a Gigabit connection
(1000 Mbps)
Off No link has been established
Other Ports and Indicators
• Console (Mini-USB)
• Status LEDs
• 2x USB 3.0
Front Side
1. Receessed Reset Button
2. Power Button
3. Power (12VDC with threaded locking connector)
Center Pin Positive
Note: The power button on the Netgate 5100 has been programmed to perform a graceful shutdown when depressed.
1.1. Netgate Appliances 4

Product Manual, TNSR 19.02
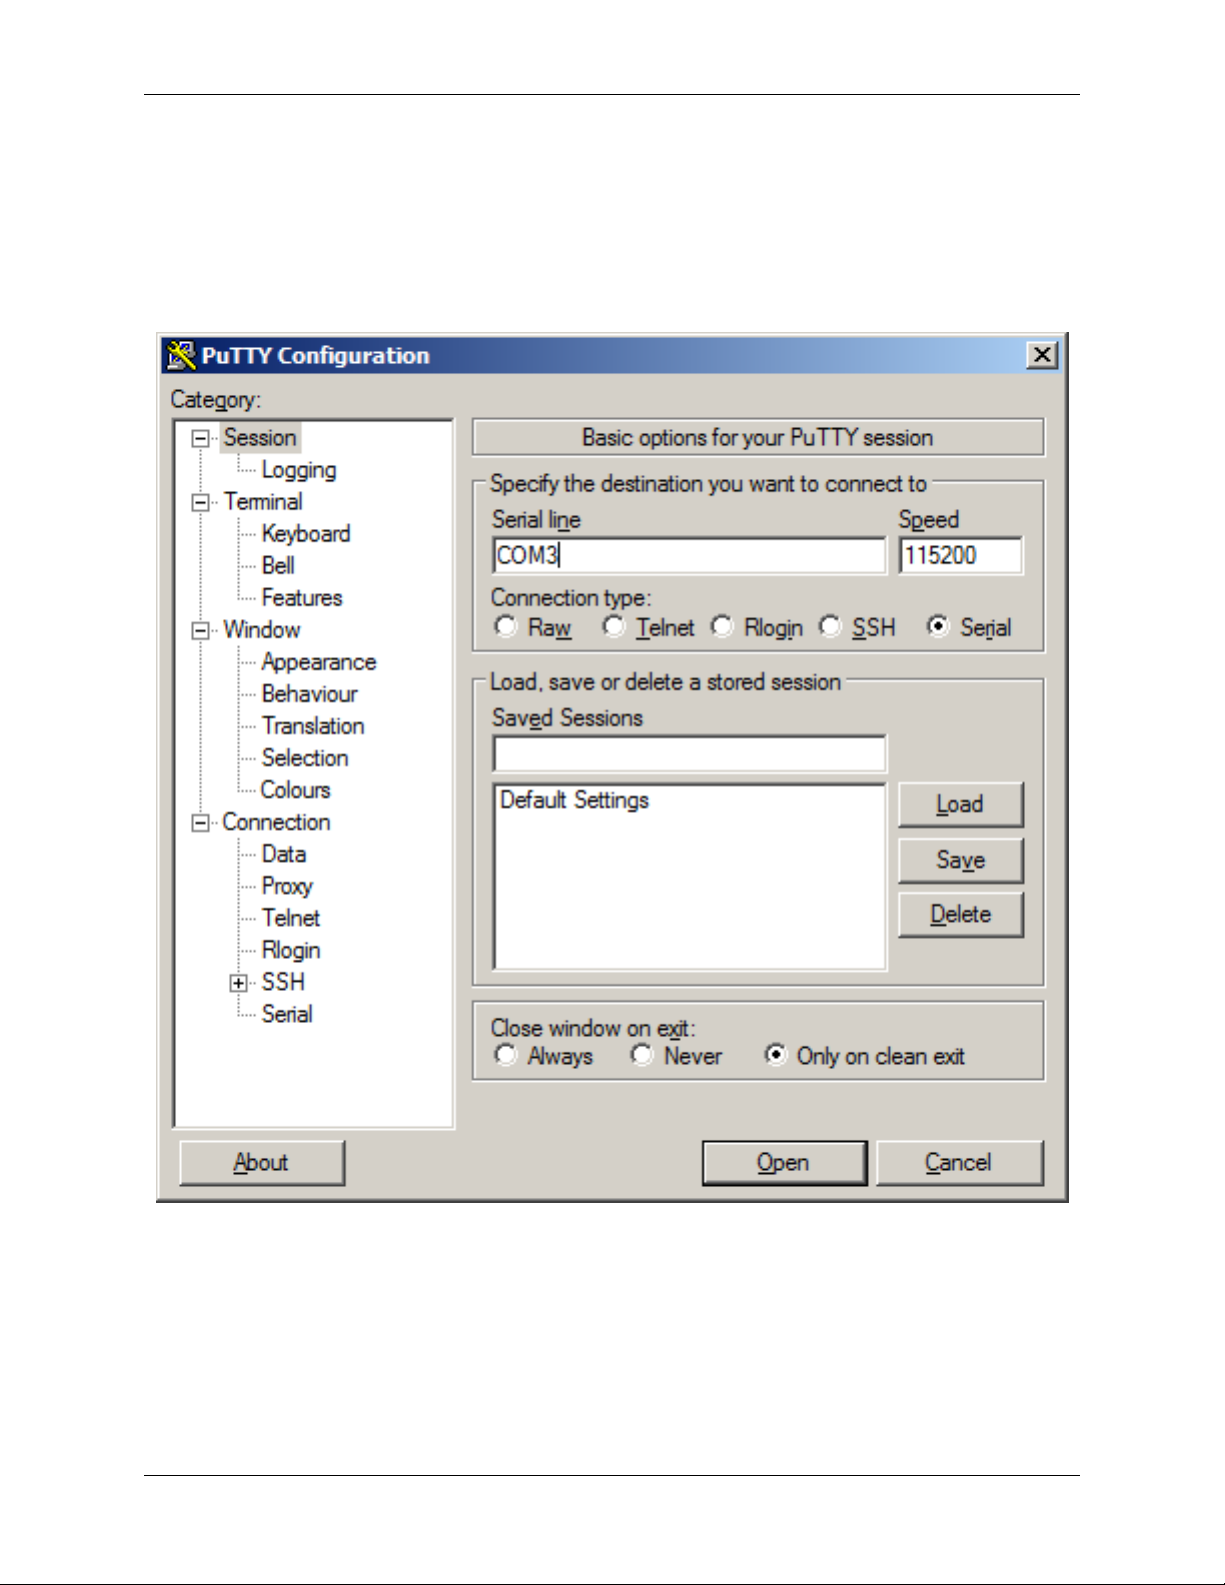
Connecting to the Console Port
This guide shows how to access the serial console which can be used for troubleshooting and diagnostics tasks as well
as some basic configuration.
There are times when directly accessing the console is required. Perhaps GUI or SSH access has been locked out, or
the password has been lost or forgotten.
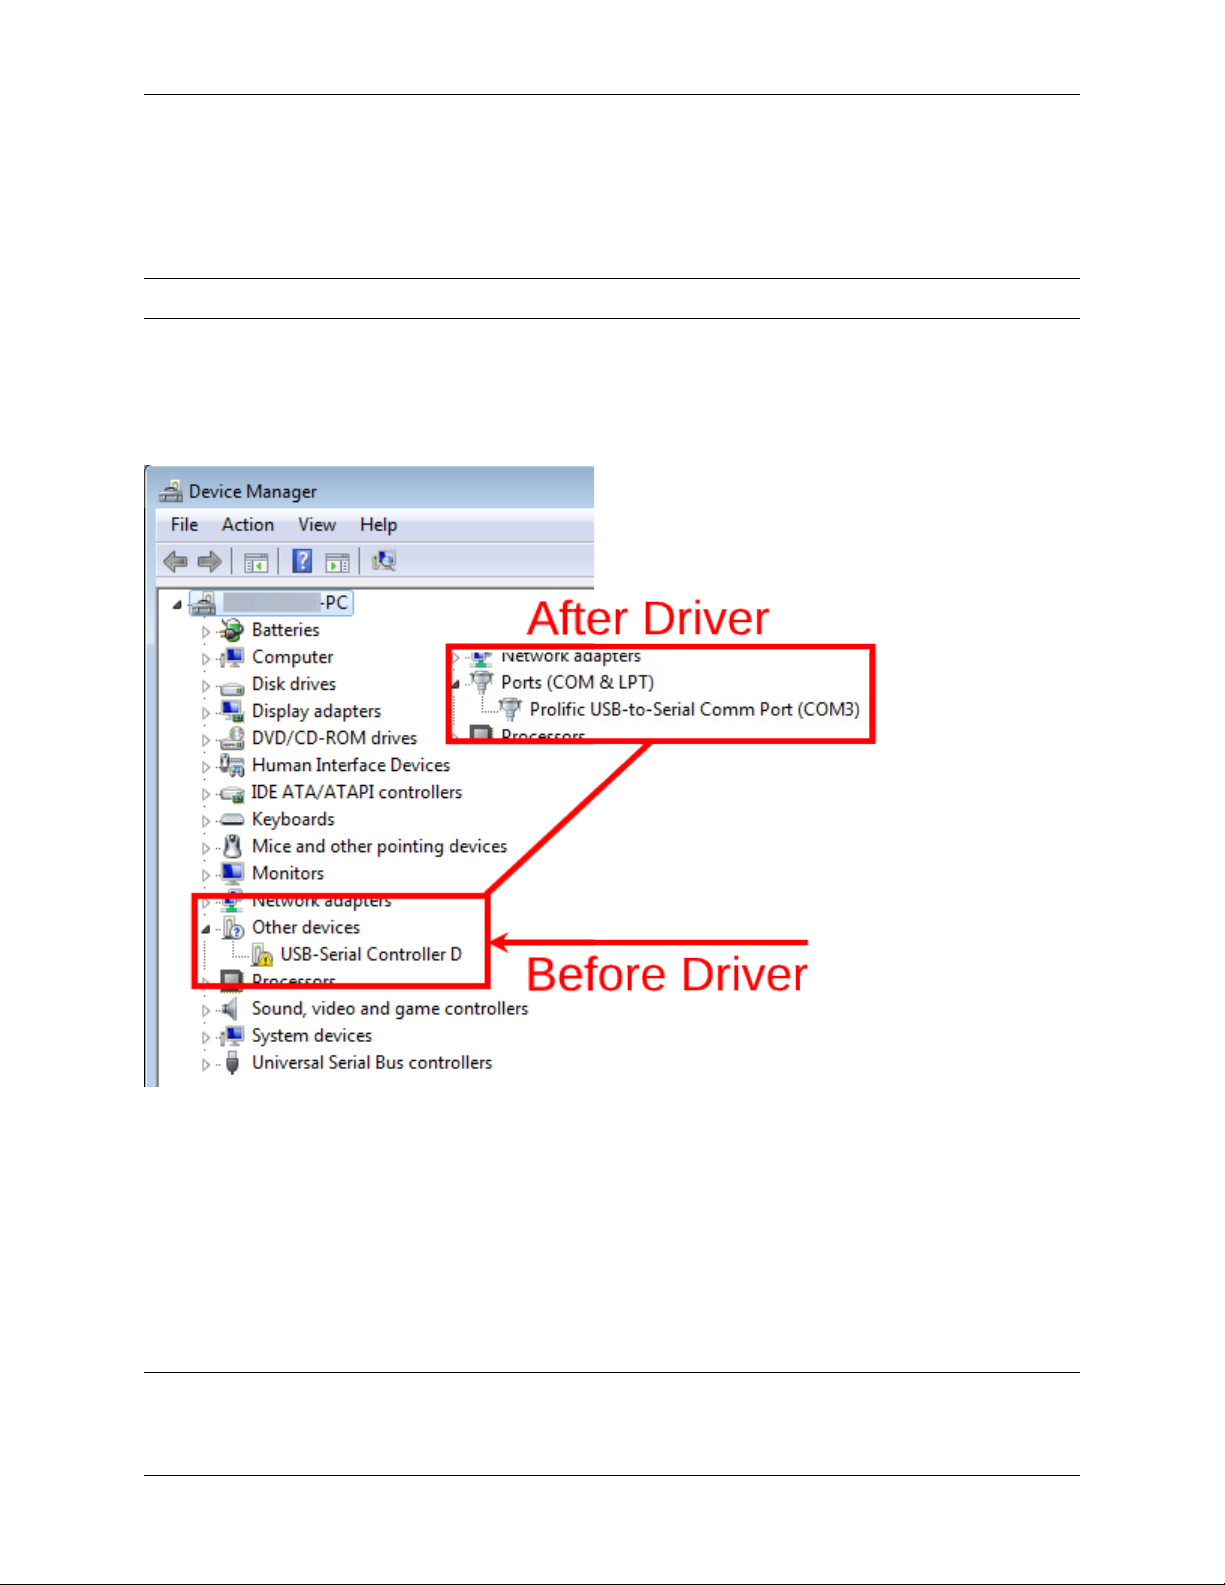
Install the Driver
AProlific PL2303 USB-to-UART Bridge driver is used to provide access to the console, which is exposed via the
USB Mini-B (5-pin) port on the appliance.
If needed, install an appropriate Prolific PL2303 USB to UART Bridge driver on the workstation used to connect
with the device.
Windows
There are drivers available for Windows available for download.
macOS
There are drivers available for macOS available for download.
Linux
There are drivers available for Linux available for download.
FreeBSD
Connect a USB Cable
Next, locate an appropriate USB cable that has a USB Mini-B (5-pin) connector on one end and a regular USB Type
Aplug on the other end. These cables are commonly used with smaller USB peripherals such as GPS units, cameras,
and so on.
Gently push the USB Mini-B (5-pin) plug end into the console port on the appliance and connect the USB Type A
plug into an available USB port on the workstation.
Tip: Be certain to gently push in the USB Mini-B (5-pin) connector on the device side completely. With most cables
there will be a tangible “click”, “snap”, or similar indication when the cable is fully engaged.
Apply Power to the Device
On some devices when using a USB serial console port the serial port will not appear on the client operating system
until the device is plugged into a power source.
If the client OS does not see the serial device, connect the power cord to the device to allow it to start booting.
If the device appears without power, then better to wait until the terminal is open before connecting power so the client
can view the entire boot output.
1.1. Netgate Appliances 5

Product Manual, TNSR 19.02
Locate the Console Port Device
The appropriate console port device that the workstation assigned as the serial port must be located before attempting
to connect to the console.
Note: Even if the serial port was assigned in the BIOS, the workstation OS may remap it to a different COM Port.
Windows
To locate the device name on Windows, open Device Manager and expand the section for Ports (COM & LPT).
Look for an entry with a title such as Prolific USB-to-Serial Comm Port. If there is a label in the name that contains
“COMX” where X is a decimal digit (e.g. COM3), that value is what would be used as the port in the terminal program.
macOS
The device associated with the system console is likely to show up as, or start with, /dev/cu.usbserial-<id>.
Run ls -l /dev/cu.*from a Terminal prompt to see a list of available USB serial devices and locate the ap-
propriate one for the hardware. If there are multiple devices, the correct device is likely the one with the most recent
timestamp or highest ID.
Linux
The device associated with the system console is likely to show up as /dev/ttyUSB0. Look for messages about the
device attaching in the system log files or by running dmesg.
Note: If the device does not appear in /dev/, see the note above in the driver section about manually loading the
1.1. Netgate Appliances 6

Product Manual, TNSR 19.02
Linux driver and then try again.
FreeBSD
The device associated with the system console is likely to show up as /dev/cuaU0. Look for messages about the
device attaching in the system log files or by running dmesg.
Note: If the serial device is not present, ensure the device has power and then check again.
Launch a Terminal Program
Use a terminal program to connect to the system console port. Some choices of terminal programs:
Windows
For Windows the best practice is to run PuTTY in Windows or SecureCRT. An example of how to configure PuTTY is
below.
Warning: Do not use Hyperterminal.
macOS
For macOS the best practice is to run GNU screen, or cu. An example of how to configure GNU screen is below.
Linux
For Linux the best practices are to run GNU screen,PuTTY in Linux,minicom, or dterm. Examples of how to
configure PuTTY and GNU screen are below.
FreeBSD
For FreeBSD the best practice is to run GNU screen or cu. An example of how to configure GNU screen is
below.
Client-Specific Examples
PuTTY in Windows
• Open PuTTY and select Session under Category on the left hand side.
• Set the Connection type to Serial
• Set Serial line to the console port determined previously
• Set the Speed to 115200 bits per second.
• Click the Open button
PuTTY will then display the console.
1.1. Netgate Appliances 7

Product Manual, TNSR 19.02
Fig. 1: An example of using PuTTY in Windows
1.1. Netgate Appliances 8
Este manual sirve para los siguientes modelos
3
Tabla de contenidos
Otros manuales de Enrutador de red de Netgate
Manuales populares de Enrutador de red de otras marcas

NETGEAR
NETGEAR FS526T - Switch Manual de usuario

Korenix
Korenix JetNet 5710G Series Manual de usuario

Automated Logic
Automated Logic ZN551 Manual del propietario

Cisco
Cisco ASR 1000 Series Manual del operador

EnGenius
EnGenius ESR-9710 Manual de usuario

Cisco
Cisco 805 Series Instrucciones de funcionamiento y seguridad


