NEONODE NNAMC2090PCEV Hoja de especificaciones

Neonode® Touch Sensor Module
Get Started
2020-04-30

Legal Notice
Neonode may make changes to specifications and product descriptions at any time, without notice.Do not finalize
a design with this information.Neonode assumes no liability for applications assistance or customer product
design. Customers are responsible for their products and applications using Neonode components. To minimize
the risks associated with customer products and applications, customers should provide adequate design and
operating safeguards.
Neonode components are neither designed nor intended for use in FDA Class III applications, or similar life-critical
medical equipment. Customers acknowledge and agree that they will not use any Neonode components in FDA
Class III applications, or similar life-critical medical equipment, and that Neonode will not be responsible for any
failure to meet the requirements of such applications or equipment.
No part of the materials contained in any Neonode document may be copied, photocopied, reproduced, translated
or reduced to any electronic medium or machine-readable form, in whole or in part, without specific written
permission from Neonode Inc.
NEONODE,the NEONODE logo, andZFORCEare trademarks of Neonode Inc. registered in the United States and
other countries. All other trademarks are the property of their respective owners.
Copyright ©2018-2020 Neonode Inc. All rights reserved.

Neonode® Touch Sensor Module User's Guide
Table of Contents
1 Table of Contents
1 Table of Contents ..................................................................................................................... 3
2 Getting started with Touch Sensor Module Evaluation...................................................... 5
2.1 Getting Started with Sensor Evaluation - Plug and Play with USB 5
2.2 Getting Started with Sensor Evaluation - Workbench and USB 8
2.3 Getting Started with Sensor Evaluation - I2C and Arduino 14
2.4 Getting Started with Sensor Evaluation - SDK and USB 20

Neonode® Touch Sensor Module User's Guide
Getting started with Touch Sensor Module Evaluation
https://support.neonode.com
5
2 Getting started with Touch Sensor Module Evaluation
2.1 Getting Started with Sensor Evaluation - Plug and Play with USB
2.1.1 Required Equipment
The following equipment from the evaluation kit is required:
•1 x Neonode Touch Sensor Module
•1 x FPC cable with connector
•1 x Interface board
Additional required equipment:
•Computer
•Operating system: Windows 8.1 or Windows 10.
•Software requirements:.NET Framework 4.5 or higher is required and can be downloaded from
Microsoft's official website. Windows 8 and higher hasthis installed by default.
• USBcable with aMicro USB type B connector
•(Optional) tape for mounting
2.1.2 Connecting Sensor Module
1. Connect the FPC cable to the interface board:
a. Lift the flip lock on the interface board.
b. Insert the FPCcable into the end of the connector, with the connector pads facing down,towards
interface board. Theyellow piece of PCB of the connector on the other side of the cable is facing
Make sure that the USB cable transmits both power and data and not only power.

Neonode® Touch Sensor Module User's Guide
Getting started with Touch Sensor Module Evaluation
https://support.neonode.com
6
upwards. Make sure the direction is straight into the connector and the pads have reached the endof
the connector.
c. Make sure the connector pads of the FPC cable are facing downwards,towards interface board. The
sensormodule risks damage if the FPC cable is connected in wrong direction.
d. Pressdown the flip lock.
2. Connect the FPC cable to the sensor module:
a. Place the sensormodule so that the module's connector pads are facing downwards (steel surface
upwards).
b. Insert the sensor module into theconnector on FPC cable (yellow piece of PCB of the FPC connector
still facing upwards).
c. Make sure the direction of the pads is straight into the connector, and the pads have reached the
endof the connector.
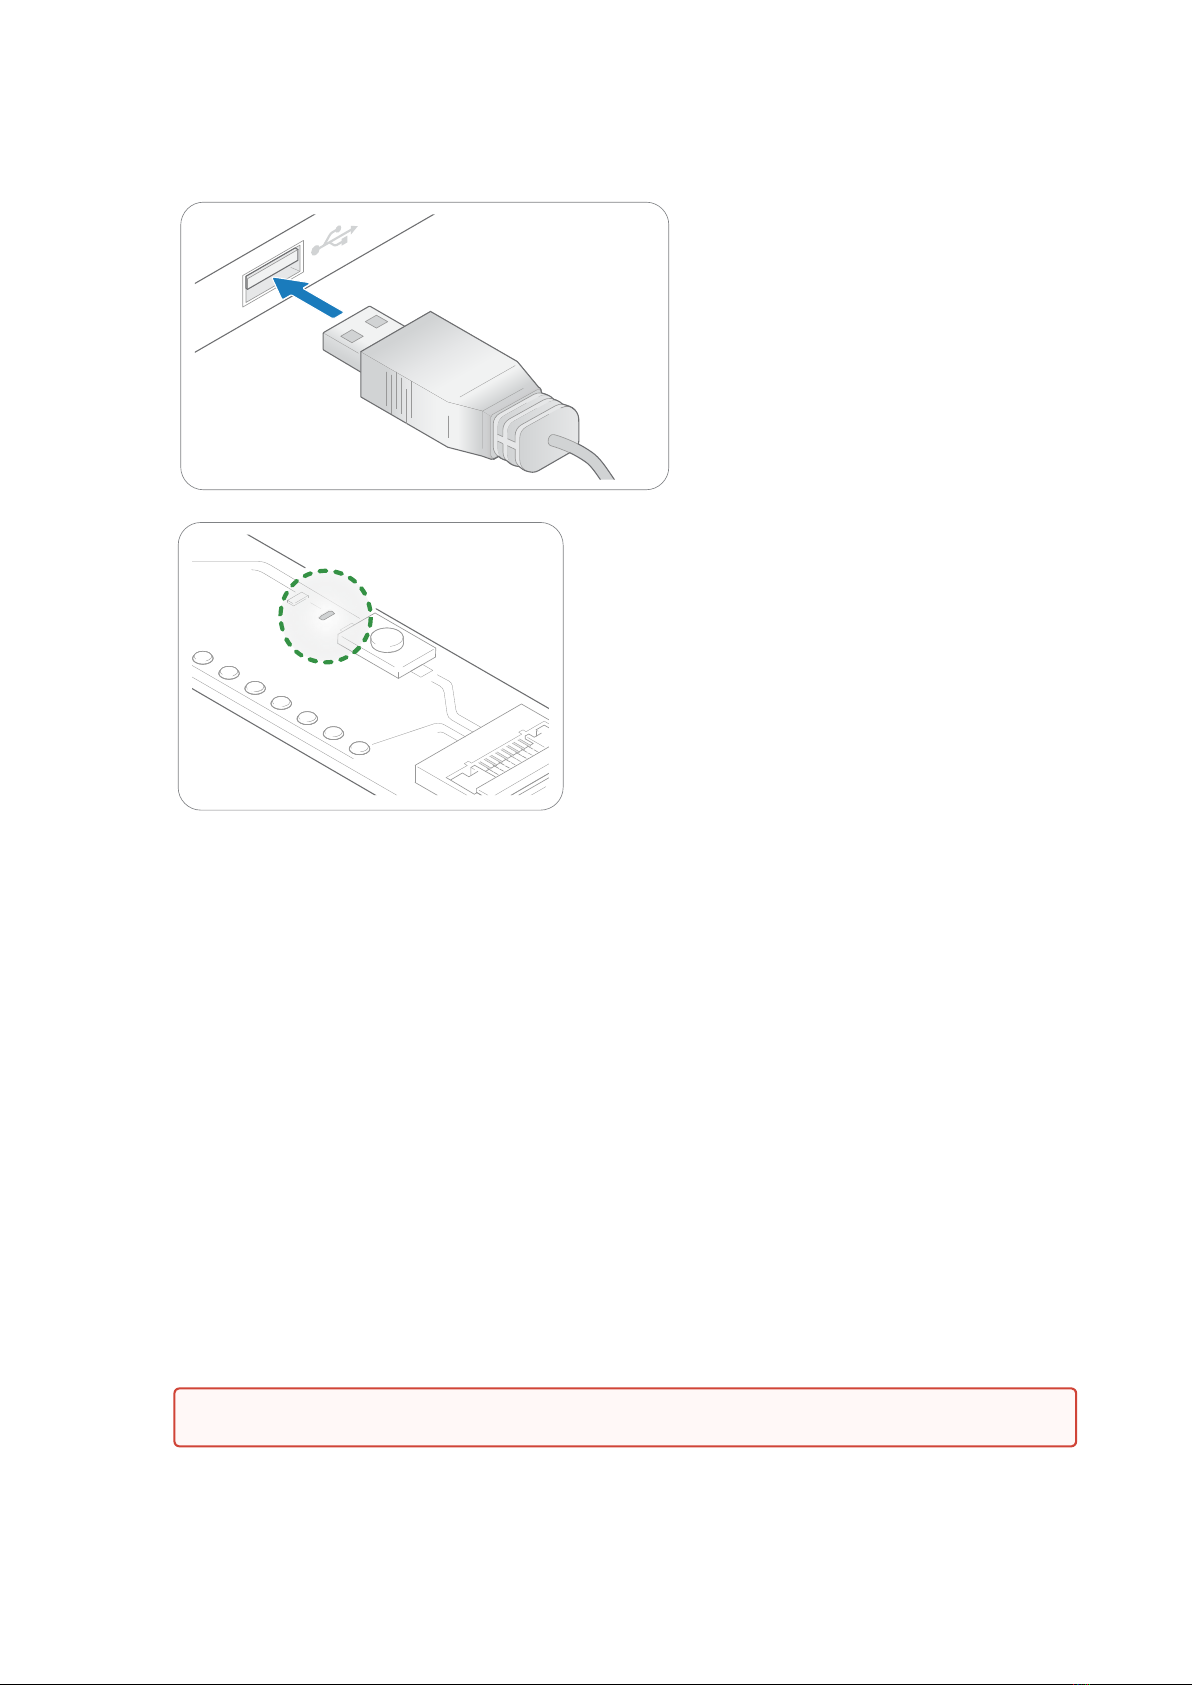
3. Connect aUSBcable with aMicro USB type B connector to the interface board.
4. Make sure no object is within the touch active area of the sensor module before connecting power to the
sensor through USB. The sensor calibrates itself when powered on and an object within the touch active
area may interfere with the calibration.

Neonode® Touch Sensor Module User's Guide
Getting started with Touch Sensor Module Evaluation
https://support.neonode.com
7
a. If the sensormodule is of the 0° type: place the module on a table with the steel surface facing
downwards and with the optical surface facing towards you.
b. If the sensor module is of the 90° type: place the module on a table with the steel surface facing
upwards, so the optical surface is facing upwards as well. Make sure no object is within the touch
active area above the sensor module.
i. Alternatively, you can mount the sensormodule by using tape in order to fasten the steel
surfaceto the edge of a table, with the optical surface facing towards you.
5. Insert the USB cable into a computer.
C
Neonode® Touch Sensor Module User's Guide
Getting started with Touch Sensor Module Evaluation
https://support.neonode.com
8
6. The green LED on the interface board lights up when connected.
7. When the sensormodule has enumerated, it will act as a touch screen USB HID device.
8. Put an object in the touch active area, touch HID reports will be sent to your computer.
9. To visualize touches, you can for for example use Paint (default Windows application) and draw lines by
moving you finger in the touch active area.
2.2 Getting Started with Sensor Evaluation - Workbench and USB
2.2.1 Required Equipment
The following equipment from the evaluation kit is required:
•1 x Neonode Touch Sensor Module
•1 x FPC cable with connector
•1 x Interface board
Additional required equipment:
•Computer
•Operating system: Windows 8.1 or Windows 10.
•Software requirements:.NET Framework 4.5 or higher is required and can be downloaded from
Microsoft's official website. Windows 8 and higher hasthis installed by default.
• USBcable with aMicro USB type B connector
C
Make sure that the USB cable transmits both power and data and not only power.

Neonode® Touch Sensor Module User's Guide
Getting started with Touch Sensor Module Evaluation
https://support.neonode.com
9
•(Optional) tape for mounting
2.2.2 Connecting Sensor Module
1. Connect the FPC cable to the interface board:
a. Lift the flip lock on the interface board.
b. Insert the FPCcable into the end of the connector, with the connector pads facing down,towards
interface board. Theyellow piece of PCB of the connector on the other side of the cable is facing
upwards. Make sure the direction is straight into the connector and the pads have reached the endof
the connector.
c. Make sure the connector pads of the FPC cable are facing downwards,towards interface board. The
sensormodulerisks damage if the FPC cable is connected in wrong direction.
d. Pressdown the flip lock.
2. Connect the FPC cable to the sensormodule:
a. Place the sensormodule so that themodule's connector pads are facing downwards (steel surface
upwards).
b. Insert the sensormoduleinto theconnector on FPC cable (yellow piece of PCB of the FPC connector
still facing upwards).
c. Make sure the direction of the pads is straight into the connector, and the pads have reached the
endof the connector.

Neonode® Touch Sensor Module User's Guide
Getting started with Touch Sensor Module Evaluation
https://support.neonode.com
10
3. Connect aUSBcable with aMicro USB type B connector to the interface board.
4. Make sure no object is within the touch active area of the sensormodulebefore connecting power to the
sensor through USB. The sensor calibrates itself when powered on and an object within the touch active
area may interfere with the calibration.
a. If the sensormoduleis of the 0° type: place the module on a table with the steel surface facing
downwards and with the optical surface facing towards you.
b. If the sensor module is of the 90° type: place themoduleon a table with the steel surface facing
upwards, so the optical surface is facing upwards as well. Make sure no object is within the touch
active area above the sensormodule.

Neonode® Touch Sensor Module User's Guide
Getting started with Touch Sensor Module Evaluation
https://support.neonode.com
11
1 https://support.neonode.com/docs/pages/viewpage.action?pageId=2490816
i. Alternatively, you can mount the sensormoduleby using tape in order to fasten the steel
surfaceto the edge of a table, with the optical surface facing towards you.
5. Insert the USB cable into a computer.
6. The green LED on the interface board lights up when connected.
2.2.3 Install and Open Neonode Workbench
1. Download the latest release of the Workbench installationpackage1.
C
C
Este manual sirve para los siguientes modelos
7
Tabla de contenidos
Manuales populares de Unidad de control de otras marcas

Festo
Festo Compact Performance CP-FB6-E Manual de lista de piezas

Elo TouchSystems
Elo TouchSystems DMS-SA19P-EXTME Manual de usuario

JS Automation
JS Automation MPC3034A Manual de usuario

JAUDT
JAUDT SW GII 6406 Series Guía rápida

Spektrum
Spektrum Air Module System Manual de usuario

BOC Edwards
BOC Edwards Q Series Manual de usuario


