Milkotester MASTER MINI Manual de operación

Milkotester Ltd.
MILKOTESTER
Milk analyzing device
Model – MASTER MINI
Fat, Solids-Non-Fat (SNF), Protein, Lactose, Water content
Temperature (°C), Freezing point, Solids, Density
THE INFORMATION CONTAINED IN THIS MANUAL IS A SUBJECT
TO CHANGE WITHOUT NOTICE. FOR UPDATES, PLEASE
CONTACT THE MANUFACTURER
OR USE THE FOLLOWING WEB ADDRESS:
www.milkotester.com

ULTRASONIC PORTABLE MILK ANALYZER www.milkotester.com
CAUTION!
This device operates on 12V DC. DO NOT REMOVE the cover!
Please follow the instructions in this manual !
Safety recommendations :
Read carefully and make sure you understand all the
instructions.
Place the device on a leveled and stable surface. If it falls or
is severely shocked its functional systems may be damaged.
When plugging the device into the electrical outlet, put away
the power cord so it does not stay in the way when accessing
the device and cannot be stepped on.
Do not disassemble the device in order to avoid damages.
In case of malfunction contact your local dealer.
Handle the liquids the device works with carefully, following
all the instructions for their preparation.
- 1 -

ULTRASONIC PORTABLE MILK ANALYZER www.milkotester.com
Table of contents
1. General description........................................................................ 3
2. Close-up view................................................................................. 4
2.1 Front panel.......................................................................... 4
2.2 Back panel .......................................................................... 5
3. Samples preparation...................................................................... 6
4. Working description........................................................................ 8
4.1 Preparing the device........................................................... 9
4.2 Measuring samples............................................................. 10
4.3 Making correction and calibration ....................................... 11
4.3.1 Correction................................................................. 13
4.3.1 Calibration ................................................................ 14
4.4 Settings and options........................................................... 18
4.5 Connecting to printer .......................................................... 20
5. Cleaning and maintenance ............................................................ 21
5.1 Routine cleaning ................................................................. 21
5.2 Complete flushing ............................................................... 22
5.3 Weekly cleaning.................................................................. 22
6. Troubleshooting ............................................................................. 23
7. Technical specifications ................................................................. 24
Appendix Freezing point determination.............................................. 26
Guarantee card .................................................................................. 29
- 2 -

ULTRASONIC PORTABLE MILK ANALYZER www.milkotester.com
General description
MASTER MINI is designed for percentage analysis of Fat, Solids-Non-
Fat (SNF), Protein, Lactose, Water content, Temperature (°C), Freezing
point, Solids and Density. These components can all be measured at the
same time. The device measures cow milk, sheep milk, buffalo milk,
camel milk, lama milk, restored milk, UHT, cream, whey and buttermilk.
The factory preset is for cow milk, sheep milk and UHT. Upon user’s
request the device can be calibrated for any of the above mentioned
types of milk.
The device has a compact design with a robust structure and a user-
friendly interface. MASTER MINI can analyze three types of milk defined
by user. The measurement speed is 40-45 samples per hour. The
samples are precisely dosed and small quantities are required – the
sample volume is 25 cm³. No thermal or mechanical treatment of the
samples before analysis is necessary. No use of chemical reagents is
required. The working conditions are as follows – temperatures from 5°
to 35 °C, HR from 30% to 80%.
With regard to the “moisture problem” which remains of much
significance the front panel of the device is designed to operate when
with wet hands. In addition to this MILKOTESTER provides a one year’s
full warranty.
- 3 -

ULTRASONIC PORTABLE MILK ANALYZER www.milkotester.com
CHAPTER TWO
Close-up view
IN THIS CHAPTER
Front panel
Display
Back panel
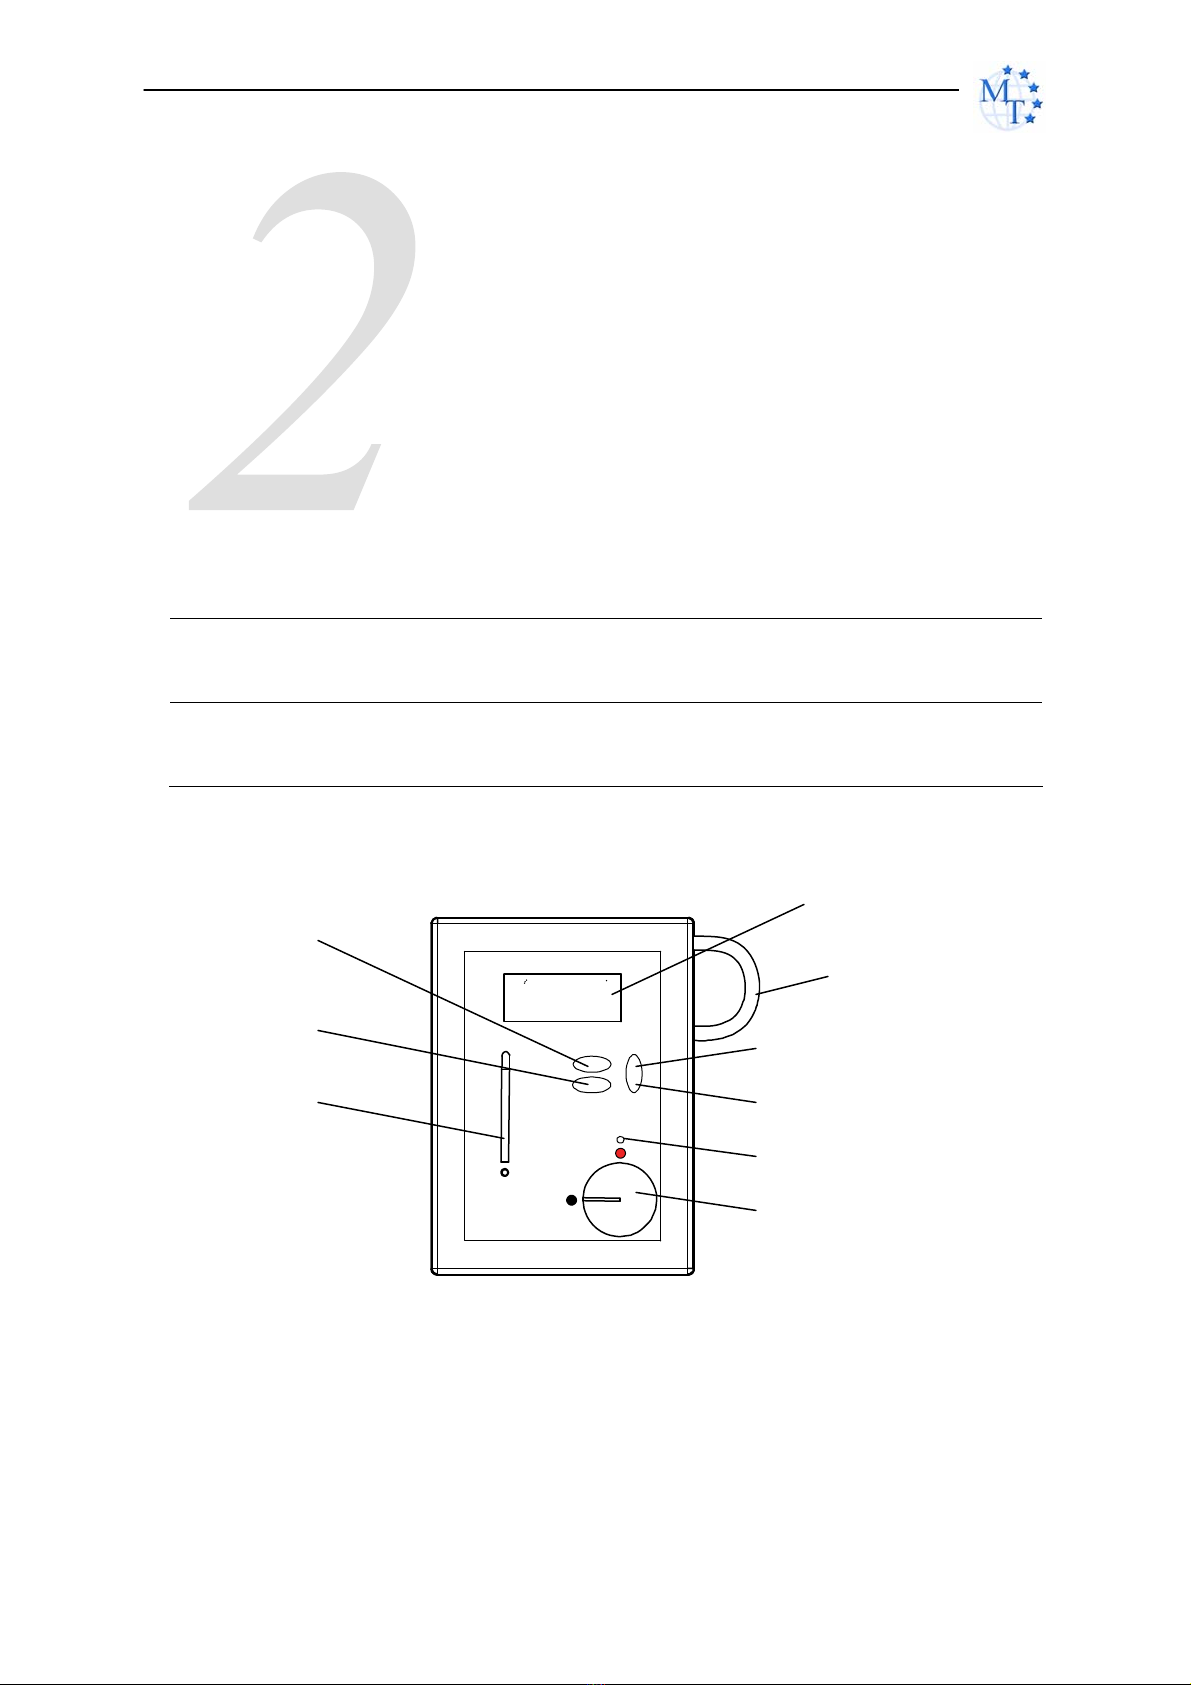
2.1 Front panel
8
7
9
6
5
1
4
3
2
1 – Intake pipette
2 – Start knob
3 – Operation indicator
4 – Arrow DOWN button
5 – Arrow UP button
6 – ENTER button
7 – EXIT button
8 – LCD
9 – Hose – quality of flushing
and milk level indicator
- 4 -

ULTRASONIC PORTABLE MILK ANALYZER www.milkotester.com
2.2 Back panel
3
1 2
1 – Serial port to printer or PC
2 – Power in 12V
3 – Power switch
- 5 -

ULTRASONIC PORTABLE MILK ANALYZER www.milkotester.com
CHAPTER THREE
Samples preparation
In order that most accurate results are obtained it is important that
the milk be kept for 2 hours after milking and stirred well before being
used for sample material. A good way to stir up the milk is to pour it
several times out of one vessel into another and back. Before analysis
the samples have to be filtered in order to be free from foreign
fragments. Milk samples should be 5-35 °C. Full cream samples
containing fat over 10% should be heated up to 42-43 °C and then
cooled to 25 – 30 °C. If the sample temperature is over 40 °C the
message “Sample overheated” will appear on the display. Use milk
samples only once and do not return it to the vessel. Samples can be
kept for a maximum of 2 days if they are stored at a temperature not
exceeding 5 °С.
Milk stirring
It is a very important condition for receiving exact results. Before
taking samples from big vessels the milk (fresh or thermally treated,
whole-milk or whipped) has to be well stirred for no less than 5 min., by
vertical and circular slow movements. Mixing spoon with long handle is
used, allowing the lowest layers of the liquid to be reached. The milk in
the milk-cans is stirred 5 to 8 times from the surface to the bottom and
reverse with slow circular movements.
Sample preservation
The vessels where the samples will be put have to be clean, dry,
glass, metal or from other suitable material, to be tightly closed with
rubber or other stopples. The stopples not to absorb water and fat and
not to influence the analyses sample content.
- 6 -

ULTRASONIC PORTABLE MILK ANALYZER www.milkotester.com
In summer the sample fills up to the top the vessel, but in winter –
at least 3/4 from the vessel’s volume. Each sample for analyses has to
be labeled and described in a way not allowing to be mixed up.
The samples are stored in conditions, assuring temperature,
corresponding to the requirements for storing such kind of product
(advisable – 1 oС).
If there is a need of longer sample storing they have to be
preserved; the most commonly used preservative is potassium
dichromate (K2Cr2O7) - 1 g for 1 000 ml. The samples have to be stored
in a cold and dark place after the preservation. Have in mind that during
the analyses the results for SNF% will be increased with 0,1 %. After
adding the preservative the sample has to be well stirred.
Preparing the samples for analyses
Milk – raw and thermally treated
When examining samples taken immediately before analyses and
shortly stored, the milk is poured several times from vessel to vessel in
order to distribute the fat content uniformly. To avoid foam formation or
separation of milk fat, the samples have to be carefully poured using the
walls of the vessels, as they are tilted slightly. For a better mixing the
sample it has to be poured at least 3 times. When needed the same is
tempered to the temperature within the measuring range.
If there is fat stuck on the walls of the vessel and the stopple (when
the samples were stored for a long time), the milk has to be slowly
heated up to 35-40 °С. At the same time it has to be slowly shaken. The
cream, stuck to the walls of the vessel is removed. The sample is poured
several times and is cooled down (advisable up to 20°С).
If there is separated liquefied fat or white particles with irregular form
on the vessel’s walls reliable results could not be expected.
Do not make analyses if the acidity of the milk is more than 17oT.
- 7 -

ULTRASONIC PORTABLE MILK ANALYZER www.milkotester.com
CHAPTER FOUR
Working description
IN THIS CHAPTER
Preparing the device
Measuring samples
Corrections
Calibration
MILKOTESTER MASTER MINI can be used in places where no
regular electrical supply is available. MILKOTESTER MASTER MINI can
be powered by your car battery or other 12V DC external power sources.
1. Fit the support to the device and place it on a horizontal and
stable surface.
Caution: Any sources of hot or cold air can influence the accuracy
of the measurements.
2. Connect the device to 12V DC power source /220V AC to 12V
DC adaptor or 12V DC electrical lighter socket/.
3. The device will be turned on immediately. After starting the unit
goes into system check mode and will be ready for analyses in about 5
minutes.
4. Before proceeding with using the unit please read and follows
the rest of the instructions in this chapter!
NOTE:
If the unit does not start up after it is connected to the power source, check the
fuse inside the connector plugged into the electrical lighter socket.
- 8 -

ULTRASONIC PORTABLE MILK ANALYZER www.milkotester.com
4.1 Preparing the device
SELECTING A WORKING MODE
After MILKOTESTER MASTER MINI is turned on, the display reads first:
Milk analyzer
MASTER MINI
System Prepare
Please Wait
Followed by:
Cow Milk
Sheep Milk
UHT Milk
Clean
You can choose among three types of milk at a time. When you choose
the desired type of milk you use the ↑↓(UP and DOWN) arrow buttons,
and then turn the knob clockwise until the knob indicator comes to the
red point and operation indicator light.
In the meantime you should have dipped the intake pipette into the
sample milk in the cup.
The following text will appear:
MEASURING…
Please Wait
In about 80-90 sec. the following message will appear on the display:
Turn to
Black point
- 9 -
Tabla de contenidos
Otros manuales de Instrumento de medición de Milkotester
Manuales populares de Instrumento de medición de otras marcas

Endress+Hauser
Endress+Hauser Proline Promag 50 Especificaciones técnicas

Siemens
Siemens SITRANS F Coriolis FCT030 Manual de lista de piezas

KLINGER
KLINGER CMF V Series Manual de usuario

EXFO
EXFO FTB-2 Manual de operación y mantenimiento

Keysight
Keysight M8290A Manual de usuario

ADTEK
ADTEK MW-5 Manual de usuario