MAXHUB UC M40 Manual de usuario

MAXHUB UC
M40 User Manual

01
TABLE OF CONTENTS
1. Safety Warnings ...................................................................................... 02
2. Product Images........................................................................................ 03
3. How to Connect....................................................................................... 04
4. Hardware Mode....................................................................................... 05
5. Pro Mode................................................................................................. 07
6. Quick Start Guide - PanoCam Studio ...................................................... 09

02
1. Safety Warnings
Before using this device, please carefully read and observe the following precautions to avoid dangerous
or improper operations.
Working Environment
① DO NOT expose the camera to any heat source (such as electric heaters).
② Use it in an environment with ambient temperature of 0~40 °C and humidity of 10%–90% RH.
③ DO NOT place the product in dusty and humid environments to avoid internal circuit fault.
④ DO NOT expose the device to direct sunlight to avoid rising device temperature that may affect
normal use of the device
Children Safety
① The product and its accessories may have some small parts.
Please place them beyond the reach of children to avoid potential safety risks.
② The lens of this device is made of glass. If it is damaged, please handle it carefully to avoid being
scratched by broken glass and keep it away from children.
Power Supply
① If an external power supply is to be used, follow all safety guidelines for third-party power supply
devices.
Waterproofness
① The product is not waterproof. Please keep it dry.
Repair and Maintenance
① Please contact professional service personnel for maintenance services.
② In case the device is damaged, please do not disassemble it for repair. Instead, please call the
Customer Service Center for repair.
③ DO NOT insert any sharp or pointed object into the device.
④ DO NOT drop or strike the device to avoid damage.
⑤ The temperature of the device may rise during operation, which is a normal phenomenon. In case
the device feels hot to touch, turn off the device and let it cool before trying to use it again.
Statement
① Intellectual property rights statement: The hardware and software of this product are patented and
copyright protected. Anyone who reproduces this product or the content of this User Manual without
the authorization of the Company shall assume legal liabilities.
② This User Manual is for reference only, and the actual functions of the product are subject to your
order and the product you received.
③All images are for illustration purpose only and may not reflect the actual product. The Company
reserves the right to improve and change the appearance and design of the product without prior
notice.

03
2. Product Images
1. Packaging content
1
UC M40
2
UK
3
EU
4
EU
5
AU
6
CN
7
US
8
Power Adaptor (12 V/1 A)
9
UC M40 User Manual
10
USB 2.0 Cable (Type-A to Type-C) 1.5 meter
2. Appearance
MAXHUB UC
M40 User Manual

04
3. How to Connect
Please connect the device according to the following figure before use.
Camera
Mode Switch
USB Type-C
Loudspeaker
DC Port
Indicator Light
Touch Button
Microphone
Adapter
USB

05
①The video conferencing equipment is connected to the 12 V/1 A adapter and automatically starts
up.
②Connect the USB cable to the computer.
③Select the appropriate modes and follow the instructions to get started.
Note:
(1) If the 12 V/1 A power adapter isn't being utilized, the camera can only provide USB video output.
Plug in the power adapter to get full access to video and audio.
(2) USB 3.0 (5 V/900 mA) or above must be used as the power supply source.
4. Hardware Mode:
①Connect the USB cable to the computer.
②Launch video platforms such as Google Meet, Zoom, or Microsoft Teams, and select MAXHUB UC
M40 as the main camera source.
③ Select UC M40 as the main speaker and microphone source in your video platform and start your
video meeting. Volume can be adjusted from your computer directly.
④Press the button to select the display layout to output (Panoramic / Compose / Grid / Portrait /
Split / AI Speaker Tracking (Dual) / AI Speaker Tracking (Pano) modes).
USB

06
⑤ Touch to mute/unmute the microphone; status light:
- White: microphone ON;
- Red: microphone OFF;
- The blue LED "circle" indicates the direction of the sound source.
Adapter
Mode switch button
USB
Mode 1: Panoramic mode
Mode 3: Grid mode
Mode 2: Compose mode
Mode 4 Portrait mode
Mode 6: AI Speaker Tracking (Dual) mode
Mode 5: Split mode
Mode 7: Al Speaker Tracking (Pano) mode
Indicator Light
Touch Button
Microphone

07
⑥Device power off.
*Note: Some video conferencing platforms require that you select MAXHUB UC M40 camera and
microphone.
5. Pro Mode
In the Pro Mode, you have access to additional AI features that are enhanced by the PanoCam software.
②Connect the USB cable to the computer.
②Open the PanoCAM Studio folder from the CD drive of your computer, and double-click on the
PanoCAM Studio Setup_1.0.2930.0 file to install. See 6. Quick Start Guide –PanoCam Studio below.
*Note: If you are on an MacOS, install the PanoCAM Studio Installer_1_3107.2.pkg
③Launch the PanoCAM Studio Software and select the appropriate "Display Layout" as well as other
necessary controls. (Compose/Manual/Body-fit/Discussion/Grid/Presentation/Speaker modes).
USB

08
④Touch to mute/unmute the microphone; status light:
A. Select the Display Layout to output.
B. Choose Angle Adjustment:
FOV-Top: Vertical+ 45° Up/ -15°Down
FOV-Center: Vertical± 30°
FOV-Down: Vertical+ 20° Up/ -40°down
C. Turn Image mirror/Auto
detect/Auto tracking on/off.
D. Select the required video effect;
Or customize the parameters in custom mode.
Compose Mode
Manual Mode
Body-Fit Mode
Discussion Mode
Grid mode
Presentation mode
Speaker mode
09
- White: microphone ON;
- Red: microphone OFF;
- The blue LED "circle" indicates the direction of the sound source.
④ Launch video platforms such as Google Meet, Zoom, or Microsoft Teams, and select Studio Camera
as the main camera source.
⑥ Select UC M40 as the main speaker and microphone source in your video platform and start your
video meeting. Volume can be adjusted from your computer directly.
⑦ Equipment power off.
*Note: Some video conferencing platforms require that you select Studio camera and microphone
6. Quick Start Guide - PanoCam Studio
Instructions on Installing PanoCam Studio
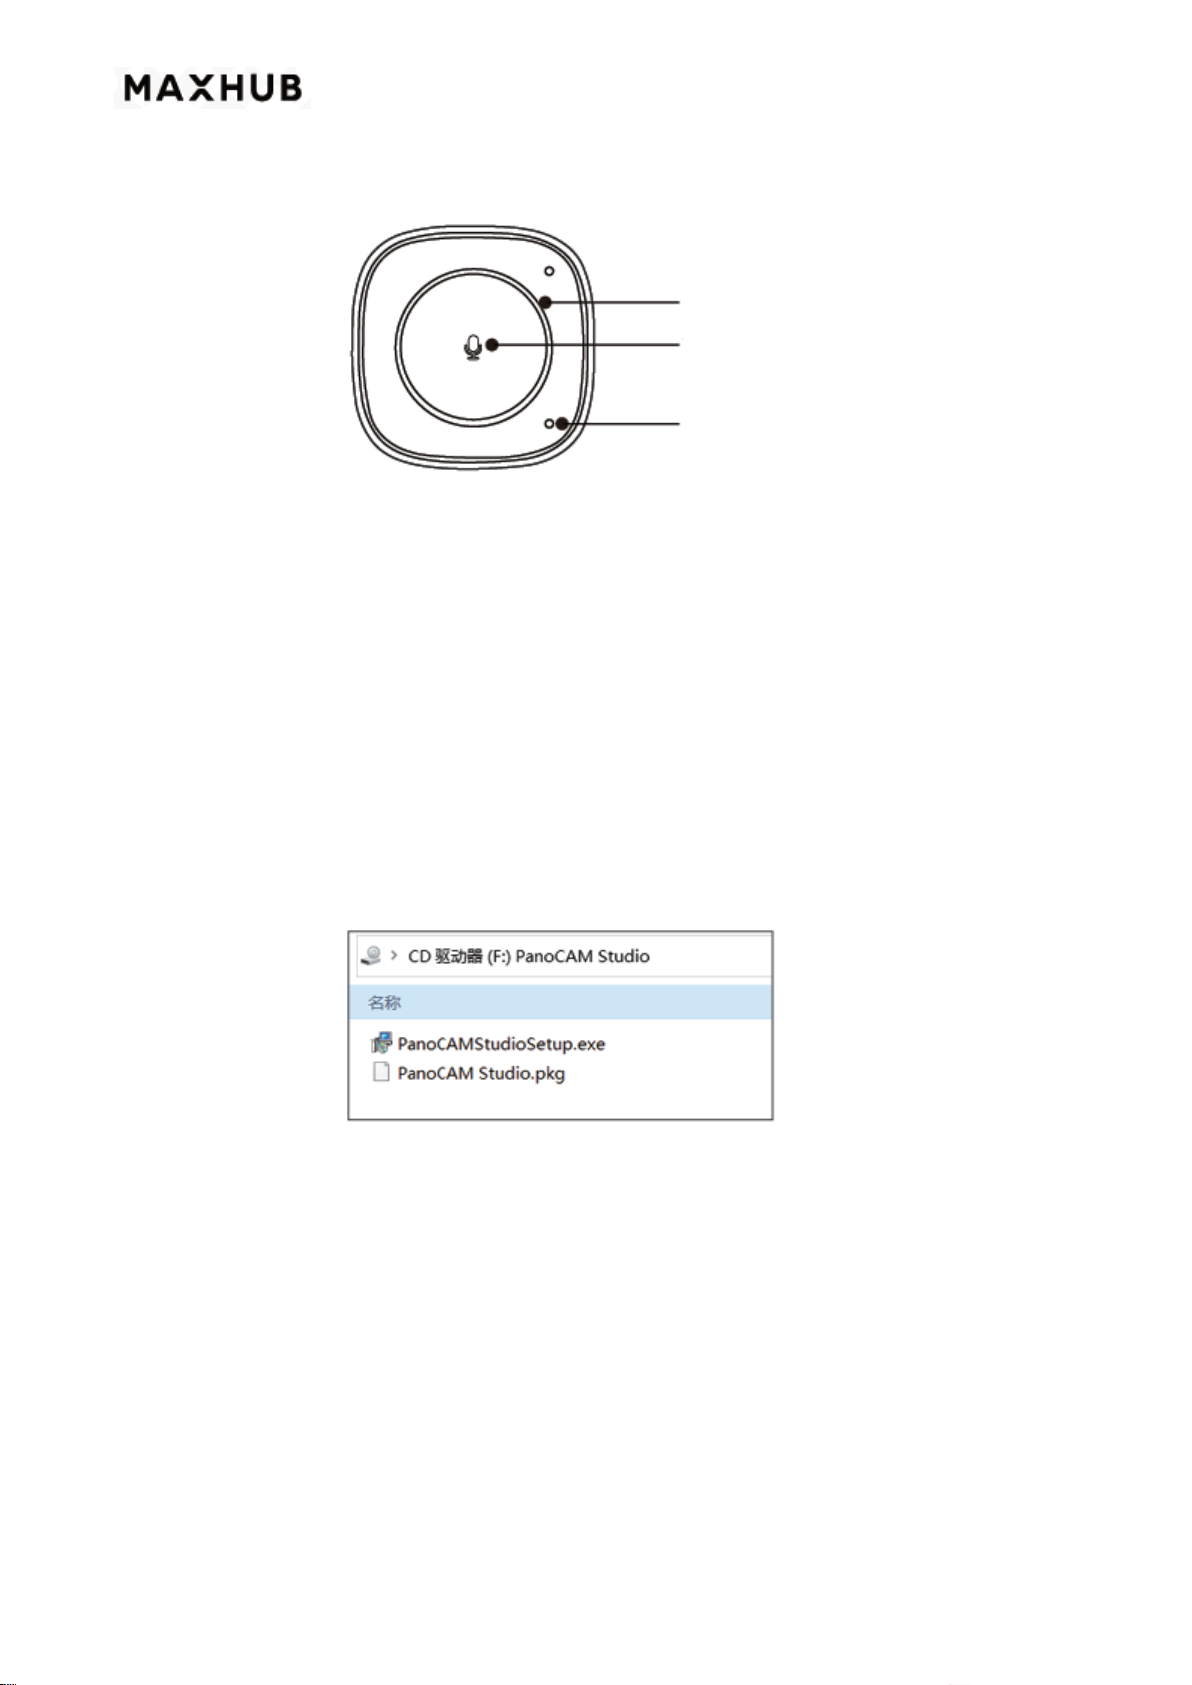
①Obtain setup file: When the USB Panoramic Camera is connected to a PC, a CD-ROM icon appears
on the PC screen, as shown below.
②Double-click on the PanoCAMStudioSetup.exe to start installation (MACOS users install PanoCAM
Studio.pkg).
③Click Install and select the appropriate directory for installation
Indicator Light
Touch Button
Microphone
Otros manuales para UC M40
3
Tabla de contenidos
Otros manuales de Cámara digital de MAXHUB


