Marksman M11RF-LCD Manual de usuario

User’s Manual
Model: M11RF-LCD
Two-Way Communication LCD Transmitter
4/5/6
54
C
For Technical Assistance, please call (800) 638-3600,
or visit www.magnadyne.com
M11RF-LCD-UM 9/10/04 9:48 AM Page 1

The remote control is powered by a 1.5V type AAA Alkaline battery. When the power of the battery
weakens the battery icon will be displayed on the LCD screen. When the old battery is replaced
with a new one, there will be a beep to indicate the power is up and the clock on the LCD screen
returns to AM12:00 after displaying all the icons. Correct the time by pressing SET for 3 seconds
before using. Note: Even if the battery is replaced, your programmed set values shall remain
unchanged. The remote control automatically reads and memorizes all the previous set information
saved in the main control module.
2
Congratulations on your purchase of a quality Marksman automotive security and remote start
system. Marksman security products have been designed to provide the consumer with a
technologically superior product with years of trouble free operation. The information enclosed will
provide a ready reference of the operation and maintenance of your new Marksman security and
remote start system.
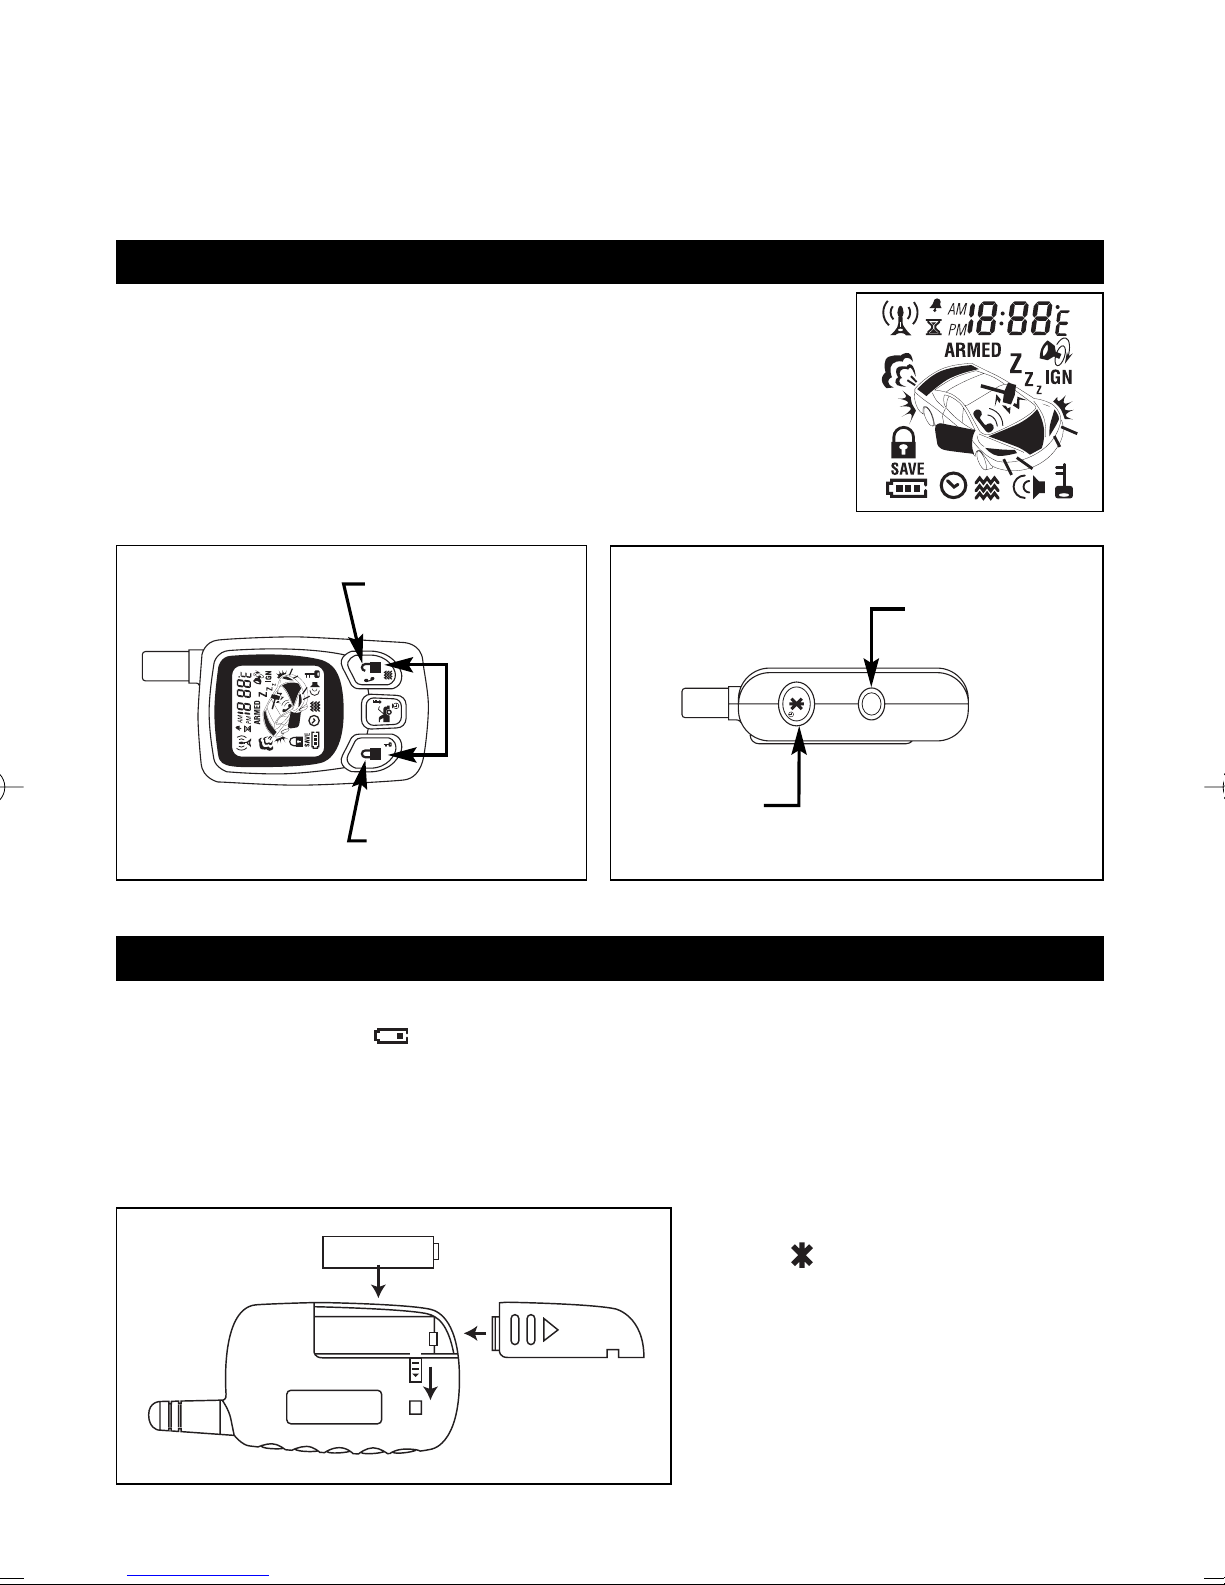
Remote Control Transmitters
Door
Unlock/Disarm
Silent
Arm/Disarm
Door
Lock/Arm
Battery Replacement
Engine
Start/Stop
System’s
Status Check
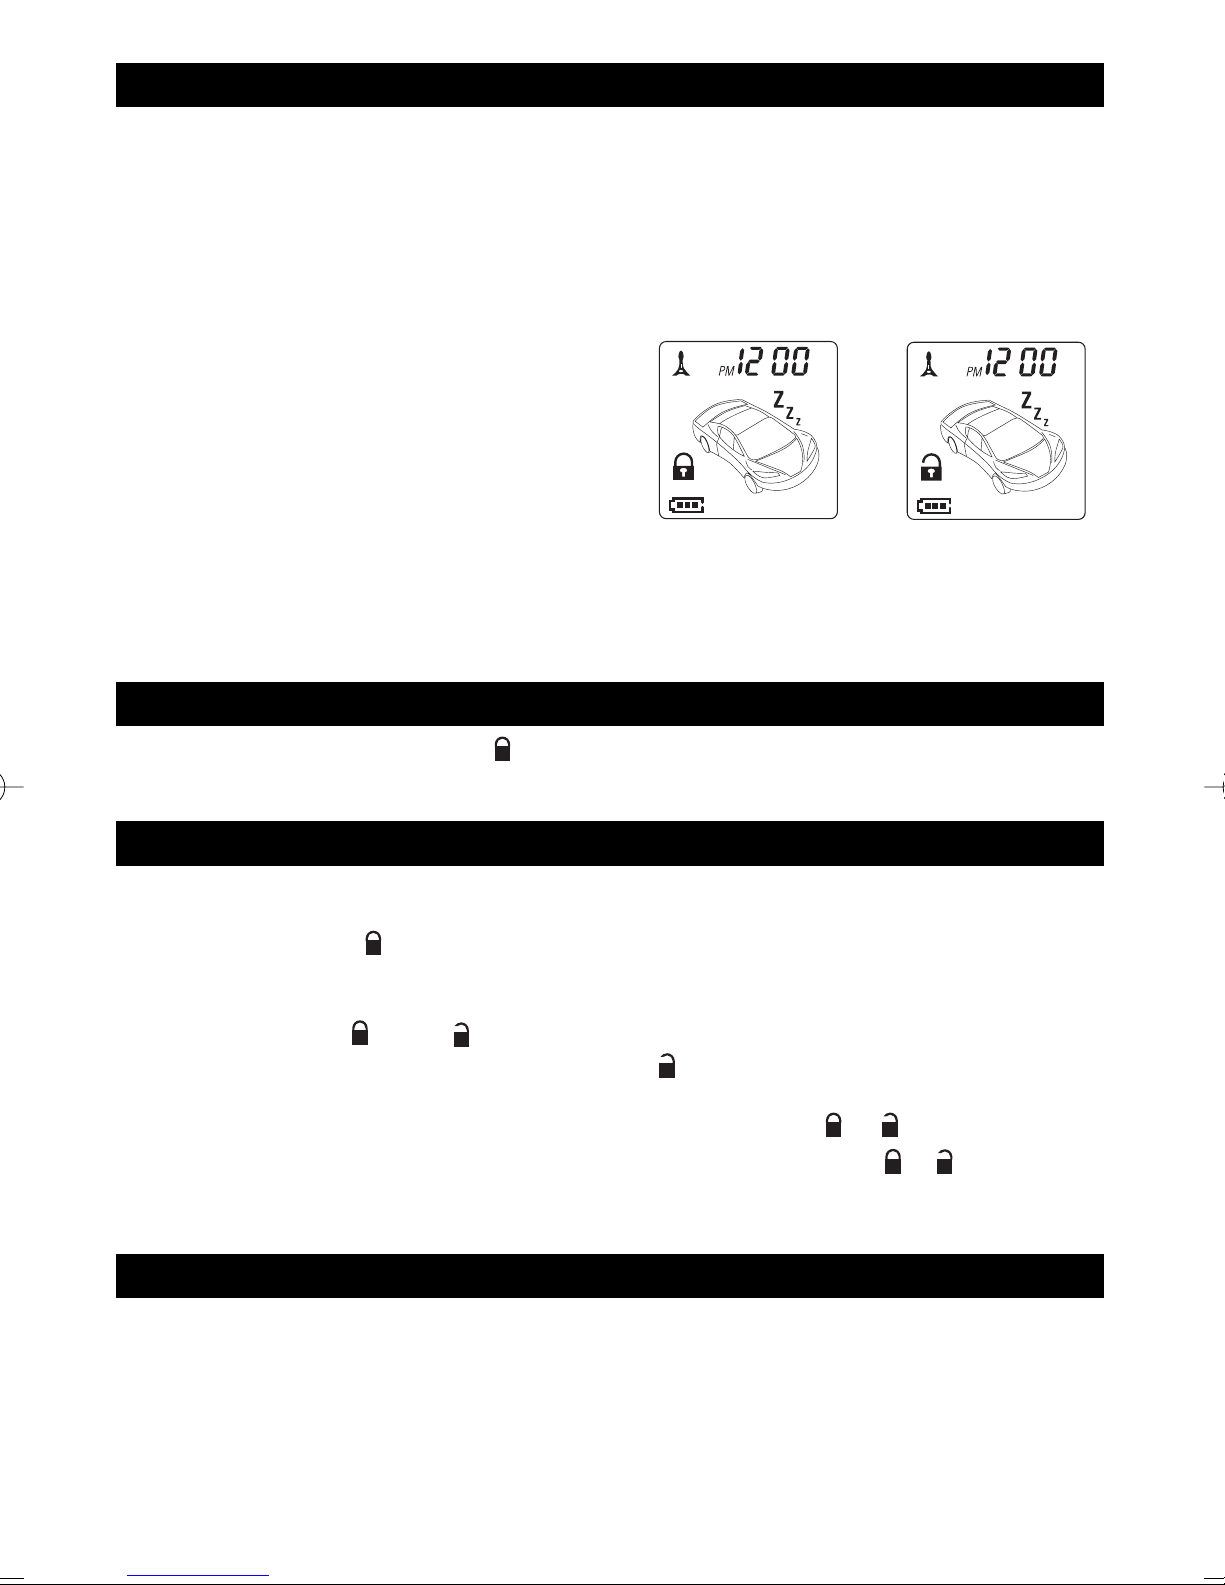
The LCD screen on the remote control displays graphic icons. It provides
you visual information on any trigger of the sensors and around the clock
surveillance to your vehicle as well as showing the present status of the
system.
4/5/6
54
C
Warning:
Press the button two times when the
battery compartment is empty,
then insert the new battery.
SET
Bi 6
M11RF-LCD-UM 9/10/04 9:48 AM Page 2

3
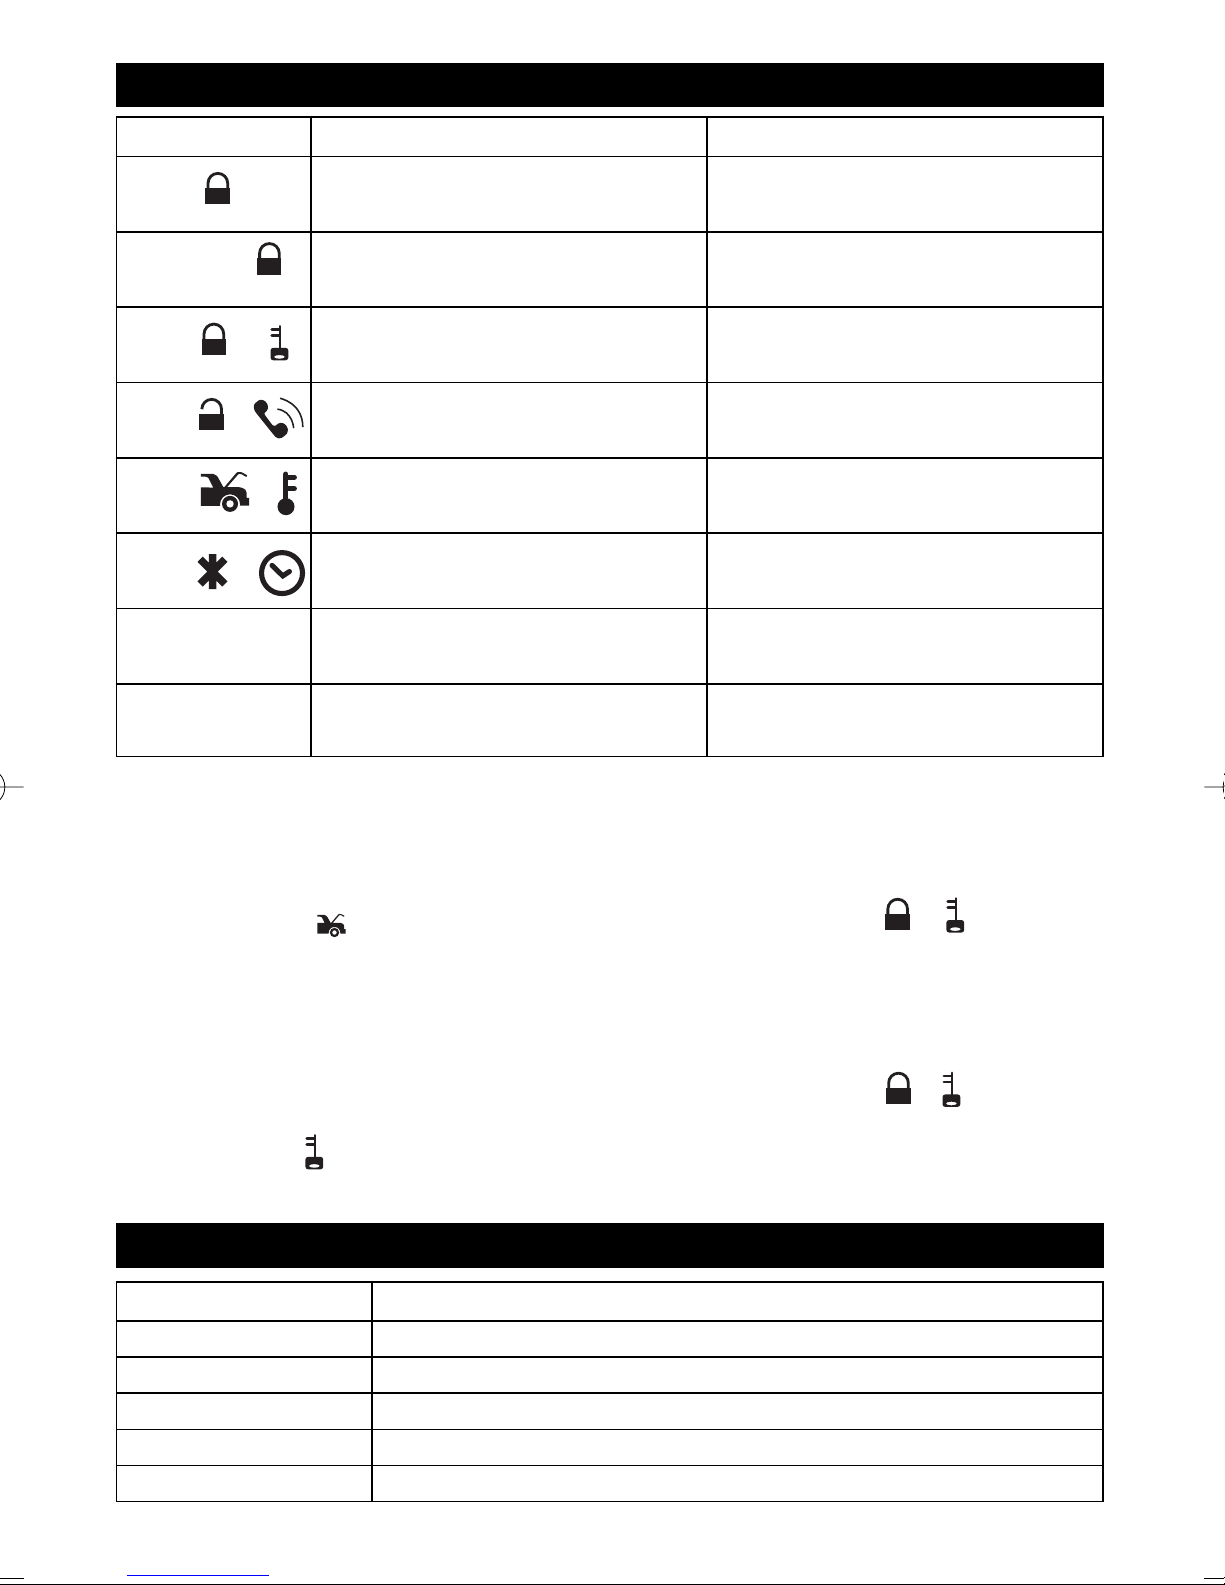
Remote Control Transmitters Operation
Transmitter Button
System Function Remark
Lock Doors & Arm System
Panic Function Press and Hold
for 3 Seconds
Car Locator Under Armed Mode
Arm and Delete the 2 Stage
Shock Sensor
Press Twice within
3 Seconds
Silent Arming/Disarming Ignition in “OFF” Position
Active Anti-Car Jacking Mode Ignition in “ON” Position,
Press and Hold for 2 Seconds
Channel #4 Timer Output (4)
Channel #5 Timer Output (5)
Channel #6 Timer Output (6)
Unlock Doors & Disarm System
Two Steps Door Unlock and
Disarm System Press Twice within 3 Seconds
Trunk Release
Channel 3 Press and Hold for 2 Seconds
Passive Arming
Bypass
While the System
is in “Disarmed” Mode
Arm System and
Hidden Alarm Function Press within 3 Seconds
Activate or Turn Off
the Remote Start Press Twice within 3 Seconds
-
+
+
+
+
-
-
+
( )
-
-
M11RF-LCD-UM 9/10/04 9:48 AM Page 3

4
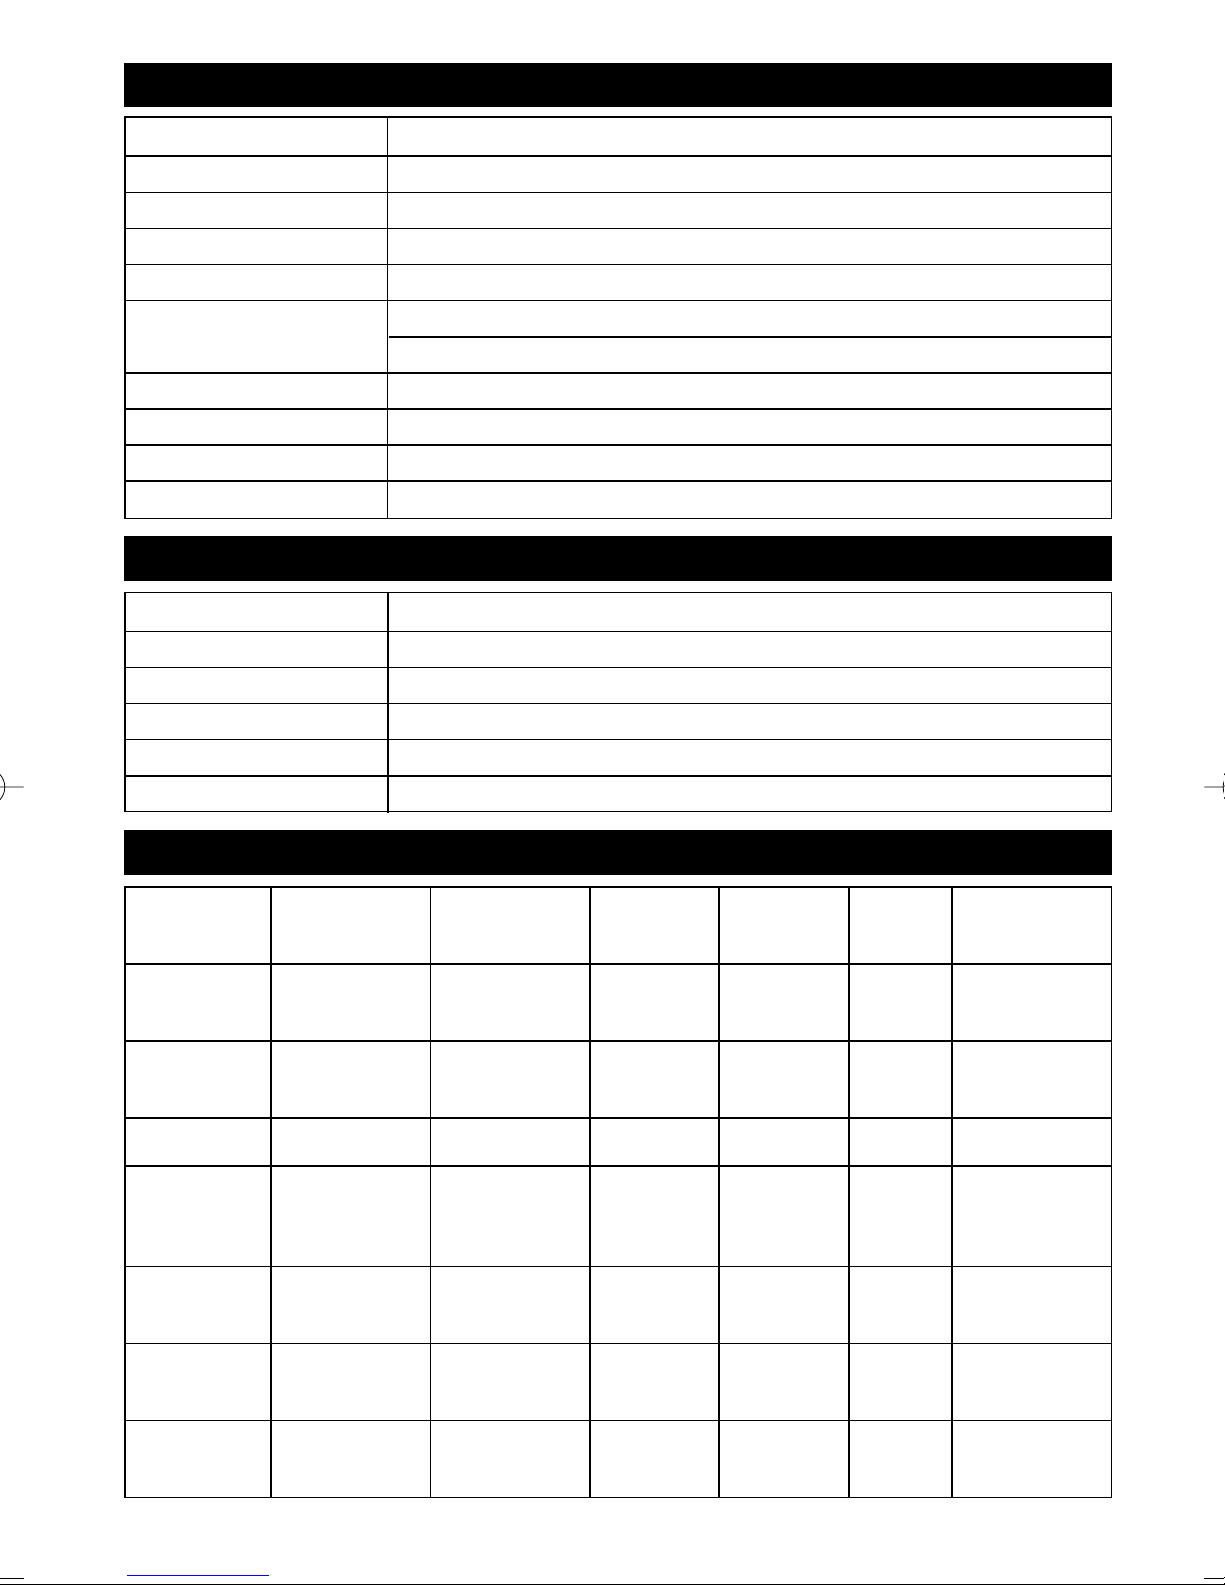
LCD Display Transmitter Operations
Transmitter Button
System Function Remark
SET (C) Systems Trigger Record Check Press within
3 Seconds
SET SET (C) System’s Status Check Press within
3 Seconds
SET Button Lock Press within 3 Seconds and Hold
“Lock” Button for 2 seconds
SET Optional Driving Pager Press within
3 Seconds
SET Monitor Interior Temperature Press within
3 Seconds
SET Daily Timer Start Press within
3 Seconds
SET LCD Screen Lamp
Turns ON for 5 Seconds Press and Hold for 1 Second
SET-SET-SET Clear the Flash Icon and Melody
Sound on the LCD Screen Transmitter
Button Lock:
Button Lock is useful if you want to disable the transmission function of the remote control
temporarily to prevent from any inadvertent pressing of buttons by others.
The regular remote control transmitter:
Press the button first, within 3 seconds press and hold the button for 2
seconds to activate or cancel the button lock function. The “LED” will pause flash for a few
seconds to indicate the remote control transmitter is on “Button Lock” mode while pressing
the transmitter button.
The 2-Way remote control transmitter:
Press the SET button first, within 3 seconds press and hold the button for 2
seconds to activate or cancel the button lock function.
Note: The icon will display on the LCD screen to show the remote transmitter is in “Button
Lock” mode.
Chirp Indicators
-
--
-
-
-
-
=
=
=
=
Chirp Function
1 Chirp System is Armed
2 Chirps System is Disarmed
3 Chirps Defective Reminder
4 Chirps Disarm / Triggered
5 Chirps Car Locator
M11RF-LCD-UM 9/10/04 9:48 AM Page 4

5
LED Display
Parking Light
System Characteristics
Siren/Horn Parking Light LED Doors Starter Dome Light
1. Arming 1 or 3 Chirps 1 Flash Slow Flash Locking Disabled
2. Disarming 2 or 4 Chirps 2 or 3 Flashes Unlocking Turns on for
30 Seconds
3. Trigger Alarming Flashes Slow Flash Disabled Flashes
4. Passive
Starter
Disable
Fast Flash Disabled
5. Panic Alarming Flashes Flashes
6.Car
Jacking Alarming Flashes Disabled Flashes
7.Car
Locator 6 Chirps 12 Flashes Locking
LED Function
OFF System is Disarmed
Slow Flashing System is Armed
Flash System in Passive Starter Disable
Fast Flashing System in Passive Arming
On Solid System in Valet Mode
Zone 1, Warn Away Trigger
2 Flashes - Pause Zone 2, Trigger on Trunk/Hook
3 Flashes - Pause Zone 3, Trigger on Door Switch
4 Flashes - Pause Zone 4, Trigger on Shock Sensor
5 Flashes - Pause Zone 5, Trigger on Ignition Switch
Flash Function
1 Flash System is Armed
2 Flashes System is Disarmed
3 Flashes Disarmed / Triggered
12 Flashes Car Locator
Constant On Under Remote Start
M11RF-LCD-UM 9/10/04 9:48 AM Page 5

6
Active Arming: Lock & Arm
1. Press the button on the transmitter.
2. The siren will chirp once and parking lights will flash once indicating that the system is now
armed. The vehicle door will lock upon arming when interfaced with the security system.
Clear the Flash Icon:
Press the SET button 3 times
within 3 seconds to clear the
flash icon on the LCD screen
transmitter.
Defective Sensor Reminder:
If the siren sounds 3 times, there is a Door, Trunk, or Hood left open. (See Alarm Feature I-4)
Silent Arming/Disarming:
Press the transmitter or button at the same time will arm or disarm your security system,
No chirp sound will be heard, arm/disarm confirmation will be through the vehicles
parking lights only.
Shock Sensor Bypass:
Press the button on the transmitter two times within 3 seconds. This will arm the security
system and bypass the shock sensor. The system will chirp one additional time to confirm the
sensor bypass mode was activated. The sensor bypass feature is programmed to activate for one
arming cycle only. The security system will return to normal operation during the
next arming cycle.
Passive Arming:
Active arming/disarming is controlling your security system via the remote transmitter. This
security system is equipped with an optional passive arming feature which allows the security
system to arm 30 seconds after the last door is closed. Operation is as follows:
1. Turn the ignition to the “OFF” position and exit the vehicle.
2. After all entrances are closed, the security system LED will flash fast for 30 seconds. If you
reopen any Door, Hood, Trunk, the security system LED will stop flashing. It will begin flashing
again once the vehicles entrances are closed.
3. After the 30-second timer has elapsed, the security system will automatically “ARM”. The
siren/horn will chirp once and the parking lights will flash once also.
Passive Arming with Passive Door Locking (See Alarm Feature 1-2 Programming)
The vehicle doors will automatically lock after passive arming cycle has been completed.
Passive Arming Bypass
While the system is in disarmed mode, press the button twice. The horn/siren will respond
with one chirp and the LED will turn “ON”. The security system will remain in this mode for as
long as you wish. To exit this mode press the or buttons and the system will return to normal
status.
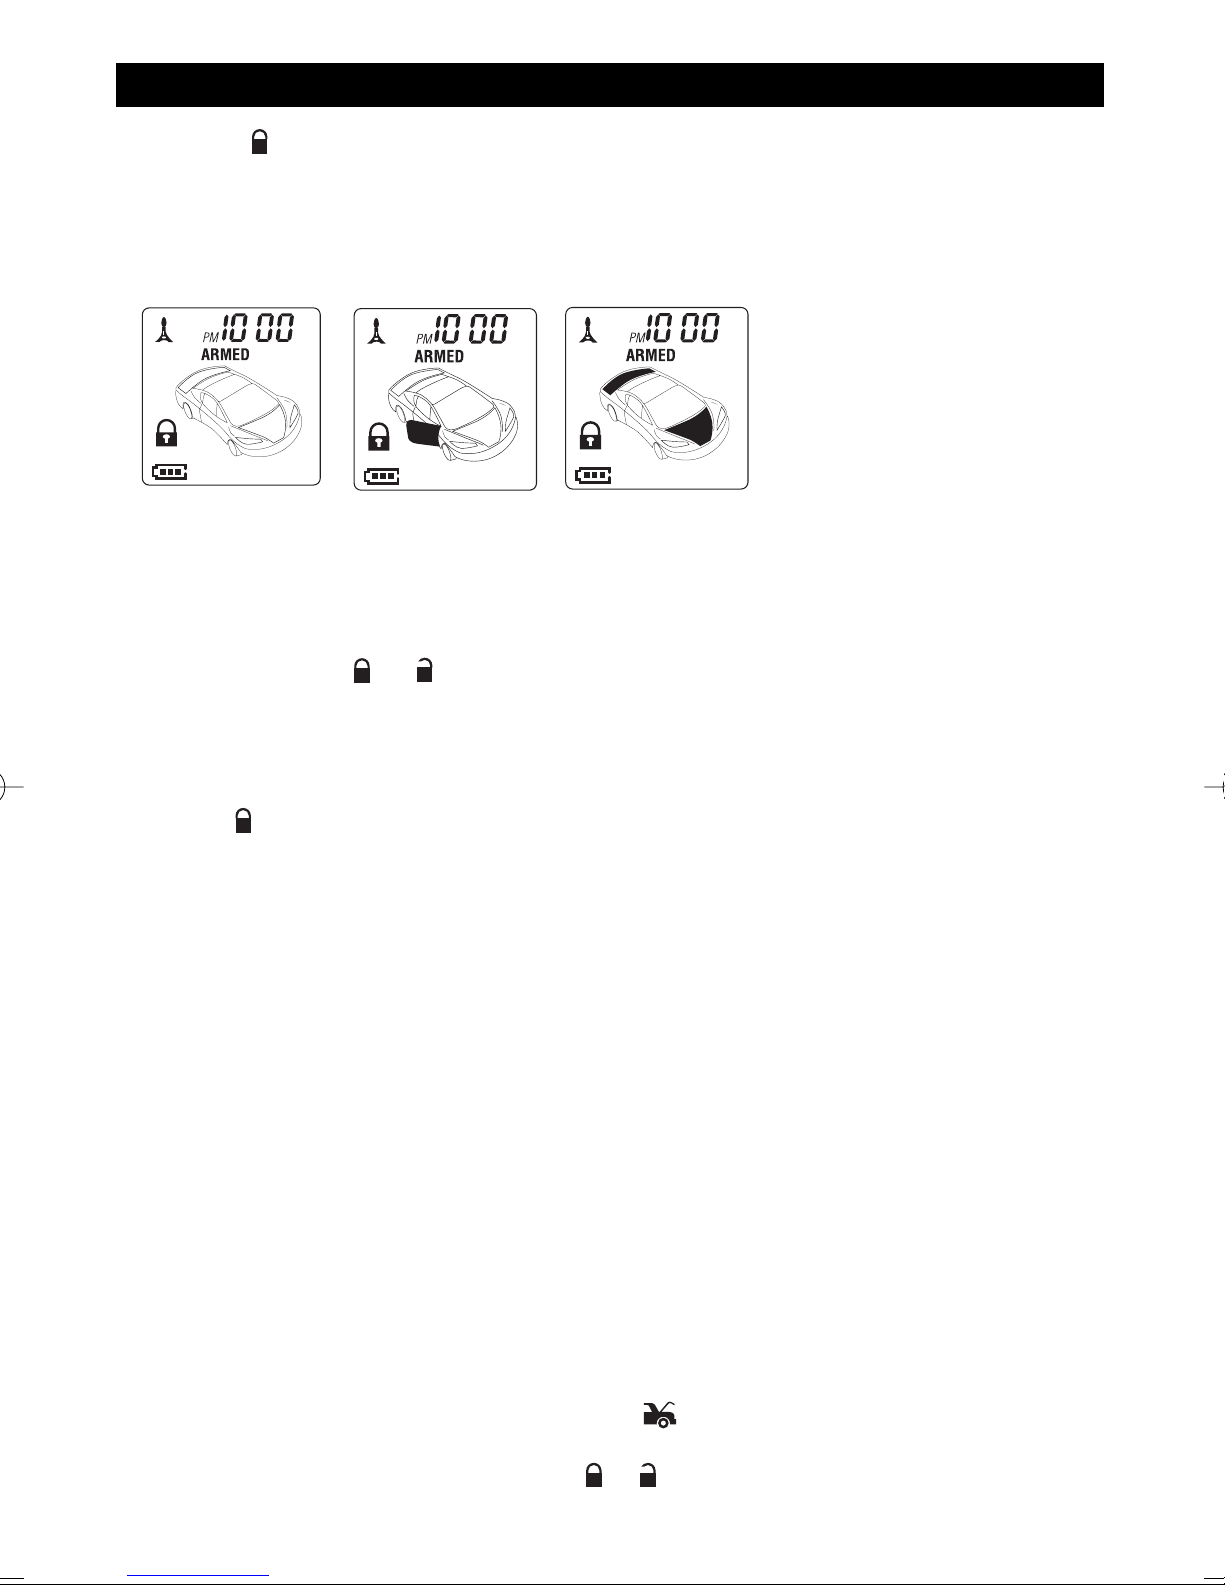
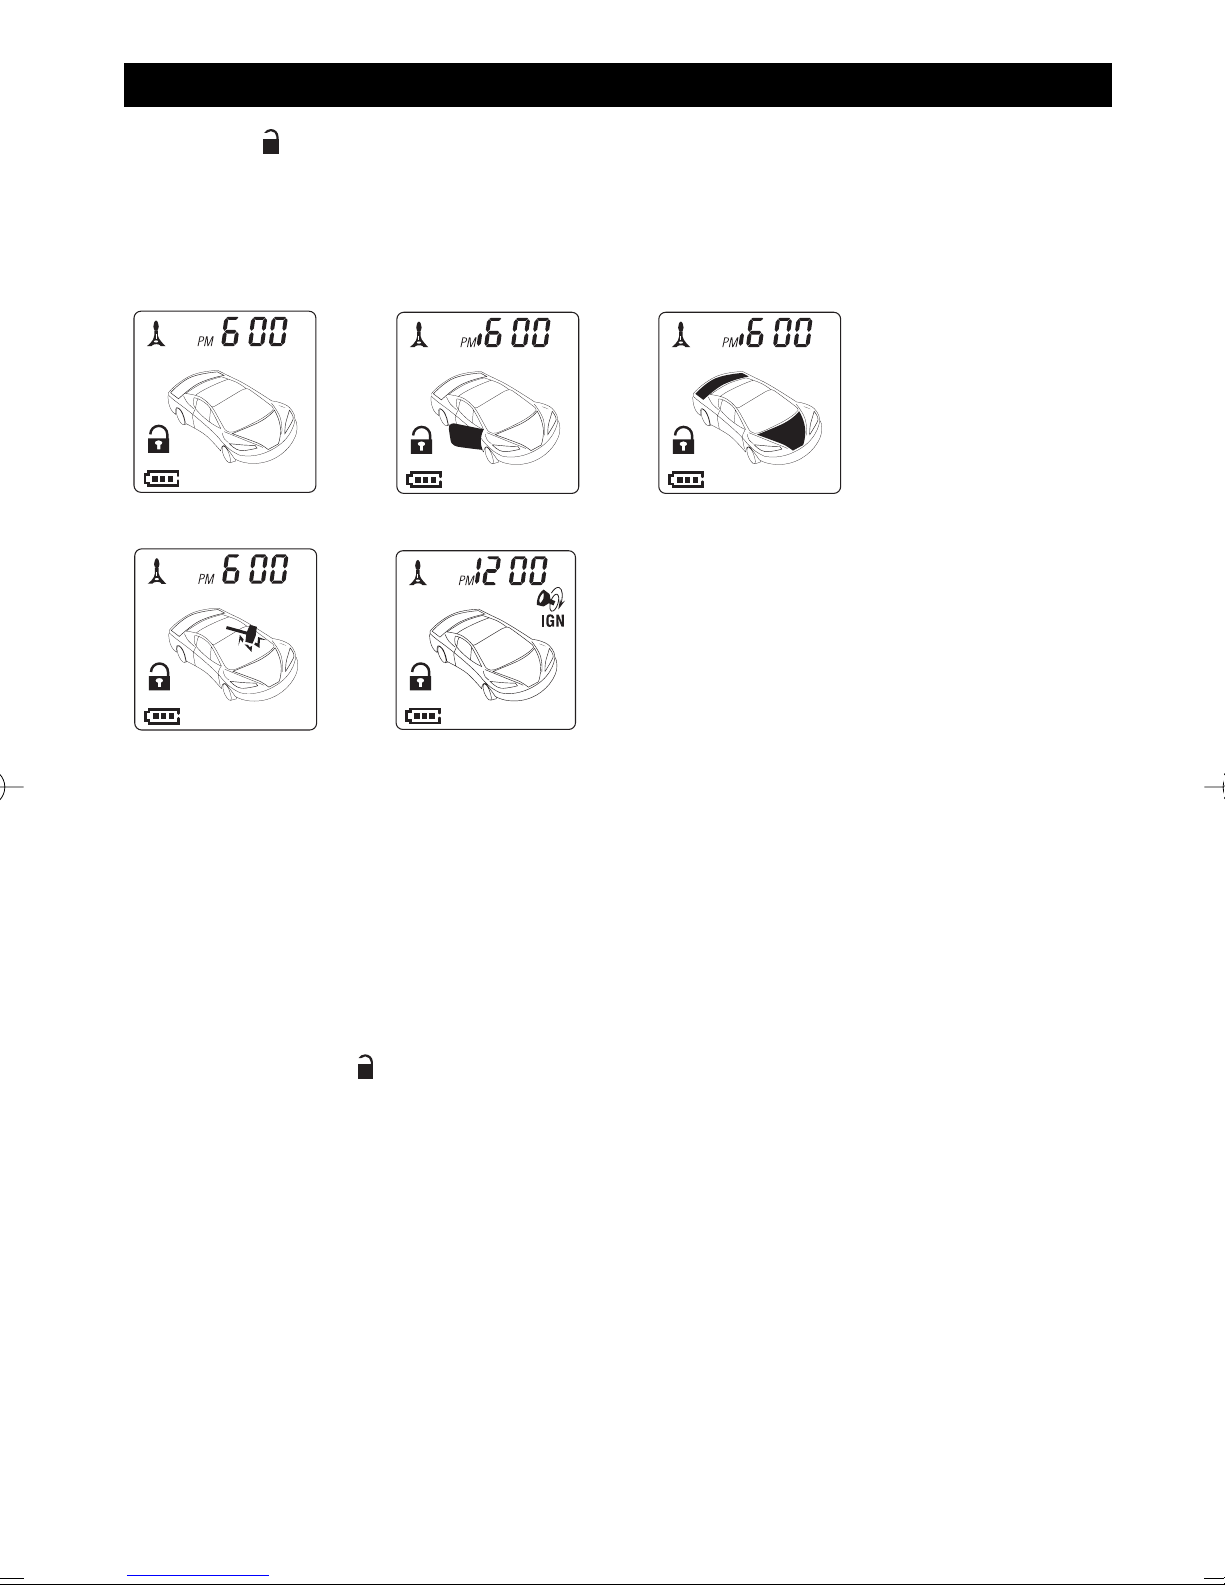
System Armed Door Ajar Trunk/Hood Ajar
M11RF-LCD-UM 9/10/04 9:48 AM Page 6

7
Active Disarming Unlock & Disarm
1. Press the button on the transmitter.
2. The siren will chirp twice and parking lights will flash twice indicating that the system is now
disarmed. The vehicle door will unlock and the dome light will turn on for 30 seconds upon
disarming when interfaced with the security system.
Shock Sensor Triggered Ignition Triggered
Clear the Flash Icon:
Press the “SET” button 3 times within 3 seconds
will clear the flash icon on the LCD screen
transmitter.
Tamper Disarming:
If the security system is triggered, upon disarm, the siren will chirp 4 times and parking lights will
flash 3 times.
Pathway Illumination:
This feature turns the parking lights “ON” for 30 seconds upon a unlock signal and for 10 seconds
upon the lock signal.
Two Steps Door Unlock:
This feature will independently unlock the drivers door only when disarming the security
system. Pushing the button a second time within 3 seconds will unlock the other doors.
Automatic Rearm:
If this feature is selected, the security system will automatically rearm itself within 60 seconds
after disarming with the remote transmitter. Automatic re-arm will cancel if any door is opened
before the 60 second timer is up.
Disarming without a Transmitter:
The override function may be used if the remote transmitter is lost or inoperative.
1. Enter the vehicle and turn the ignition switch to “ON” position (alarm will sound).
2. Within 10 seconds push and release the valet switch, the alarm will stop sounding and enter
the disarm mode. You can now start and operate the vehicle normally.
System Disarmed Doors Triggered Trunk/Hood Triggered
M11RF-LCD-UM 9/10/04 9:48 AM Page 7

The valet switch allows you to temporarily bypass all alarm functions eliminating the need to hand
your transmitter to parking attendants or garage mechanics. When the system is in valet mode, all
alarm functions and remote start functions are bypassed, however the remote panic feature and
remote door locks will remain operational. To use the valet mode, the system must first be
disarmed either by using your remote transmitter, or by operating the manual override sequence.
Valet Mode (System in Disarm or Valet Mode)
Enter the Valet Mode:
1. In the disarmed mode, turn the ignition to “ON”
position.
2. Push and hold the valet switch for 2 seconds
until the LED turns on solid. The LED will
remain on solid while the unit is in the valet
mode.
Exit the Valet Mode:
1. To return to normal operation, turn “ON” ignition.
2. Push and hold valet switch for 2 seconds. The LED will turn off to indicate the system is now
out of the valet mode.
Remote Door Lock Remote Door Unlock
While in the armed mode, press the button to activate car locator function. The siren/horn will
chirp six (6) times. The parking lights will flash 12 times to help you locate your car.
Car Locator
The transmitter can be used as a remote panic switch to manually trigger the alarm system in case
of an emergency.
1. Press and hold the button for 3 seconds. The security system will begin to sound and
the parking lights will begin to flash.
2. During panic mode, the normal functions of this transmitter becomes temporarily inoperable.
The transmitter and buttons can be used to lock and unlock the door
(if the option is installed), however, once the button is pressed, the vehicle’s starter
disable device, (where installed) will be enabled allowing the vehicle to start.
3. To stop the alarm, press and hold the transmitter or buttons on the
transmitter again for 3 seconds. Also, if any transmitter button other than or is pressed and
release, the panic mode will be turned off immediately.
4. If the button is not pressed, the alarm will automatically stop after 30 seconds.
Panic Function
When armed, your vehicle is protected as follows:
1. Light impact will trigger the warn-away signal.
2. Heavy Impacts/Doors Open/Hood Open/Trunk Open/Ignition Key Activated will trigger the
programmed sequence. The starter disable relay (if installed) prevents the vehicle’s starter from
cranking. The siren, horn, parking lights and dome light will turn on to alert of an intrusion for
60 seconds. If one of the sensors or detectors are still active, the security system will sound a
maximum of 6 times for 30 seconds.
Trigger the System
8
M11RF-LCD-UM 9/10/04 9:48 AM Page 8

Trigger the System (Continued)
Ignition Trigger (Clear the Flash Icon and Melody Sound):
When the Security System is triggered, the LCD screen will alert the user through melody sound
and flashing icons. By pressing the “SET” button 3 times within 3 seconds it will clear the flashing
icons and stop the melody sound.
Stop the Melody Sound:
When the Security System is triggered, it will alert the user with flashing icons on the LCD Display
and audible melody sound. To stop the melody sound, press any button on the LCD transmitter.
Noise Abatement:
This security system has a “Noise Abatement Circuit”. This circuit prevents annoying, repetitive
false alarms by filtering out environmental conditions.
If the security system is triggered five times or more, the circuit will interpret this as a false alarm.
After the fifth trigger, the noise abatement circuit ignores, or bypasses that switch or sensor until
the next switch or sensor is activated.
Noise Abatement Circuit covers doors, hood and trunk switches differently. If the security system
is triggered by one of these switches for three cycles, the switch will be bypassed until the trigger
ceases.
Anti-Car Jacking
Warning: This security system has a car jacking feature. Its default setting is “OFF”. So, be sure to
enable this feature if you feel it is needed.
Active Anti-Car Jacking
1. Press and hold the transmitter and buttons at the same time for 2 seconds while the
vehicle’s ignition is “ON” and all doors are closed. The parking lights will turn on for 1.5
seconds to indicate this feature.
2. Once the system is armed, and you are forced from your vehicle, the system will trigger when
the door is opened and closed while the ignition is “ON”.
Passive Anti-Car Jacking
1. Turn the ignition switch to the “ON” position, the system will arm.
2. Once the system is armed, if you are forced from your vehicle, the system will trigger when the
door is opened and closed while the ignition is “ON”.
9
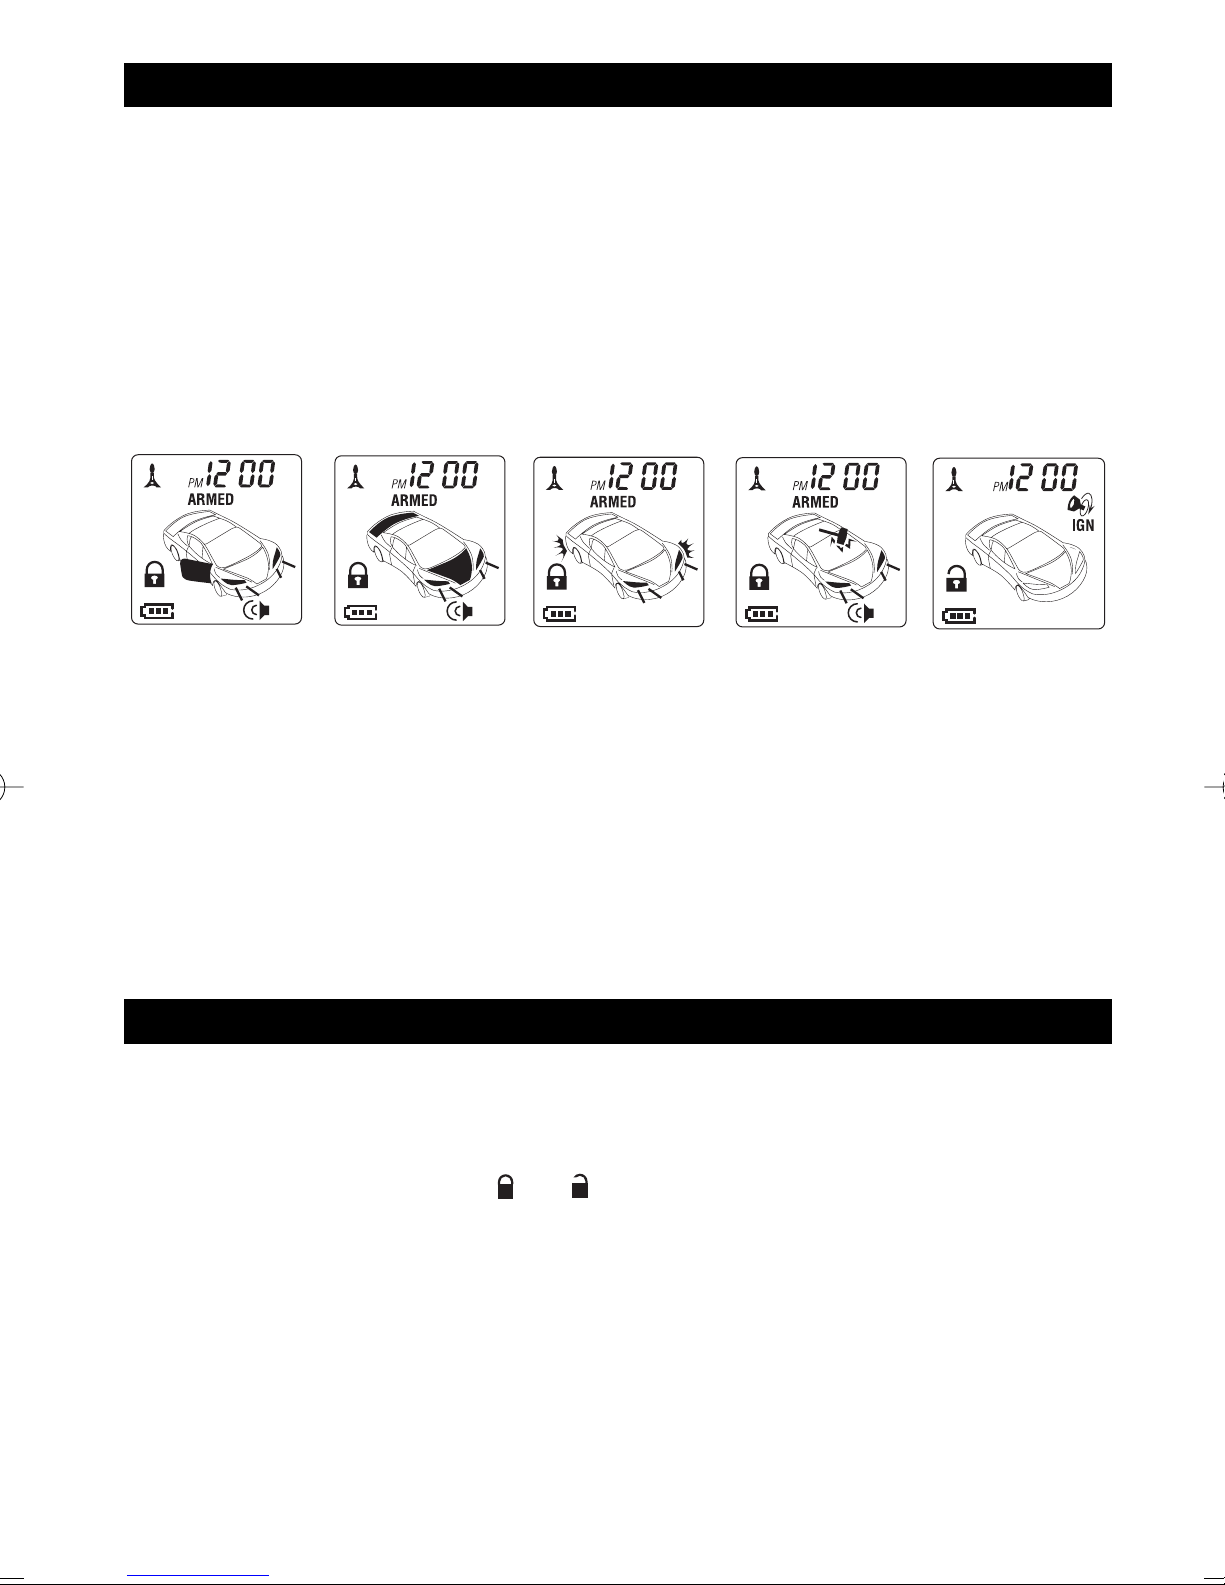
Doors Triggered Trunk/Hood
Triggered
Warn Away
Trigger
Shock Sensor
Trigger
Ignition
Trigger
M11RF-LCD-UM 9/10/04 9:48 AM Page 9

Anti-Car Jacking (Continued)
Trigger the Anti-Car Jacking Mode
Three Timer circuits will function as follows:
First Timer Circuit
1. 50 seconds after the car jacking mode has been activated, the siren will begin to sound for 15
seconds.
2. During the 15 second activation period, you will be alerted to push the valet switch once to
turn off the car jacking feature.
3. If by now the valet switch has not been pushed, it will enter the second timer circuit.
Second Timer Circuit
65 seconds after the system has been triggered, the siren starts sounding and the parking lights
start flashing.
Third Timer Circuit
90 seconds after the security system has been triggered:
1. The vehicles siren is still sounding, parking light are flashing
2. The starter disable mode will activate to prevent the vehicle from starting
3. It will remain active until the vehicles battery power is exhausted
Override the System to Turn Off Anti-Car Jacking
Turn the ignition switch from OFF to ON and within 10 seconds, push the valet switch. The siren
will stop sounding and the security system is now disarmed.
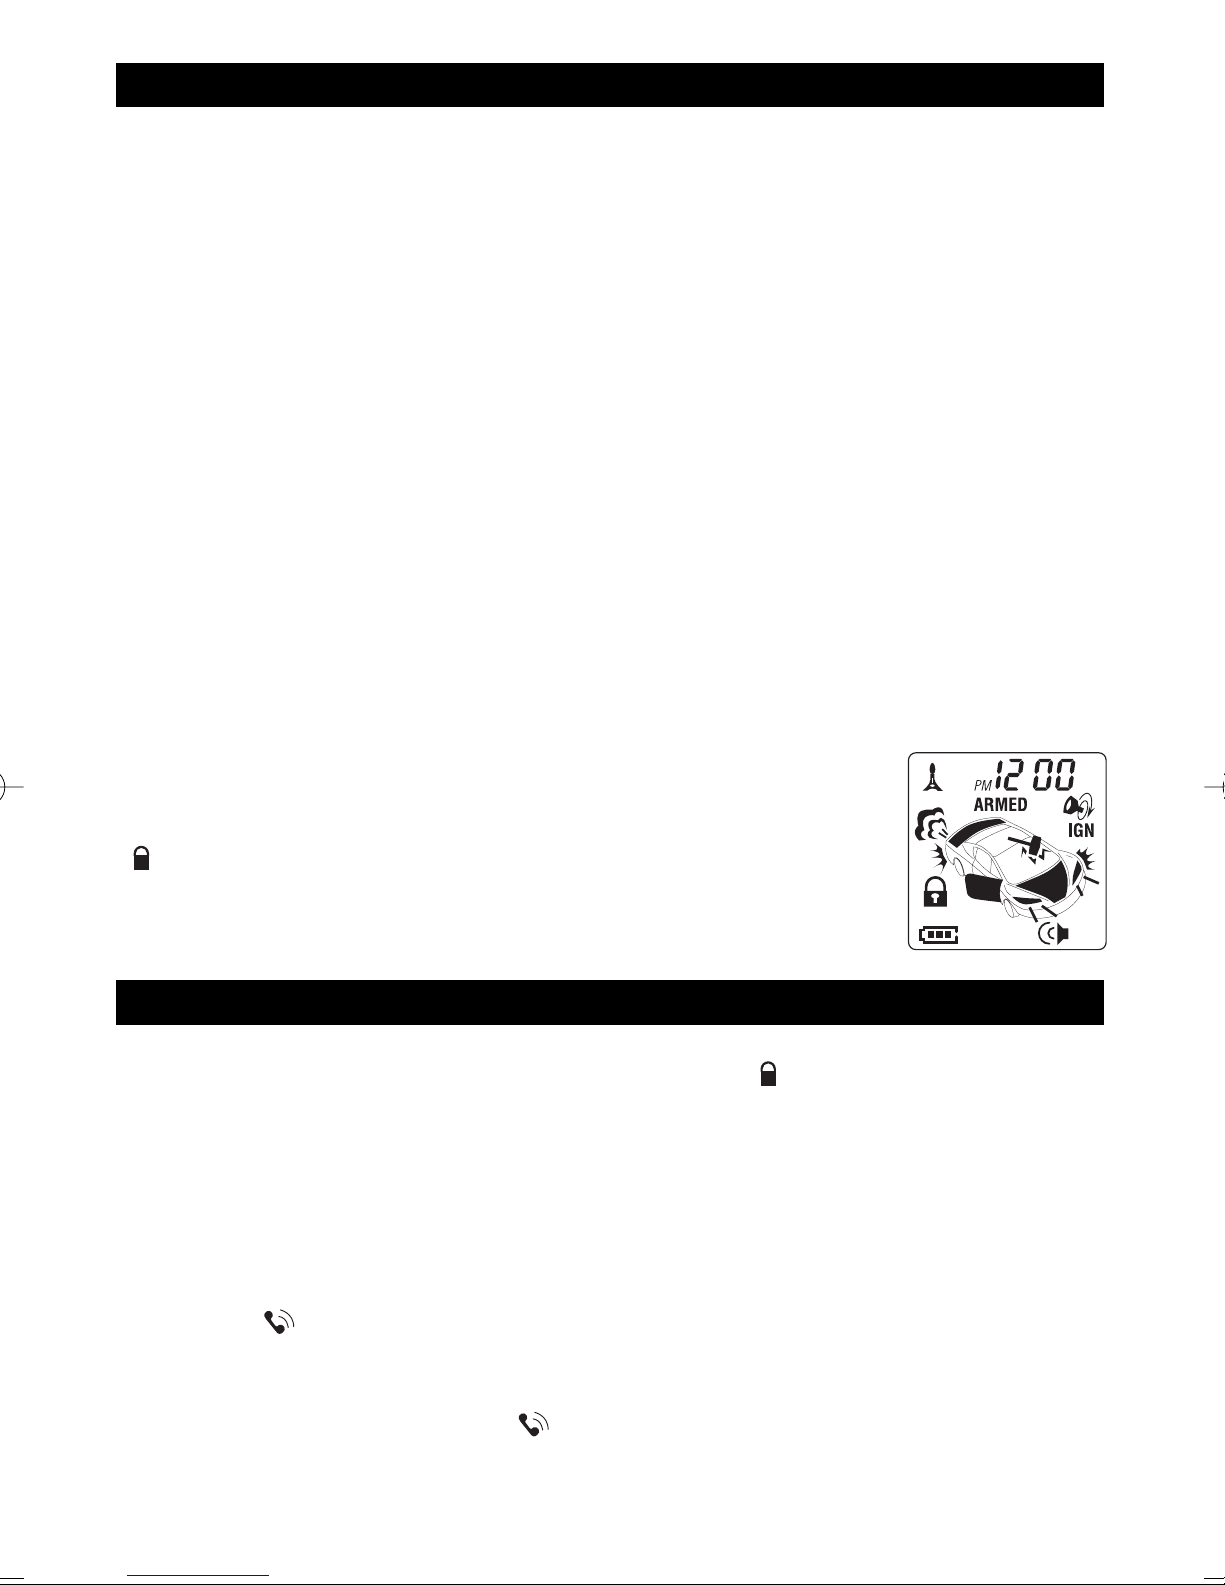
Systems Trigger Check
Press the transmitter “SET” button first, within three seconds press the
(C) button. The transmitter will respond with one melody sound and all
trigger’s records will immediately displayed on the transmitter LCD screen.
System Status Check
When you want to check the security systems present status through the transmitter LCD, press the
transmitter “SET” button twice, within three seconds press the (C) button. The security system
responds with one melody sound and the LCD screen should be illuminated.
Driver Paging
It is useful in the event that someone wants to page the driver of the parked vehicle. (Optional)
Inside the Vehicle Paging
With the ignition switch in the "OFF" position, press the valet switch for 2 seconds to page the
driver. One chirp will sound from the vehicle and the LCD transmitter will begin to sound with a
melody. The icon will then appear on the LCD transmitter to confirm this function.
Outside the Vehicle Paging
To page the driver from outside of the vehicle, "Knock" on the windshield glass to activate the LCD
transmitter with a melody sound. The icon will then appear on the LCD screen (only when the
optional knock sensor, model # M10-Page, is installed).
10
M11RF-LCD-UM 9/10/04 9:48 AM Page 10
Tabla de contenidos
Otros manuales de Transmisor de Marksman
Manuales populares de Transmisor de otras marcas

Dejero
Dejero EnGo 3x Manual de usuario

Rosemount
Rosemount 4600 Manual de usuario

Speaka Professional
Speaka Professional 2342740 Manual de usuario

trubomat
trubomat GAB 1000 Manual de usuario

Teledyne Analytical Instruments
Teledyne Analytical Instruments LXT-380 Manual de usuario

Rondish
Rondish UT-11 Manual de usuario