Marco 1000950 Manual de usuario

Page 1 of 24
ColdBRU –
Service Manual
1000950, 1000950EU & 1001950US
www.marcobeveragesystems.com
Ireland Tel: +353 (1) 295 2674
UK Tel: +44 (0207) 2744577

Page 2 of 24
CONTENTS:
1. Introduction …………………………………………………………………………………………………………………… 3
2. Safety Instructions …………………………………………………………………………………………………………. 3
3. Specifications …………………………………………………………………………………………………………………. 4
4. Installation …………………………………………………………………………………………………………………….. 5
4.1 ColdBRU Installation ……………….……………………………………………………………………….….. 5
5. ColdBRU Setup .………..………………………………………………………………………………………………………… 7
5.1 Operating ColdBRU for the first time……………………………………………………………………………. 7
5.2 Dispense Calibration Procedure…………………………………………………………………………………… 7
6. Overview & Operation ……………………………………………………………………………………………………. 8
6.1 ColdBRU - Operation …………………..………………………………………………….……….…………. 8
7. Routine Maintenance/Internal Access …………………………………………………………………………… 11
7.1 Top Lid removal ……………………………………………………………………………………………………… 11
7.2 PCB removal …..……………………………..………………………………………………………………….. 11
7.3 Inlet Solenoid removal …….…………………………………………………………………………………. 13
7.4 Sprayhead and Sprayhead disk removal……………………………………………………………... 15
7.5 Flow Meter removal …………….….………………………………………………………………….…….. 17
8. Diagnostics/Trouble Shooting ……………………………………………………………………………………….. 19
9. Wiring Diagram …..…………………………………………………………………………………………………….. 20
9.1 Wiring Diagram …………………………………………………………………………………………………. 20
10. Plumbing Drawing ………………………………………………………………………………………………………… 21
10.1 Plumbing Drawing ……………………………………………………………………………………………….. 21
11. Parts Diagram and lists ……………………………………………………………………………………………. 22
11.1 Spare Parts Diagram …………………………………………………………………………………………..….. 22
11.2 Spare Parts List ………………………………………………………………………………………………………. 23

Page 3 of 24
1. INTRODUCTION
The information provided in this manual is intended to assist in the installation and maintenance
of the Marco ColdBRU. Please read the instructions carefully to prevent accidents and ensure an
efficient installation.
This manual is not a substitute for any safety instructions or technical data affixed to the machine
or its packaging. All information in this manual is current at the time of publication and is subject
to change without notice.
Only technicians or service providers authorised by Marco should carry out installation and
maintenance of these machines.
Marco accepts no responsibility for any damage or injury caused by incorrect or unreasonable
installation and operation.
2. SAFETY INSTRUCTIONS
When using electrical appliances, basic safety precautions should always be followed to prevent
the risk of fire, electric shock, burns, or other injuries or damages.
• Read all operating and safety instructions carefully.
• This appliance must be placed/installed on a horizontal flat stable surface.
• The ambient temperatures this appliance should operate within are 5 °C - 35 °C.
• This appliance may be placed in self-service areas if attended to by trained personnel.
• Risk of flooding, the hose supplied with the ColdBRU is non-toxic food quality tested to 190psi.
However, a hose is not a permanent connection. It is, therefore, advisable to switch off the
machine and close the stopcock valve when the machine is not in use, e.g. overnight etc.
• The utmost care has been taken in the manufacture and testing of this machine. Failure to
install, maintain and / or operate this machine according to the manufacturer’s instructions may
result in conditions that can cause injury or damage to property. If in any doubt about the
serviceability of the machine always contact the manufacturer or your own supplier for advice.
• This machine is not intended for use by persons (including children) with reduced physical,
sensory, or mental capabilities, or lack of experience and knowledge, unless they have been
given supervision or instruction concerning use of the machine by a person responsible for their
safety.
• Children should be supervised to ensure that they do not play with the machine.
• In the event any wires are damaged, such wires can only be replaced by experts or profes-
sional after service staff from the manufacturer after service department or similar function
departments.
• CAUTION - Risk of fire and electric shock. Only to be used with manufacturer’s specified power
cord set. Marco p/n 1501487 (USA), 1501488 (EU), 1501489 (UK/Ire).
• This appliance should not be installed in an area where a water jet could be used to clean it.
• Access to the service area of the appliance is restricted to persons having knowledge and
practical experience of the appliance and the relevant safety and hygiene requirements.

Page 4 of 24
3. SPECIFICATIONS
ColdBRU 1000950, 1000950EU, 1001950US
Performance
The maximum dispense of the ColdBRU is 10.5L / 2.75 Gallons (US)
Electrical
Mains Connection
Earthed Mains Plug to IEC 230vac
(UK –3-Pin Plug, BS1363)
(EU –CEE7 Schuko)
(US (120v –NEMA 5-15)
Rating
@230V
15W
0.07A
@120v
15W
0.125A
Plumbing
Fittings
Required Pressure
0.75” BSP (or 3/8” compression for US versions) food grade inlet
hose supplied.
14.5 –145psi (0.1-1 MPa)
Dimensions
Height (mm/inches)
Width (mm/inches)
Depth (mm/inches)
702/27.7
325/12.8
428/16.8

Page 5 of 24
4. INSTALLATION
4.1 ColdBRU Installation
Electrical Installation:
•Electrical specification: 15W-230VAC-50/60Hz
15W-120VAC-60Hz
•A moulded 13A IEC power cord is provided. This should be plugged into the IEC connection on the
rear of the ColdBRU and plugged into a suitable 13A power outlet.
•When installing the machine, always observe the local regulations and standards.
Plumbing Installation:
•Mains water pressure required (limits): 14.5 –145psi (0.1 -1 1 MPa)
•Fit a stop Valve on a cold water line and attach a 3/4" BSP male fitting, e.g. 3/4" x 1/2" or washing
machine type stop valve (3/8” compression US).
•Connect straight tailpiece of the hose to the stop valve fitting. Make sure that the pre-attached
sealing washer is fitted.
•Turn on the water to flush any impurities, dust etc. from the inlet hose and water pipe. Allow
several litres through.
•Connect 1/4” hose to the Bulkhead connector of the ColdBRU (1/4” pushfit). Make sure the 1/4”
hose is pushed in fully.
•Turn on water and check for leaks.

Page 6 of 24
4.1 ColdBRU Installation (cont.)
•Check that all installation procedures have been carried out.
•Ensure water valve is on.
•Plug ColdBRU into suitable socket.
Connecting ColdBRU to water
Connecting ColdBRU to power
Page 7 of 24
5. ColdBRU SETUP
5.1 Operating ColdBRU for the First Time
•Check that all installation procedures have been carried out.
•Ensure water valve is on.
•Plug ColdBRU into suitable socket.
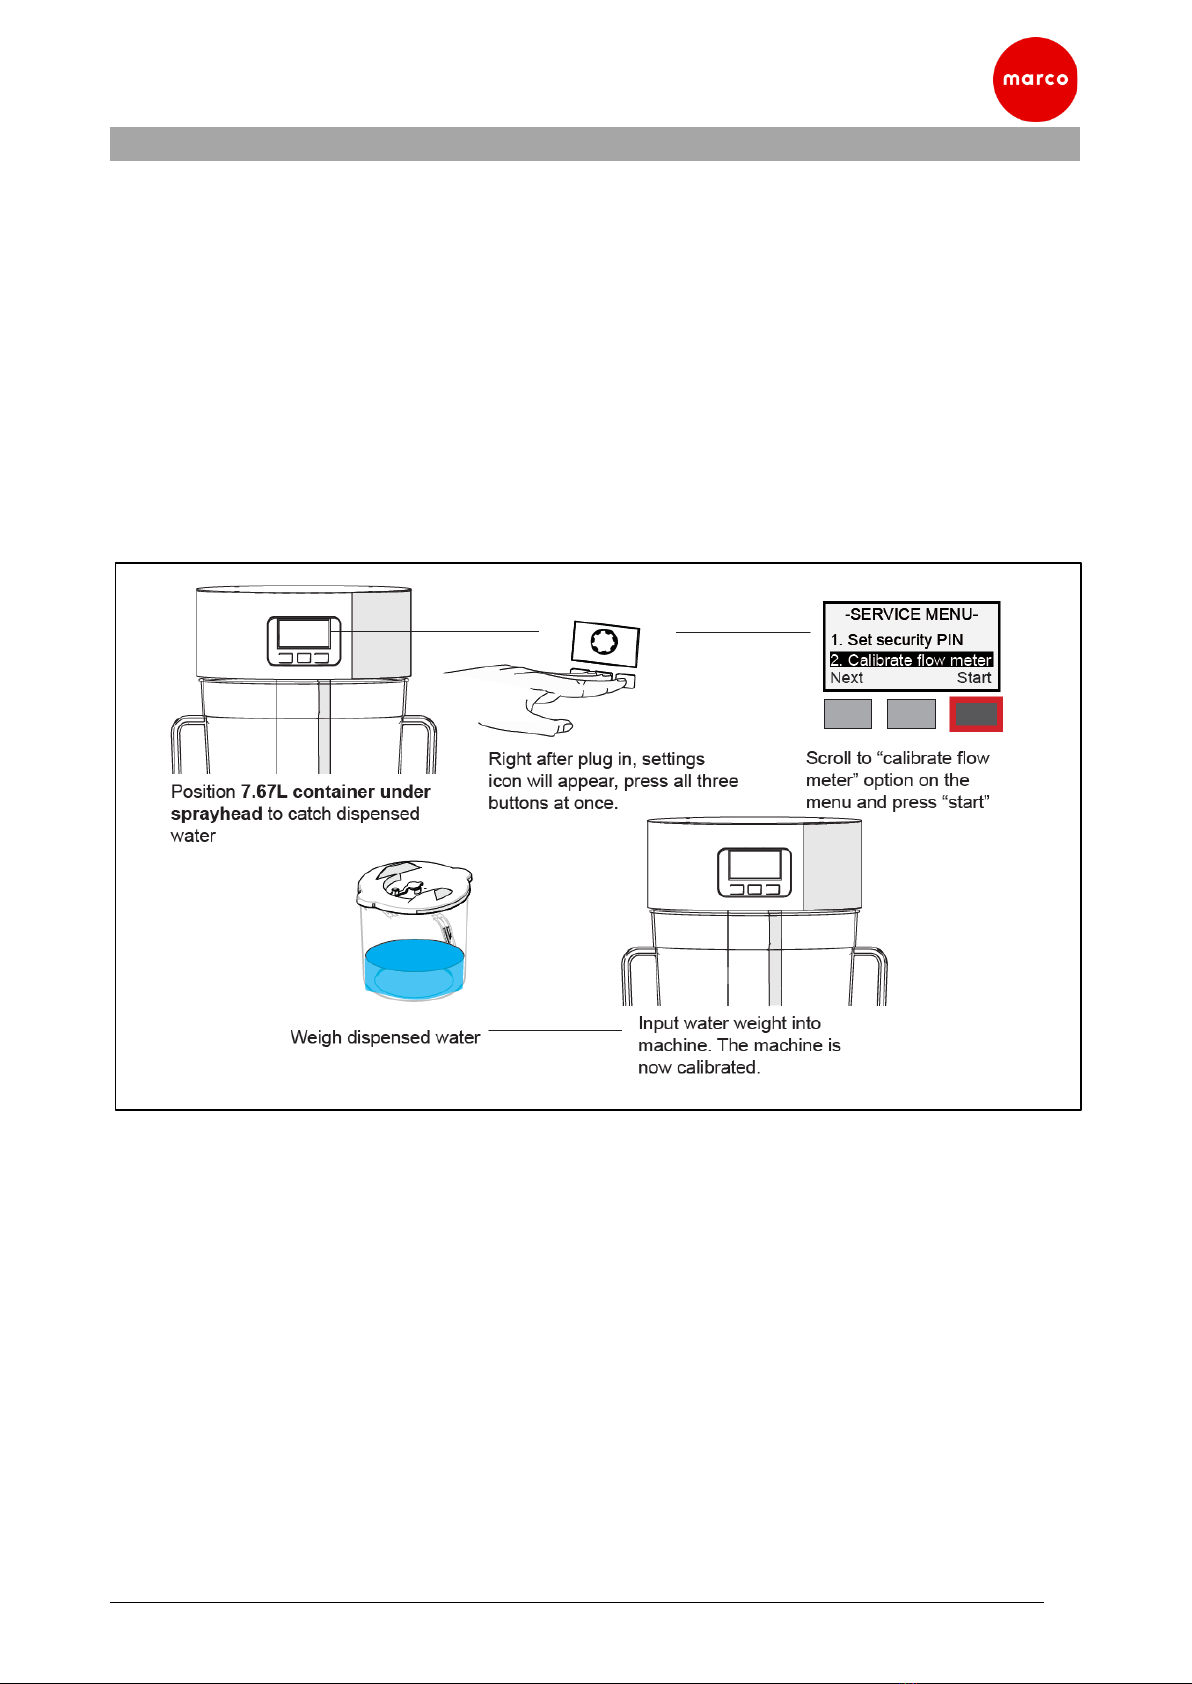
5.2 Dispense Calibration Procedure (Required to be completed on initial startup)
The Dispense Calibration procedure should only be run if the machine has had major component
change, such as PCB or inlet solenoid that requires calibration settings to be re-done, or there has
been a change in the mains water pressure. Calibration option only remains on the screen for 5
seconds after power up. If you miss this window, power off the machine and try again.
Once the water weight has been input into the machine, a dispense operation can be performed
to check the accuracy of dispense.

Page 8 of 24
6. OVERVIEW & OPERATION
6.1 ColdBRU –Operation
When performing this operation, use the 7.67L container to catch dispensed water. This can then
be weighed to confirm the machine is within spec

Page 9 of 24

Page 10 of 24
7. MENU NAVI
Este manual sirve para los siguientes modelos
2
Tabla de contenidos
Otros manuales de Dispensador de bebidas de Marco


Manuales populares de Dispensador de bebidas de otras marcas


Cecilware
Cecilware 2K-GB-LD Manual

Sure Vend
Sure Vend 673 Manual de usuario

Cornelius
Cornelius 2 Flavor Post-Mix Cold Coffee Dispenser Quest... Manual de usuario

Nostalgia Electrics
Nostalgia Electrics KEG7000SS Manual de usuario

Bunn
Bunn LCR-3 HV Guía de solución de problemas

Servend
Servend SV-200 Manual de usuario


