LG M197WAP Manual de usuario

LCD MONITOR TV
SERVICE MANUAL
CAUTION
BEFORE SERVICING THE CHASSIS,
READ THE SAFETY PRECAUTIONS IN THIS MANUAL.
CHASSIS : LP92C
MODEL : M197WAP M197WAP-PMM
North/Latin A erica http://aic.lgservice.co
Europe/Africa http://eic.lgservice.co
Asia/Oceania http://biz.lgservice.co
Internal Use Only
P/NO : MFL63261606(1002-REV00) Printed in Korea

LGE Internal Use OnlyCopyright LG Electronics. Inc. All right reserved.
Only for training and service purposes
CONTENTS
CONTENTS .............................................................................................. 2
PRODUCT SAFETY ..................................................................................3
SPECIFICATION ........................................................................................6
ADJUSTMENT INSTRUCTION ...............................................................14
TROUBLE SHOOTING ............................................................................20
BLOCK DIAGRAM...................................................................................24
EXPLODED VIE .................................................................................. 25
SVC. SHEET ...............................................................................................
- 2 -

LGE Internal Use OnlyCopyright LG Electronics. Inc. All right reserved.
Only for training and service purposes - 3 -
PRECAUTION
ARNING FOR THE SAFETY-RELATED COMPONENT.
There are some special components used in LCD
monitor that are important for safety. These parts are
marked on the schematic diagram and the
Exploded View It is essential that these critical parts
should be replaced with the manufacturer’s specified
parts to prevent electric shock, fire or other hazard.
Do not modify original design without obtaining written
permission from manufacturer or you will void the
original parts and labor guarantee.
TAKE CARE DURING HANDLING THE LCD MODULE
ITH BACKLIGHT UNIT.
Must mount the module using mounting holes arranged
in four corners.
Do not press on the panel, edge of the frame strongly
or electric shock as this will result in damage to the
screen.
Do not scratch or press on the panel with any sharp
objects, such as pencil or pen as this may result in
damage to the panel.
Protect the module from the ESD as it may damage the
electronic circuit (C-MOS).
Make certain that treatment person’s body are
grounded through wrist band.
Do not leave the module in high temperature and in
areas of high humidity for a long time.
The module not be exposed to the direct sunlight.
Avoid contact with water as it may a short circuit within
the module.
If the surface of panel become dirty, please wipe it off
with a soft material. (Cleaning with a dirty or rough cloth
may damage the panel.)
ARNING
BE CAREFUL ELECTRIC SHOCK !
If you want to replace with the new backlight (CCFL) or
inverter circuit, must disconnect the AC adapter
because high voltage appears at inverter circuit about
650Vrms.
Handle with care wires or connectors of the inverter
circuit. If the wires are pressed cause short and may
burn or take fire.
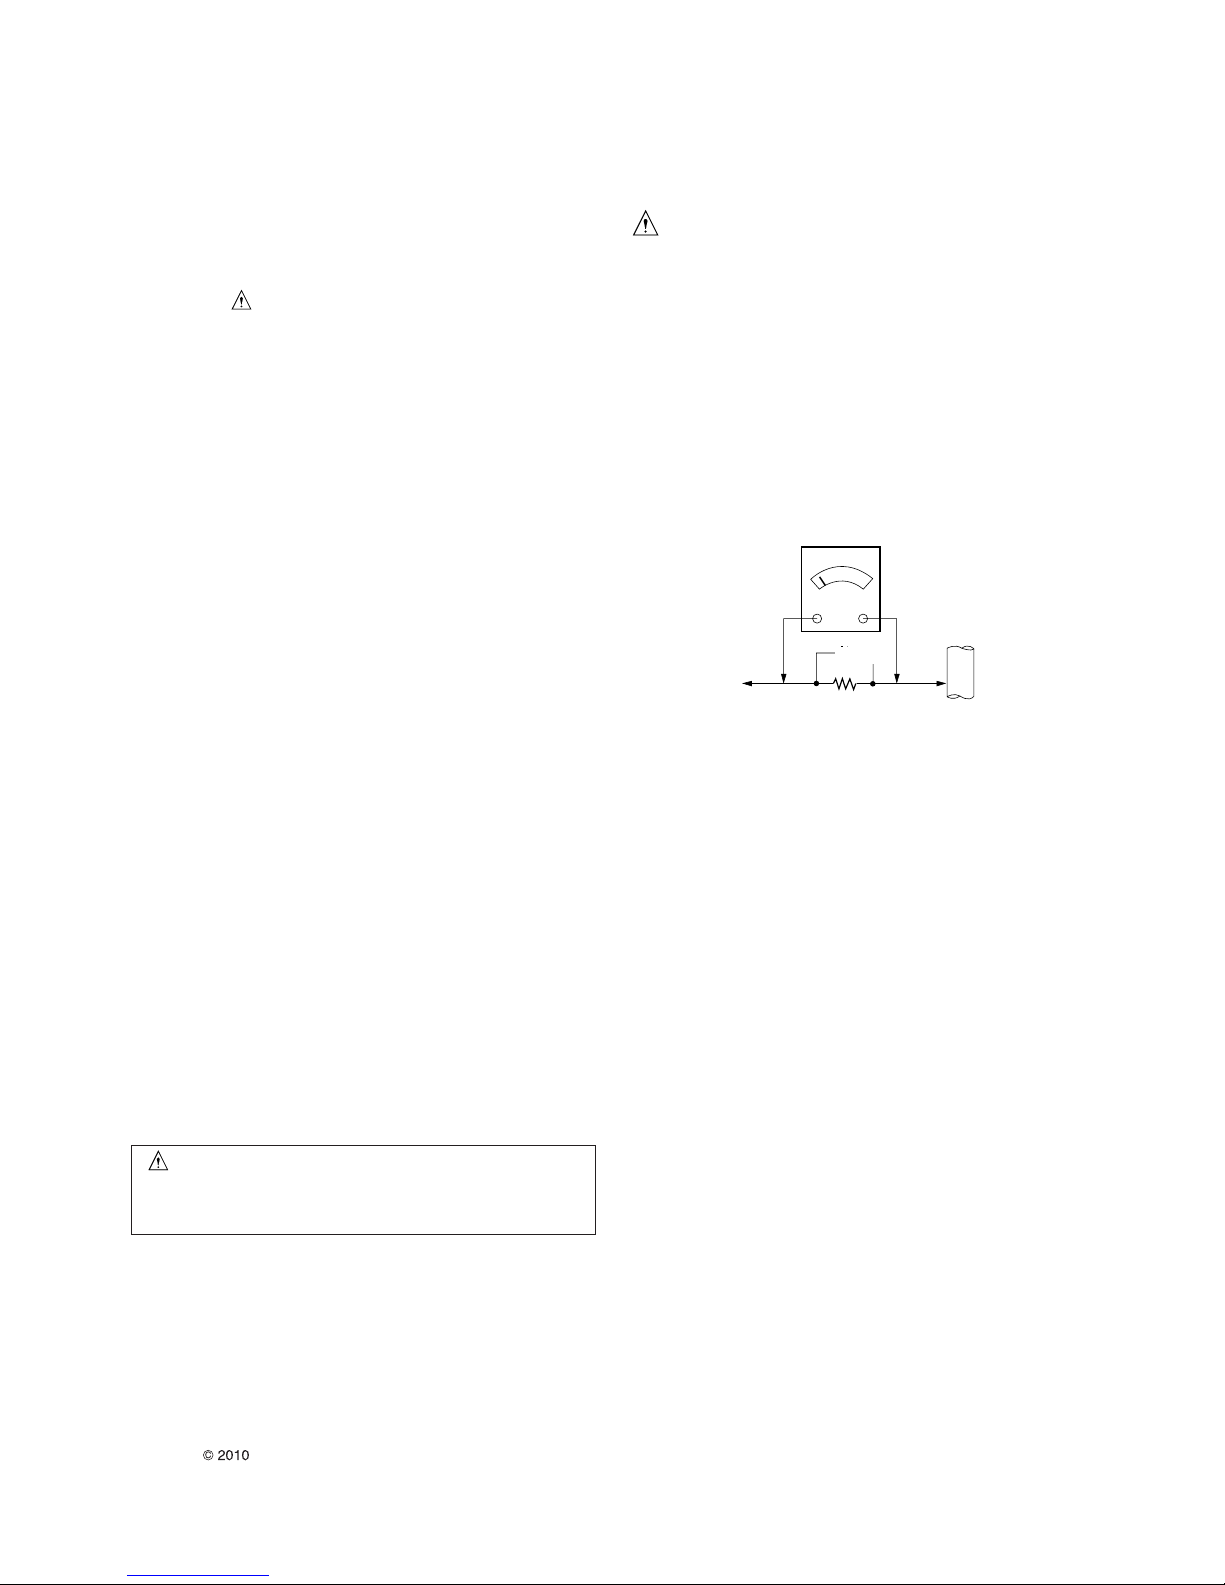
Leakage Current Hot Check Circuit
Replaceable batteries
* CAUTION
RISK OF EXPLOSION IF BATTERY IS REPLACED BY
AN INCORRECT TYPE.
DISPOSE OF USED BATTERIES ACCORDING TO
THE INSTRUCTIONS
CAUTION
Please use only a plastic screwdriver to protect yourself
from shock hazard during service operation.
1.5 Kohm/10W
To Instrument's
exposed
METALLIC PARTS
Good Earth Ground
such as WATER PIPE,
CONDUIT etc.
AC Volt-meter
When 25A is impressed between Earth and 2nd Ground
for 1 second, Resistance must be less than 0.1
*Base on Adjustment standard
Ω
0.15uF

LGE Internal Use OnlyCopyright LG Electronics. Inc. All right reserved.
Only for training and service purposes - 4 -
CAUTION: Before servicing receivers covered by this service
manual and its supplements and addenda, read and follow the
SAFETY PRECAUTIONS on page 3 of this publication.
NOTE: If unforeseen circumstances create conflict between the
following servicing precautions and any of the safety precautions on
page 3 of this publication, always follow the safety precautions.
Remember: Safety First.
General Servicing Precautions
1. Always unplug the receiver AC power cord from the AC power
source before;
a. Removing or reinstalling any component, circuit board
module or any other receiver assembly.
b. Disconnecting or re-connecting any receiver electrical plug
or other electrical connection.
c. Connecting a test substitute in parallel with an electrolytic
capacitor in the receiver.
CAUTION: A wrong part substitution or incorrect polarity
installation of electrolytic capacitors may result in an
explosion hazard.
2. Test high voltage only by measuring it with an appropriate high
voltage meter or other voltage measuring device (DVM,
FETVOM, etc) equipped with a suitable high voltage probe.
Do not test high voltage by "drawing an arc".
3. Do not spray chemicals on or near this receiver or any of its
assemblies.
4. Unless specified otherwise in this service manual, clean
electrical contacts only by applying the following mixture to the
contacts with a pipe cleaner, cotton-tipped stick or comparable
non-abrasive applicator; 10% (by volume) Acetone and 90% (by
volume) is opropyl alcohol (90%-99% strength)
CAUTION: This is a flammable mixture.
Unless specified otherwise in this service manual, lubrication of
contacts in not required.
5. Do not defeat any plug/socket B+ voltage interlocks with which
receivers covered by this service manual might be equipped.
6. Do not apply AC power to this instrument and/or any of its
electrical assemblies unless all solid-state device heat sinks are
correctly installed.
7. Always connect the test receiver ground lead to the receiver
chassis ground before connecting the test receiver positive
lead.
Always remove the test receiver ground lead last.
8. Use with this receiver only the test fixtures s ecified in this
service manual.
CAUTION: Do not connect the test fixture ground strap to any
heat sink in this receiver.
Electrostatically Sensitive (ES) Devices
Some semiconductor (solid-state) devices can be damaged easily
by static electricity. Such components commonly are called
Electrostatically Sensitive (ES) Devices. Examples of typical ES
devices are integrated circuits and some field-effect transistors and
semiconductor "chip" components. The following techniques
should be used to help reduce the incidence of component
damage caused by static by static electricity.
1. Immediately before handling any semiconductor component or
semiconductor-equipped assembly, drain off any electrostatic
charge on your body by touching a known earth ground.
Alternatively, obtain and wear a commercially available
discharging wrist strap device, which should be removed to
prevent potential shock reasons prior to applying power to the
unit under test.
2. After removing an electrical assembly equipped with ES
devices, place the assembly on a conductive surface such as
aluminum foil, to prevent electrostatic charge buildup or
exposure of the assembly.
3. Use only a grounded-tip soldering iron to solder or unsolder ES
devices.
4. Use only an anti-static type solder removal device. Some solder
removal devices not classified as "anti-static" can generate
electrical charges sufficient to damage ES devices.
5. Do not use freon-propelled chemicals. These can generate
electrical charges sufficient to damage ES devices.
6. Do not remove a replacement ES device from its protective
package until immediately before you are ready to install it.
(Most replacement ES devices are packaged with leads
electrically shorted together by conductive foam, aluminum foil
or comparable conductive material).
7. Immediately before removing the protective material from the
leads of a replacement ES device, touch the protective material
to the chassis or circuit assembly into which the device will be
installed.
CAUTION: Be sure no power is applied to the chassis or circuit,
and observe all other safety precautions.
8. Minimize bodily motions when handling unpackaged
replacement ES devices. (Otherwise harmless motion such as
the brushing together of your clothes fabric or the lifting of your
foot from a carpeted floor can generate static electricity
sufficient to damage an ES device.)
General Soldering Guidelines
1. Use a grounded-tip, low-wattage soldering iron and appropriate
tip size and shape that will maintain tip temperature within the
range or 500ºF to 600ºF.
2. Use an appropriate gauge of RMA resin-core solder composed
of 60 parts tin/40 parts lead.
3. Keep the soldering iron tip clean and well tinned.
4. Thoroughly clean the surfaces to be soldered. Use a mall wire-
bristle (0.5 inch, or 1.25cm) brush with a metal handle.
Do not use freon-propelled spray-on cleaners.
5. Use the following unsoldering technique
a. Allow the soldering iron tip to reach normal temperature.
(500ºF to 600ºF)
b. Heat the component lead until the solder melts.
c. Quickly draw the melted solder with an anti-static, suction-
type solder removal device or with solder braid.
CAUTION: Work quickly to avoid overheating the circuit
board printed foil.
6. Use the following soldering technique.
a. Allow the soldering iron tip to reach a normal temperature
(500ºF to 600ºF)
b. First, hold the soldering iron tip and solder the strand against
the component lead until the solder melts.
c. Quickly move the soldering iron tip to the junction of the
component lead and the printed circuit foil, and hold it there
only until the solder flows onto and around both the
component lead and the foil.
CAUTION: Work quickly to avoid overheating the circuit
board printed foil.
d. Closely inspect the solder area and remove any excess or
splashed solder with a small wire-bristle brush.
SERVICING PRECAUTIONS

LGE Internal Use OnlyCopyright LG Electronics. Inc. All right reserved.
Only for training and service purposes - 5 -
IC Remove/Replacement
Some chassis circuit boards have slotted holes (oblong) through
which the IC leads are inserted and then bent flat against the
circuit foil. When holes are the slotted type, the following technique
should be used to remove and replace the IC. When working with
boards using the familiar round hole, use the standard technique
as outlined in paragraphs 5 and 6 above.
Removal
1. Desolder and straighten each IC lead in one operation by gently
prying up on the lead with the soldering iron tip as the solder
melts.
2. Draw away the melted solder with an anti-static suction-type
solder removal device (or with solder braid) before removing the
IC.
Re lacement
1. Carefully insert the replacement IC in the circuit board.
2. Carefully bend each IC lead against the circuit foil pad and
solder it.
3. Clean the soldered areas with a small wire-bristle brush.
(It is not necessary to reapply acrylic coating to the areas).
"Small-Signal" Discrete Transistor
Removal/Replacement
1. Remove the defective transistor by clipping its leads as close as
possible to the component body.
2. Bend into a "U" shape the end of each of three leads remaining
on the circuit board.
3. Bend into a "U" shape the replacement transistor leads.
4. Connect the replacement transistor leads to the corresponding
leads extending from the circuit board and crimp the "U" with
long nose pliers to insure metal to metal contact then solder
each connection.
Power Output, Transistor Device
Removal/Replacement
1. Heat and remove all solder from around the transistor leads.
2. Remove the heat sink mounting screw (if so equipped).
3. Carefully remove the transistor from the heat sink of the circuit
board.
4. Insert new transistor in the circuit board.
5. Solder each transistor lead, and clip off excess lead.
6. Replace heat sink.
Diode Removal/Replacement
1. Remove defective diode by clipping its leads as close as
possible to diode body.
2. Bend the two remaining leads perpendicular y to the circuit
board.
3. Observing diode polarity, wrap each lead of the new diode
around the corresponding lead on the circuit board.
4. Securely crimp each connection and solder it.
5. Inspect (on the circuit board copper side) the solder joints of
the two "original" leads. If they are not shiny, reheat them and if
necessary, apply additional solder.
Fuse and Conventional Resistor
Removal/Replacement
1. Clip each fuse or resistor lead at top of the circuit board hollow
stake.
2. Securely crimp the leads of replacement component around
notch at stake top.
3. Solder the connections.
CAUTION: Maintain original spacing between the replaced
component and adjacent components and the circuit board to
prevent excessive component temperatures.
Circuit Board Foil Repair
Excessive heat applied to the copper foil of any printed circuit
board will weaken the adhesive that bonds the foil to the circuit
board causing the foil to separate from or "lift-off" the board. The
following guidelines and procedures should be followed whenever
this condition is encountered.
At IC Connections
To repair a defective copper pattern at IC connections use the
following procedure to install a jumper wire on the copper pattern
side of the circuit board. (Use this technique only on IC
connections).
1. Carefully remove the damaged copper pattern with a sharp
knife. (Remove only as much copper as absolutely necessary).
2. carefully scratch away the solder resist and acrylic coating (if
used) from the end of the remaining copper pattern.
3. Bend a small "U" in one end of a small gauge jumper wire and
carefully crimp it around the IC pin. Solder the IC connection.
4. Route the jumper wire along the path of the out-away copper
pattern and let it overlap the previously scraped end of the good
copper pattern. Solder the overlapped area and clip off any
excess jumper wire.
At Other Connections
Use the following technique to repair the defective copper pattern
at connections other than IC Pins. This technique involves the
installation of a jumper wire on the component side of the circuit
board.
1. Remove the defective copper pattern with a sharp knife.
Remove at least 1/4 inch of copper, to ensure that a hazardous
condition will not exist if the jumper wire opens.
2. Trace along the copper pattern from both sides of the pattern
break and locate the nearest component that is directly
connected to the affected copper pattern.
3. Connect insulated 20-gauge jumper wire from the lead of the
nearest component on one side of the pattern break to the lead
of the nearest component on the other side.
Carefully crimp and solder the connections.
CAUTION: Be sure the insulated jumper wire is dressed so the
it does not touch components or sharp edges.

LGE Internal Use OnlyCopyright LG Electronics. Inc. All right reserved.
Only for training and service purposes - 6 -
SPECIFICATION
NOTE : Specifications and others are subject to change without notice for improvement
.
1. Application Range.
This spec sheet is applied to the 47 cm(18.5 inch) LCD
Monitor TV used LP92C chassis.
2. Specification
Each part is tested as below without special appointment
2.1 Temperature : 25 °C ± 5 °C (77 °F ± 9 °F),
CST : 40 °C ± 5° C
2.2 Relative Humidity : 65 % ±10 %
2.3 Power Voltage : Standard input voltage
(100 V - 240 V ~, 50 / 60 Hz)
Standard Voltage of each products is marked by models
2.4 Specification and performance of each parts are followed
each drawing and specification by part number in
accordance with BOM .
2.5 The receiver must be operated for about 5 minutes prior to
the adjustment.
3. Test method
3.1 Performance : LGE TV test method followed.
3.2 Demanded other specification
Safety : CE, IEC specification, UL6500
EMC : CE, IEC, FCC Part 15Class A/ B
Safety : IEC/EN60065
EMI : EN55013
EMS : EN55020

- 7 - LGE Internal Use OnlyCopyright LG Electronics. Inc. All right reserved.
Only for training and service purposes
No Item Specification Unit Remark
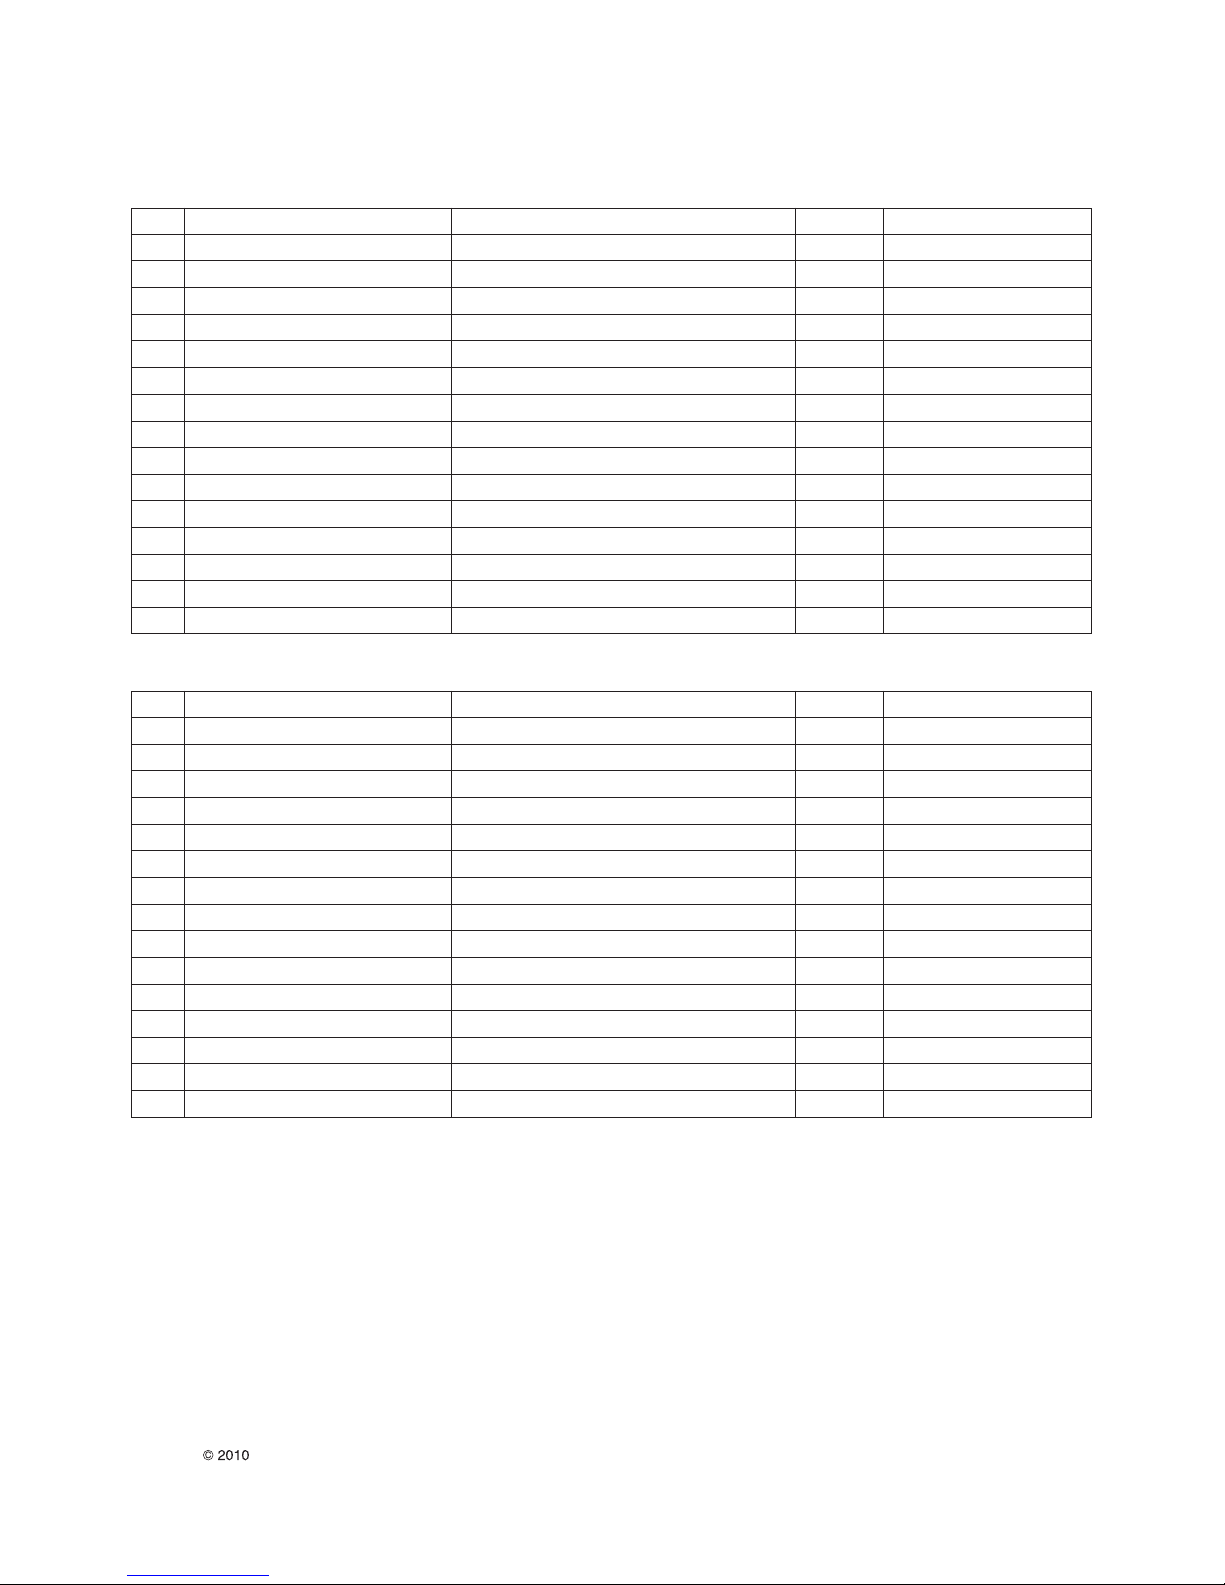
1 Type TFT Color LCD Module
2 Diagonal Size 18.51 inches (470.1mm) diagonal
3 Active Display area 413.4(H) x 234.0(V) mm
4 Outline Dimension 430.4(H) x 254.6(V) x 13.0(D) mm Typ.
5 Aspect Ratio 16:9
6 Pixel Number 1366 x RGB x 768 pixel
7 Pixel Pitch 0.10(H) x 0.30(V) mm
8 Color arrangement RGB vertical Stripe
9 Color Depth 16.7M color with Advanced FRC
10 Electrical Interface LVDS 1port
11 Surface Treatment Hard coating(3H) & Anti-glare
12 Operating Mode Transmissive mode & Normally White
13 Backlight Unit 2 CCFL (2 lamps)
14 Response Time Rising Time : 1.1 + Falling Time : 3.9 ms Typ.
15 Color Gamut Normal 72% Panel(CIE1931)
2) LGD, LM185WH1-TLF8 ( P/N : EAJ61009301)
No Item Specification Unit Remark
1 Type TFT Color LCD Module
2 Diagonal Size 18.51 inches (470.1mm) diagonal
3 Active Display area 413.4(H) x 234.0(V) mm
4 Outline Dimension 430.4(H) x 254.6(V) x 13.0(D) mm Typ. (Without Inverter)
5 Aspect Ratio 16:9
6 Pixel Number 1366 x RGB x 768 pixel
7 Pixel Pitch 0.30(H) x 0.30(V) mm
8 Color arrangement RGB vertical Stripe
9 Color Depth 16.7M color with Advanced FRC
10 Electrical Interface LVDS 1port
11 Surface Treatment Hard coating(3H) & Anti-glare
12 Operating Mode Transmissive mode & Normally White
13 Backlight Unit 2 CCFL (2 lamps)
14 Response Time Rising Time : 1.1 + Falling Time : 3.9 ms Typ.
15 Color Gamut Normal 72% Panel(CIE1931)
4. Module Specification
1) LGD LM185WH1_TLF7 ( P/N : EAJ60989201)

5. General Specification
5.1 TV
- 8 - LGE Internal Use OnlyCopyright LG Electronics. Inc. All right reserved.
Only for training and service purposes
No Item Specification Remarks
1 Market Central and South America
2 Broadcasting system NTSC
PAL-M
PAL-N
BAND NTSC
3 Receiving system VHF 2 ~ 13
UHF 14 ~ 69
CATV 1 ~ 125
4 Receiving system Upper Heterodyne
5 Component Input (1EA) Y/Cb/Cr
Y/Pb/Pr
6 CVBS Input (1EA) PAL, SECAM, NTSC 4 System(Rear) :PAL50, SECAM, NTSC, PAL60
7 RGB Input RGB-PC Analog(D-SUB 15Pin)
8 HDMI Input (1EA) HDMI1-DTV/PC HDMI version 1.3 , Support HDCP
9 Audio Input (3EA) RGB-PC/ DVI Audio
Component L/R Input
CVBS
10 Earphone out (1EA) Antenna, AV, Component,
RGB-PC, HDMI1

No Item Specification Remarks
1 Supported Sync. Type Separate Sync.(RGB), Digital(DVI)
2 Operating Frequency Analog Horizontal 30 ~ 61kHz
Vertical 56 ~ 61 Hz
Digital Horizontal 30 ~ 61kHz
Vertical 56 ~ 61 Hz
3 Resolution Analog Max. 1366x768 @ 60Hz
Recommend 1360x768 @ 60Hz
Digital Max. 1366x768 @ 60Hz
Recommend 1360x768 @ 60Hz
4 Input Voltage Voltage :100 – 240 Vac, 50 or 60Hz
5 Inrush Current Cold Start : 50 A Hot : 120 A
6 Operating Condition Sync (H/V) Video LED Wattage
Power S/W On On Typ. On/On Active Blue 25W
mode Max On/On Active Blue 30W
Sleep mode Off/On Off Amber 1W RGB
On/Off
Power S/W Off Off mode - Off Off 0.5W Just operate power key
and remote controller power button
7 MTBF 50,000 HRS with 90% Confidence leve Lamp Life: 50,000 Hours(min)
8 Using Altitude 5,000 m (for Reliability) 3,000m(for FOS)
9 Operating Environment Temp : 10°C ~ 35°C
Humidity : 20 % ~ 80 %
10 Storage Environment Temp : -10°C~60°C non condensing
Humidity : 5 % ~ 90 % non condensing
LGE Internal Use OnlyCopyright LG Electronics. Inc. All right reserved.
Only for training and service purposes - 9 -
5.2 RGB - PC

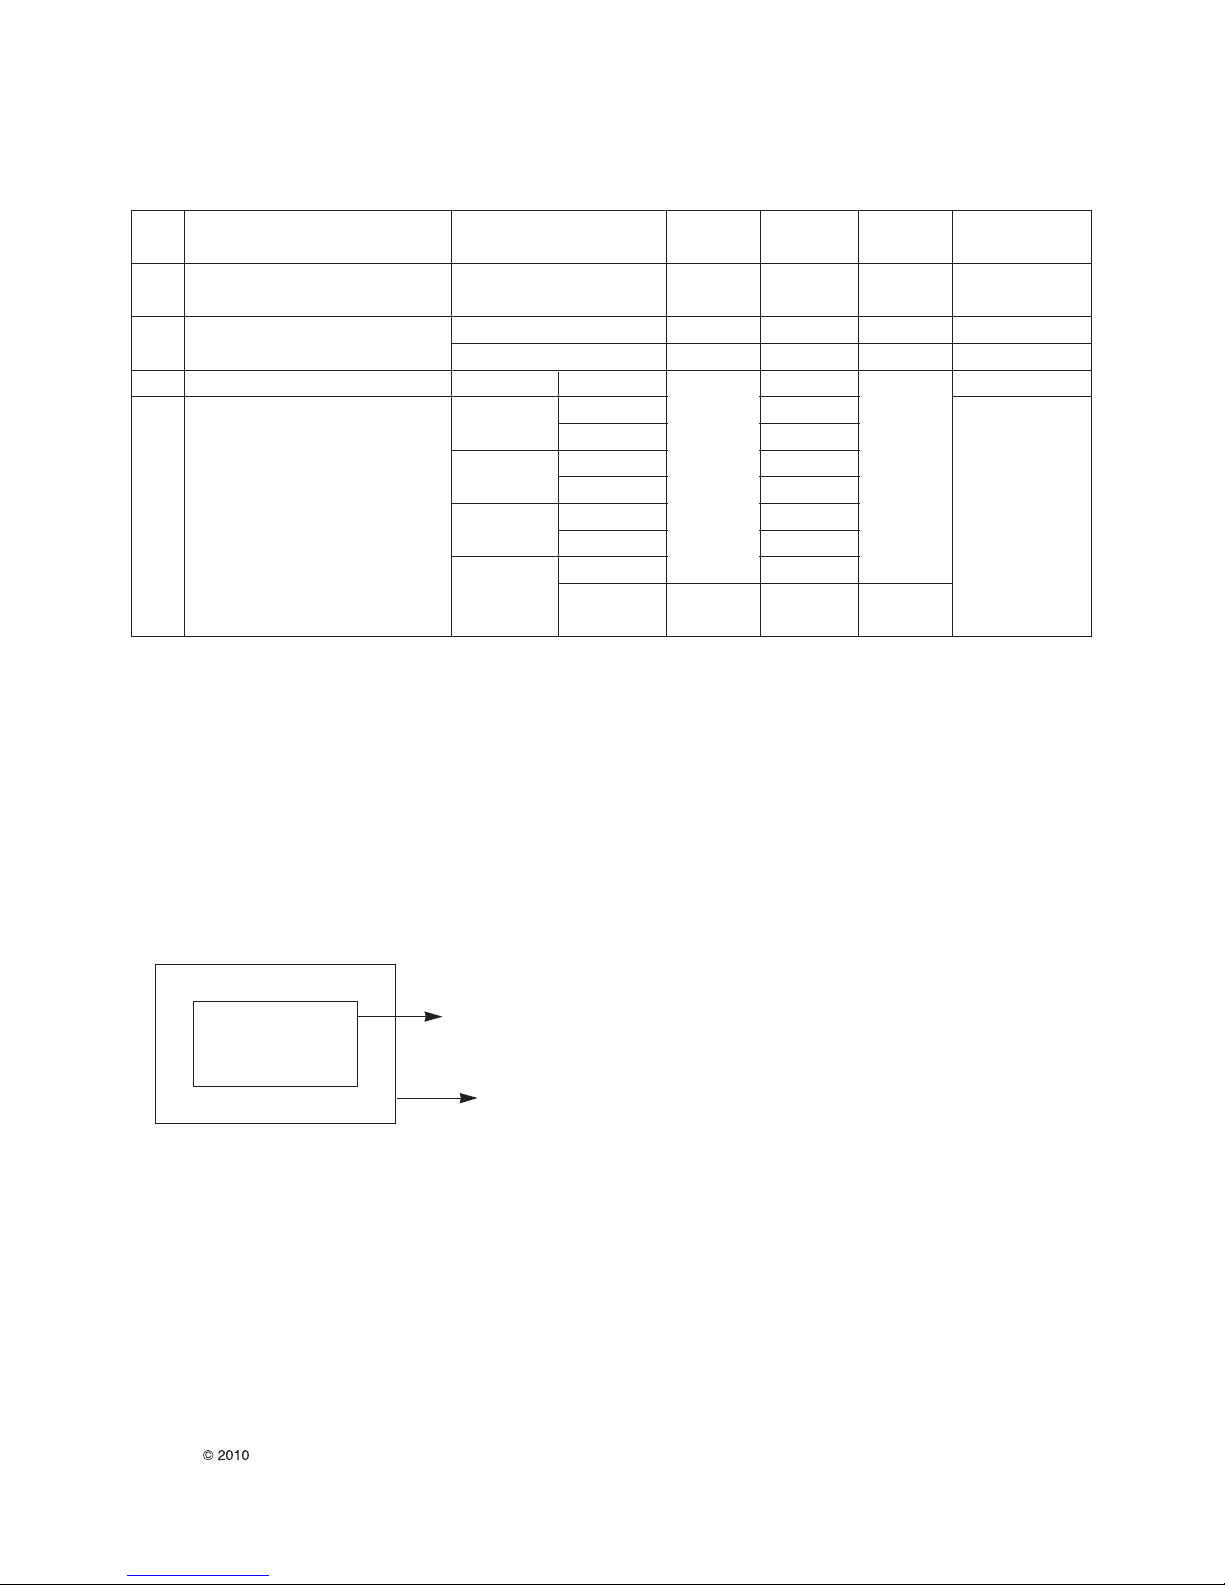
No. Item Specification Min. Typ. Max. Remark
1 Viewing Angle[CR>10] Right/Left 70/70 85/85 - CR >10
Up/Down 60/70 75/85
2 Luminance Luminance (cd/m2) 180 250 -
Variation(%) 75 Min/ Max
3 Contrst Ratio CR 600 1000
Full white/Full black
4 Color Coordinates [CIE1931] White WX0.313
WYTyp. 0.329 Typ.
RED Xr -0.03 0.644 +0.03 RGB
Yr0.335 Vivid, 6500K
Green Xg0.304
Full white(100IRE)
Yg0.613
Blue Xb0.146
Yb0.071
LGE Internal Use OnlyCopyright LG Electronics. Inc. All right reserved.
Only for training and service purposes - 10 -
6. Chroma & Brightness
18.5” LCD Module (for more details, refer to the module spec.)
* Optical Test Condition
- Surrounding Brightness Level : dark
- Surrounding Temperature : 25±5°C
- warm-up Time : 30 Min
- Contrast, Brightness : Outgoing condition
- *Incase of Vivid Mode, high level saturation may be occurred. Check gray linearity at standard mode.
* Active area
1. Active area of LCD PANEL is in bezel of cabinet.
2. Interval between active area and bezel
|A-B|<1.0 mm , |C-D|<1.0 mm
A: Interval between left of active area and bezel
B: Interval between right of active area and bezel
C: Interval between top of active area and bezel
D: Interval between bottom of active area and bezel
C
B
D
A
Active Area
Bezel
Este manual sirve para los siguientes modelos
1
Tabla de contenidos
Otros manuales de Televisor LCD de LG

LG
LG 32LE7500 Manual de usuario

LG
LG 32LW4500 Manual de usuario

LG
LG 32LD450 Manual de usuario

LG
LG 32LS5750 Manual de usuario

LG
LG 42LS3100-TA.UFCWLJK Manual de usuario

LG
LG RZ-20LA66 Manual de usuario

LG
LG 32LG40 Series Guía de instalación

LG
LG 22LG3DCH Manual de usuario

LG
LG 32LS5600 Manual de usuario

LG
LG 19LE5300 Manual de usuario

LG
LG 37LK457C Manual de usuario

LG
LG 32LD650H-ZA Manual de usuario

LG
LG 42LK550 Manual de usuario

LG
LG 22LF15R Manual de usuario

LG
LG 32LG2100 Manual de usuario

LG
LG 65UF770T.ATR Manual de usuario

LG
LG 22LK230 Manual de usuario

LG
LG 37LH200C Manual de usuario

LG
LG 42LH50 Series Manual de usuario

LG
LG 32LX1D Manual de usuario