Kystar K2 Manual de usuario

Visual switcher
K2
User manual
Beijing Kystar Technology Co., Ltd.

Statement
Thank you for using our products.
Copyright of this manual belongs to our company,without our written permission,
reproduction, transfer, distribution and storage of any part of this document in any form is strictly
prohibited。The company reserves the right to modify and improve any product features described
in this document without prior notice.
This product may come with related control software, which is for your use only, and the
ownership of the software is owned by the company. You can make copies, but only for personal
use. If you use this software for other purposes, especially for commercial purposes, please contact
us. The company reserves the right to pursue legal responsibility for infringements.
Please read this manual carefully before use. Improper operation may cause damage to the
product. This product is a live product. Please pay attention to the safety of electricity. If you do not
follow the instructions in this manual and take improper operations, the company will not be held
liable for the property damage and personal injury caused. If this article conflicts with local laws
and regulations, the local laws and regulations shall prevail.
Version Information
Version: v1.0
Release date: October 2018

Safety instructions
Power supply
The normal working power of this equipment is 100 ~ 220V AC, please make
sure to use this product within this voltage range.
High voltage
This device contains high voltage components.
Non-professionals do not disassemble
This equipment is not equipped with maintenance accessories for users to repair
and use by themselves, please do not open the case for operation by yourself.
Disassembly by yourself may cause irreparable damage to the equipment. If
repair is required, please contact the after-sales personnel.
Ensure good grounding
In order to protect the personal safety of the user, before use, please ensure that
the power cable is well grounded.
Keep away from strong magnetic fields, engines and transformers
In order to ensure the normal use of the equipment, please keep away from
strong magnetic fields, engines and transformers.
Pay attention to moisture
Keep the use environment dry. If the device is wet accidentally, do not connect
it to the power supply. Dry the device before using it.
Keep away from explosives
Do not use this product in a flammable or explosive environment.
Prevent liquid or conductive debris from entering the case
Conduct conductive materials such as liquids or metal scraps into the
equipment case. If it happens, immediately cut off the power, and then
reconnect the power supply after removing foreign objects.

Table of Contents
1 Product introduction....................................................................................................1
2 Hardware introduction................................................................................................1
2.1 Front panel............................................................................................................2
2.2 Rear panel.............................................................................................................5
2.3 Monitoring screen introduction............................................................................5
3 Equipment...................................................................................................................6
3.1 Main menu introduction.......................................................................................6
3.2 Layer information...............................................................................................14
3.3 Source information.............................................................................................17
4 Case explanation.......................................................................................................20
4.1 Horizontal stitching............................................................................................20
4.2 Vertical stitching................................................................................................21
4.3 Field stitching.....................................................................................................20
5 Other functions..........................................................................................................21
5.1 USB Play............................................................................................................21
5.2 Basemap settings................................................................................................22
5.3 Mouse editing operation.....................................................................................23
6 Technical Parameters................................................................................................26
7 Common problem .....................................................................................................27

1
1 Product introduction
K2 is a pinch-controlled video processor designed for small-pitch super-large screens. The device has built-in
video playback, editing, and control functions, supports two 4K @ 60HZ DPinputs, has multiple monitoring modes,
switching modes, complete backups, and is safe and reliable. The machine carries 9.6 million pixels, which meets
the needs of most field applications.
Functional characteristics:
1. Eight-way splicing output, four main and four backup custom splicing belts carrying 9.6 million pixels.
2. The single machine has a horizontal maximum of 16000 pixels and a vertical maximum of 8000 pixels.
3. Support two 4K @ 60Hz DP inputs, the maximum resolution can reach 3840 * 2160 @ 60Hz or 7680 *
1080 @@ 60Hz.
4. Support hot backup of input signal. When input signal is lost, it can automatically switch to designated
backup signal.
5. Embedded operating system, users can observe the current playback screen and all input signals in real
time, and complete the WYSIWYG layout operation.
6. Supports built-in storage and external U disk independent playback function.
7. Support external display, real-time monitor all input and output picture content.
8. Support real-time capture of the current output picture as a base map.
9. Supports scene pre-edit, which does not affect the current playback screen when setting the device
parameters. The setting can be pushed with one-click special effects to prevent misoperation. There is no black
screen, flickering, or stuttering in scene switching.
10. Seamless connection with Kommander series servers.
11. Support external mouse, operation and debugging on the monitor, more convenient.
12. A maximum of four input signals can be displayed on the screen at the same time, which can be
superimposed and roamed at will.
13. Supports more than ten kinds of scene switching effects such as straight cut, fade in and fade out, and
push screen. One-click Take and Cut are supported.
14. All layers support matting and transparencyadjustment, as well as arbitrary cropping of the signal source.
15. Support one-button black screen / still.
16. Supports adjusting the brightness and contrast of the input signal separately, and supports EDID online
editing.
17. Built-in military-grade power anti-interference filter to cope with the complex power environment on
site.

2
2 Hardware introduction
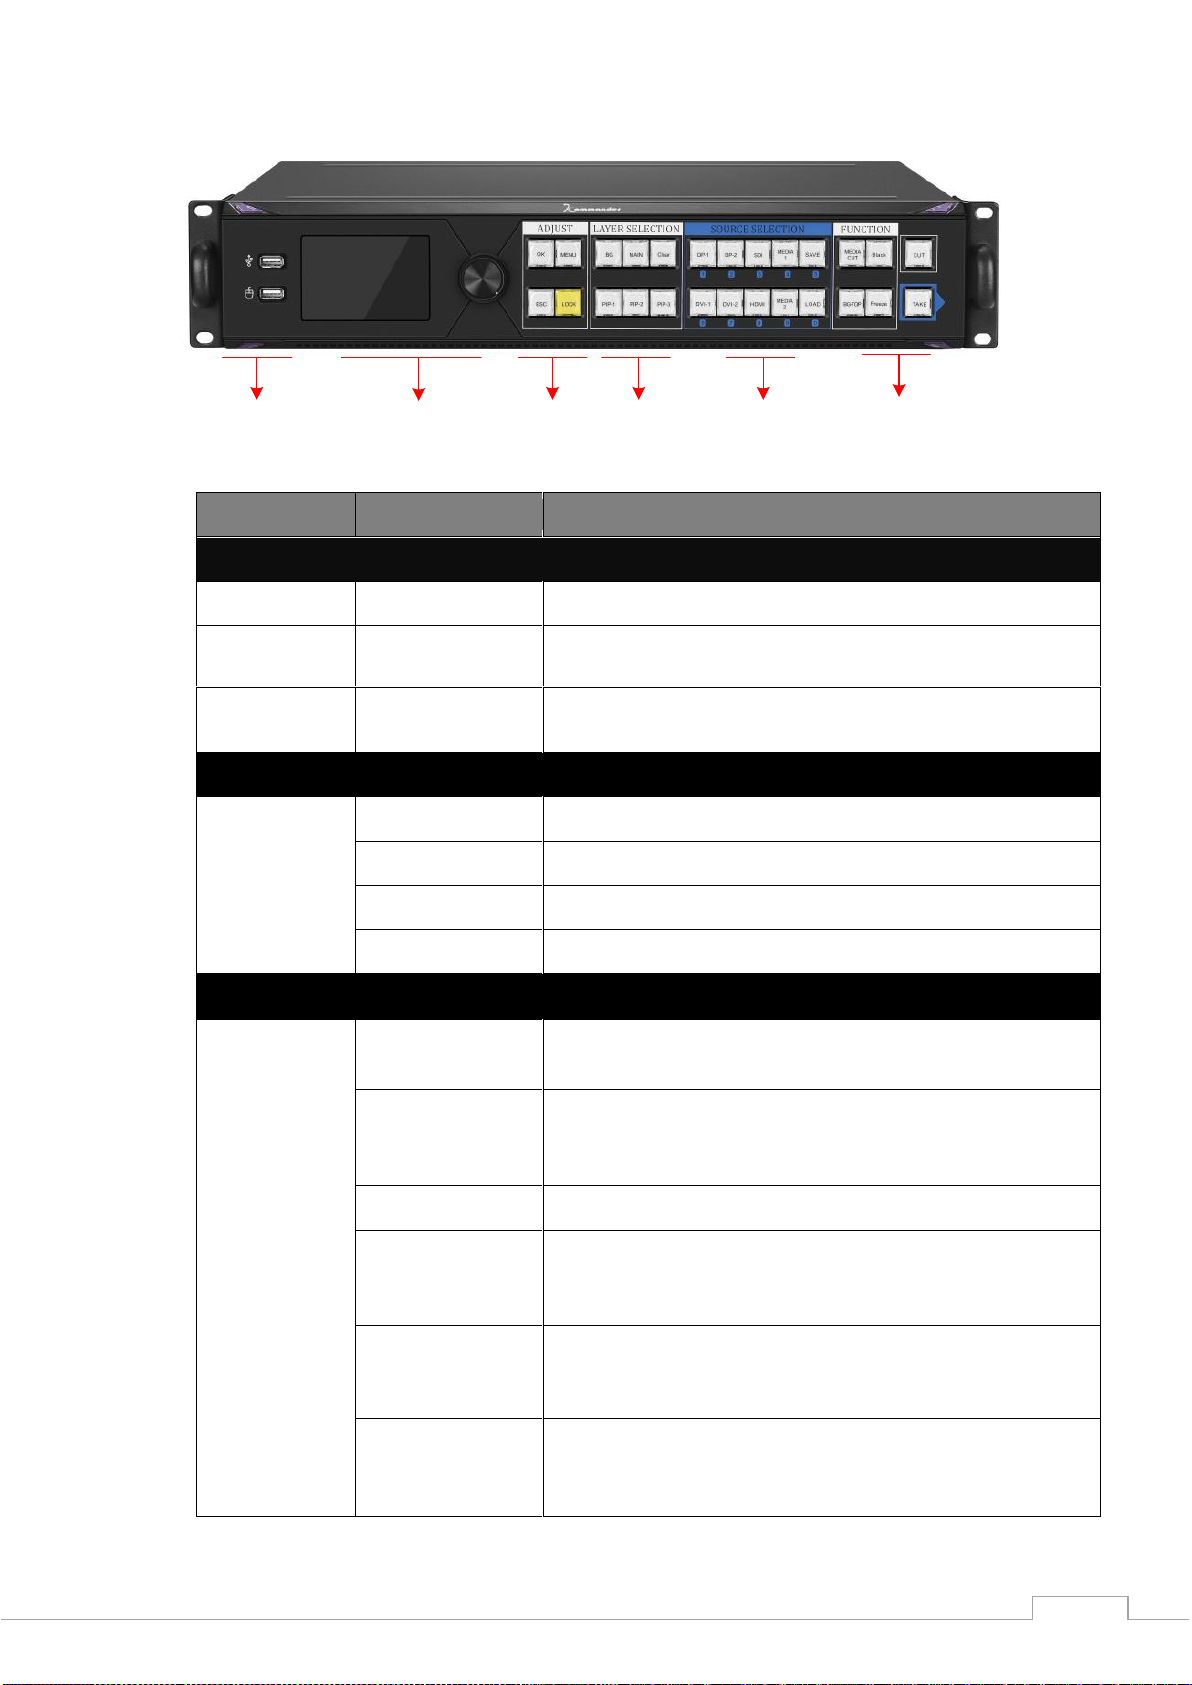
2.1 Front panel
K2 software-visual interactive management platform
The user can observe the current playback screen and all input signals in real time, and complete the layout
operation of WYSIWYG; the layout and playback content can be visually edited in preview mode, and the playback
is pushed after confirmation.
预览编辑区
预览编辑区
实时监控区
信号预览区

3
①②③④⑤⑥
Serial number
Knob name
Function introduction
LCD
①
USB interface
For U disk playback; mouse editing and control
②
LCD full color
information screen
Friendly human-machine interface interaction, full information
monitoring
Turn the knob
In menu operation, used to select menu items and adjust parameters
ADJUST
③
OK
Enter
MENU/LOCK
Menu key / Keyboard lock key
ESC
Back key to return to the previous menu
LOCK
Keyboard lock key
LAYER SELECTION
④
BG
Click to enter the basemap setting interface, you can open / close,
grab, and reload the basemap.
MAIN
Main screen, press and hold for 3 seconds to open the main screen.
After the layer is opened, click to enter the main screen setting
interface.
Clear
Turn off the specified layer.
PIP-2
Layer 2, press and hold for 3 seconds to turn on layer 2. After the
layer is turned on, click to enter the layer 2 setting interface.
PIP-3
Layer 3, press and hold for 3 seconds to turn on layer 3, after the
layer is turned on, click to enter the layer 3 setting interface.
PIP-1
Layer 1, press and hold for 3 seconds to turn on layer 1. After the
layer is turned on, click to enter the layer 1 setting interface.

4
SOURCE SELECTION
⑤
DVI1/1
DVI-1 input port selection key / recall preset 1, keyboard numeric
key 1.
DVI2/2
DVI-2 input port selection key / recall preset 2, keyboard numeric
key 2.
DP-1/3
DP-1 input port selection key / recall preset 3, keyboard number key
3.
DP-2/4
DP-2 input port selection button / recall preset 4, keyboard number
button 4.
LOAD/5
Preset recall key / recall preset 5, keyboard number key 5.
HDMI1/6
HDMI-1 input port selection key / recall preset 6, keyboard numeric
key 6.
HDMI2/7
HDMI-2 input port selection button / recall preset 7, keyboard
number button 7.
HDMI3/8
HDMI-3 input port selection key / recall preset 8, keyboard number
key 8.
SDI/9
SDI input port selection key / recall preset 9, keyboard numeric key
9.
SAVE/10
Preset save key / recall preset 10, keyboard numeric keys 10.
FUNCTION
⑥
AUX
Inverse signal function start button.
BLACK
Output black screen button preset call button
BG TOP
Basemap Sticky Button
Freeze
Output image freeze button
CUT AND TAKE
⑦
CUT
Straight cut switch between PVW and PGM buttons
TAKE
Special effect switch PVW and PGM button

5
2.2 Rear panel
port
Number of ports
Resolution / Specification
输入端口
DVI(24+1)
DVI×2
1920 × 1080/60HZ and backward compatible. VESA
Compliant Resolution
DP1.2
DP×2
3840 × 2160/60HZ and backward compatible. DP1.2
Compliant Resolution
HDMI
HDMI×1
1920× 1080/60HZ and backward compatible, compatible
with HDMI 1.3 and below
SDI
SDI×1
Supports SD-SDI, HD-SDI, and 3G-SDI
输出端口
1-A,1-B
2-A,2-B
3-A,3-B
4-A,4-B
DVI×8
(4 groups of two backups)
Support common output resolutions such as: 2048 ×1152 @
60Hz, 1920 ×1080 @ 60Hz, 1536 ×1536 @ 60HZ;
Support custom output resolution, up to 4000 wide, up to
2000;支持 60Hz/50Hz/30Hz 输出帧率
SDI-LOOP
SDI×1
3G-SDI, maximum support 1080P / 1080I
DP-OUT
DP×1
Support reverse look at any signal
DVI-
MONITOR
DVI×1
1920 ×1080 / 60HZ (fixed) surveillance port.
控制端口
COM
RS232×1
Serial control
ETH
100M×1
Network port control
音频口
USB
AUDIO×1
Audio output

6
2.3 Touch screen interface introduction
Serial number
Function introduction
①
Menu bar for debugging device stitching and other common functions
②
Layer area, you can turn the layer on and off here
③
PVW display area, where the display content can be edited
④
PGM display area, where you can monitor the actual display content
⑤
Switching area, where you can switch the display content of PVW and PGM
⑥
Signal source / plan management area, you can monitor and switch the signal
source or plan
⑦
Signal source / layer parameter viewing area, where you can view and modify
the relevant parameters of the signal source or layer
Tabla de contenidos
Otros manuales de Cambiar de Kystar