Kraun Wireless ADSL2/2plus Modem Router 54Mbps Manual de usuario

Manual
www.kraun.it
Warning
The manufacturer is under no circumstances liable for any unauthorised modifications made to
the product by the user or any other parties which may compromise its conformity and safety.
Cod. KN.3N
User’s Manual
ADSL2/2+ Wireless-N
Router 300Mbps

2
Manual
www.kraun.it
TABLE OF CONTENTS
Package Contents 4
Chapter 1. Introduction 4
1.1 Product Overview 4
ADSL 4
Wireless 4
1.2 Main Features 5
1.3 Factory Defaults 5
Chapter 2. Hardware Installation 6
2.1 The Front Panel 6
LED Explanation 6
2.2 The Back Panel 7
2.3 Installation Environment 7
2.4 Connecting the Router 8
Chapter 3. Quick Installation Guide 9
3.1 Congure PC 9
3.2 Login 12
Chapter 4. Software Conguration 15
4.1 Status 15
4.1.1 Device Info 15
4.1.2 System Log 16
4.1.3 Statistics 16
4.2 Quick Start 18
4.3 Interface Setup 18
4.3.1 Internet 19
Dynamic IP Address 20
Static IP Address 21
PPPoA/PPPoE 22
Bridge Mode 23
4.3.2 LAN 24
4.3.3 Wireless 26
WEP-64Bits 28
WEP-128Bits 28
WPA-PSK 28
WPA2-PSK 29
WPA-PSK/WPA2-PSK 29
4.4 Advanced Setup 32
4.4.1 Firewall 32
4.4.2 Routing 32
4.4.3 NAT 33
4.4.3.1 DMZ 34
4.4.3.2 Virtual Server 34
4.4.3.3 IP Address Mapping 35
4.4.4 QoS 37

3
Manual
www.kraun.it
4.4.5 VLAN 38
Assign VLAN PVID for each Interface 39
Dene VLAN Group 39
4.4.6 ADSL 40
4.5 Access Management 40
4.5.1 ACL 41
4.5.2 Filter 41
4.5.2.1 IP Filter 41
4.5.2.2 MAC Filter 45
4.5.2.3 Application Filter 47
4.5.2.4 URL 47
4.5.3 SNMP 48
4.5.4 UPnP 49
4.5.5 DDNS 49
4.5.6 CWMP 50
4.6 Maintenance 51
4.6.1 Administration 51
4.6.2 Time Zone 51
NTP Server automatically 52
PC’s Clock 52
Manually 53
4.6.3 Firmware 53
4.6.4 System Restart 55
4.6.5 Diagnostic 55
4.7 Help 56
Chapter 5. Appendix A: Specications 57

4
Manual
www.kraun.it
Package Contents
The following contents should be found in your package:
yOne Kraun ADSL2/2+ Wireless-N Router 300Mbps
yOne Power Adapter for Kraun ADSL2/2+ Wireless-N Router 300Mbps
yQuick Installation Guide
yOne RJ45 cable
yTwo RJ11 cables
yOne ADSL splitter
yOne Resource CD, which includes this User Manual
NOTE:
Make sure that the package contains the above items. If any of the listed items are damaged or missing, please
contact your distributor.
Chapter 1. Introduction
Thank you for choosing the Kraun ADSL2/2+ Wireless-N Router 300Mbps.
1.1 Product Overview
The device is designed to provide a simple and cost-eective ADSL Internet connection for a private Ethernet or
IEEE 802.11n/ IEEE 802.11g/ IEEE 802.11b wireless network.
The Kraun-300N connects to an Ethernet LAN or computers via standard Ethernet ports. The ADSL connection
is made using ordinary telephone line with standard connectors. Multiple workstations can be networked and
connected to the Internet using a single Wide Area Network (WAN) interface and single global IP address. The
advanced security enhancements, IP/MAC Filter, Application Filter and URL Filter can help to protect your
network from potentially devastating intrusions by malicious agents from the outside of your network.
Quick Start of the Web-based Utility is supplied and friendly help messages are provided for the conguration.
Network and Router management is done through the Web-based Utility which can be accessed through local
Ethernet using any web browser.
ADSL
The Kraun-300N supports full-rate ADSL2+ connectivity conforming to the ITU and ANSI specications. In addi-
tion to the basic DMT physical layer functions, the ADSL2+ PHY supports dual latency ADSL2+ framing (fast and
interleaved) and the I.432 ATM Physical Layer.
Wireless
In the most attentive wireless security, the Router provides multiple protection measures. It can be set to turn
o the wireless network name (SSID) broadcast so that only stations that have the SSID can be connected. The
Router provides wireless LAN 64/128-bit WEP encryption security, WPA-PSK/WPA2-PSK authentication, as well
as TKIP/AES encryption security.
5
Manual
www.kraun.it
1.2 Main Features
yFour 10/100Mbps Auto-Negotiation RJ45 LAN ports (Auto MDI/MDIX), one RJ11 port.
yProvides external splitter.
yAdopts Advanced DMT modulation and demodulation technology.
ySupports bridge mode and Router function.
yMulti-user sharing a high-speed Internet connection.
yDownstream data rates up to 24Mbps, upstream data rates up to 3.5Mbps(With Annex M enabled(.
ySupports long transfers, the max line length can reach to 6.5Km.
ySupports remote conguration and management through SNMP and CWMP.
ySupports PPPoE, it allows connecting the internet on demand and disconnecting from the Internet when idle.
yProvides reliable ESD and surge-protect function with quick response semi-conductive surge protection circuit.
yHigh speed and asymmetrical data transmit mode, provides safe and exclusive bandwidth.
ySupports All ADSL industrial standards.
yCompatible with all mainstream DSLAM (CO).
yProvides integrated access of internet and route function which face to SOHO user.
yReal-time Conguration and device monitoring.
ySupports Multiple PVC (Permanent Virtual Circuit).
yBuilt-in DHCP server.
yBuilt-in rewall, supporting IP/MAC lter, Application lter and URL lter.
ySupports Virtual Server, DMZ host and IP Address Mapping.
ySupports Dynamic DNS, UPnP and Static Routing.
ySupports system log and ow Statistics.
yProvides WPA-PSK/WPA2-PSK data security, TKIP/AES encryption security.
yProvides 64/128-bit WEP encryption security and wireless LAN ACL (Access Control List).
1.3 Factory Defaults
Item Default Value
Common Default Settings
Username admin
Password admin
IP Address 192.168.1.1
Subnet Mask 255.255.255.0
Wireless
SSID KRAUN_XXXXXX
KRAUN_the last 6 characters of MAC address (example KRAUN_123456)
Wireless Security Enable
Security Type WPA-PSK/WPA2-PSK
Encryption TKIP+AES
WPA KEY KRAUN_KN.3N
DHCP Server Enable
6
Manual
www.kraun.it
Chapter 2. Hardware Installation
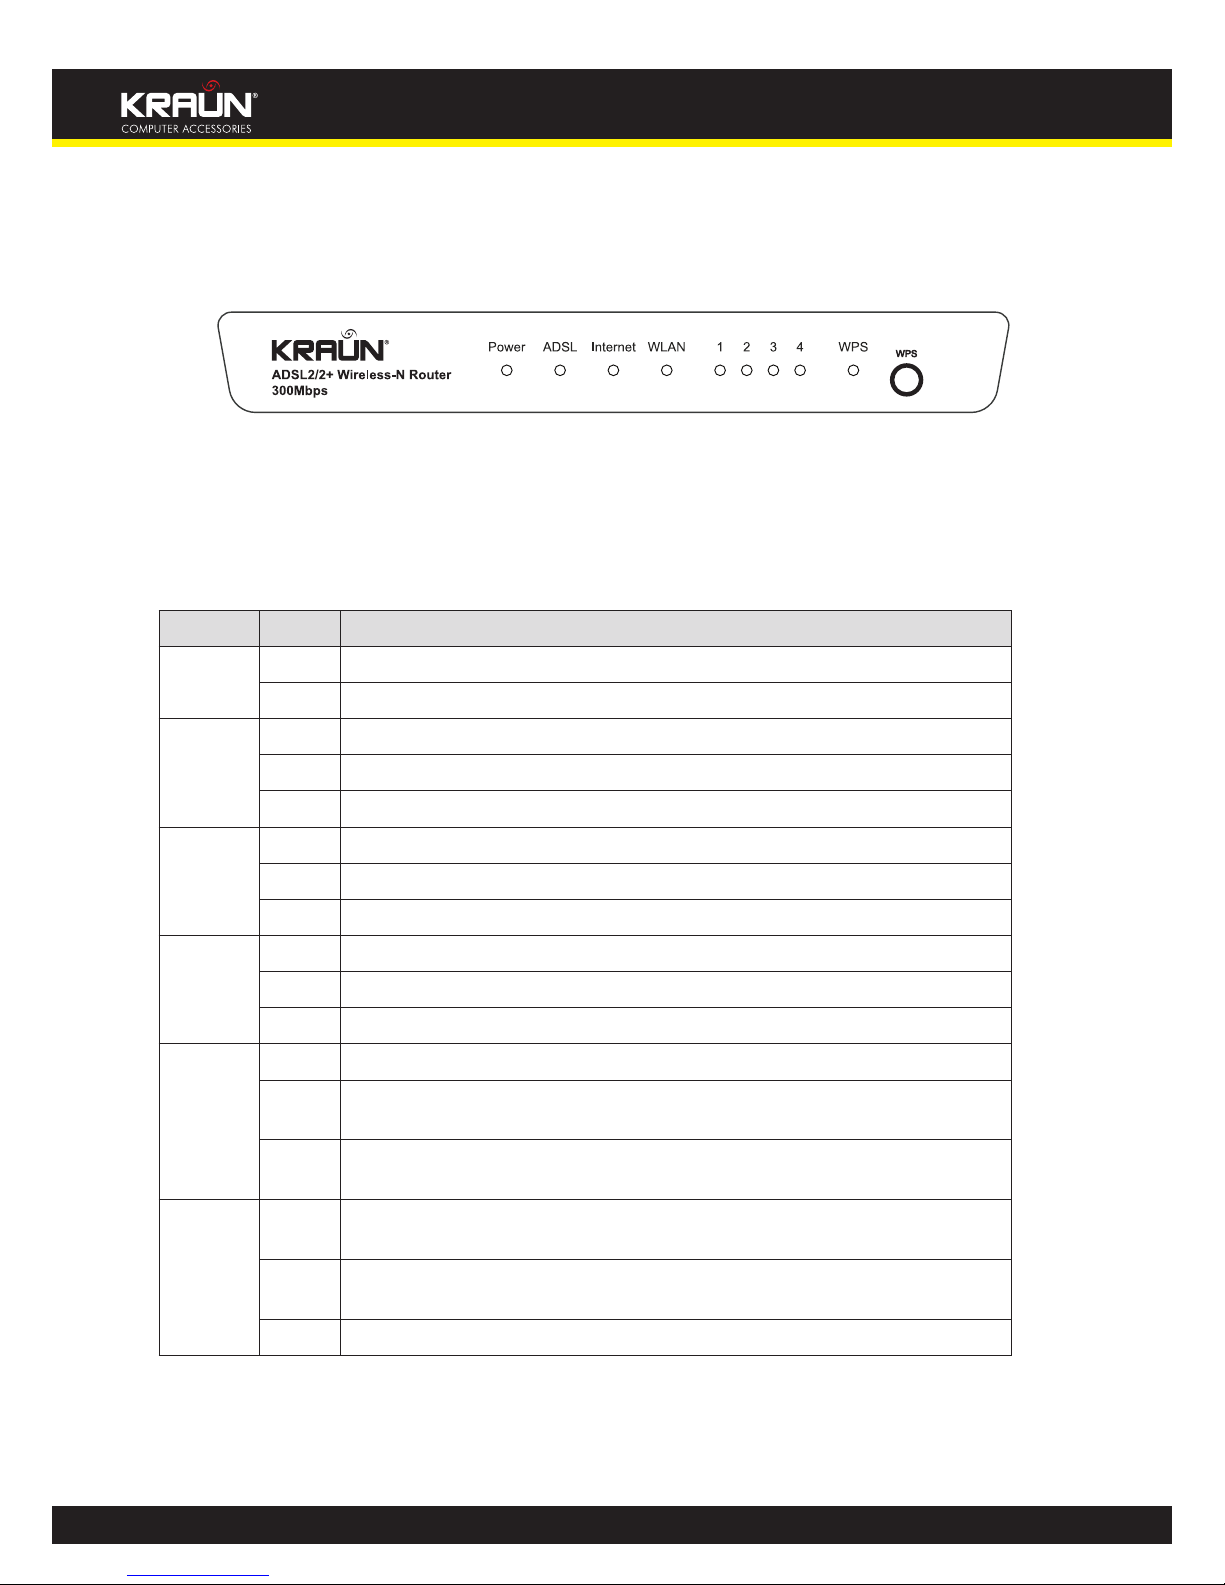
2.1 The Front Panel
Figure 2-1
The LEDs locate on the front panel, they indicate the device’s working status. For details, please refer to LED
Explanation.
LED Explanation
Name Status Indication
Power On Power is on.
O Power is o.
ADSL
Flash The ADSL negotiation is in progress.
On The LINE port is linked up.
O The LINE port is linked down.
Internet
O There is no successful PPP connection or the Router works on Bridge mode.
On A successful PPP connection has been built.
Flash Data is being transferred over the Internet.
WLAN
On The wireless function is enabled but no data is being transmitted.
Flash There is wireless data being transmitted.
O The wireless function is disabled.
LAN(1-4)
Flash Data is being transferred over the 1-4 (LAN) port.
On There is a successful connection on the corresponding 1-4 (LAN) port but no
activity.
O There is no connection on the corresponding 1-4 (LAN) port or the connection
is abnormal.
WPS
Flash A wireless device is connecting to the network by WPS function. This process will
last in the rst 2 minutes and then turn o.
On A wireless device has been successfully added to the network by WPS function.
The WPS LED will keep on for about 5 minutes and then turn o.
O The WPS function is disabled or a wireless device is failed to add the network.
7
Manual
www.kraun.it
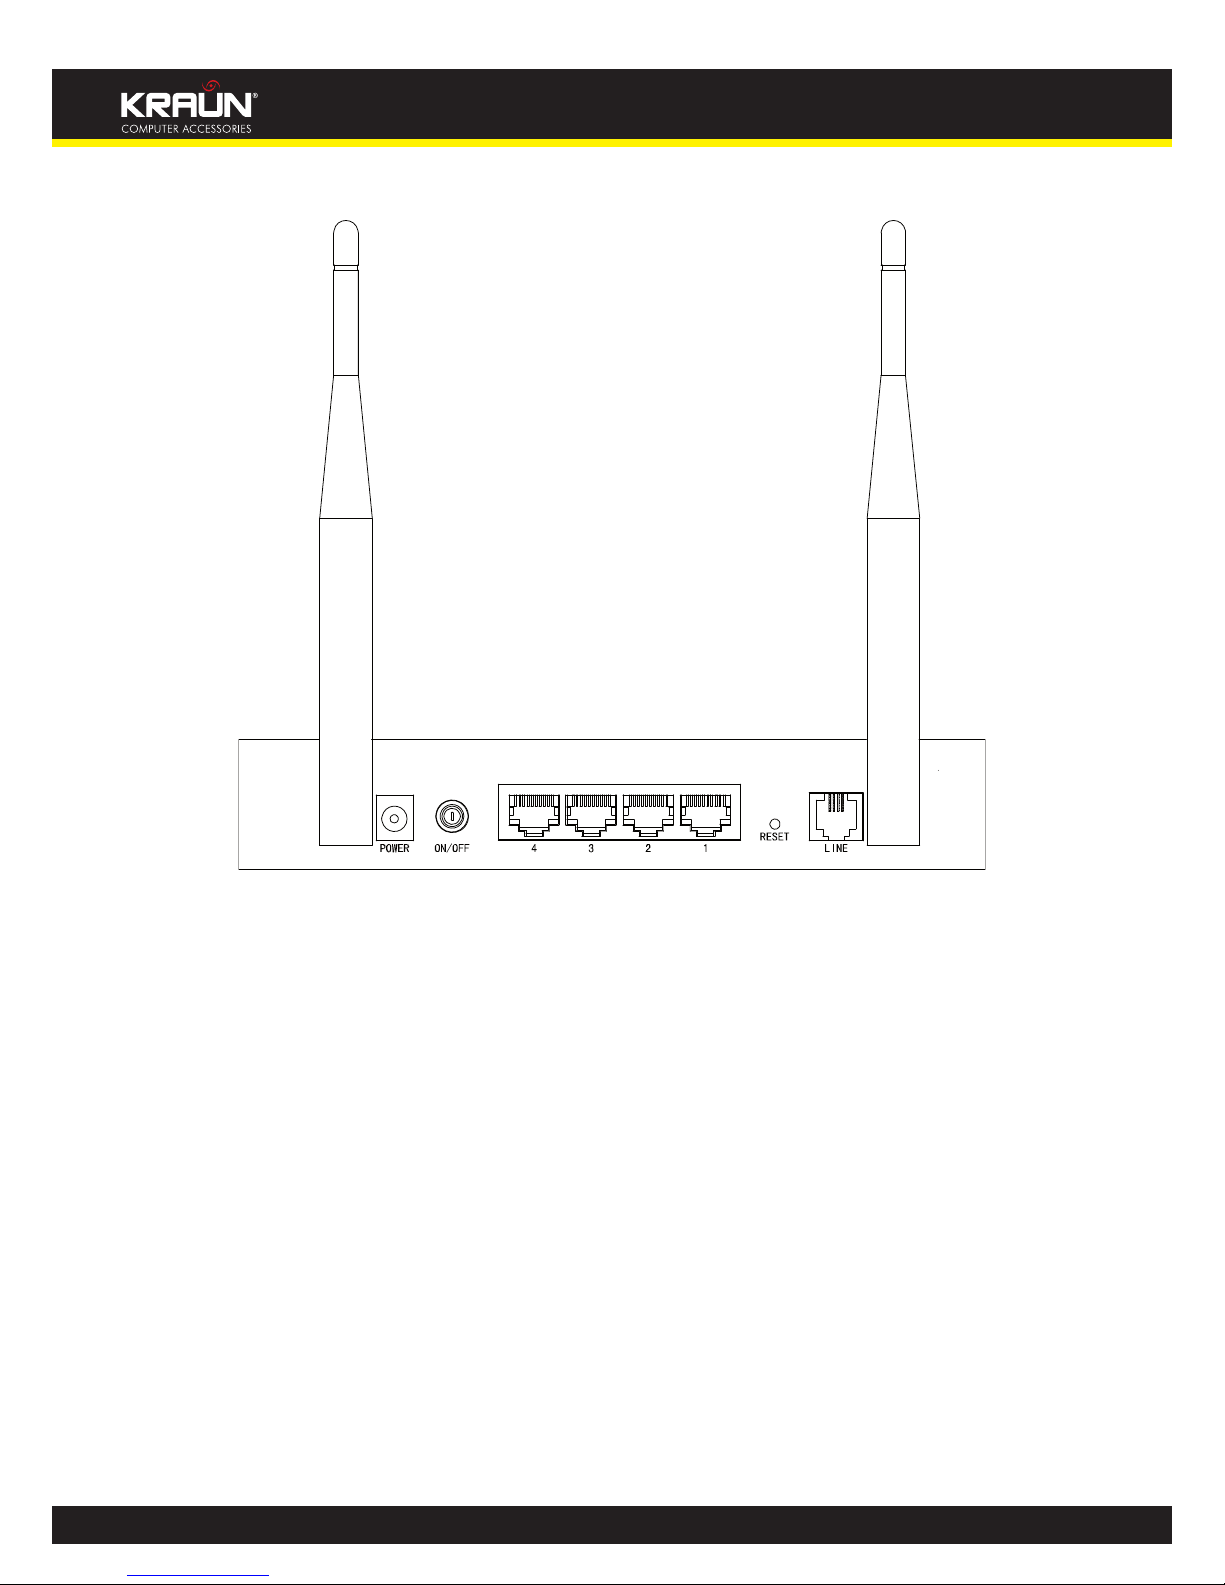
2.2 The Back Panel
Figure 2-2
yPOWER: The Power plug is where you will connect the power adapter.
yON/OFF: The power for the Router.
y1, 2, 3, 4 (LAN): Through the port, you can connect the Router to your PC or the other Ethernet network
devices.
yRESET: There are two ways to reset the Router’s factory defaults.
yMethod one: With the Router powered on, use a pin to press and hold the Reset button for at least 5 seconds.
And the Router will reboot to its factory default settings.
yMethod two: Restore the default setting from “Maintenance-SysRestart” of the Router’s Web-based Utility.
yLINE: Through the port, you can connect the router with the telephone. Or you can connect them by an
external separate splitter. For details, please refer to 2.4.
yAntenna: Used for wireless operation and data transmit.
2.3 Installation Environment
yThe Product should not be located where it will be exposed to moisture or excessive heat.
yPlace the Router in a location where it can be connected to the various devices as well as to a power source.
yMake sure the cables and power cord are safely placed out of the way so they do not create a tripping hazard.
yThe Router can be placed on a shelf or desktop.
yKeep away from the strong electromagnetic radiation and the device of electromagnetic sensitive.
8
Manual
www.kraun.it
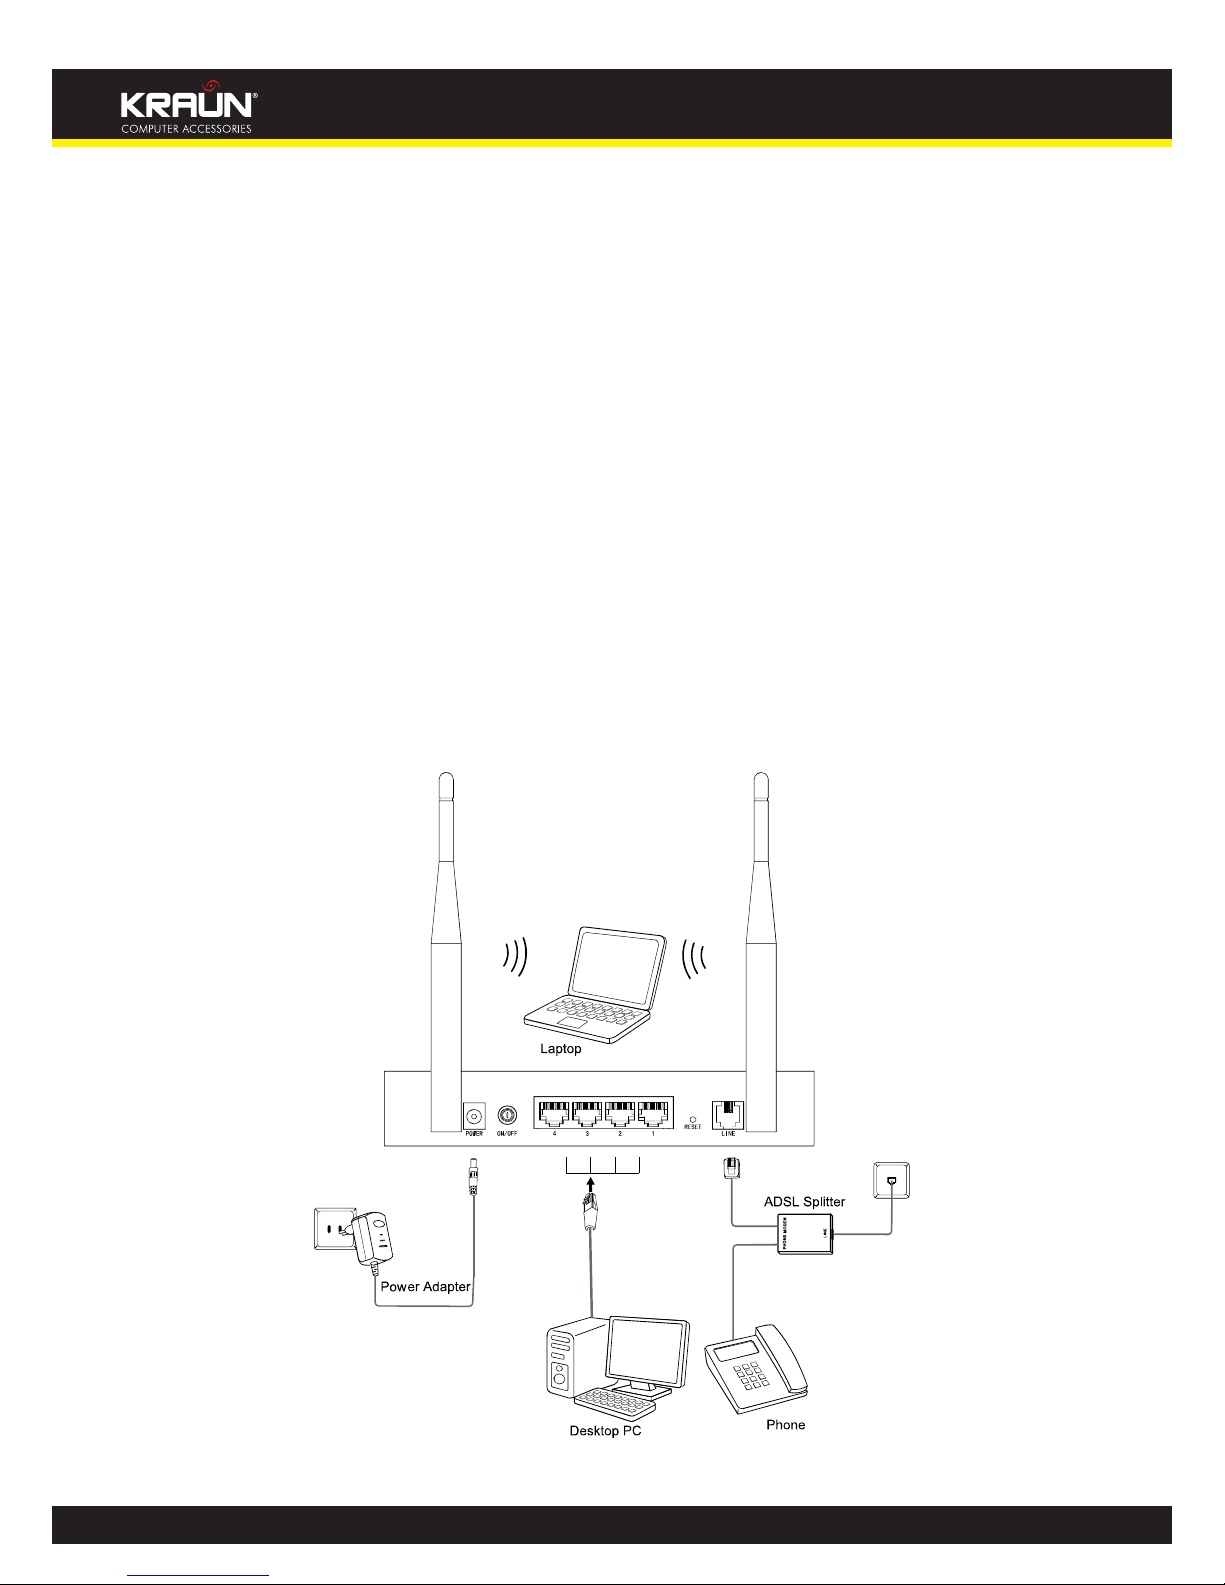
2.4 Connecting the Router
Before installing the device, please make sure your broadband service provided by your ISP is available. If there
is any problem, please contact your ISP. Before cable connection, cut o the power supply and keep your hands
dry. You can follow the steps below to install it.
Step 1: Connect the ADSL Line.
Method one: Plug one end of the twisted-pair ADSL cable into the ADSL LINE port on the rear panel
of Kraun-300N, and insert the other end into the wall socket.
Method two: You can use a separate splitter. External splitter can divide the data and voice, and then
you can access the Internet and make calls at the same time. The external splitter has three ports:
• LINE: Connect to the wall jack
• PHONE: Connect to the phone sets
• MODEM: Connect to the ADSL LINE port of Kraun-300N
Plug one end of the twisted-pair ADSL cable into the ADSL LINE port on the rear panel of Kraun-300N.
Connect the other end to the MODEM port of the external splitter.
Step 2: Connect the Ethernet cable. Attach one end of a network cable to your computer’s Ethernet port or a
regular hub/switch port, and the other end to the LAN port on the Kraun-300N.
Step 3: Power on the computers and LAN devices.
Step 4: Attach the power adapter. Connect the power adapter to the power connector on the rear of the
device and plug in the adapter to a wall outlet or power extension.
Figure 2-3

9
Manual
www.kraun.it
Chapter 3. Quick Installation Guide
3.1 Congure PC
After you directly connect your PC to the Kraun-300N or connect your adapter to a Hub/Switch which has con-
nected to the Router, you need to congure your PC’s IP address. Follow the steps below to congure it.
Step 1: Click the Start menu on your desktop, right click My Network Places, and then select Properties
(shown in Figure 3-1).
Figure 3-1
Step 2: Right click Local Area Connection (LAN), and then select Properties.
Figure 3-2
10
Manual
www.kraun.it
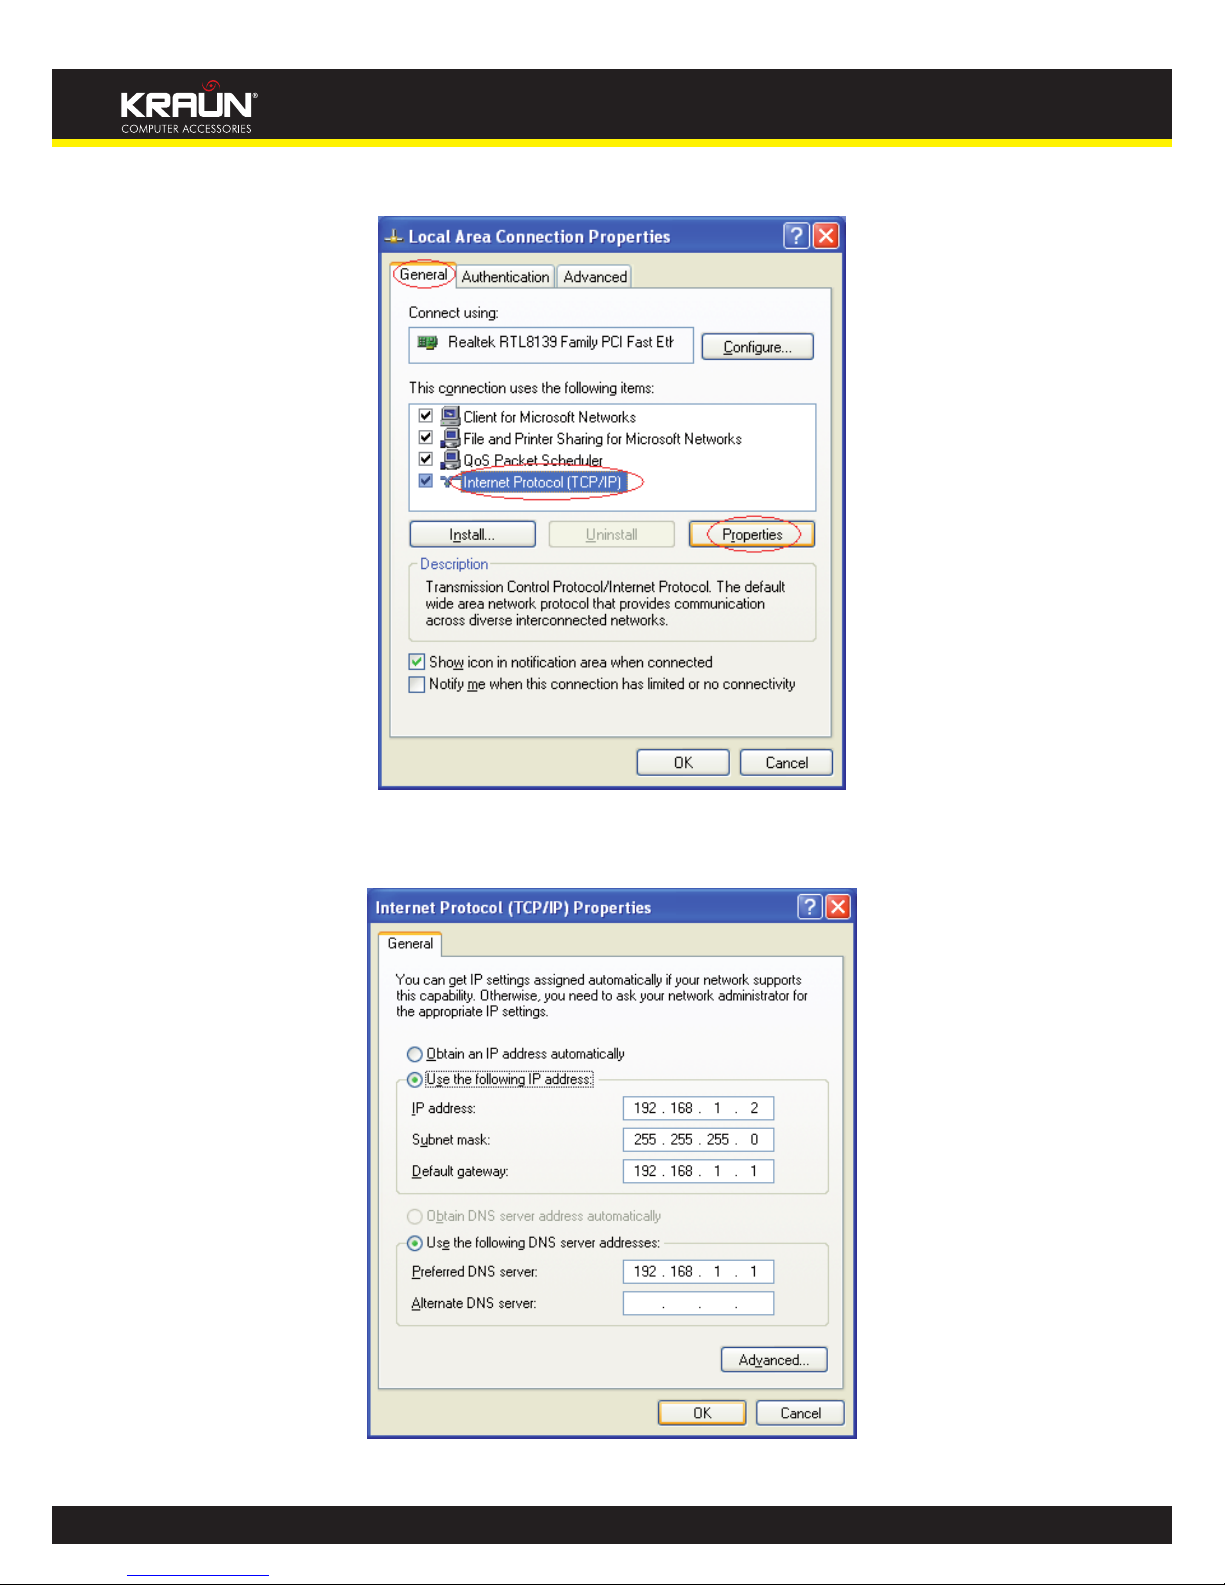
Step 3: Select General tab, highlight Internet Protocol (TCP/IP), and then click the Properties button.
Figure 3-3
Step 4: Congure the IP address as Figure 3-4 shows. After that, click OK.
Figure 3-4
Otros manuales para Wireless ADSL2/2plus Modem Router 54Mbps
2
Este manual sirve para los siguientes modelos
1
Tabla de contenidos
Otros manuales de Enrutador inalámbrico de Kraun


