Kleinwaechter TERA Manual de usuario

Manual
TERA Ohmmeter TOM 610
Contents
1. Product Description ...................................................................................................................................................................... 3
With USB Interface, Touch-Display and
“Break Down Resistance” Measurement etc.

2 Manual TOM 610
1.1. Specifications ........................................................................................................................................................................ 3
1.2. Legend ...................................................................................................................................................................................... 4
2. Manual ................................................................................................................................................................................................ 5
2.1. Operation ................................................................................................................................................................................ 5
2.2 MAIN MENU ........................................................................................................................................................................... 5
2.3 select measuring voltage.................................................................................................................................................. 5
2.4 Special function .................................................................................................................................................................... 6
2.4.1 view storage ..................................................................................................................................................................... 6
2.4.2 Break down resistance ................................................................................................................................................ 6
2.4.3 Break down Voltage detected ................................................................................................................................... 7
2.4.4 Break OFF .......................................................................................................................................................................... 8
2.5 measure ................................................................................................................................................................................... 8
2.6 measuring with timer ........................................................................................................................................................ 8
2.6.1 select timer ....................................................................................................................................................................... 9
2.6.2 measure with timer started....................................................................................................................................... 9
2.7 save measurement .............................................................................................................................................................. 9
2.8 Battery monitoring ............................................................................................................................................................. 9
2.9 Reset ....................................................................................................................................................................................... 10
3. User SetUp ...................................................................................................................................................................................... 10
3.1 date and time ...................................................................................................................................................................... 10
3.2 Info .......................................................................................................................................................................................... 10
3.3 Select Language ................................................................................................................................................................. 10
3.4 Break Down T. / Break OFF T. .................................................................................................................................... 11
4. PC Operation ................................................................................................................................................................................. 11
4.1. System Requirements .................................................................................................................................................... 11
4.2. Installation .......................................................................................................................................................................... 11
5. Maintenance / Calibration ...................................................................................................................................................... 11
6. Warranty ......................................................................................................................................................................................... 12
7. Scope of Delivery ......................................................................................................................................................................... 12
TOM 610 .......................................................................................................................................................................................... 12
TOM 610 ME .................................................................................................................................................................................. 12
8. Security Advices........................................................................................................................................................................... 12
9. Measuring Electrodes ................................................................................................................................................................ 13
9.1 Surface Electrode ME 250 ............................................................................................................................................ 13
9.2 Circle Electrode RME 810 ............................................................................................................................................. 14
9.3 Two-point electrodes ..................................................................................................................................................... 14
9.4 Measuring handle ............................................................................................................................................................. 14
10. Measuring Techniques according to IEC 61340-4-1 .............................................................................................. 15

3 Product Description
1. Product Description
Due to its compact design and battery powered operation the TOM 610 is suited for mobile
applications in industrial areas. It also can be operated stationary with the provided wall power
supply. The menu-driven TOM 610 is operated by only 2 pushbuttons and its touch display and
therefore very user-friendly. All set measurement parameters are shown in the display for a
better orientation. The provided PC software enables the user to perform computer driven
measurements.
The enclosed PC software also allows the TOM 610 to be operated computer-controlled.
In addition the measurement data can be administrated and processed.
The TOM 610 works according to the voltage current measurement principle. The measurement
time required by norms, like DIN EN 61340 or EOS-ESD 4.1/6.1, can be set with an internal
timer.
As a new world innovation, we measure the „Break-Down“ Resistor and Voltage and also the
„Break-OFF“ – Time if it happens.
The measured data including environment parameters, can be stored in an internal memory (up
to 200 records). Thereby the measurements are maintained and can be read out later via the
USB interface.
As resistance values of some materials depend on air humidity and temperature, these
environmental parameters are measured and saved together with each measurement value.
Thus, reproducible measurements can be performed.
1.1. Specifications
Dimensions (L x W x H): 224mm x 81mm x 40mm
Weight: 350g
Display: Graphic Touch Display
size: 75 mm x 50 mm
Resistance: 1 k - 10 .0 T accuracy ± 10%
Temperature: 0°C....60°C accuracy ± 3°C
Rel. Humidity: 20%...80%r.F. accuracy ± 5%
PC interface: USB interface
PC software: Turned-out Software
Battery: 4 x AA-NiMH 2100 mAh
Operation time with fully charged battery: > 12 hours
permanent operation
Charging time with provided wall power supply: max. 14h
Power supply: 9V-DC / 300 mA
The TERA – Ohm Meter TOM 6100 measures resistances in function of the selected measure
voltage.
Measure Voltage 10V from 1kOHM (103 Ohm) until 200GOhm (1011 Ohm)
Measure Voltage 100V from 100kOHM (105 Ohm) until 2TOhm (2x10¹² Ohm)
Measure Voltage 500V from 1MOHM (106 Ohm) until 5TOhm (5x10¹² Ohm)
Measure Voltage 1,000V from 1MOHM (106 Ohm) until 10TOhm (1013 Ohm)
Auto Measuring Voltage 10V from 1kOHM (103 Ohm) until ~1MOhm (105Ohm)
100V from ~1MOHM (105 Ohm) until 2TOhm (2x10¹² Ohm)
The tolerance is 10%
4 Manual TOM 610
As long as the selected measuring voltage is not stable, the displayed measured value is
highlighted in blue. If the measuring range is exceeded “Overflow” and if it fell below the range
“R < xxxOhm” will be displayed. (depending of measure voltage)
When the measured value is displayed without a blue background it is stable !
This can take up to a few seconds with very high resistances.
As a rule, we recommend a max. Measuring voltage of 100V !
Use 500V or 1.000V only if problems occur by 100V !
IMPORTANT !! Umess > 100V => Do not touch the electrodes during the measurement !
After switching on it can also take a few seconds until the temperature and humidity are
displayed. As long as these are set to zero no operation is possible !
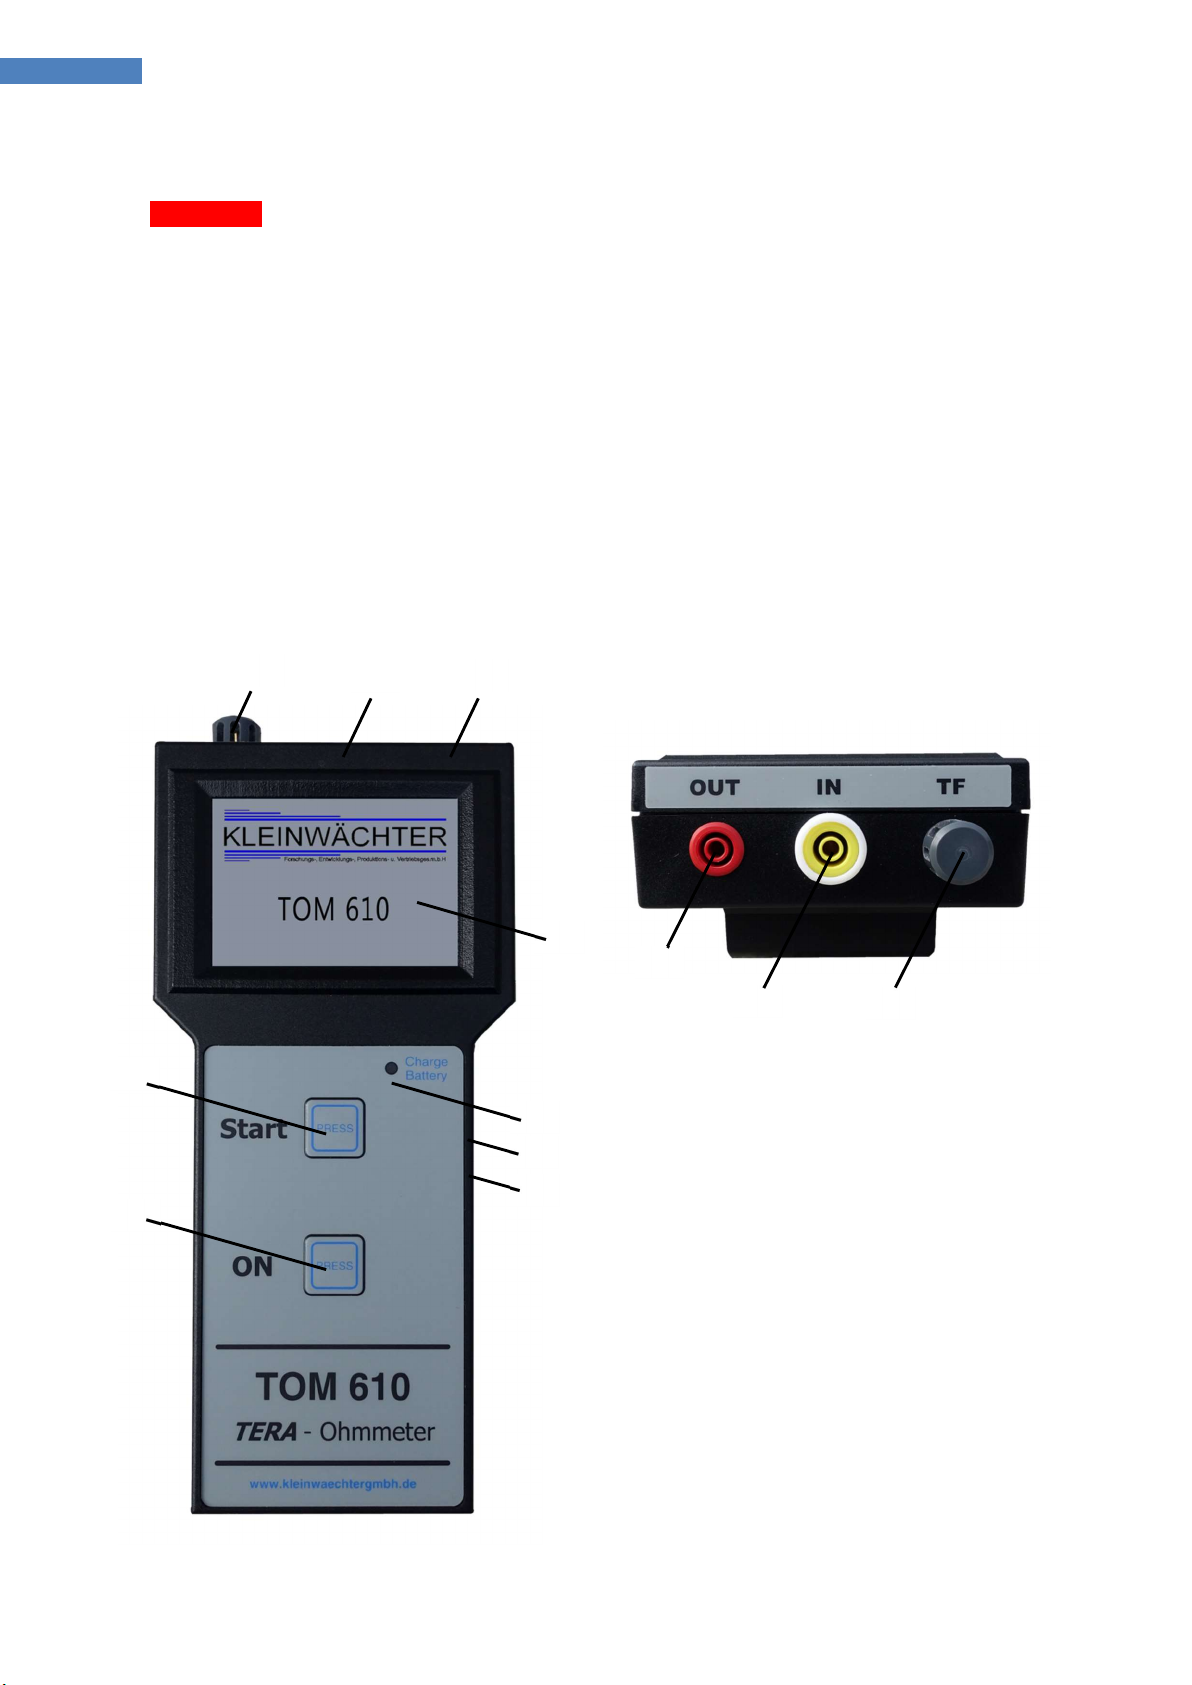
1.2. Legend
1
LCD – Touch Display
2
Start Button
3
ON Button
4
Battery charge LED
5
Temperature- and humidity sensor
6
Measurement input
7
Measurement Voltage output
8
Power supply connector
9
USB – Interface
1
2
3
4
8
9
7
6
5
7
6
5

5 Manual
2. Manual
2.1. Operation
The TERA Ohmmeter TOM 610 is shipped with 4 AA NiMH rechargeable batteries and is
immediately ready to start.
For charging the batteries and for continuous operation only the provided wall power supply
may be used.
For start measurements, first connect the electrodes to the appropriate connectors (see legend)
and position it on the object to be measured. Afterwards touch button «Measure» or «Measure
with timer» has to be pressed to start the measurement.
Please pay attention by moving the measure cables or people passing by as it can cause
electrostatic induction of the measurement setup.
Switch on the unit by touching button “ON”
After powering on, the software version is displayed and after 3 seconds it switches to the main
menu:
2.2 MAIN MENU
Seven touch fields are available in the main menu:
1 Umess => Manual ↔ Auto Selection between
automatic and Manuell measuring voltage - Field 3 is
only active (blue background) if Manuell is selected !
2 Umess => submenu select measuring voltage 2.3
will be open
3 Display Mode Techn. ↔ Expo. selection
between displaying the Measure Value in technical
(235MOhm) or exponential (2,35 x 10⁸ Ohm)
representation
4 By touching => off => the device switches off.
5 special function => submenu “special function” 2.4 will be opened.
6 Measure => Start the measurement 2.5 with selected parameters
7 Meas. with Timer => submenu “measuring with timer” 2.6 will be opened.
The current date and time will also be displayed.
By pressing the Button “Start” the measuring will start with the selected parameters.
2.3 select measuring voltage
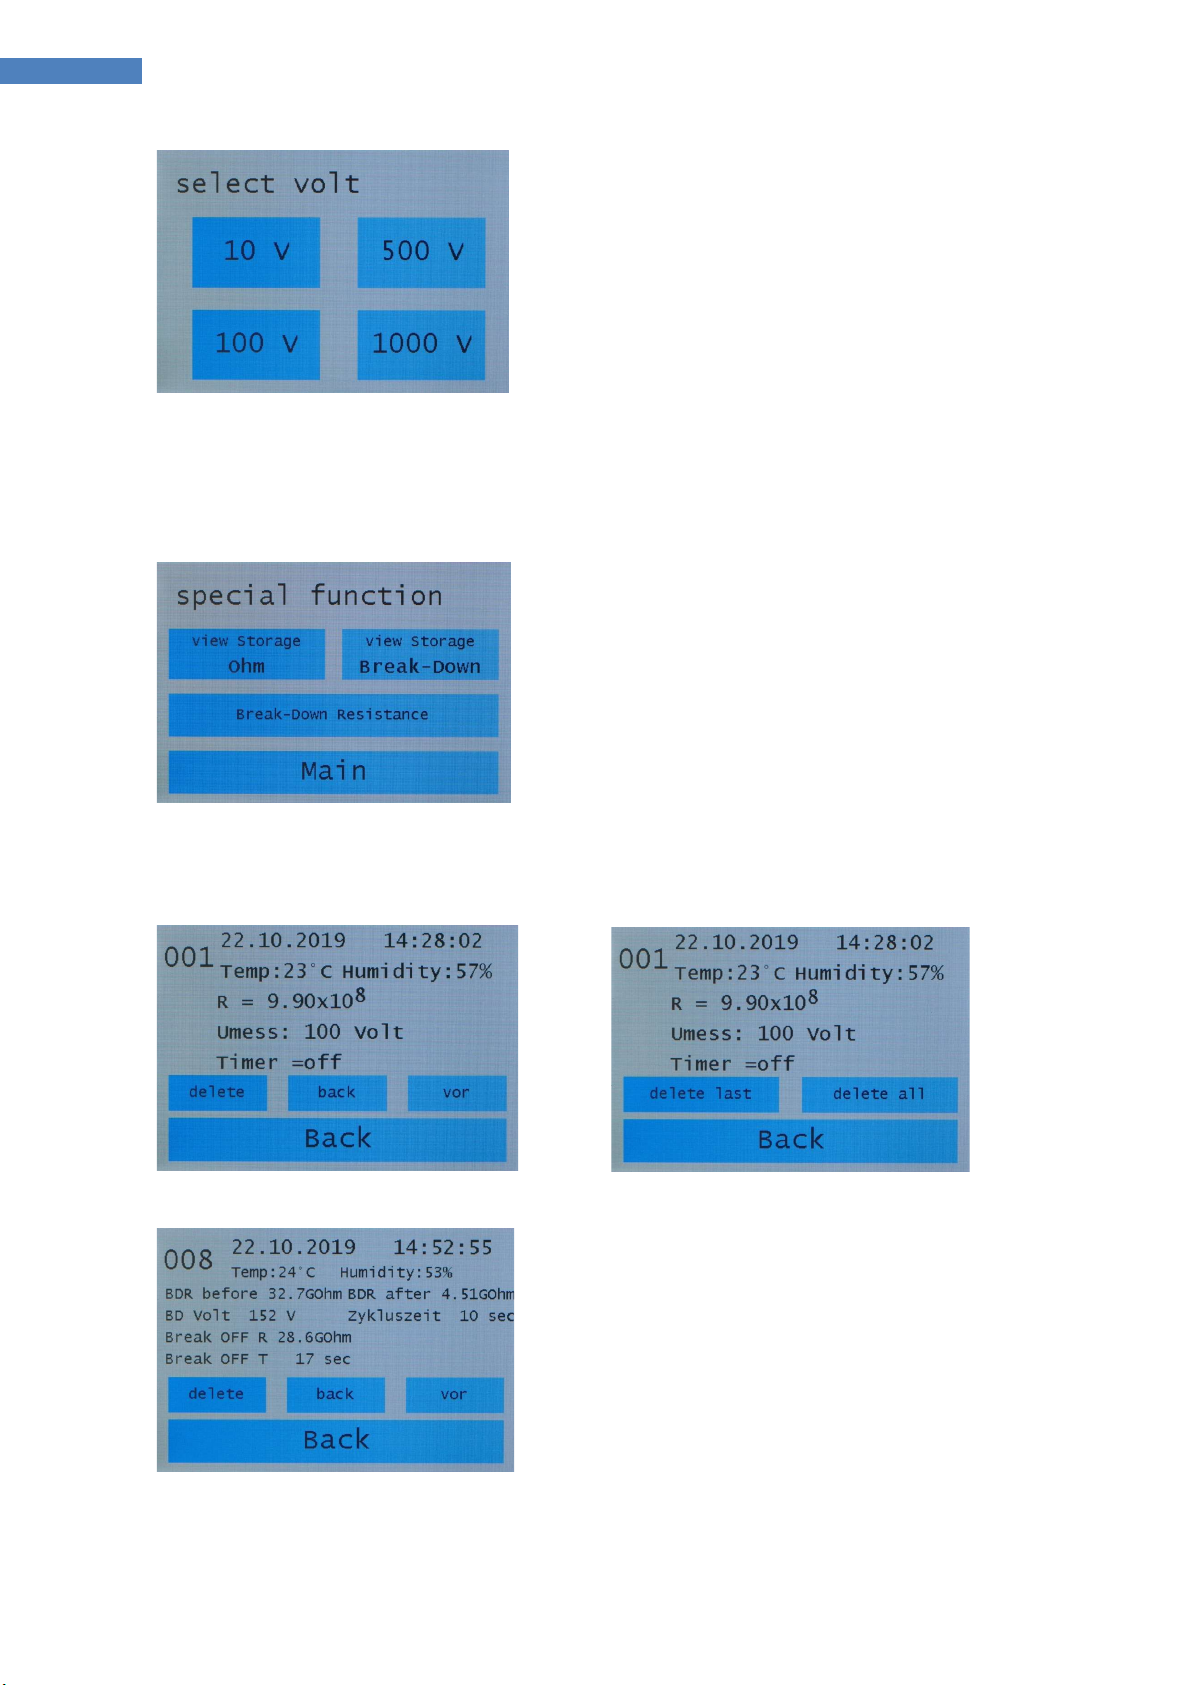
6 Manual TOM 610
By touching =>desired Measure Voltage => it will be
selected, and switches back to the main menu.
IMPORTANT !! The measuring voltage is only applied
when the measuring is started.
First make the measuring setup then start the
measure. Never change the setup during the
measurement. Switch back to the main menu at the
end of your measure.
2.4 Special function
By touching => view storage => submenu storage
2.4.1 will be opened
By touching => Break down voltage => submenu
Break down voltage 2.4.2 will be opened
By touching => Main => It will switch to the main
menu
2.4.1 view storage
The saved file number (top left) is displayed and
further the saved data.
By touching => -1 or +1 => changes the displayed file
number
By touching => delete =>it switches into the delete
menu and there you can select “delete last” or “delete
all”
By touching => Back => It will switch to menu
“special function” 2.4
2.4.2 Break down resistance
Measuring the “Break Down” resistance in dependence of the measuring voltage

7 Manual
Important !! Measuring range 5MOhm up to 200GOhm !! ( 5x10⁶ . . . . . 2x10¹¹)
Measurement procedure :
Measure Voltage starts by 10V
Continued by 100V and then in steps from +50V up to 1.000V.
The resistance is measured continuously.
If a Break Down takes place, the resistance value goes down sharply (>50%).
This voltage value is displayed as BDV (Break Down Voltage)
The resistance before and after is also displayed.
By touching => Start => (or by pressing the button “Start”)
it starts measuring.
By touching => Main => it will switch back to the main
menu.
After “Start” The resistance value and the Measure voltage
is displayed. Down right, the time remaining of this voltage
step is displayed. (The voltage step time can be selected in
the user setup).
By touching => Stop => the measuring will stop and then it
switches back to the start menu.
If the resistance is out of the measuring range an overflow
or underflow will be displayed
If there was no Break Down up to 1.000V => “no Break-
Down” appears.
By touching => Main => It switches to the main menu.
By touching => ok => It switches to “Break Down
Resistance” menu 2.4.2
2.4.3 Break down Voltage detected
The “BREAK DOWN ! !” menu opens automatically after a
break-down occurs.
By touching => Main => It switches to the main menu.
By touching => Save => it saves the measured data.
By touching => Break Off => It switches to menu
“BOFF Time” 2.4.4
** If no “Break OFF” measurement has taken place => No values will be displayed.
After Break OFF measurement without Break OFF display shows “NO BOFF".
If Break OFF has occurred, the Break OFF resistance value and the Break OFF time are displayed.

8 Manual TOM 610
2.4.4 Break OFF
Measuring of the Break Off time (BOFF)
The voltage switches to 1.000 Volt and the timer will start.
If there is a sharp change in resistance value (<50%) this
value (before and after) and the timer (BOFF) are
displayed.
Break OFF time can be selected in the user setup.
If the timer counts up to the max. time and no Break off
occurs => it displays NO BOFF
By touching => Back => it switches back to menu 2.4.3
with “break OFF R = 0” and “Break OFF T”
If Break Off occurs , the timer stops and displays “Break
Off R = xx.x Ohm” (actually value)
By touching => Back => it switches back to menu 2.4.3
with measured values in “break OFF R” and “Break OFF T”
2.5 measure
By touching => Umess / Display => you can select as well
in the main menu.
By touching => Main => It switches to the main menu.
By touching => Save => (when measure voltage is stable =
blue background) It switches to menu
“save measurement” 2.7
Always switch back to main menu after measurement !
2.6 measuring with timer
By touching => Umess / Display => you can change it, like
in the main menu
By touching => Time => It switches to menu “select
timer” 2.6.1
By touching => Lapse / Average => it switches between
lapse** and average* mode
By touching => Start => it starts measuring 2.6.2
*Average => Averaging during the measuring time
**Lapse => At the end of the measuring time, the last measured value is displayed.

9 Manual
2.6.1 select timer
By touching => delete => sets the timer to zero
By touching => +1 / +10 / +60 => It choses your time
By touching => save => saves the chosen time and goes
back to “measuring with timer” menu 2.6
2.6.2 measure with timer started
In the first row you see the Measure mode and timer
counts down to zero when the measured value is stabile.
In the 2nd row temperature and humidity
In the 3rd row the measure value
By touching => Save => It switches to menu
“save measurement” 2.7
By touching => Back => It switches to the main menu.
2.7 save measurement
In the first row you see the next file number
By touching = -1 => It goes back to overwrite an old file
number
By touching => Save => The measure is saved by the
displayed file number in the EEPROM
By touching => brake/Main => It switches to the main
menu.
2.8 Battery monitoring
If the battery voltage drops below 4. 4 V, the current
values are highlighted. (yellow)
When switching to another menu, the background color
also changes. (yellow)
In this case it is absolutely necessary to connect the
power plug adapter!
If the battery voltage drops below 4. 0 V , the device is
switched off to prevent over discharge of the batteries!

10 Manual TOM 610
2.9 Reset
If the device no longer reacts, a “Reset” can be execute by pressing the hidden “R” button. The
“R” button is located on the left side at the height of the display. Use a thin wire (e.g. paper clip)
to press it through the 1.5mm hole.
=> In standard operation, this should never be necessary.
In normal operation, this should never be necessary.
3. User SetUp
The user setting can be accessed by pressing the button „Start” while the start
screen is displayed !
By touching
Date and time
Info
Language
Break Down T.
Break Off T
By touching => Back => It switches to the main menu.
3.1 date and time
By touching => + / - => The field highlighted in red can be
changed. First the date then the time.
By touching => Save => The data will be saved.
By touching => Back => It switches to the User Setup menu.
3.2 Info
Information about the hardware and software version.
By touching => Back => It switches to the User Setup
menu.
3.3 Select Language
By touching => German / English => It selects the
language from the display
By touching => Back => It switches to the User Setup
menu.
Este manual sirve para los siguientes modelos
1
Tabla de contenidos
Otros manuales de Instrumento de medición de Kleinwaechter

Manuales populares de Instrumento de medición de otras marcas


Endress+Hauser
Endress+Hauser Proline Promag 50 Especificaciones técnicas

Siemens
Siemens SITRANS F Coriolis FCT030 Manual de lista de piezas

KLINGER
KLINGER CMF V Series Manual de usuario

EXFO
EXFO FTB-2 Manual de operación y mantenimiento

Keysight
Keysight M8290A Manual de usuario

ADTEK
ADTEK MW-5 Manual de usuario