
King Controls KD-2200 Manual de usuario

Automatic Satellite System
with built-in digital off-air antenna
KD-2200 Stationary
KD-3200 In-Motion
Installation and Operating Instructions
Advanced Integrated Reception
11200 Hampshire Avenue South, Bloomington, MN 55438-2453
Phone: (800) 982-9920 Fax: (952) 922-8424
www.kingcontrols.com
1348 REV D
Digital TV Solutions for Mobile Markets
®


Page 1
TABLE OF CONTENTS
Section Contents Page
1. INTRODUCTION............................................................................................................2
2. DEFINITION OF TERMS...............................................................................................3
3. INSTALLATION.........................................................................................................4-13
4. ANTENNA CONFIGURATION................................................................................15-31
5. SATELLITE ANTENNA OPERATION .....................................................................32-35
6. OFF-AIR ANTENNA OPERATION..........................................................................36-38
7. TROUBLESHOOTING.................................................................................................39
8. MAINTENANCE...........................................................................................................40
9. LIMITED WARRANTY .................................................................................................41
DIRECTV®is a registered trademark of DIRECTV, Inc.
Dish Network®is a registered trademark of Echostar Communications Corporation.
Bell TV is an official trademark of Bell Canada.
DVB®is a trademark of the DVB Digital Video Broadcast Project (1991-1996)
HDMITM is a trademark of HDMI Licensing LLC.
IMPORTANT!
The TV market is expanding and changing. The information in this manual was accurate at the time of
printing. If your King-DomeAIR does not operate as outlined in this manual please call King Controls at (800)
982-9920 or visit our website at www.kingcontrols.com.
The King-DomeAIR is factory pre-set for DIRECTV®standard digital programming broadcast from the
101° W satellite. If you also receive your local channels from DIRECTV’s 119 satellite or if you subscribe to
Dish Network®or Bell TV programming, YOU MUST RECONFIGURE THE ANTENNA to work with your satellite
service. Doing this will allow the King-DomeAIR to lock on the correct satellites to receive your programming
and also enable automatic satellite switching via the receiver’s remote control for multi-satellite service.
Antenna configuration is a one time procedure that MUST BE COMPLETED before using your King-DomeAIR
antenna. Configuration may be done with the supplied wall mount controller, or the #1844 Keypad
(dealer tool). See the antenna configuration section in this manual for specific instructions.
The King-DomeAIR can receive available HDTV programming from DIRECTV Ku band satellites at 101° and 119°.
It will not receive channels broadcast from DIRECTV’s Ka band satellites at 99° and 103°.
Please read this entire manual before beginning the installation.
Note: The following upgrade kit is available for the KD-2200 series antennas:
Upgrade Kit #9743: Adds in-motion tracking capability.
For more information, call King Controls at (800) 982-9920.

Page 2
The King-DomeAIR 2200 and 3200 Satellite Systems include 2 main components (Fig. 1).
Dome (Antenna) Unit Located on the roof of the vehicle. The satellite dish, off-air
antenna and electronics are covered by a protective dome that
keeps operational components free from the elements.
Controller Located in the vehicle. Activates the search mode and provides
limited diagnostic functions using the status light.
SECTION 1 INTRODUCTION
Note: A TV, satellite receiver, and program subscription are also required for satellite TV viewing (sold separately).
Note: Overview only.
See Installation Section for specific
wiring diagrams.
Fig. 1

Page 3
SECTION 2 DEFINITION OF TERMS
AZIMUTH: Circular rotation around the vehicle. Using the clock as a reference, the front of the
vehicle is 12:00, and the rear is 6:00 (Fig. 2).
ELEVATION: Angle in degrees measured from a level plane (Fig. 3).
SIGNAL STRENGTH: Intensity of signal received from the satellite or off-air transmission.
Fig. 2
Fig. 3
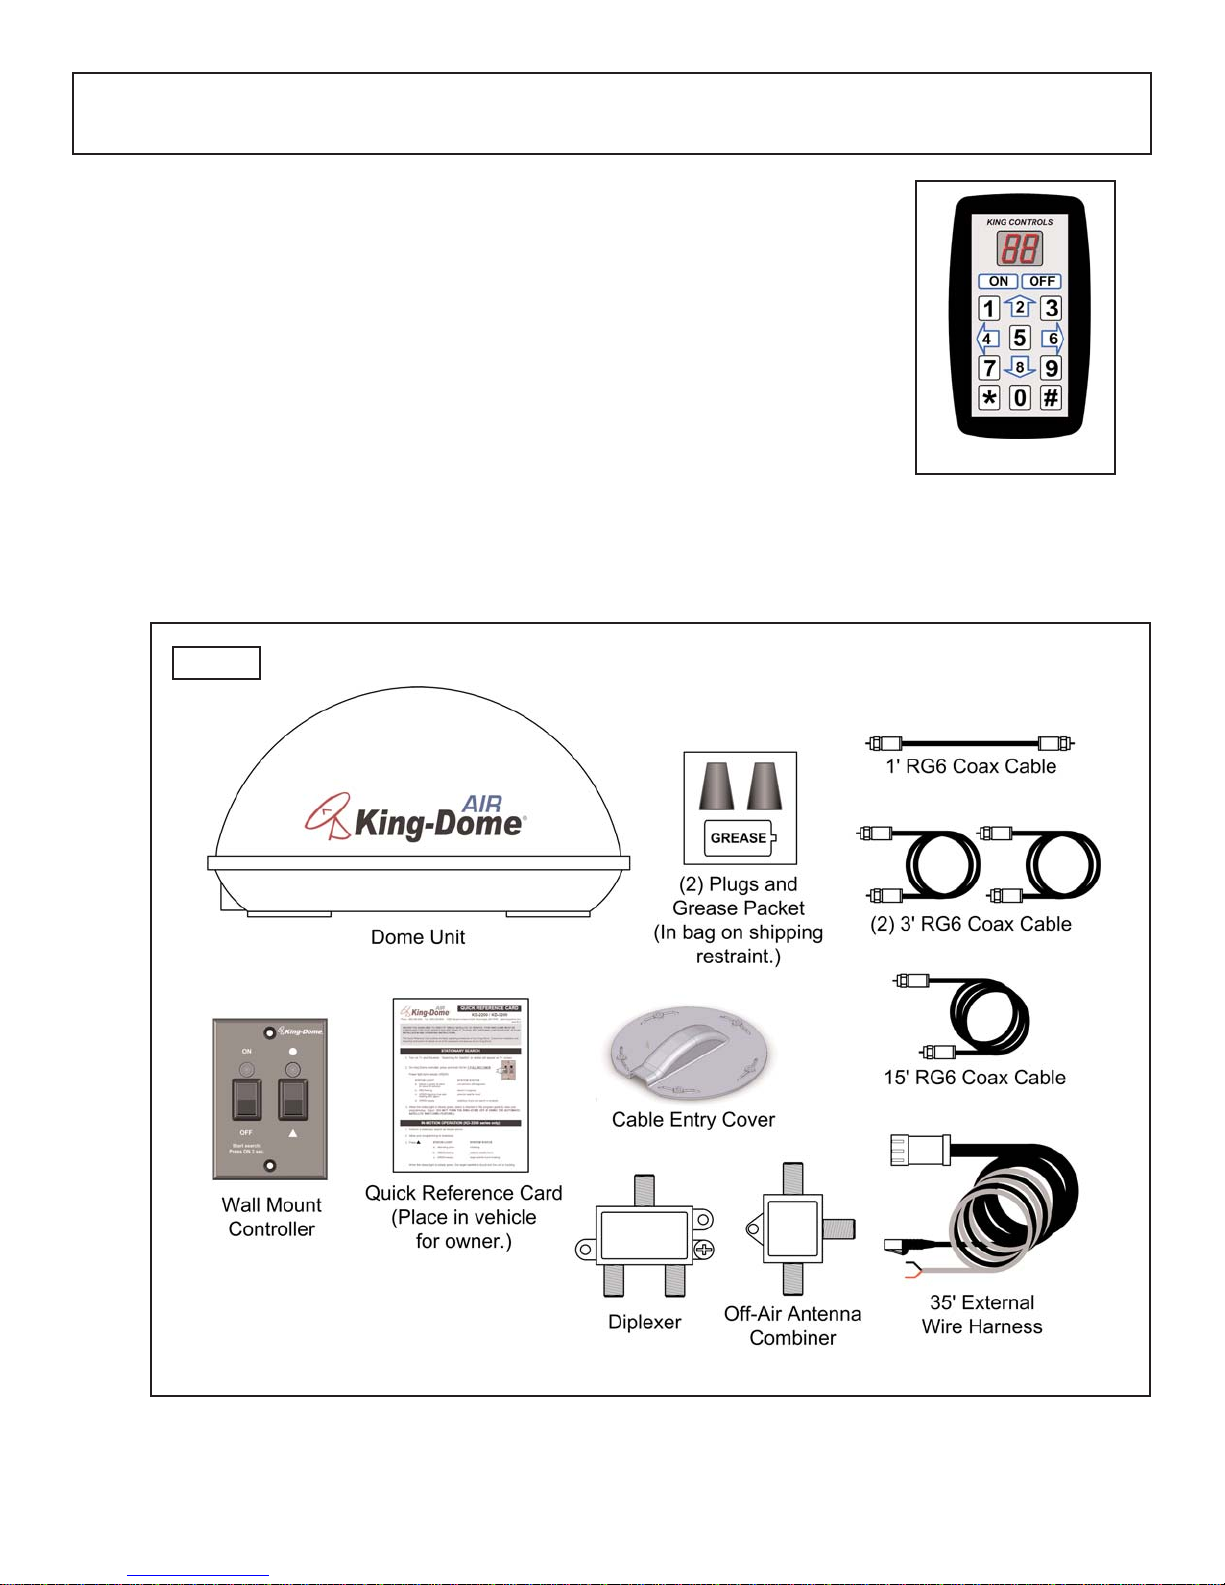
KIT CONTENTS
1. Unpack and identify all components (Fig. 4).
Page 4
SECTION 3 INSTALLATION
Fig. 4
TOOLS AND MATERIALS REQUIRED
• drill and drill bit set
• tape measure
• 7/16” open end wrench (coax connections)
• adhesive sealant (compatible with roof material)
• appropriate fasteners to install all components and wiring
• 5/32” allen wrench, channel lock or pliers (to remove shipping bolts)
• wire cutter (to remove shipping tie strap)
• Optional: #1844 King Controls Keypad
KIT CONTENTS
#1844 Keypad

Page 5
IMPORTANT! The tie strap and spacer, and the shipping bolts and washers must be removed from the
bottom of the dome unit prior to installation. DO NOT REMOVE THE DOME COVER TO
REMOVE THESE SHIPPING RESTRAINTS.
YOU MUST PLUG THE SHIPPING BOLT HOLES WITH THE SUPPLIED PLUGS (ATTACHED TO
TIE STRAP SHIPPING RESTRAINT).
2. Remove and discard the tie strap and spacer (KEEP RUBBER PLUGS AND GREASE
PACKET), and the 2 bolts and 2 washers that pass through the bottom of the base (Fig. 5).
3. Insert provided plugs into holes that were occupied by the shipping bolts. Inserted plugs
should be flush with base (Fig. 5).
Fig. 5
IMPORTANT!
Remove and discard Tie
Strap and Plastic Spacer
prior to installation.
KEEP RUBBER PLUGS
AND GREASE PACKET.
IMPORTANT!
Remove and discard
Shipping Bolts and
Washers prior to
installation.
IMPORTANT!
After removing shipping bolts, firmly
insert plugs into holes. Plugs should
be flush with base.

Page 6
DOME LOCATION
4. Select an area on the roof for the dome unit and the location where the wiring will enter the
vehicle through the roof to the satellite receiver, controller, combiner, diplexer, and
12 volt power source inside, using the following criteria:
a) The dome unit should be mounted as far away as possible from the existing off-air
antenna if the antenna signals will be combined.
b) A shorter distance between the dome unit and the satellite receiver is most desirable.
c) The dome unit requires a 28 inch diameter mounting area.
d) The dome unit should be mounted on the centerline of the vehicle.
e) There must be no “line of sight” obstructions. Air conditioning units, other antennas, and
storage areas that are too close to the dome unit may obstruct the satellite signal and
off-air transmissions (Fig. 6).
HEIGHT OF
OBSTRUCTION
APPROXIMATE
MINIMUM DISTANCE
TO DOME EDGE
10” 8”
11” 10”
12” 12”
13” 14”
14” 16”
15” 18”
16” 20”
Fig.6

Page 7
5. Place dome unit on installation location chosen using the criteria discussed in the previous
section. Shipping restraints must be removed, plugs must be inserted in holes (Fig. 5,
Page 5), and cable connections must be positioned facing rear of vehicle.
6. Position the dome unit so that both feet on each side of the vehicle are equal distances from
the roof edge. This should be checked by measuring the distance from each foot to the roof
edge. Confirm that these measurements are equal (Fig. 7).
IMPORTANT! Make sure shipping restraints are removed from bottom of dome unit and plugs are inserted in
holes (Fig. 5, Page 5).
Cable connections must ALWAYS be positioned facing the rear of vehicle.
Fig. 7
DOME INSTALLATION
IMPORTANT! The dome unit should never be mounted so that it is tilted more
than two degrees in any direction.
IMPORTANT!
Cable connections
must always face
REAR of vehicle.
Note: The installer is responsible for determining the most appropriate fastener to secure the dome unit to the roof.
Depending on the roof material, fasteners such as lag screws, sheet metal screws, toggle bolts and T anchors
may be used, and should always be used in combination with a roof compatible sealant.
IMPORTANT! The installer is responsible for weatherproofing all holes with sealant.
7. Mount the dome unit. Use the pre-drilled holes in the mounting feet as a guide to install the
fasteners into the roof. Use additional fasteners whenever necessary.
8. Test that the dome unit is secure by pulling upward from each foot location.

Page 8
EXTERNAL WIRING
9. Plug external wire harness into wiring port on back of dome unit and tighten connection until
it clicks past the detent lock (Fig. 8).
10. Fill end of coax cable that will connect to the MAIN port on the dome unit with supplied
dielectric grease. Connect this end of the coax cable to the MAIN port and tighten
connection (Fig. 8).
If using a second (auxiliary) receiver, fill end of second coax cable (not supplied) and connect
it to the AUX port. Tighten connection.
DO NOT OVER TIGHTEN CONNECTIONS.
Note: The King-DomeAIR is wired for multiple receiver support. There are two coax ports on the back of the dome unit.
The one labeled “MAIN” MUST be connected thru the diplexer to the main receiver in vehicle. This is the
receiver that will control automatic satellite switching if applicable. The one labeled “AUX” can be used for an
additional receiver.
IMPORTANT! You must fill the ends of all external coax cables with the supplied dielectric grease.
Failure to do so will void product warranty.
Fig. 8
IMPORTANT!
Fill ends of coax cables with supplied dielectric grease.
Failure to do so will void product warranty.
Coax connections should be snug. DO NOT OVER TIGHTEN!
IMPORTANT!
The alignment tabs on the
wiring port and the external
wire harness plug must
match up when engaging
plug onto port.
YOU MUST TIGHTEN THE
EXTERNAL WIRE HARNESS
PLUG UNTIL IT CLICKS
PAST THE
DETENT LOCK.
(A channel lock pliers may
be used to tighten the
connection.)
Este manual sirve para los siguientes modelos
1
Tabla de contenidos
Otros manuales de Sistema de televisión por satélite de King Controls

Manuales populares de Sistema de televisión por satélite de otras marcas


DefineSat
DefineSat VM55 Manual de usuario

Dish Network
Dish Network 112182 Manual de usuario

Thrane&Thrane
Thrane&Thrane sailor 60 Manual técnico

KVH Industries
KVH Industries TracVision L2 Manual de usuario

KVH Industries
KVH Industries TracVision TV1 Manual de usuario

JRC
JRC NJT8304 Series Manual de usuario

Bell
Bell EXPRESSVU Manual de usuario

Promax
Promax SATHUNTER Manual de usuario

SatKing
SatKing PRO MAX Manual de usuario

KVH Industries
KVH Industries TracVision M5 Manual de usuario

KVH Industries
KVH Industries TracVision R5SL Manual de usuario

Dish Network
Dish Network Satellite Television Manual de usuario