Javes HDX-520 Manual de usuario

Address: Room 207, Block B, Seaview Estate, Watson Road, North Point, Hong Kong
JAVES HDX-520
Javes Projector
DLP Projector
USER MANUAL

EN-1
FCC Notice
This equipment has been tested and found to comply with the limits for a Class B
digital device, pursuant to part 15 of the FCC Rules. These limits are designed to
provide reasonable protection against harmful interference in residential installation.
This equipment generates, uses and can radiate radio frequency energy and if not
installed and used in accordance with the instructions, may cause harmful interference
to radio communications. However, there is no guarantee that interference will not
occur in a particular installation. If this equipment does cause harmful interference to
radio or television reception, detectable by turning the equipment in question off and
on, the user is encouraged to try to correct the interference by one or more of the
following measures:
Reorient or relocate the receiving antenna
Increase the distance between the equipment and the receiver
Connect the equipment to an outlet on a different circuit than that which the receiver
is connected to
Or consult the dealer or an experienced radio/TV technician for help.
This device complies with Part 15 of the FCC Rules. Operation is subject to following
two conditions:
1. This device may not cause harmful interference, and
2. This device must accept any interference that may cause undesired operation.

EN-2
Safety Instructions
Read all of these instructions before you operate your projector and save for future
reference.
1. Read instructions
All the safety and operating instructions should be read before the appliance is
operated.
2. Notes and warnings
All notes and warnings in the operating instructions should be adhered to.
3. Cleaning
Unplug the projector from the wall socket before cleaning. Use a damp cloth for
cleaning the projector housing. Do not use liquid or aerosol cleaners.
4. Accessories
Do not place this product on an unstable cart, stand, or table. The product may fall,
causing serious damage to the product.
Keep the plastic packing materials (from the projector, accessories and optional
parts) out of the reach of children as these bags may result in death by
suffocation. Be particularly careful around the small children.
5. Ventilation
The projector is equipped with ventilation holes (intake) and ventilation holes (exhaust).
Do not block or place anything near these slots, or internal heat build-up may occur,
causing picture degradation or damage to the projector.
6. Power sources
Check that the operating voltage of your unit is identical with the voltage of your local
power supply.
7. Servicing
Do not attempt to service this projector yourself. Refer all servicing to qualified
service personnel.
8. Replacement parts
When replacement parts are required, be sure that the replacement parts are
specified by the manufacture. Unauthorized substitutions may result in fire, electric
shock or other hazards.
9. Moisture Condensation
Never operate this projector immediately after moving it from a cold location to a
warm one. When the projector is exposed to such a change in temperature,
moisture may condense on the lens and the crucial internal parts. To prevent the
unit from possible damage, do not use the projector for at least 2 hours when
there is an extreme or sudden change in temperature.
EN-3
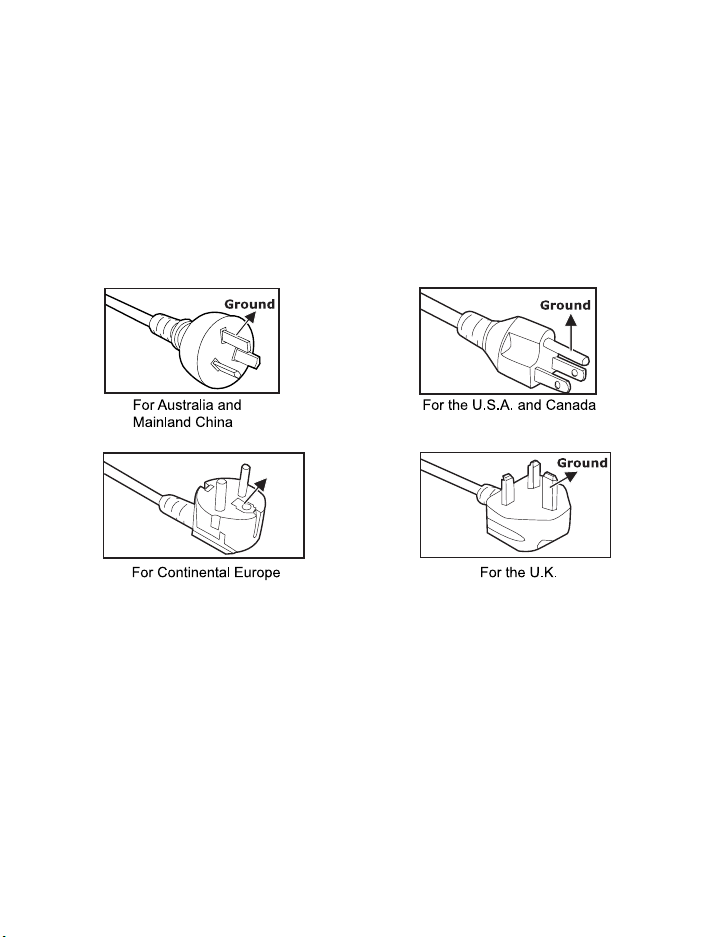
Notes on the AC Power Cord
AC Power Cord must meet the requirement of countries where you use this projector.
Please confirm your AC plug type with the graphics below and ensure that the proper
AC Power Cord is used. If the supplied AC Power Cord does not match your AC outlet,
please contact your sales dealer. This projector is equipped with a grounding type AC
line plug. Please ensure that your outlet fits the plug. Do not defeat the safety purpose
of this grounding type plug. We highly recommend using a video source device also
equipped with a grounding type AC line plug to prevent signal interference due to
voltage fluctuations.
Ground

EN-4
CONTENTS
Introduction ........................................................................................................5
Projector Features .......................................................................................................5
Package Contents .......................................................................................................6
Projector Overview ......................................................................................................7
Using the Product ........................................................................................ 9
Control Panel ..............................................................................................................9
Connection Ports .......................................................................................................10
Remote Control .........................................................................................................11
Replacing the Battery ................................................................................................12
Remote Control Operation ........................................................................................13
Installation ........................................................................................................14
Connecting the Projector ...........................................................................................14
Powering On/Off the Projector ..................................................................................15
Adjusting the Projector ..............................................................................................16
Menu Operation ............................................................................................18
Maintenance ...................................................................................................22
Cleaning the Lens .....................................................................................................22
Cleaning the Projector Housing ................................................................................22
Replacing the Lamp ..................................................................................................23
Specifications ...............................................................................................25
Appendix ............................................................................................................26
LED Indicator Messages ...........................................................................................26
Compatibility Modes ..................................................................................................27
Troubleshooting ........................................................................................................28

EN-5
Introduction
Projector Features
The projector integrates high-performance optical engine projection and a user - friendly
design to deliver high reliability and ease of use.
The projector offers the following features:
Single chip 0.55" Texas Instruments DLP®technology
XGA (1024 x 768 pixels)
Auto image re-sizing (Auto-Sync.) to 1024 x 768 full screen with scaling
compression compatibility for VGA, SVGA, XGA and SXGA*
Compatibility with Macintosh®computers
Compatibility with NTSC, PAL, SECAM and HDTV
D-Sub 15-pin terminal for analog video connectivity
User-friendly, multi-language on-screen display
Advanced electronic keystone correction
* means compressed.

EN-6
Package Contents
When you unpack the projector, make sure you have all these components:
Projector with Lens
Cap
AC Power Cord VGA Cable (D-SUB
to D-SUB)
Composite Video
Cable
S-Video Cable Remote Control (IR) User’s Manual Quick Start Guide
Save the original shipping carton and packing material; they will comein handy
if you ever to ship your unit. For maximum protection, repack your unit as it was
originally packed at the factory.
Accessories and components may vary by retailer and region.

EN-7
Projector Overview
Front View
Lens cap AC power socket
Elevator button Zoom ring
Lens cap strap Focus ring
Front IR remote control sensor Control panel
Projection lens Lamp cover
Ventilation holes
10
12
4
5
6
7
8
3
9
11
17
2 8
3 9
410
511
6

EN-8
Rear View
Connection ports
Kensington lock
Rear IR remote control sensor
Ventilation holes
Bottom View
Elevator foot
Ceiling mount (3-M4*6)
Tilt-adjustment foot
1234
1
2
3
4
1
2
3
1
2
3
This projector can be used with a ceiling mount for support. The ceiling mount is
not included in the package.

EN-9
Using the Product
Control Panel
LED
Button Function
Lamp (Lamp LED indicator)
Refer to “LED Indicator Messages”.
Temp (Temperature LED indicator)
Refer to “LED Indicator Messages”.
Four directional buttons
Use four directional buttons to select items or make adjustments to your selection.
Enter
Enter to sub-menu and confirm the menu selection. Activate in Color Setting, Lamp
Counter Reset and Factory Default menu operations.
Resync
Resynchronize the projector to the input signal from a computer.
Power
Turn the projector on or off.
Source
Manually select an input source.
Menu
Display or exit the on-screen display menus.
12
3
4
5
6
8
7
1
2
3
4
5
6
7
8
Tabla de contenidos
Otros manuales de Proyector de Javes

Javes
Javes VPT-681 Manual de usuario

Javes
Javes TOY-550 Manual de usuario

Javes
Javes IMD-440 Manual de usuario

Javes
Javes HLT-102 Manual de usuario

Javes
Javes NSK-1080P Manual de usuario

Javes
Javes JAVES SLC-515SA Manual de usuario

Javes
Javes PMP-N70 Manual de usuario

Javes
Javes OLX-730 Manual de usuario

Javes
Javes JCD-720P Manual de usuario

Javes
Javes TLX-928 Manual de usuario


