iPort FS-21 Manual de usuario

Instruction Manual
FS-21
FS-22

2
iPort FS-21 and FS-22 Instruction Manual
Introduction
The iPort®FS-21 and FS-22 are free-standing docking systems
that allow an Apple iPod®or iPhone®to become part of a
whole-home audio system, and/or be used as a source in a
variety of local audio systems. You can place the iPort dock on
a desk, table, or other convenient location — allowing quick
and easy docking of an iPod — and connect it to both your
audio/video system and your computer. By pressing a single button on the iPort, you can change the
iPod from the streaming (listening) mode to the music transfer mode, letting you
transfer content from your computer to the iPod.
Before installing and using the iPort, please read and follow all of the instructions in this manual carefully.
iPort System Components and Capabilities
This manual covers the FS-21 and FS-22 iPort free-standing systems. The systems have different
capabilities and include different components. Except where noted, the connections and installation
are the same for both systems.
FS-21 System Capabilities:
• Delivers unbalanced audio from the iPod
• Delivers unbalanced component video,
composite video, or S-Video from the iPod
• Allows the iPod to be line-of-sight
IR-controlled and remotely IR-controlled
(remote IR control requires a compatible
3rd-party controller)
• Allows the iPod’s own volume control to
control the iPort system volume
• Connects to a computer, allowing the iPod to
be updated via iTunes while it is docked*
• Charges the iPod (via the 12V power supply)
while it is docked
FS-21 System Box Contents:
(1) iPort Dock with black color plate
(1) Audio Cable (3.5mm stereo to 2-RCA,
2 meters)
(1) Component Video Cable (3.5mm 4-pin to
3-RCA, 2 meters)
(1) 12V DC Regulated Global Power Supply with
USA plug
*Requires USB 2.0 cable, not included

3
iPort FS-21 and FS-22 Instruction Manual
iPod Models Supported
The iPort FS-21 and FS-22 can be used with the following iPod/iPhone products via the Dock
Adapters included with each:
• iPod classic models (4th generation – 6th generation)
• iPod touch models
• iPod nano models
• iPhone models
Except where noted, the instructions in this manual apply to all of the above products.
FS-22 System Capabilities:
• Delivers unbalanced audio from the iPod
(3.5mm stereo connection)
• Delivers unbalanced component video,
composite video, or S-Video from the iPod
• Allows extensive long-distance extended
control of iPod functions with 2-way communi-
cation (requires compatible 3rd-party controller)
• Allows iPort firmware upgrades (requires
optional firmware update cable)
• Allows the iPod to be line-of-sight IR-controlled
and remotely IR-controlled (remote IR control
requires a compatible 3rd-party controller)
• Allows the iPod’s own volume control to
control the iPort system volume
• Connects to a computer, allowing the iPod to be
updated via iTunes while it is docked*
• Charges the iPod (via the 12V power supply)
while it is docked
• Selectable default iPod control mode: General
(normal) or Extended (RS-232). See page 10.
FS-22 Box Contents:
(1) iPort Dock with black color plate
(1) Audio Cable (3.5mm stereo to 2-RCA,
2 meters)
(1) Component Video Cable (3.5mm 4-pin to
3-RCA, 2 meters)
(1) RS-232 Extended Control Cable (RJ11 to
female DB9, 2 meters)
(1) 12V DC Regulated Global Power Supply with
USA plug
*Requires USB 2.0 cable, not included

4
iPort FS-21 and FS-22 Instruction Manual
Selecting a Location for the iPort Dock
The iPort FS-21 and FS-22 are designed for use in normal interior environments. When selecting a
location for the system, please consider the following:
• Do not use the iPort outside or in a humid or wet environment. The iPort is not waterproof, nor is
it water-resistant.
• Avoid placing the iPort dock in direct sunlight as it can interfere with IR operation.
iPort Connections and Controls
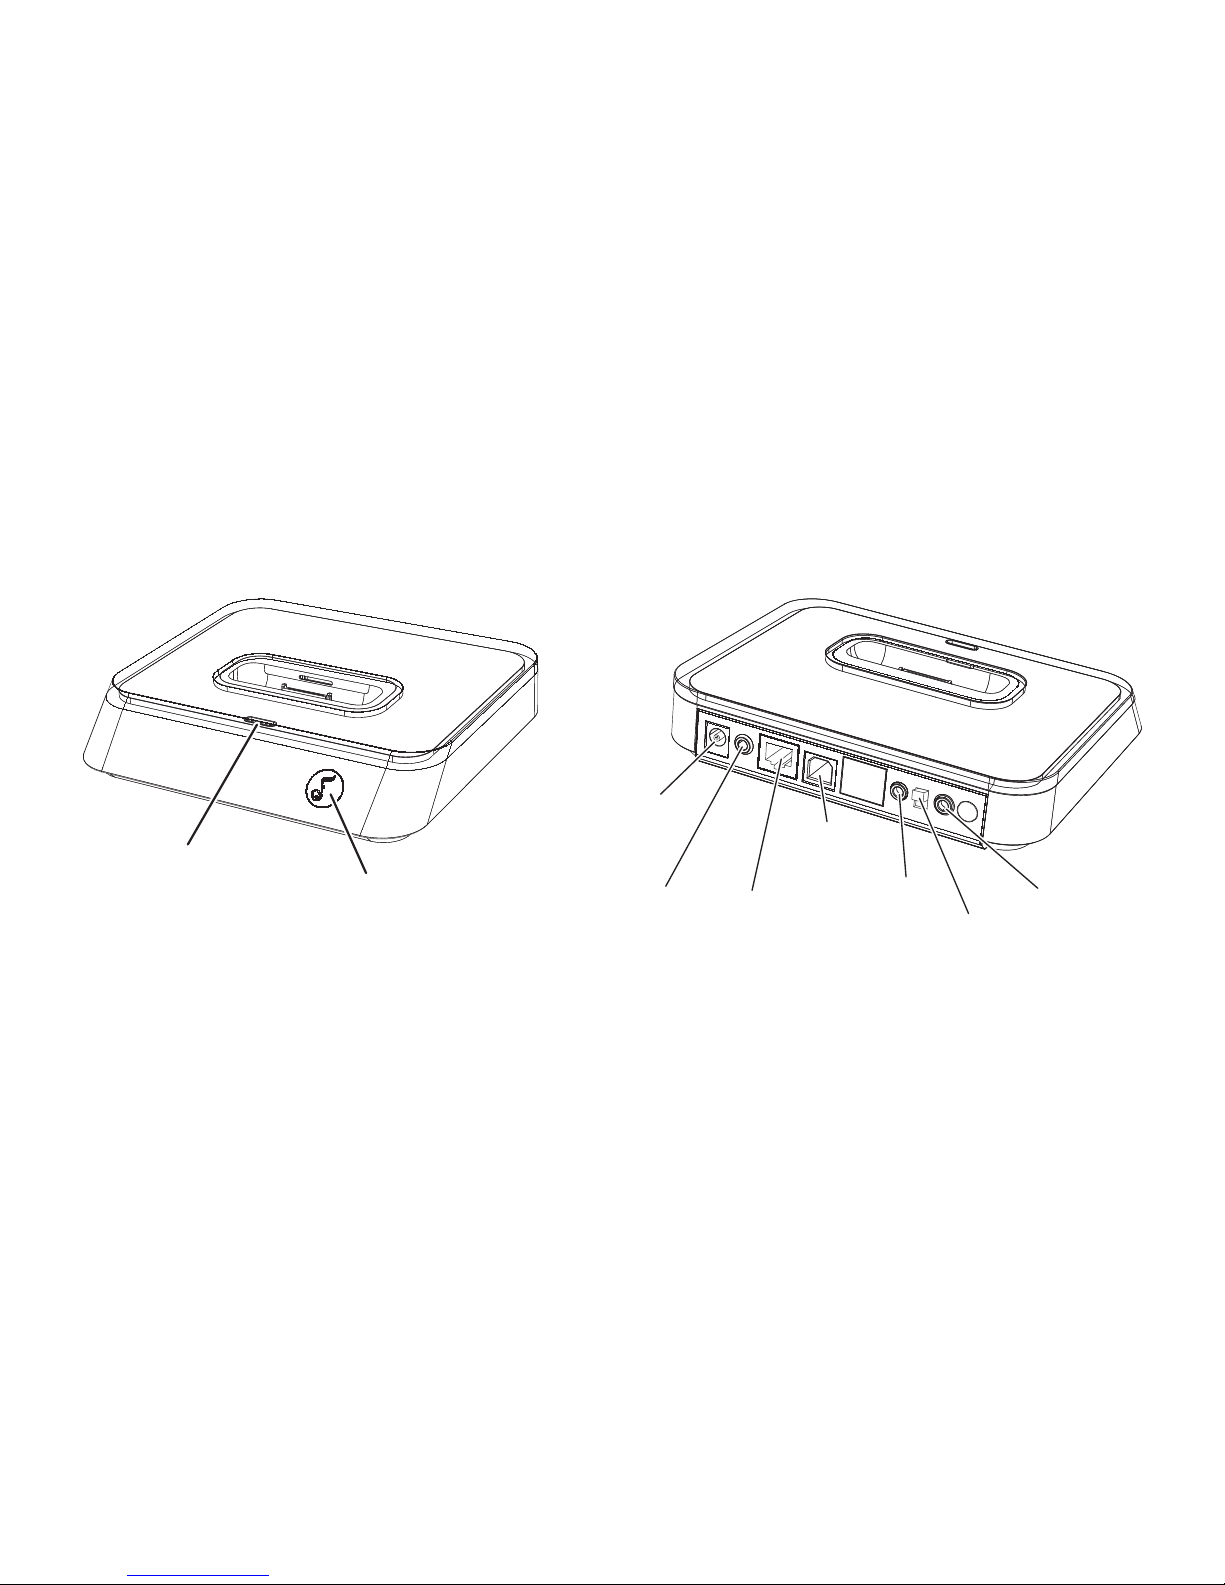
STATUS INDICATOR:Whenever an iPod is docked, the Status Indicator glows
white
and iPort enters the
Music Stream (listening) mode.
FUNCTION SELECTOR:Pressing the Function Selector switches the iPort to the Data Transfer mode and
the Status Indicator glows
red
. Data can then be transferred from the computer to the iPod. To switch
back to the Music Stream mode, eject the iPod from your computer via iTunes. (The iPort will not switch
back to the listening mode while data is being transferred from the computer to the iPod.) iPhone and
iPod touch models with firmware older than version 2.0 need to be undocked and re-docked to go back
into the listening mode.
Note: The iPort does not output audio or video while in the Data Transfer mode.
Power
Connector
IR
Control
Input RS-232
Control Input
(FS-22 onl
y
)
USB 2.0
Connector
Video
Selector
Video
Output Audio
Output
Function Selector/
IR Receiver
Status Indicator
(under clear cover)
Figure 1: iPort Controls and Connections

5
iPort FS-21 and FS-22 Instruction Manual
IR RECEIVER:Receives line-of-sight IR signals from an iPort or iPod remote control (available separately).
POWER CONNECTOR:Connects to the included 12V DC power supply.
IR CONTROL INPUT:3.5mm mono mini jack connects to a compatible IR control system.
RS-232 CONTROL INPUT (FS-22 ONLY): RJ11 jack connects to a compatible RS-232 control system.
USB 2.0 CONNECTOR:Connects to a computer’s USB port via a USB 2.0 cable (USB 1.1 cables will not
work).
VIDEO OUTPUT:3.5mm mini jack connects to a video monitor. The Video Output can send either a
component video, composite video, or S-Video signal, depending on what type of cable is plugged-
into it and the setting of the Video Selector Switch (see below).
VIDEO SELECTOR:When the selector switch is in the DOWN position the Video Output sends compo-
nent video via the included Component Video Cable. When the selector switch is in the UP position
the Video Output sends composite
and S-Video via a combination
Composite/S-Video Cable (part #70120,
not included).
AUDIO OUTPUT:3.5mm Stereo mini jack
connects to an audio system via the
included Audio Cable.
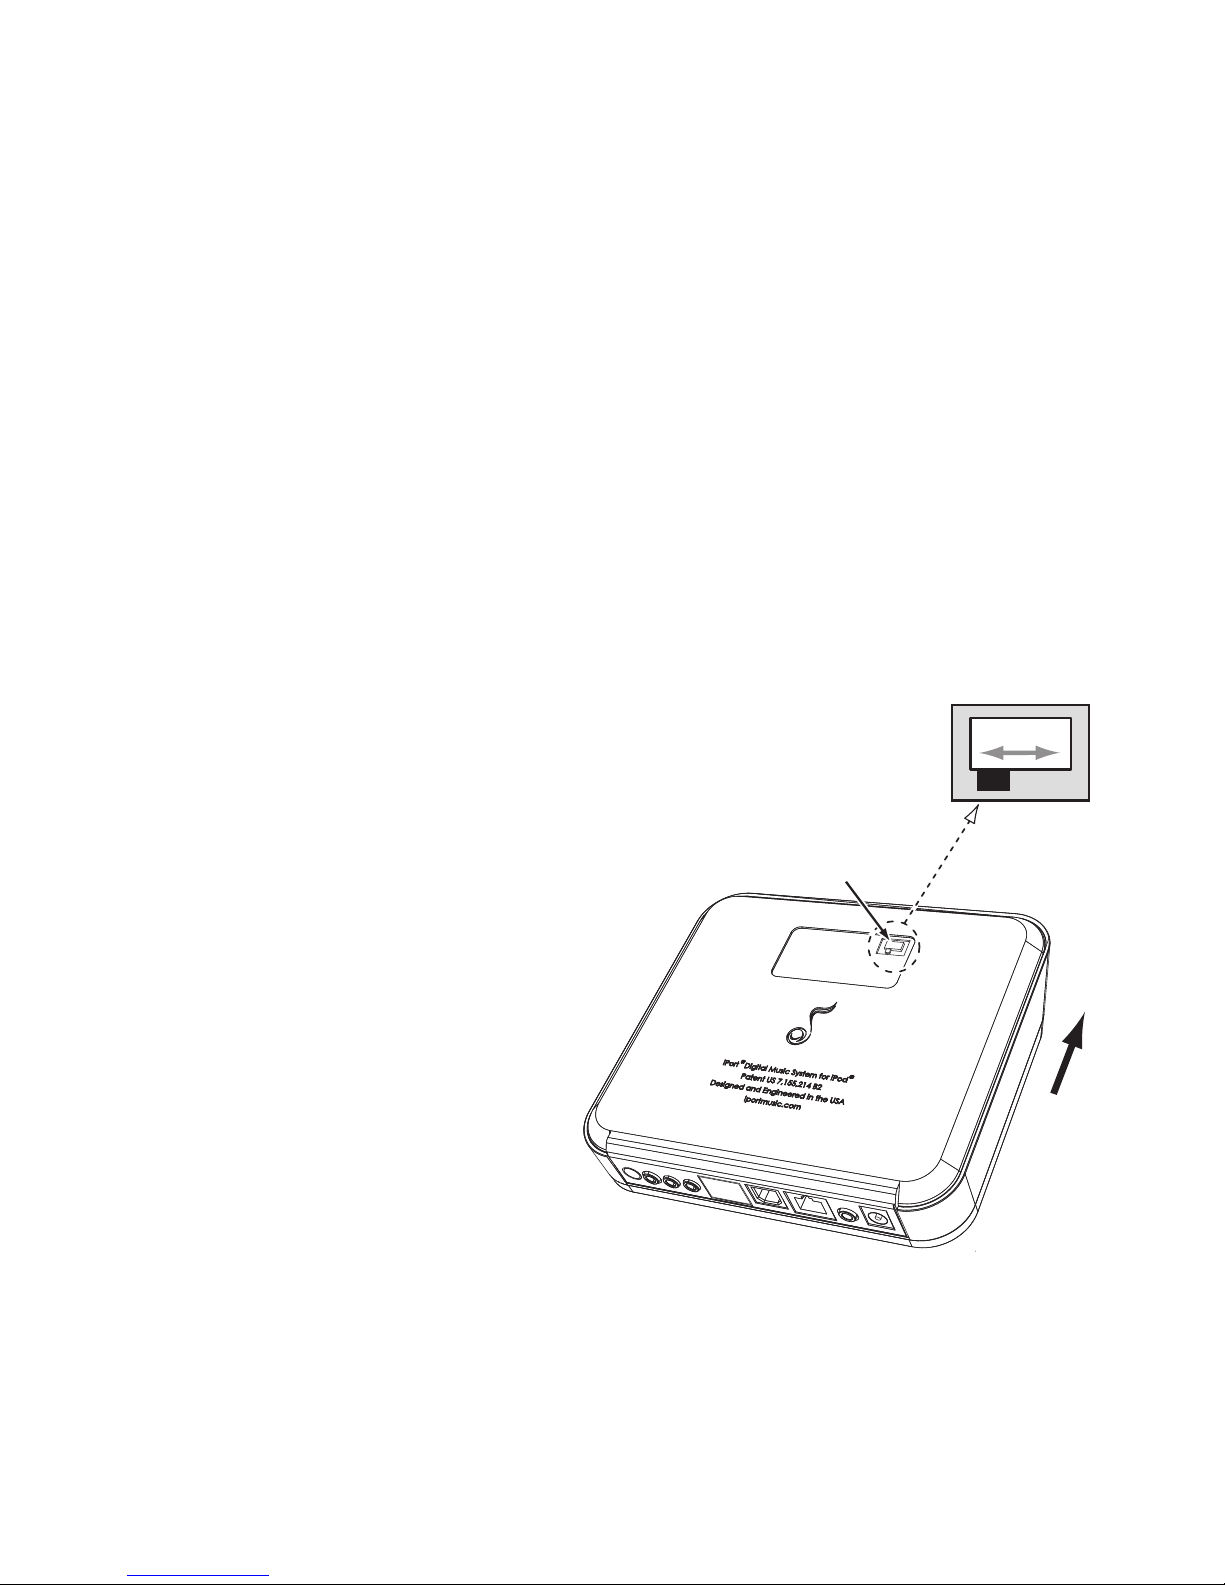
There is a switch on the underside of the
iPort (see
Figure 2
) that sets the Audio
Output to either
Fixed
or
Variable
:
VARIABLE = The iPort system volume is
controlled via the iPod’s volume control.
FIXED = The iPod’s volume control
does not control the iPort system volume
(recommended in systems where the iPort
is being controlled via IR or RS-232).
Fixed
Variable
Front of
iPort
Fixed/Variable
Switch
Figure 2: Fixed/Variable Audio Switch

iPort FS-21 and FS-22 Instruction Manual
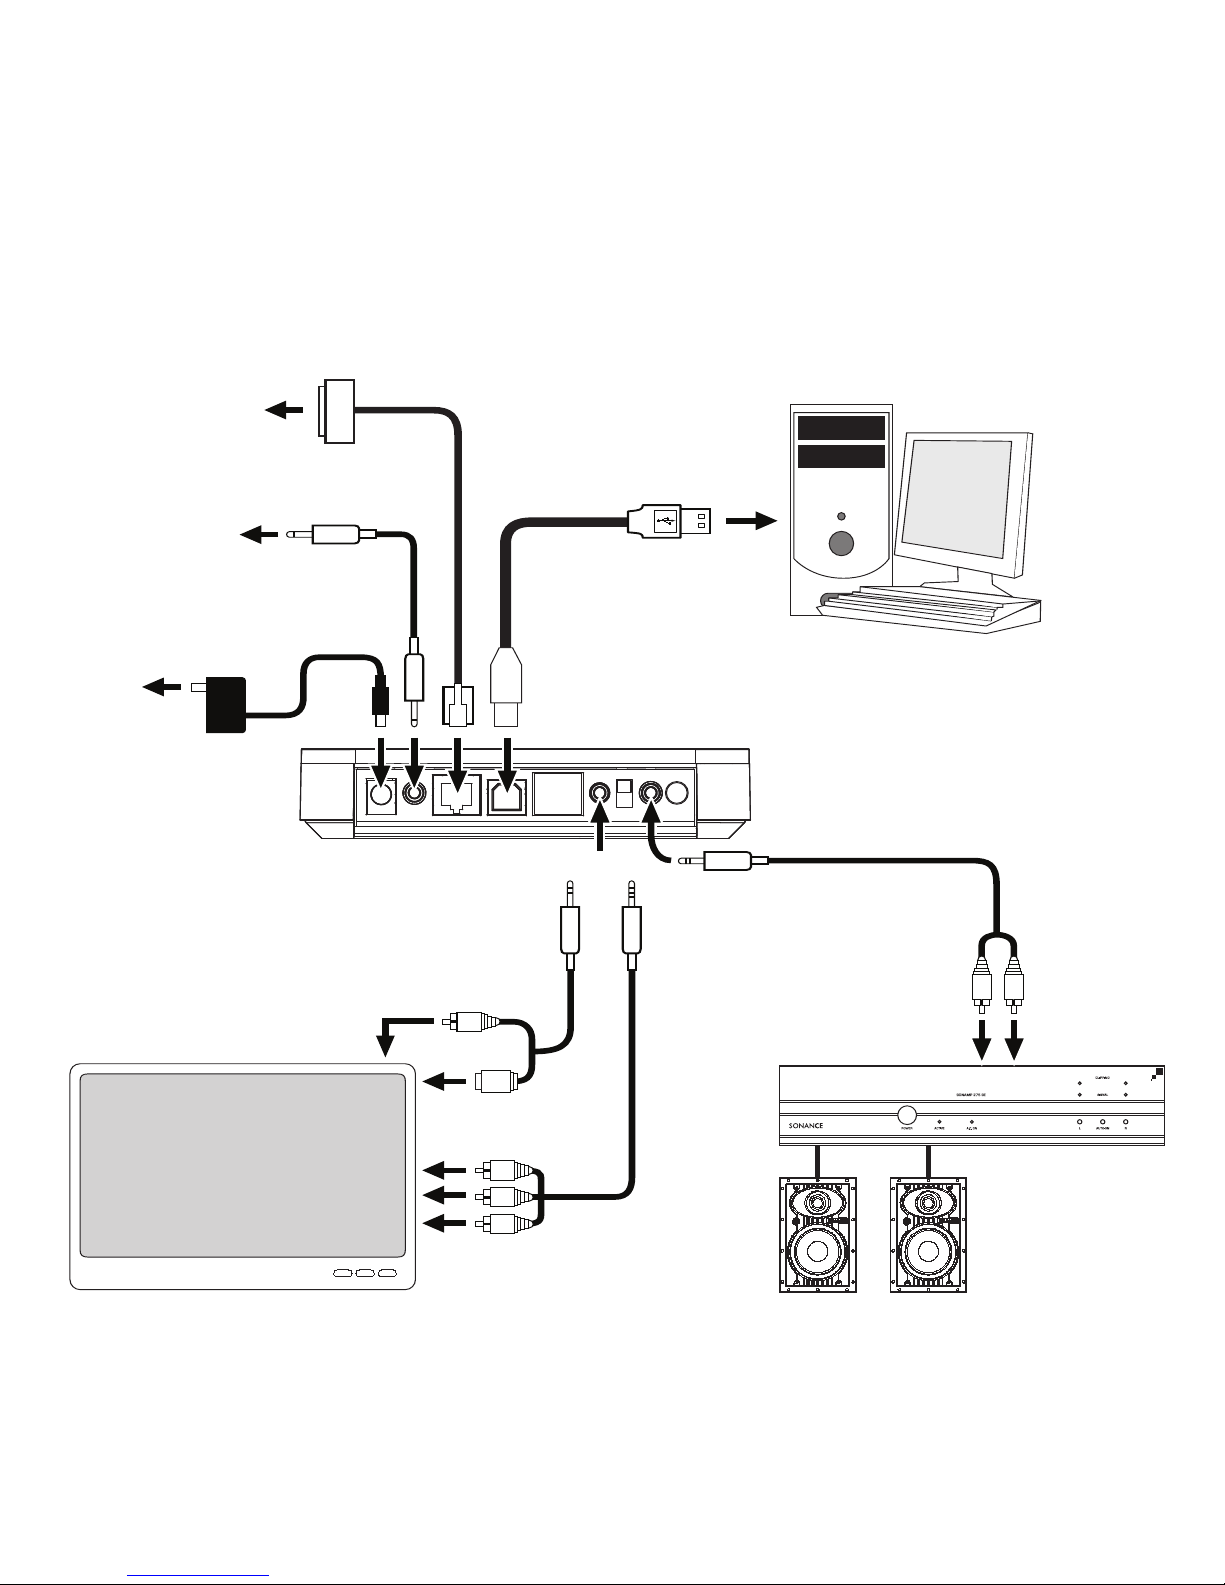
iPort FS-21 and FS-22 System Connections
6
Audio
System
iPort Dock
– OR –
Video
Monitor
Computer
To
Control System
RS-232 Output
(iPort FS-22 only) To
USB Port
To L/R
Audio Inputs
To
Control System
IR Output
RS-232 C
ONTROL
C
ABLE
(
INCLUDED
WITH
I
P
ORT
FS-22)
M
ONO
3.5
MM
CABLE
(
NOT
INCLUDED
)
A
UDIO
C
ABLE
(
INCLUDED
)
USB 2.0
CABLE
(
NOT
INCLUDED
)
C
OMPONENT
V
IDEO
CABLE
(
INCLUDED
)
C
OMBINATION
S-V
IDEO
/ C
OMPOSITE
V
IDEO
CABLE
(
NOT
INCLUDED
)
12V
Power
Supply
To
Wall
Outlet
To Component Video
Input
To S-Video Input
To Composite
Video Input
Figure 3: iPort FS-21 and FS-22 System Connections

7
iPort FS-21 and FS-22 Instruction Manual
The iPort FS-21 and FS-22 systems’ unbalanced audio and video outputs are designed for use in a
local-zone system where the audio/video equipment is located less than 25 feet from the iPort.
For longer distances, use the iPort Balanced Audio Kit (part #70122, not included) and Balanced
Video Kit (part #70123, not included). The Balanced Audio Kit allows the iPort to connect to audio
equipment located up to 500 feet away; the Balanced Video Kit allows the iPort to connect to video
equipment located up to 250 feet away. For more information about connecting the iPort to a long-
distance audio/video system, see the instruction manuals included with the Balanced Audio and
Balanced Video kits.
Connecting the iPort to a Local-Zone Audio/Video System
Connect the iPort dock to the computer and audio/video components as shown in
Figure 3
:
1. Connect the included Audio Cable to the iPort’s Audio Output and to a source input on the
audio system.
2. Connect the iPort’s Video Output to an input on the video monitor:
• If the video monitor has a component video input, set the iPort’s Video Selector switch in the DOWN
position (see
Video Selector
, on page 5), and connect the included Component Video Cable.

• If the video monitor does not have a component video input, set the iPort’s Video Selector
switch in the UP position (see
Video Selector
, on page 5) and use the available combination
Composite/S-Video cable (part #70120, not included). If the video monitor has an S-Video
input, connect the cable’s S-Video plug. If the monitor has a composite video input, connect
the cable’s RCA plug.
3. Use a USB 2.0 cable (not included) to connect the iPort’s USB 2.0 connector to the USB port of the
computer containing the iTunes application.
4. Connect a mono 3.5mm-to-3.5mm cable (not included) to the iPort’s IR Control Input and to the
IR control output of a compatible 3rd-party IR control system.
5. (IPORT FS-22 ONLY): Connect the included RS-232 Extended Control Cable to the iPort’s RS-232
Control Input and to the RS-232 control output of a compatible 3rd-party RS-232 control system.
Note: For complete information about RS-232 programming and operation go to
www.iportmusic.com.
6. Plug the included 12V DC power supply into the iPort’s Power Connector.
After confirming that all cables are connected correctly, plug the power supply into a wall outlet.

8
iPort FS-21 and FS-22 Instruction Manual
Docking and Undocking an iPod
Docking
Insert the dock adapter that was included with your iPod all the way into the iPort well
(see
Figure 4
). Once inserted, the dock adapter can remain in the well.
To dock the iPod, gently slide it down into the iPort well, as shown in
Figure 5
. Do not force the iPod
down into the well as you may damage the multi-pin connector in the iPort base.
Undocking
Undock the iPod only when the iPort Status Indicator is
white
, indicating that the iPort is in the Music
Stream (listening) mode. To undock the iPod while the Status Indicator is
red
(iPort is in the Data
Transfer mode), you should eject the iPod from the computer via iTunes. See
Status Indicator
and
Function Selector
on page 4, for more information.
If you undock the iPod while the Status Indicator is red, Apple computers and PC computers
running Windows (other than Windows XP) will display an error message. (Windows XP permits ‘hot’
connection/disconnection via USB.) When you re-dock the iPod, there will be a slight delay before
you can use it while the iPort software re-synchronizes with the iPod. See
Status Indicator
and
Function Selector
on page 4 for more information.
Figure 4: Inserting the iPod Dock
Adapter
Figure 5: Inserting the iPod

9
iPort FS-21 and FS-22 Instruction Manual
Controlling the iPod in iPort FS-21 and FS-22 Systems
iPort FS-21 Systems:
• From the iPod front panel.
• By an optional iPort remote (part #70030 — black; part #70032 — white) or iPod remote.
• By IR commands from a compatible IR control system.
iPort FS-22 Systems:
• From the iPod front panel (the
General
control mode).
• By an optional iPort remote (part #70030 — black; part #70032 — white) or iPod remote.
• By IR commands from a compatible IR control system.
• By RS-232 commands from a compatible control system (the
Extended
control mode). Two-way
communication from the iPod including iPod metadata — non-program information such as song
titles — is available.
NOTE: The iPort FS-22 is set from the factory to default to the Extended control mode when-
ever an iPod is docked. To change the default control mode to the General control mode,
see page 10.
IR Control Notes
• iPort IR codes for universal remotes can be downloaded from
www.iportmusic.com
.
At press time supported formats are: RTI, Phillips Pronto style, Logitech/Harmony, and Universal
Electronics (UEI). Check
www.iportmusic.com
for the most up-to-date information.
• Third-generation iPod models only respond to the following IR commands:
Play/Pause, Next Track,
and
Previous Track.
For iPort IR remote control commands, please see the instruction manual accompanying the remote.

10
iPort FS-21 and FS-22 Instruction Manual
Extended (RS-232) Control Notes (FS-22 only)
All iPort FS-22s come from the factory set to default to the
Extended
control mode whenever an
iPod is docked. Once an iPod is docked, it can be changed to the General control mode and back
to the Extended control mode via commands from the RS-232 controller. To change the default
control mode to the
General
control mode:
1. Unplug the iPort 12V power supply from the back of the iPort dock.
2. Remove the iPod dock adapter from the iPod well and then remove the iPort’s top cover.
3. Locate the iPod
Control Mode
Jumper on the iPort
circuit board, as
shown at the bot-
tom of
Figure 6
.
The jumper is set in
the Extended posi-
tion, as shown at
the top left of
Figure 6
.
4. Remove the jumper
and replace it in the
General position, as
shown at the top
right of
Figure 6
.
5. Replace the iPort’s
top cover and iPod
dock adapter, then
plug the iPort 12V
power supply back
into the iPort dock.
E226252
8MX–01
94V–0
RS232
R92 R93
J11
+3.3V
_1
_1
RS232
J11
_1
_1
RS232
J11
_1
_1
iPod Control
Mode Jumper
Multi-Pin
Connector
Exten
d
e
d
(RS-232)
Control Mode Genera
l
(Norma
l
)
Control Mode
iPort Well
Front of iPort
Jumper
Figure 6: Changing the Default iPod Control Mode
Otros manuales para FS-21
1
Este manual sirve para los siguientes modelos
1
Tabla de contenidos
Otros manuales de Estación de acoplamiento de iPort

iPort
iPort FS-21 Manual del propietario

iPort
iPort FS-23 Manual del propietario

iPort
iPort FS-1 Manual de usuario

iPort
iPort FS-1 Manual de usuario

iPort
iPort FS-23 Manual de usuario

iPort
iPort FS-22 Manual del propietario

iPort
iPort EX-1 Manual de instrucciones

iPort
iPort FS-23 Manual de usuario

iPort
iPort IW-20 Manual del propietario

iPort
iPort IW-1 Manual de usuario


