ION U-CAST Manual de usuario

USB-MIC PODCASTING KIT
U-CAST
REFERENCE MANUAL
(ENGLISH) ::::: 3 – 21
MANUAL DE REFERENCIA
(ESPAÑOL) ::::: 22– 41
GUIDE D’UTILISATION
(FRANÇAIS) ::::: 42 – 61
BEDIENUNGSANLEITUNG
(DEUTSCH) ::::: 62 – 81
MANUALE DI RIFERIMENTO
(ITALIANO) ::::: 82 – 101


3
TABLE OF CONTENTS
TABLE OF CONTENTS..........................................................3
BOX CONTENTS....................................................................4
CONNECTING THE MICROPHONE ......................................4
GENERAL SOFTWARE NOTES............................................4
AUDACITY SOFTWARE INSTALLATION .............................5
SELECTING YOUR LANGUAGE...........................................5
CONFIGURING WINDOWS VISTA TO WORK WITH THE
USB MICROPHONE ....................................................6
CONFIGURING WINDOWS XP TO WORK WITH THE USB
MICROPHONE.............................................................8
AUDACITY CONFIGURATION FOR WINDOWS.................10
AUDACITY CONFIGURATION FOR MAC 10.4 AND ABOVE
...................................................................................12
RECORDING INTO THE COMPUTER .................................16
ADJUSTING YOUR AUDIO LEVEL (optional)....................17
EXPORTING YOUR RECORDING.......................................18
LISTENING AND EXPORTING TO WAV & MP3 .................18
UPLOADING YOUR PODCASTS.........................................19
TROUBLESHOOTING..........................................................21

4
BOX CONTENTS
USB Microphone
USB Cable
Desktop mic stand
Headphones
Software CD
CONNECTING THE MICROPHONE
The USB microphone is a Plug and Play device, which means that there are no
drivers to install. The first time you plug the microphone into your computer, it will
automatically install all the necessary driver components and will be ready to use
immediately.
GENERAL SOFTWARE NOTES
Your USB microphone is compatible with any recording software that supports USB
Audio devices. We have included Audacity, however you may prefer to use a
variety of 3rd party software packages.
Audacity software is distributed under the General Public License (GPL). More
information as well as open source code can be found on the CD included or on the
web at http://audacity.sourceforge.net.
Audacity works on both Windows (98 and greater) as well as Mac OS X (10.4 and
greater). Software for Linux can be found on the Audacity website.
Go to http://audacity.sourceforge.net/help/ for additional tutorials.
The website also has information for separate add-ons to Audacity to enhance
performance and features.

5
AUDACITY SOFTWARE INSTALLATION
Before Starting the Software
Make sure that your USB microphone is plugged into the computer with the supplied USB cable, and that
your computer is plugged in and turned on.
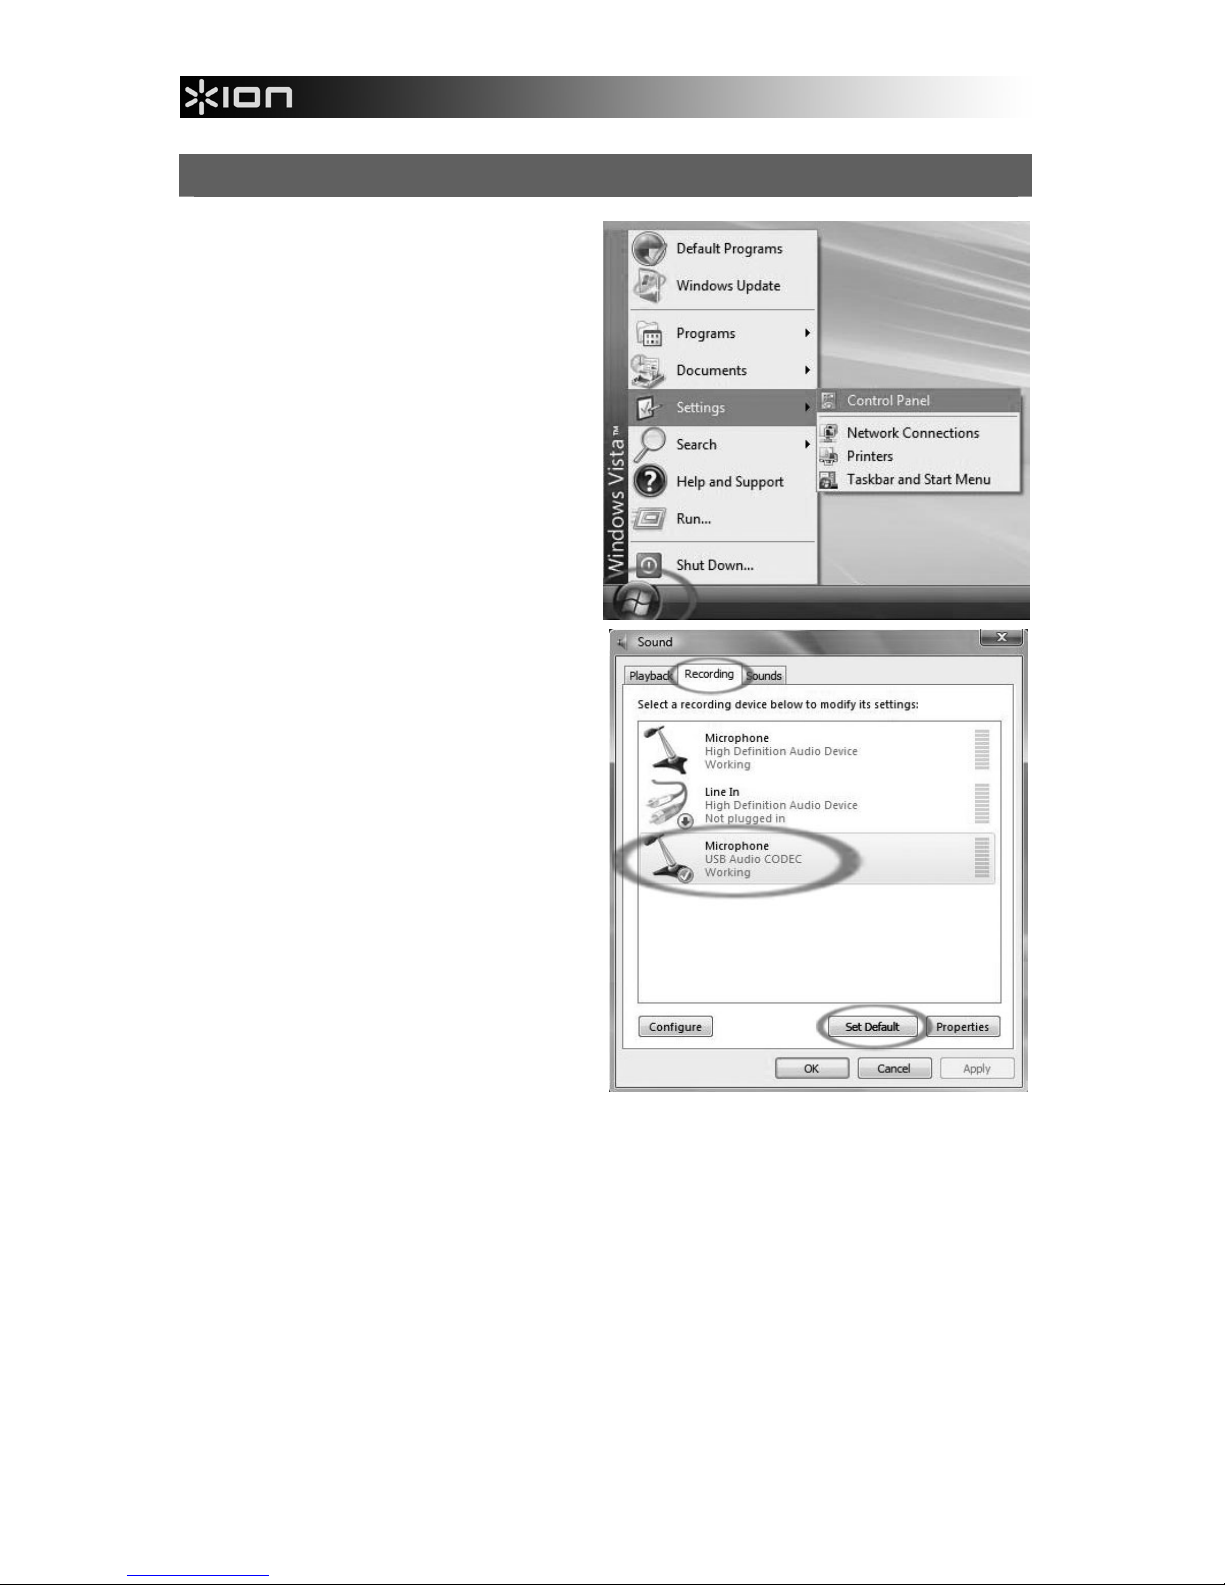
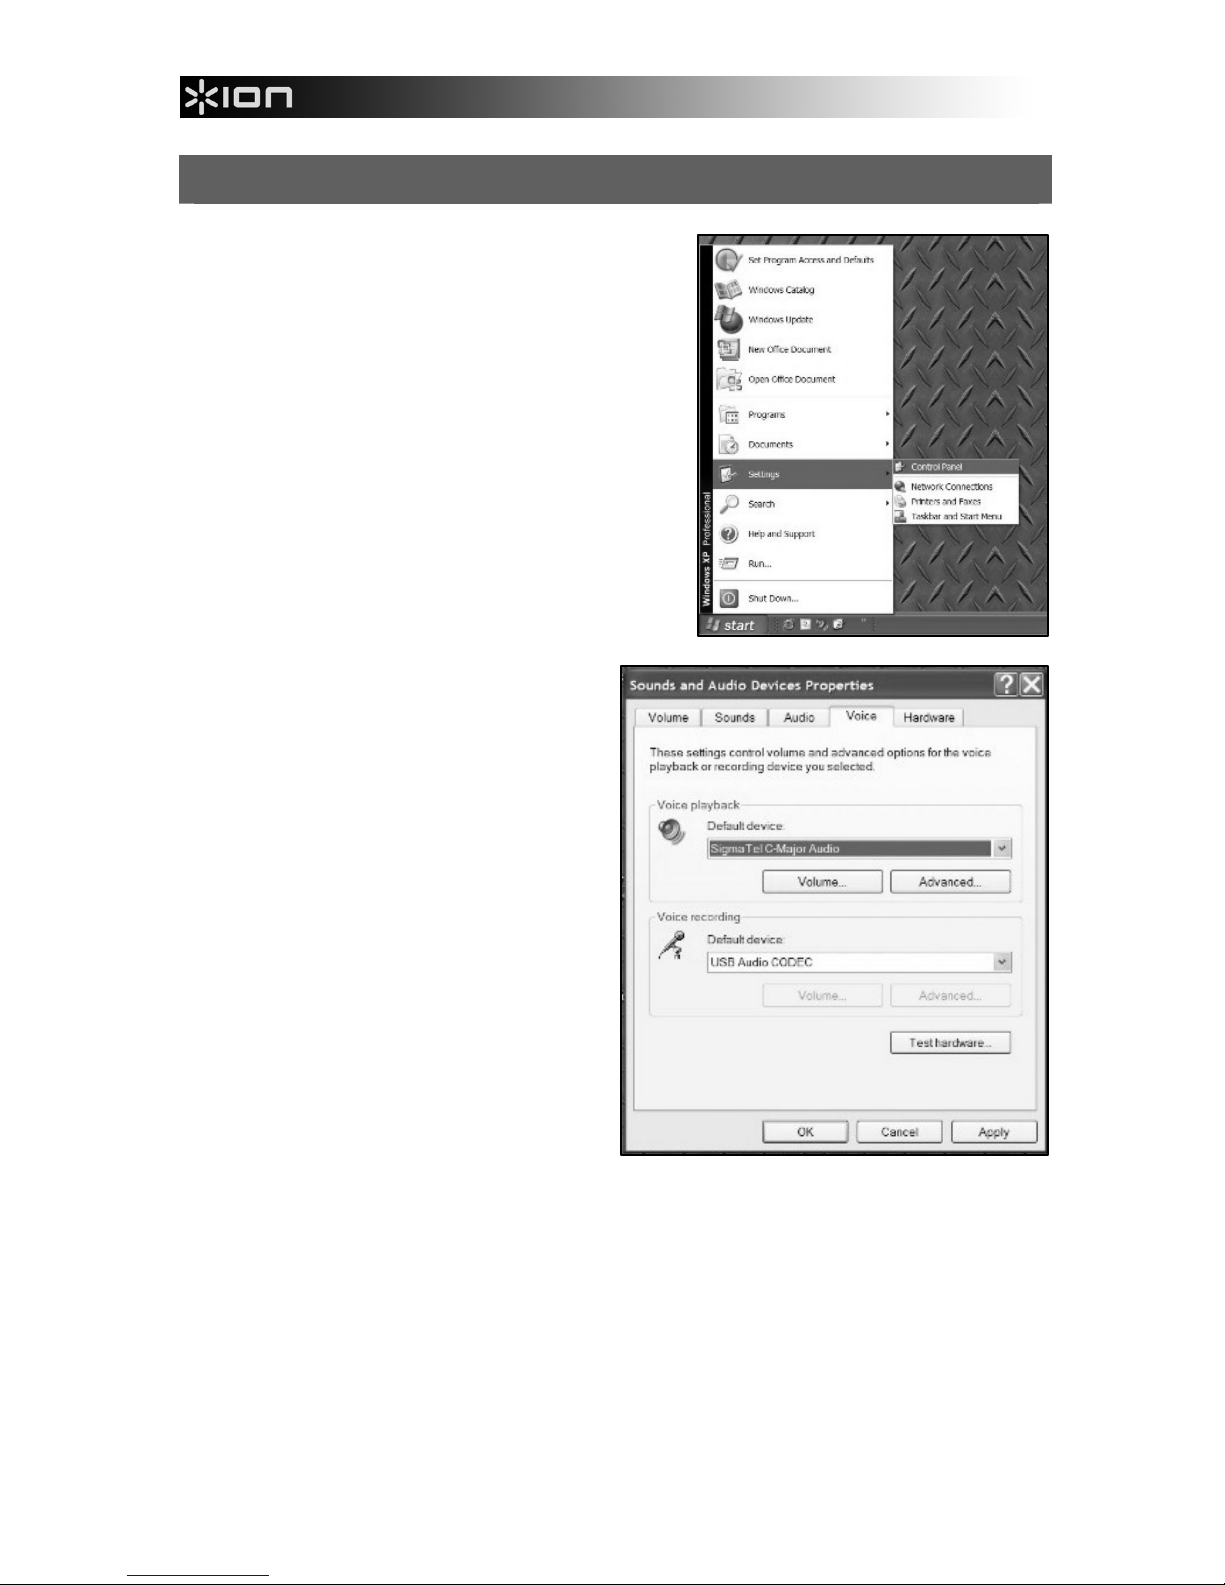
To Install Software (PC)
1. Connect the USB port on the USB microphone to the USB port of your computer.
2. Turn your computer on and allow it to boot fully if it is not on already.
3. Your computer will say that Windows detects a new device and that it is available to use.
4. Insert the CD that came with your USB microphone.
5. Double-click the Audacity Recording Software to open it.
6. Double-click the Windows folder to open it.
7. Double-click the Audacity folder to open it.
8. Double-click the audacity-win-1.2.4b.exe file to begin installing the application.
9. Follow the on-screen instructions to install Audacity.
10. Once the installation has completed successfully, you can open the Audacity application by clicking
on Start, then going to All Programs -> Audacity.
To Install Software (Mac)
1. Connect the USB port on the USB microphone to the USB port of your computer.
2. Turn your computer on and allow it to boot fully if it is not on already.
3. Insert the included CD.
4. Open the CD icon on the desktop.
5. Double-click the Audacity Recording Software folder.
6. Double-click the Apple folder.
7. Drag the Audacity folder, located inside, to your hard drive. We recommend that you move the
folder to your Applications folder.
8. A window will come up which shows the files copying.
9. When copying has finished, EJECT the CD. Audacity is now installed.
10. To open the application, go to your Finder and click on Applications. Then, double-click the
Audacity folder to open it. Lastly, double-click the Audacity icon to launch the application.
Note: If you copied the Audacity folder to a different location than your Applications folder, simply find
the Audacity folder and double-click on the Audacity icon, located inside the folder, to launch the
application.
SELECTING YOUR LANGUAGE
Before you begin using the software, note that
Audacity’s controls and menus can be displayed in a
variety of different languages. Go to Edit |
Preferences and click on the Interface tab. Under
the Language pull-down tab, you can select your
preferred language.

6
CONFIGURING WINDOWS VISTA TO WORK WITH THE USB MICROPHONE
1. Close all programs that are open
on your computer.
2. On the bottom left of your screen,
select the Start menu.
3. Select Settings then Control
Panel.
4. In the window that opens, find and
double-click the Sound control
panel. (If you don’t see a choice
called “Sound”, choose the Switch
to Classic View option in the panel
on the left of the window, and the
Sound Control Panel should
become available on the right.)
5. Select the Recording tab at the
top of the Sound Control Panel.
6. Under the Recording tab, choose
Microphone - USB Audio Codec
as the default device. The USB
Audio Codec represents your
microphone.
7. Click on the Set Default button to
confirm your choice.

7
8. Now select the Playback tab
at the top of the Sound
control panel.
9. Under the Playback tab,
choose the device that you
would like your computer’s
audio to come out of.
Your computer’s audio
outputs may appear as:
Speakers – High Definition
Audio Device
or
Headphones – High
Definition Audio Device
or both, depending on the
hardware installed in your
computer.
Click on the device that best
matches your desired audio
setup and click Set Default to confirm your selection.
Note: Do NOT choose “Speakers - USB Audio Codec” as your playback
device. USB Audio Codec represents your microphone, and can only be used
as recording input, not a playback output.
10. Click Set Default to confirm your choice.
11. Click Apply if possible, then click OK to close the Control Panel.
12. Click Apply (if possible), then click OK.
13. Make sure that your computer’s speakers (if not built-in) are plugged into your
computer’s audio output and turned on so you can hear your recording. If your
computer has a headphone output, you can use headphones in-place of
speakers.

8
CONFIGURING WINDOWS XP TO WORK WITH THE USB MICROPHONE
1. Close all programs that are open on your
computer.
2. On the bottom left of your screen, select
the Start menu.
3. Select Settings then Control Panel.
4. In the window that opens, find and
double-click the Sounds and
Audio Devices control panel. (If
you don’t see a choice called
Sounds and Audio Devices,
choose the Switch to Classic View
option in the panel on the left of
the window, and the Sounds and
Audio Devices should become
available on the right.
5. Select the Voice tab at the top of
the Sounds and Audio Devices
control panel.
6. Under Voice Playback, choose
your internal sound card as the
default device. This varies by
computer but should not be set to
“USB Audio Codec, Modem, or
Microsoft Sound Mapper.”
7. Under Voice Recording, select USB Audio Codec for your default device –
this is the USB truntable.

9
8. Select the Audio tab at the top
of the Sounds and Audio
Devices control panel.
9. Under Sound Playback,
choose your internal sound card
as the default device. This
varies by computer but should
not be set to “USB Audio
Codec, Modem, or Microsoft
Sound Mapper.”
10. Under Sound Recording,
select USB Audio Codec for
your default device – this is the
USB microphone.
11. Check the box titled Use only
default devices.
12. Click Apply (if possible), then
click OK.
13. Make sure that your computer’s
speakers (if not built-in) are
plugged into your computer’s audio output and turned on so you can hear
your recording. If your computer has a headphone output, you can use
headphones in-place of speakers.

10
AUDACITY CONFIGURATION FOR WINDOWS
1. Launch Audacity: Click on the Start menu on the bottom left of your
screen. Select All Programs, then Audacity.
2. In Audacity, click on the Edit menu at the top of the screen.
3. Select Preferences from the Edit menu.
Figure 1: Select Preferences
The Audacity Preferences window will come up (Figure 2). Choose the
Audio I/O tab from the top of the Preferences screen.
4. Set your Playback Device to your internal sound card. Since different
computers have different internal sound cards, your selection may be
different from the image below (Figure 2). The correct selection, however,
will NOT be USB Audio Codec, Microsoft Sound Mapper or Modem.
5. Set your Recording Device to USB Audio Codec. This represents your
microphone.
Note: The USB microphone may show up with a different name in the
Preferences window. This may depend on your computer model and
operating system. 99% of the time it will contain “USB” in the Name.
6. Set Channels to 2 (Stereo).
7. Check the box labeled Software Playthrough.
Tabla de contenidos
Idiomas:
Otros manuales de Micrófono de ION


