Inoi MP180 Manual de usuario

MP3 HARD DISK
User Manual
V1.0


MP3 HARD DISK
Contents
Before Using the Product 1
Introduction 1
System Requirements 1
Charging the Battery 2
Transferring Music Files 3
Music File Transferring Example 4
Basic Functions 5
Components 5
Component Description 6
Playback Screen 8
Using the Product 10
Charging the Battery with the AC Adapter 10
Charging the Battery with the USB Cable 11
Playing Music 12
Library List 13
Function List 17
Connecting to Computer 21
Software Installation 21
Cable Connection 21
MP3 Hard Disk Utility 23
MP3 Hard Disk Utility Operation 23
Specifications 31

MP3 HARD DISK
Before Using the Product
Introduction
The MP3 Hard Disk has excellent sound quality, is easy to use, and is capable of
storing thousands of songs. It is USB 2.0 compatible and can download MP3 files
without additional software. The unit can also be used as an external hard drive.
The package contains a MP3 Hard Disk Utility that allows you to convert music
CDs to MP3 files and store songs onto the MP3 Hard Disk. This utility allows you
to compile playlists and manage MP3 files.
System Requirements
Microsoft® Windows XP, Windows 2000, Windows Millennium Edition (Me) or
Windows 98 Second Edition (SE).
Intel®Pentium®II 350 MHz, AMD®K6-2®266 MHz or faster processor
(Pentium III 450 MHz or faster is recommended for MP3 encoding).
Optical drive (ex. CD-ROM, DVD ROM drive).
USB 1.1 / USB 2.0 (USB 2.0 recommended).
64 MB RAM (128MB recommended).
10 MB of available hard disk space (A larger capacity is needed for storing
music files).
Internet Connection for CDDB support.
SVGA Graphic Card (256 colors, resolution 800 x 600 or higher).
DirectX 7.0 or higher.
1

MP3 HARD DISK
Before Using the Product
Charging the Battery
The built-in high capacity Li-polymer battery must be fully charged before
first-time use or when the battery has not been charged for over 6 months. It
takes about 6 hours to fully charge the battery. (To take full advantage of the
battery, charging the battery for 10 hours before initial use is recommended.)
You can charge the battery with either the included AC adapter or USB cable.
Charging with AC adapter
播放狀態
Charging with USB cable
2

MP3 HARD DISK
Before Using the Product
Transferring Music Files
The MP3 Hard Disk is pre-formatted. There are two ways to transfer music files
to the MP3 Hard Disk:
1. Without using any software application, connect MP3 Hard Disk directly to a
computer and transfer MP3 or WMA files to the “MUSIC_ME” folder. See
Figure 1. (Note: please do not transfer non-musical data to the MUSIC_ME
folder.)
A USB driver is required for Windows 98 SE. Please refer to “Software
Installation” section.
2. Install and use the MP3 Hard Disk Utility in the attached CD. Refer to “MP3
Hard Disk Utility” section.
Figure 1
3

MP3 HARD DISK
Before Using the Product
Music File Transferring Example
You can store tracks or employ folder names by preference. The following
example describes how to transfer and arrange music files in this unit:
1. Turn off the MP3 Hard Disk.
2. Use the USB cable to connect the MP3 Hard Disk with the computer. (The
smaller plug of the cable connects to the USB connector of the MP3 Hard Disk;
the bigger plug connects to the computer’s USB port.)
3. When the LCD lights up automatically, press button for connection.
4. The LCD will prompt a successful connection as shown on
the right.
5. The MP3 Hard Disk will appear as a new drive in “My Computer” (e.g. E:).
Please look up the drive in “My Computer” and click into it.
6. Open the “MUSIC_ME” folder under the new drive.
7. Create new folders under “MUSIC_ME” such as “Classic”, “Pop”, and “Rock”.
8. Open the folder and copy music albums or singles stored in your computer
into these newly-created, categorized folders.
4
MP3 HARD DISK
Basic Functions
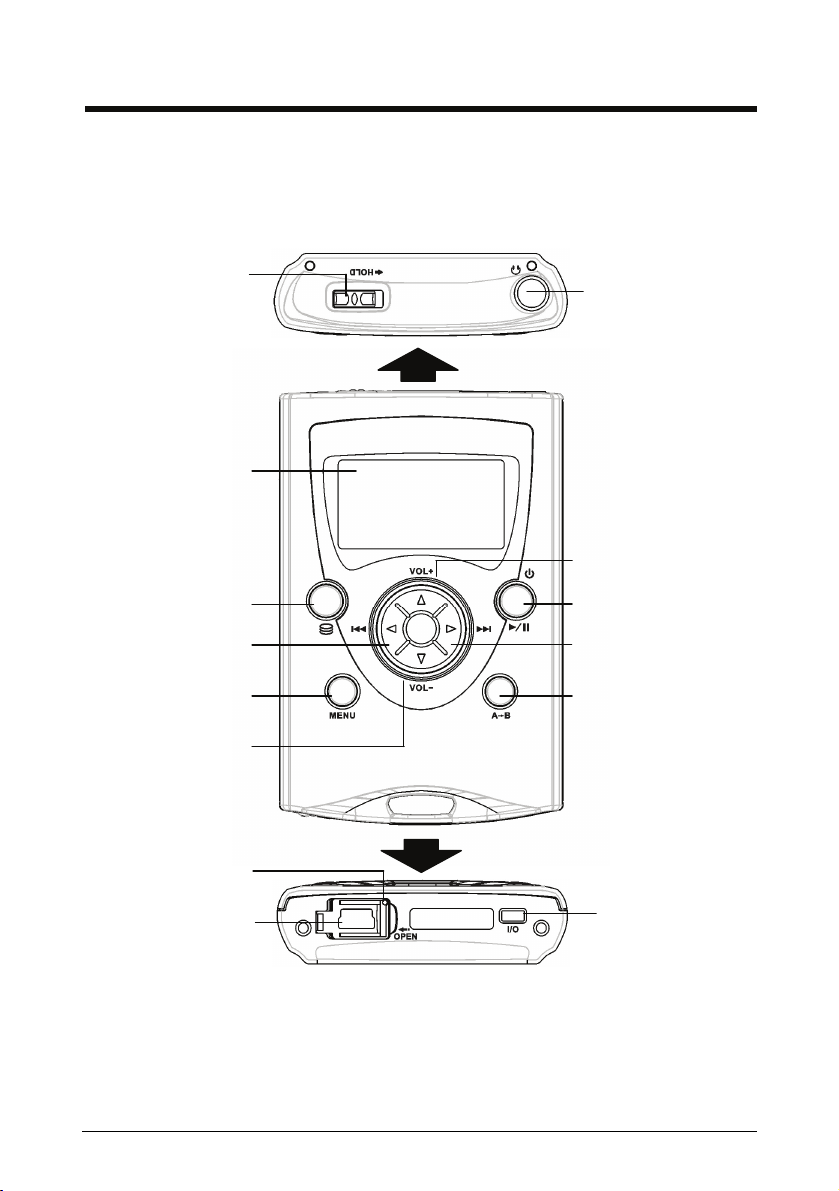
Components
HOLD switch
Earphone jack
Backli
g
ht LCD
Play / Pause / Power
Right / Next / Enter
A-B button
Up / VOL+ button
Menu button
Library button
Left / Prev / Return
Down / VOL-
Reset pinhole
Speaker interface
USB connector
(with lid on top)
5

MP3 HARD DISK
Basic Functions
Component Description
Name or
Symbol
Function Description
Playback Starts, pauses or resumes playback.
Power On/Off Press once to turn the power on;
Press and hold for 2 seconds to turn it off.
Right
Next
Enter
During playback: Plays the next track or hold to fast
forward.
While Paused: Selects the next track.
Enters into a selected function or make a selection.
Left
Previous
Return
During playback: Replays the current track from
start; when at the beginning of a track, plays the
previous track; hold to rewind.
While Paused: Selects the previous track.
Returns to upper function layer (previous screen).
Volume up
Move upward
Increase value
During playback: Raises the volume.
Moves cursor upward
Increases a value.
Volume down
Move downward
Decrease value
During playback: Lowers the volume.
Moves cursor downward
Decreases a value.
Loops music; Add
tracks into My
Favorite; Restart a
game
During playback: Selects points A and B and plays
from A to B repeatedly.
When the cursor is on a track or folder: Adds the
track or folder into My Favorite.
Restarts a game when it is over.
6

MP3 HARD DISK
Basic Functions
Function List
Displays the Function List; Switches between
Function List and Playback Screen.
Library List
Displays the Library List; Switches among Library
List, Playback Screen, and Track Location Screen
Key Lock
Moves the Hold Switch in the arrow direction to lock
up all key operations. Moves in the opposite
direction to unlock all buttons.
Earphone Jack Plug in earphones.
USB Connector
(with lid on top)
1. Connecting with the USB cable: Use USB cable to
connect to computer or charge the battery via
computer (bus power).
2. Connecting with AC adapter: to charge the
battery.
Speaker Interface Connects to speakers.
Reset Pinhole
(To the upper right
of the USB
connector)
Inserting a pointy object into the Reset Pinhole will
reset the MP3 Hard Disk and return it to factory
default settings.
Resumed settings include:
☆Language ENGLISH→
☆My Favorite →Empty
EQ Normal☆→
☆Shuffle →Off
☆Repeat →All
☆Contrast 50%→
☆BackLight Duration 5→seconds
☆Date&Time →Default
7
Tabla de contenidos


