Ingenico AXIUM EX-SBASE-W Manual de usuario

WWW.ingenico.com
28-32,boulevard de Grenelle, 75015 Paris - France/ (T)+33(0)1 58 01 80 00 / (F)+33 (0)1 58 01 91 35
Ingenico-SA au capital de 47 656 332 / 317 218 758 RCS Nanterre
1
Model:AXIUM EX-SBASE-W
User Guide

2
Contents
1. Product Introduction ......................................................................................................................................... 3
1.1 Open Package Inspection............................................................................................................................ 3
1.2 Device Introduction..................................................................................................................................... 3
1.3 Interface definition...................................................................................................................................... 3
2. Product Technology Features ........................................................................................................................... 4
2.1 Product Technology Specifications ............................................................................................................ 4
2.2 Environmental Conditions .......................................................................................................................... 4
2.3 Product Functions....................................................................................................................................... 5
2.4 Instructions ................................................................................................................................................. 5
3. WiFi Connection................................................................................................................................................. 6
3.1 Connect EX pos to the base WiFi................................................................................................................ 6
3.2 Web Setting of base.................................................................................................................................... 6
3.3 Restore factory Setting .............................................................................................................................. 9
4. BASE Setting From EX pos ................................................................................................................................ 9
4.1 Get the Admin permission .......................................................................................................................... 9
4.2 Ethernet Parameter Setting..................................................................................................................... 10
4.3 WLAN Parameter Setting ......................................................................................................................... 10
4.4 Advanced Setting ......................................................................................................................................11
4.5 Operating Mode ........................................................................................................................................11
4.5.1 Gateway Mode.................................................................................................................................11
4.5.2 Bridge Mode ................................................................................................................................... 12
4.5.3 WiFi Repeater Mode....................................................................................................................... 12
4.6 Management Setting ............................................................................................................................... 12
5. Fixing of the power cable................................................................................................................................ 13
6. FAQs ................................................................................................................................................................. 14
7. Notes ................................................................................................................................................................ 14
8. Delivery and Storage....................................................................................................................................... 14
9. Power Adapter ................................................................................................................................................ 14
10. Standard ............................................................................................................................................................ 15
3
1. Product Introduction
1.1 Open Package Inspection
Open the package to check if there are any disabling masks or transportation damage in the terminals
and fittings.
Procedures:
1) Open the package
2) Check the following items(Subject to actual product configuration)
Base host
User Guide
USB type-C cable
5V 2A Power adapter
AC transfer head for EU
AC transfer head for UK
AC transfer head for UL
USB type-B cable
1 AXIUM EX8000 Bushing
1 AXIUM EX6000 Bushing
3) Save the transportation package and packing material for second use.
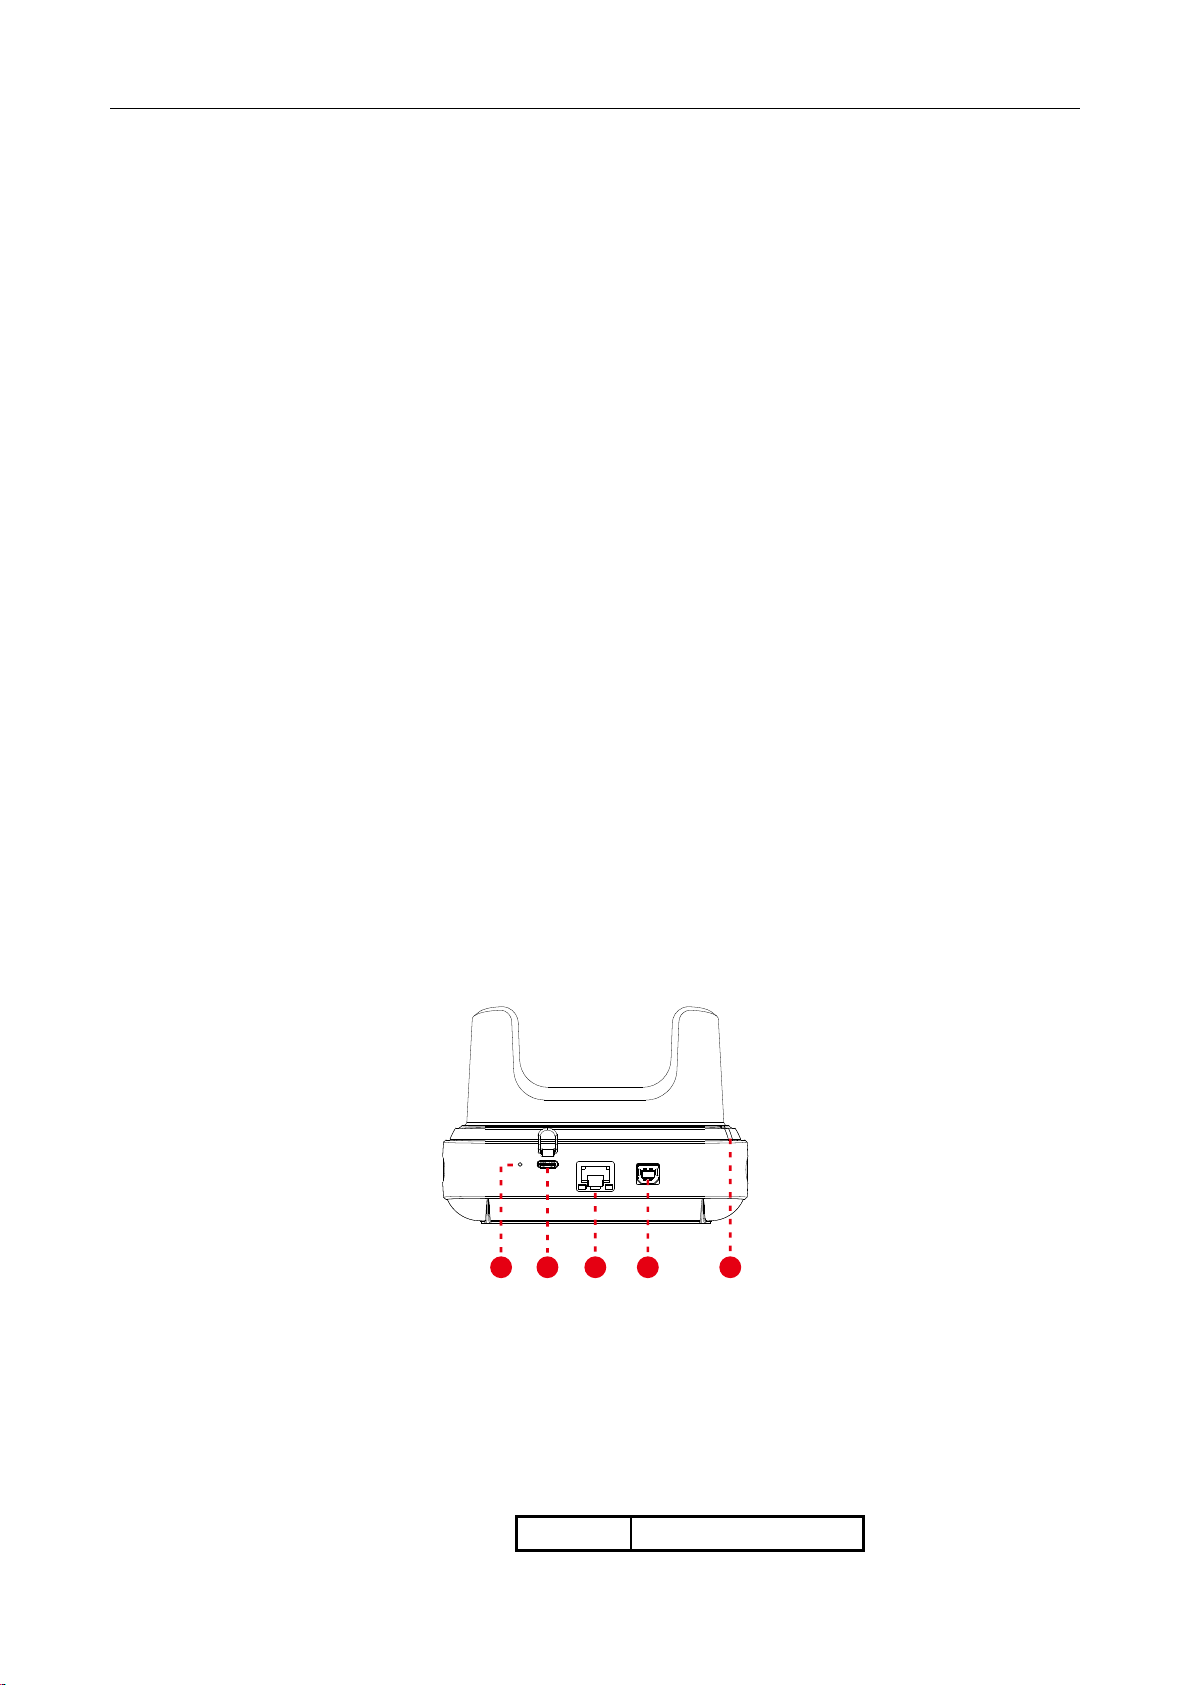
1.2 Device Introduction
1 2 345
1.Reset Button2. USB-TYPE CPower Interface3.RJ45 Network Interface
4. USB-TYPE B 5. Power LED
1.3Interface definition
1)RJ45 interface
Sequence
RJ45Signal
4
2)USB-TYPE B interface
2. Product Technology Features
2.1 Product Technology Specifications
Port
a USB type-C power port
a RJ45 network port
a USB B DEVICE port supporting USB2.0
Power
Charge output: 5.0VDC 1.4A
Power adapter: input 100-240V AC, 50/60Hz; output 5.0V DC 2.0A
Size and Weight
Size:90.8mmx127.8mmx91mm
Net Weight:0.33kg
Gross Weight:0.57kg
2.2 Environmental Conditions
Environmental conditions for running, storing and delivering the product:
Temperature
Running
0℃~40℃
Storage and Delivery
-20℃~70℃
Humidity
Running
10%~90%
Storage and Delivery
5%~90%(40℃)
Atmospheric pressure
86kPa~106 kPa; Below 2000 meters above sea level
1
ETH_TX+
2
ETH_TX-
3
ETH_RX+
4
NC
5
NC
6
ETH_RX-
7
NC
8
NC
Sequence
USB-TYPE BSignal
1
Not connect
2
D-
3
D+
4
GND
5
2.3 Product Functions
The base has three main functions as below:
Place EX pos on the base to get charged.
Place EX pos on the base. Connect the USB type-B to computer to extend the USB port.
Serves as a router. EX pos can connect to the base via WiFi to extend the network.
2.4 Instructions
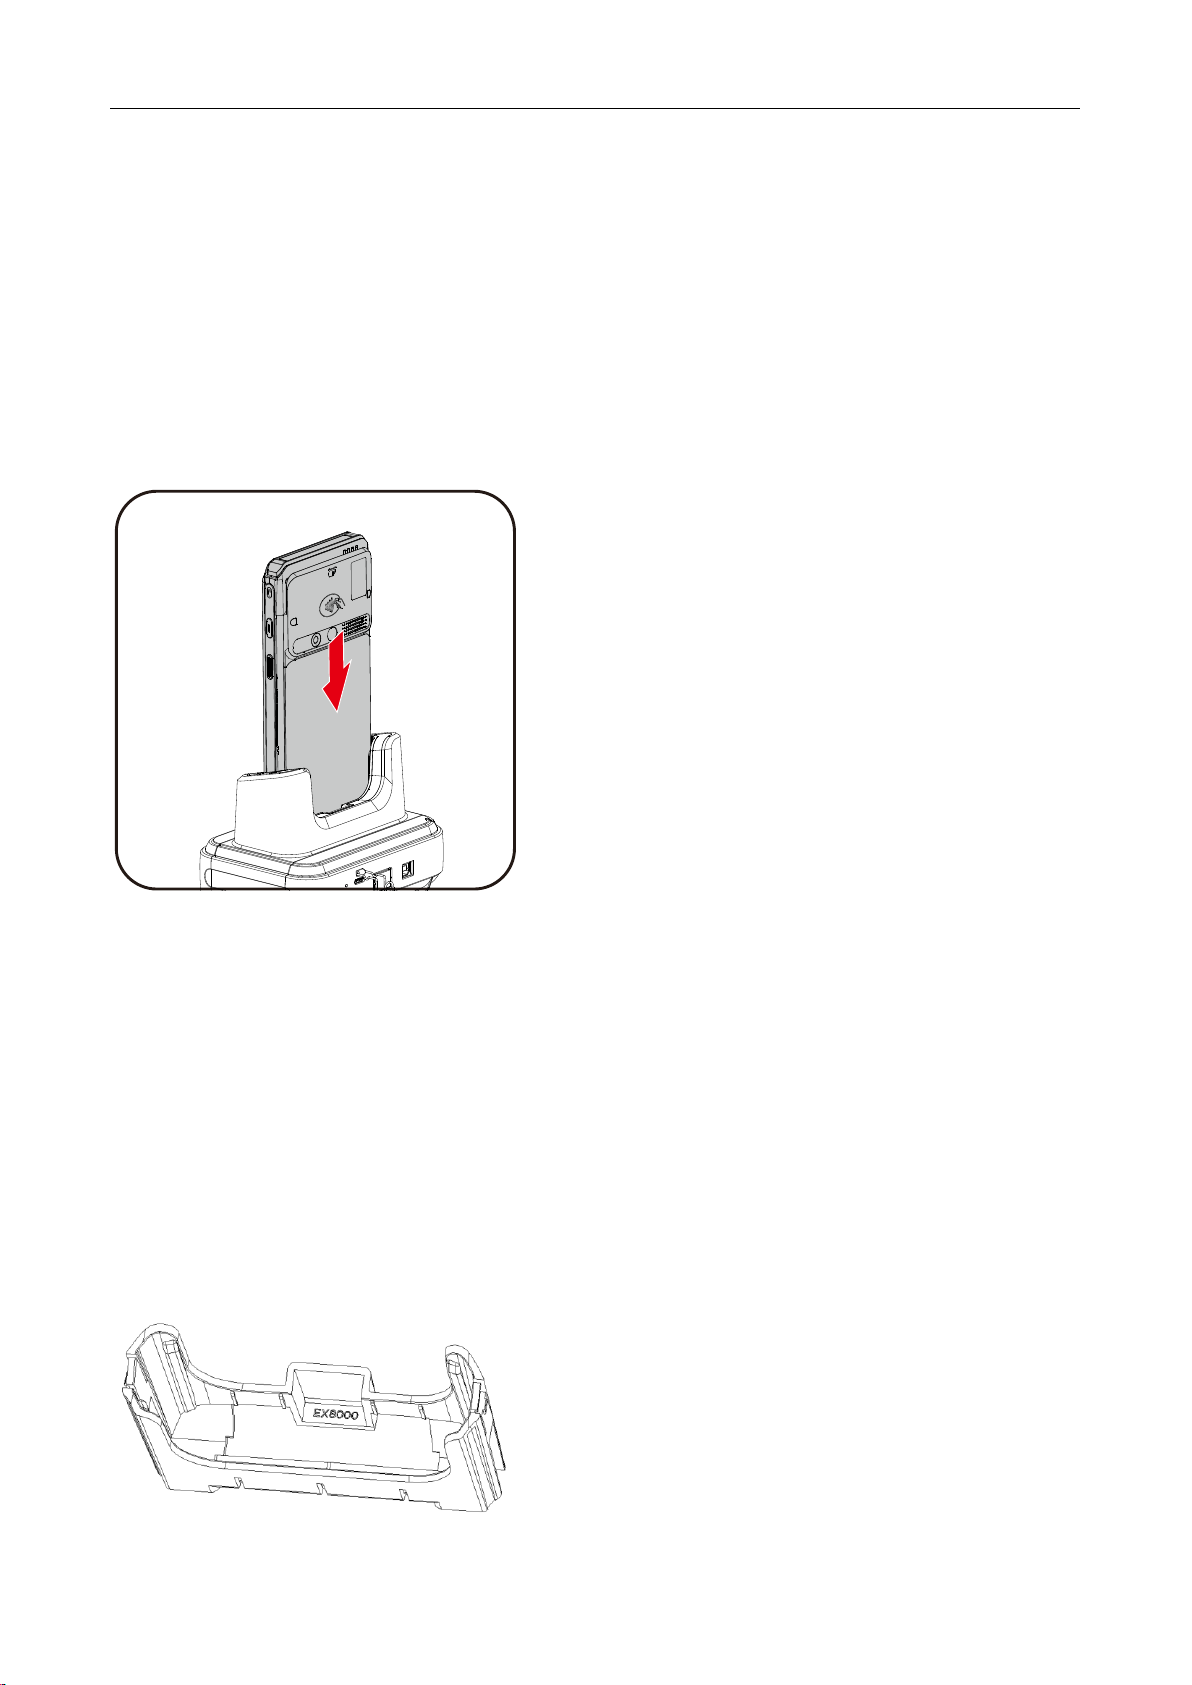
If AXIUM EX pos has the shell , we can place it on the base directlly.
If AXIUM EX pos does not have the shell , we must check the AXIUM EX pos is EX8000 or EX6000.
If AXIUM EX pos is EX8000, we find the EX8000 bushing and put it in the base. After that, we can
put EX8000 pos on the base.
If AXIUM EX pos is EX6000, we find the EX6000 bushing and put it in the base. After that, we can
put EX6000 pos on the base.
The bushings can be recognized from the color and words in the bushings.
The color of EX8000 bushings is black C.
The color of EX6000 bushings is cool grey.

6
3. WiFi Connection
3.1 Connect EX pos to the base WiFi
Power on the base.
Check the SSID and password from the label on the back of base.
Click “Settings” menu on EX pos,and then click “Network and Internet”, enter “ Wi-Fi” and select
the base SSID to connect.(step 1~4).
(WiFi Password please refer to the rear label for details)
After that , EX pos can use the RJ45 network of the base.
Step1 Step2 Step3 Step4
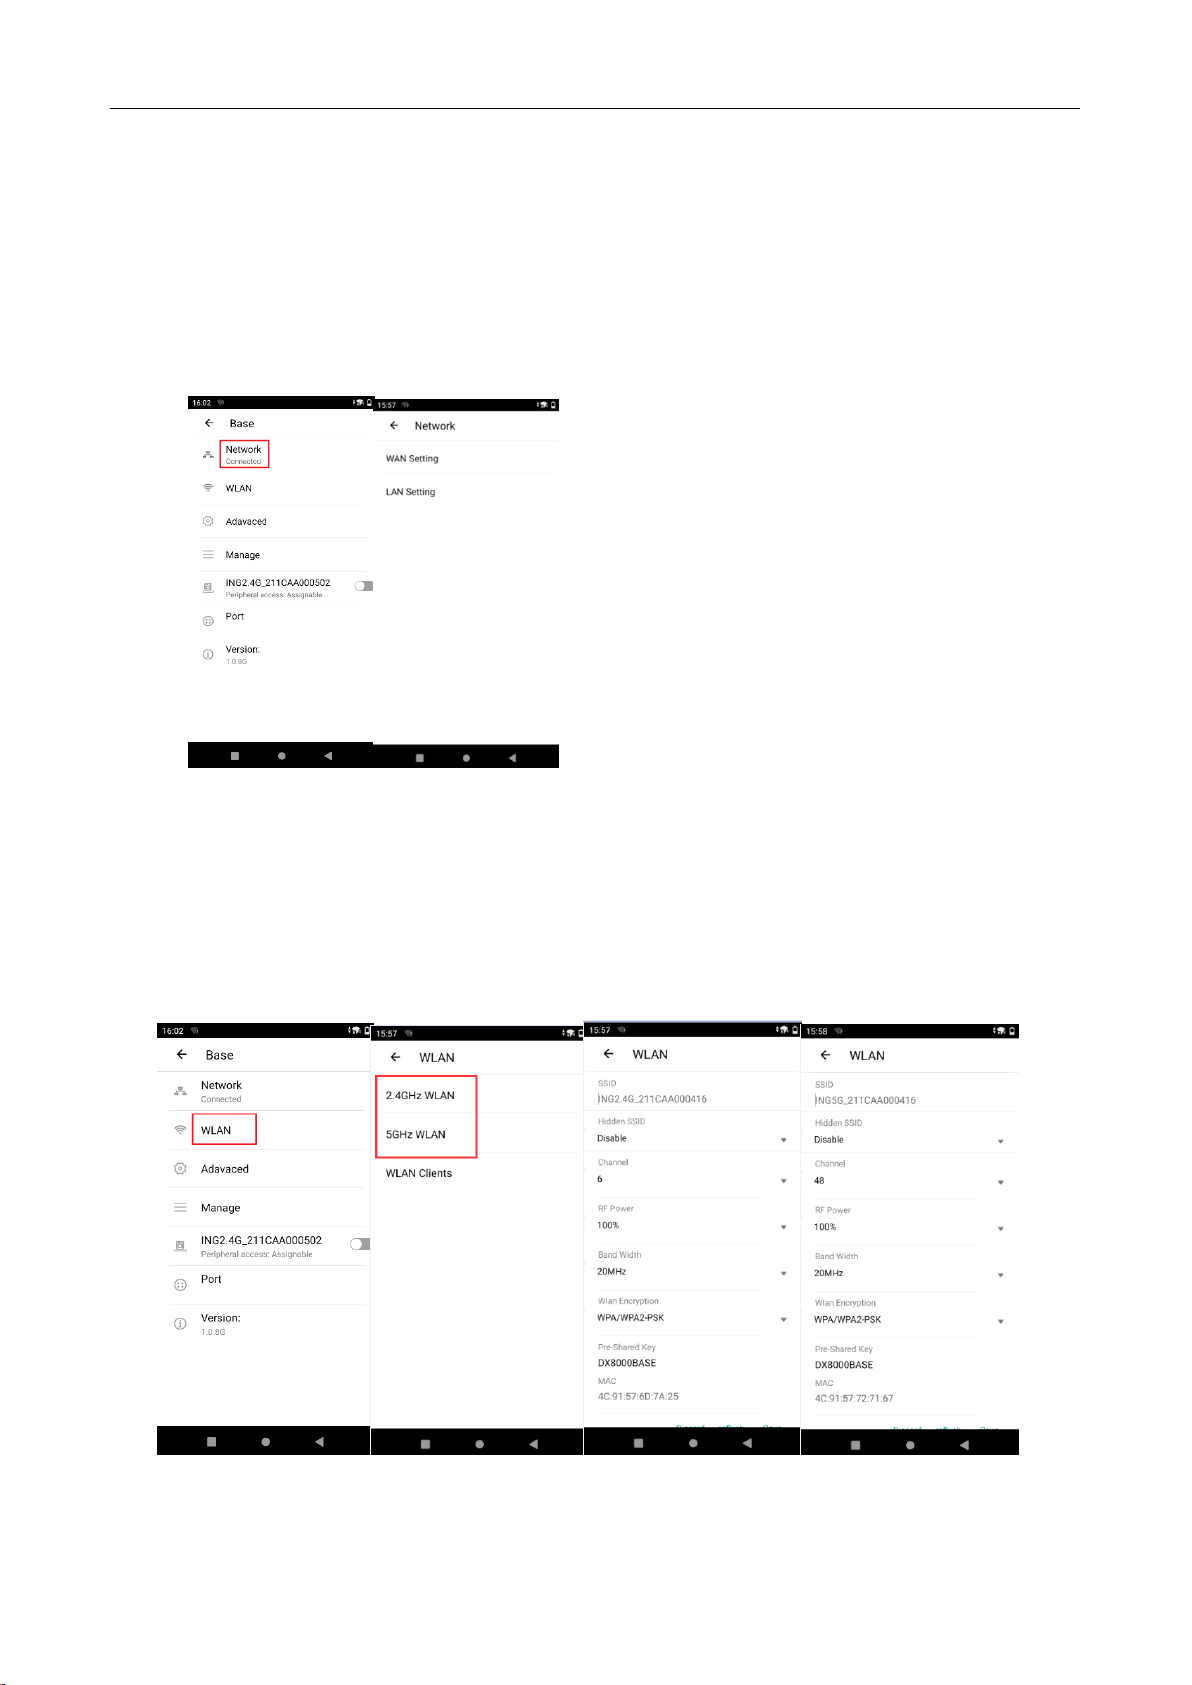
3.2 Web Setting of base
The base can be set from the web.
Use a computer to connect the base via WiFi.
The web setting IP of base is 192.168.47.1. Login name is Admin. Password is the Pairing Password.
(Pairing Password please refer to the rear label for details)
User can get the status of base on the status page.

7
User can get and change the Ethernet parameter on the Network page.
User can get and change the WLAN parameter on the WLAN page.

8
User canchange the operating mode,enable DMZ or set static DHCP on the Advanced page.
User can update the firmware of base, save and reload the settings, change the password on the
Manage page.

9
3.3 Restore factory Setting
Use sharp to click the RESET button for 3 seconds to restore the factory setting of the base.
The position of RESET button is in chapter 1.2.
4. BASE Setting From EX pos
4.1 Get the Admin permission
First,connect EX pos to the base via chapter 3.1.
Click “Settings” menu on EX pos,and then click “Base”,input the Pairing Password [Step1].
(Pairing Password please refer to the rear label for details)
Click the grey button beside the SSID “ING2.4G_XXXXXXX”[Step2].
After that,we can check the Version of base in the menu.[Step3].
Step1 Step2Step3
10
4.2 Ethernet Parameter Setting
Procedures:
Tab on “Network”enter WAN Setting or LAN Setting menu.
Enter WAN Setting to get and set the WAN parameter.
Enter LAN Setting to get and set the LAN parameter.
Step 1Step 2
4.3 WLAN Parameter Setting
Enter WLAN menu.[Step1]
We can click “2.4GHz WLAN”to set 2.4G parameter and click “5GHz WLAN”to set 5GHz
WLAN.[Step2]
We can set channel,RF power,band width and get WLAN MAC on the menu.[Step3,4]
Step 1 Step 2 Step 3 Step 4
Tabla de contenidos
Otros manuales de Rack y soporte de Ingenico


