Impossible I-1 Manual de usuario

USER
MANUAL

Please be sure to read through this manual before using the I-1.
Keep for future reference. For updated information, video tutorials
and more, please visit: support.the-impossible-project.com
USER
MANUAL

The Impossible I-1 is an easy to use, point
and shoot analog instant camera for the
original instant photo format. It makes
real, physical photos that develop in the
palm of your hand. The I-1 features an
advanced ring flash, designed for taking
great portraits. It can also be used with the
I-1 App for iOS, which lets you try creative
techniques like light painting and gives you
full photographic control of manual features
like shutter speed and aperture.
INTRODUCTION

Parts diagram
Viewfinder
rear lens
Viewfinder
front lens
Indicating LED
Frog Tongue
USB Power Connector
Control Knob
Lighten/darken Switch
Shutter Button
Film Door
Strap Mount
D
E
F
G
H
I
J
K
L
M
A
B
C
Hand strap
USB
charging
cable
Screws
Ring Flash
Flash Switch
Film Door
Latch
N
P
0
DIAGRAMS
USB data
cable
Q
Front lens Rear lens Lens
alignment
The Viewfinder
5cm
REMAINING PHOTOS
CONTROL KNOB:
BATTERY LEVEL (%)
CONTROL KNOB:
+ SHUTTER BUTTON
NO PHOTOS / NO FILM PACK
CONTROL KNOB:
SEARCHING FOR DEVICE
CONTROL KNOB:
1
2
3
4
5
6
7
8
25
5075
100
The Ring Flash

1
5
2
6
How to use the I-1
3
7
IMPORTANT: Always charge the I-1 fully before using
4
8
Flash On
Flash Off
Normal
Lighter
Image
Darker
Image

CONTENTS
ENGLISH 10
Box Contents
How to Use the I-1
Further Guidance
The I-1 App
Troubleshooting & FAQ
Customer Support
Safety Information
Compliance
DEUTSCH 26
Inhalt der Verpackung
So verwenden Sie die I-1
Weitere Hinweise
Die I-1 App
Fehlerbehebung und FAQ
Kundendienst
Sicherheitsinformationen
Compliance und Garantie
ITALIANO
46
Contenuto della confezione
Come utilizzare l'I-1
Istruzioni avanzate
L'App I-1
Risoluzione dei problemi e FAQ
Assistenza Clienti
Informazioni sulla sicurezza
Conformità e garanzia
FRANÇAIS 64
Contenu de la boîte
Utilisation de l’I-1
Conseils supplémentaires
L’Appli I-1
Dépannage & FAQ
Service clientèle
Consignes de sécurité
Conformité & Garantie
ESPAÑOL 84
Contenido de la caja
Cómo utilizar la I-1
Instrucciones adicionales
La aplicación I-1
Solución de problemas y FAQ
Servicio de atención al cliente
Información relativa a la seguridad
Cumplimiento y garantíay
PORTUGUÊS 104
Conteúdo da embalagem
Como usar a I-1
Orientações adicionais
A aplicação I-1 App
Resolução de problemas e FAQ
Apoio a Clientes
Informações de segurança
Conformidade e garantia
日本語 122
内容物
I-1の使い方
詳 細 ガ イダ ンス
I-1アプリ
トラブルシュ ー ティングとよくある 質 問
カスタマーサポート
安全に関する情報
規制への適合および保証
中文 138
包装盒内容物
I-1 使用方法
更多指导
I-1 应用程序
故障排除与常见问题解答
客户支持
安全信息
合规与质保
繁體中文 154
包装盒内容物
I-1 使用方法
更多指导
I-1 应用程序
故障排除与常见问题解答
客户支持
安全信息
合规与质保
CONTENTS

10 | English
I-1 CAMERA
DETACHABLE VIEWFINDER
USB CHARGING CABLE
USB DATA CABLE
ARCHIVE/DISPLAY BOX
USER MANUAL
QUICK START GUIDE
CAMERA HAND
STRAP & SCREWS
CLEANING CLOTH
I-1 APP INFO LEAFLET
CHARGE THE CAMERA
Important: The I-1 will not be
charged upon purchase – it must
be fully charged before first use.
You should charge the I-1 fully
before every use to ensure it has
enough power for the duration of
your shoot. A full charge usually
takes just one and a half to two
hours when you use the dedicated
I-1 USB charging cable (P) with
a smartphone power adapter or
computer USB port. To charge the
camera, plug the USB charging
cable Pinto the micro USB slot
on the camera door K. Then plug
the other end of the cable into
a charger such as your iPhone
charger, or into your computer’s
USB slot. The red power indicator
LED Jwill switch off as soon as
the battery is fully charged.
1TURN THE CAMERA ON/OFF
To turn the camera on, turn the
control knob Bcounter-clockwise
BOX CONTENTS HOW TO USE THE I-1
English | 11
until the yellow lines on the control
knob and shutter button Aline
up, and the filled circle symbol is
at the front. To turn it off again,
turn the control knob clockwise
until the empty circle symbol is
at the front and the yellow line
is pointing downwards.
2LOAD THE FILM
Slide the film door latch Hto open
the film door L. Push the film cas-
sette all the way in, with darkslide
up and plastic base at the bottom.
Note: Please check individual film
packaging for development time,
handling and storage details.
3CLOSE FILM DOOR
When you close the film door, the
darkslide will eject from the camera
automatically, underneath the frog
tongue. The plastic frog tongue is
designed to protect images from
light as they develop – it should
not be removed. Take the darkslide
out from under the frog tongue and
let the frog tongue roll back up. If
the darkslide has not ejected, take
out the film pack and re-insert it,
making sure it is pushed all the
way to the back of the camera.
4SET FLASH & LIGHTEN/DARKEN
Flash: You can find the flash on/
off switch Gon the side of the
lens barrel. To turn the flash on,
push the flash on/off switch up so
it meets the yellow lightning flash
symbol. The flash is on by default
when you unpack the camera. We
recommend that you use the flash
in all conditions except bright,
direct sunlight.
Note: the camera should be fully
charged to take best advantage
of the ring flash.
Lighten/Darken: Use the lighten/
darken switch Con the opposite
side of the lens barrel to adjust
the exposure of your shot. To get a
brighter photo, move the lighten/
darken switch up to the plus posi-
tion. For a darker photo, move the
lighten/darken switch down to the
minus position. These two settings
ENGLISH

12 | English
correspond to different Exposure
Values (EV). The camera’s Expo-
sure Values are + 2/3(when you
move the switch up) and - 2/3(when
you move the switch down).
5OPEN THE VIEWFINDER
To open the viewfinder D& E
,
gently push the tab labeled ‘push’
sideways in the direction of the
arrow. This will release the latch
and the viewfinder will pop up.
To close it again, simply fold it
down, rear lens first, pressing
gently downwards until the latch
clicks shut.
Using the viewfinder: The I-1 uses
a mechanical pop-up viewfinder
with reflective silver markings
that help you to align the camera
correctly for a well-composed shot.
The viewfinder is most accurate
when you hold it 4 – 5cm away
from your eye. To use the align-
ment markings, follow these steps:
· Close one eye and hold your
camera out in front of you, at first
about 20cm away from your face.
· Train your eye on the silver dot on
the viewfinder’s rear lens. Move
the camera until the silver dot is
in the center of the circle on the
front lens.
· Move the camera towards you
until the viewfinder is 4–5 cm
away from your eye. The dot will
become blurry but should still
be visible inside the circle. You’ll
see that the view through the
viewfinder has become sharp.
· Remember that the viewfinder
sits above the camera’s lens,
so at very close distances (1.2
meters or less), you will need to
aim higher than what you see in
the viewfinder to compose your
shot correctly.
Note: See “The Viewfinder” diagram
on the inside cover of this manual.
English | 13
6COMPOSE YOUR PHOTO
The I-1 uses infrared light to work
out how far away the subject is.
In order for this to work most
effectively, your subject should be
at the center of your composition
while the camera is focusing. If
you don’t want your subject to be
in the center of your photo, first
compose the shot with the subject
at the center. Then press the
shutter button halfway in to focus.
To avoid a blurry photo, make sure
you are at least 30cm away from
your subject when you take the
picture.
Important: The shutter button has two
positions: press it lightly halfway in
to focus, and firmly all the way in to
take a photo. You will feel a very subtle
click when you reach the halfway po-
sition. Practice this a few times while
the camera is switched off to
get a feel for it.
Keep your finger on the shutter
button as it’s pressed halfway in,
then reframe your shot by moving
your subject off-center. Then,
finally, push the shutter button all
the way in to take the photo. Your
subject will remain in focus even
though it is no longer centered.
7TAKE THE PHOTO
Press the shutter button A
halfway to automatically focus your
shot. Press the shutter button all
the way in to take the photo. The
photo will be ejected from the slot
at the front of the camera as soon
as you let go of the shutter button.
It will be shielded from the light
by the frog tongue I, which also
holds it in place.
8REMOVE AND SHIELD THE PHOTO
Remove the photo from beneath
the frog tongue and let the frog
tongue roll back into the camera.
Place the photo face down to
continue shielding it from light
as it develops.

14 | English
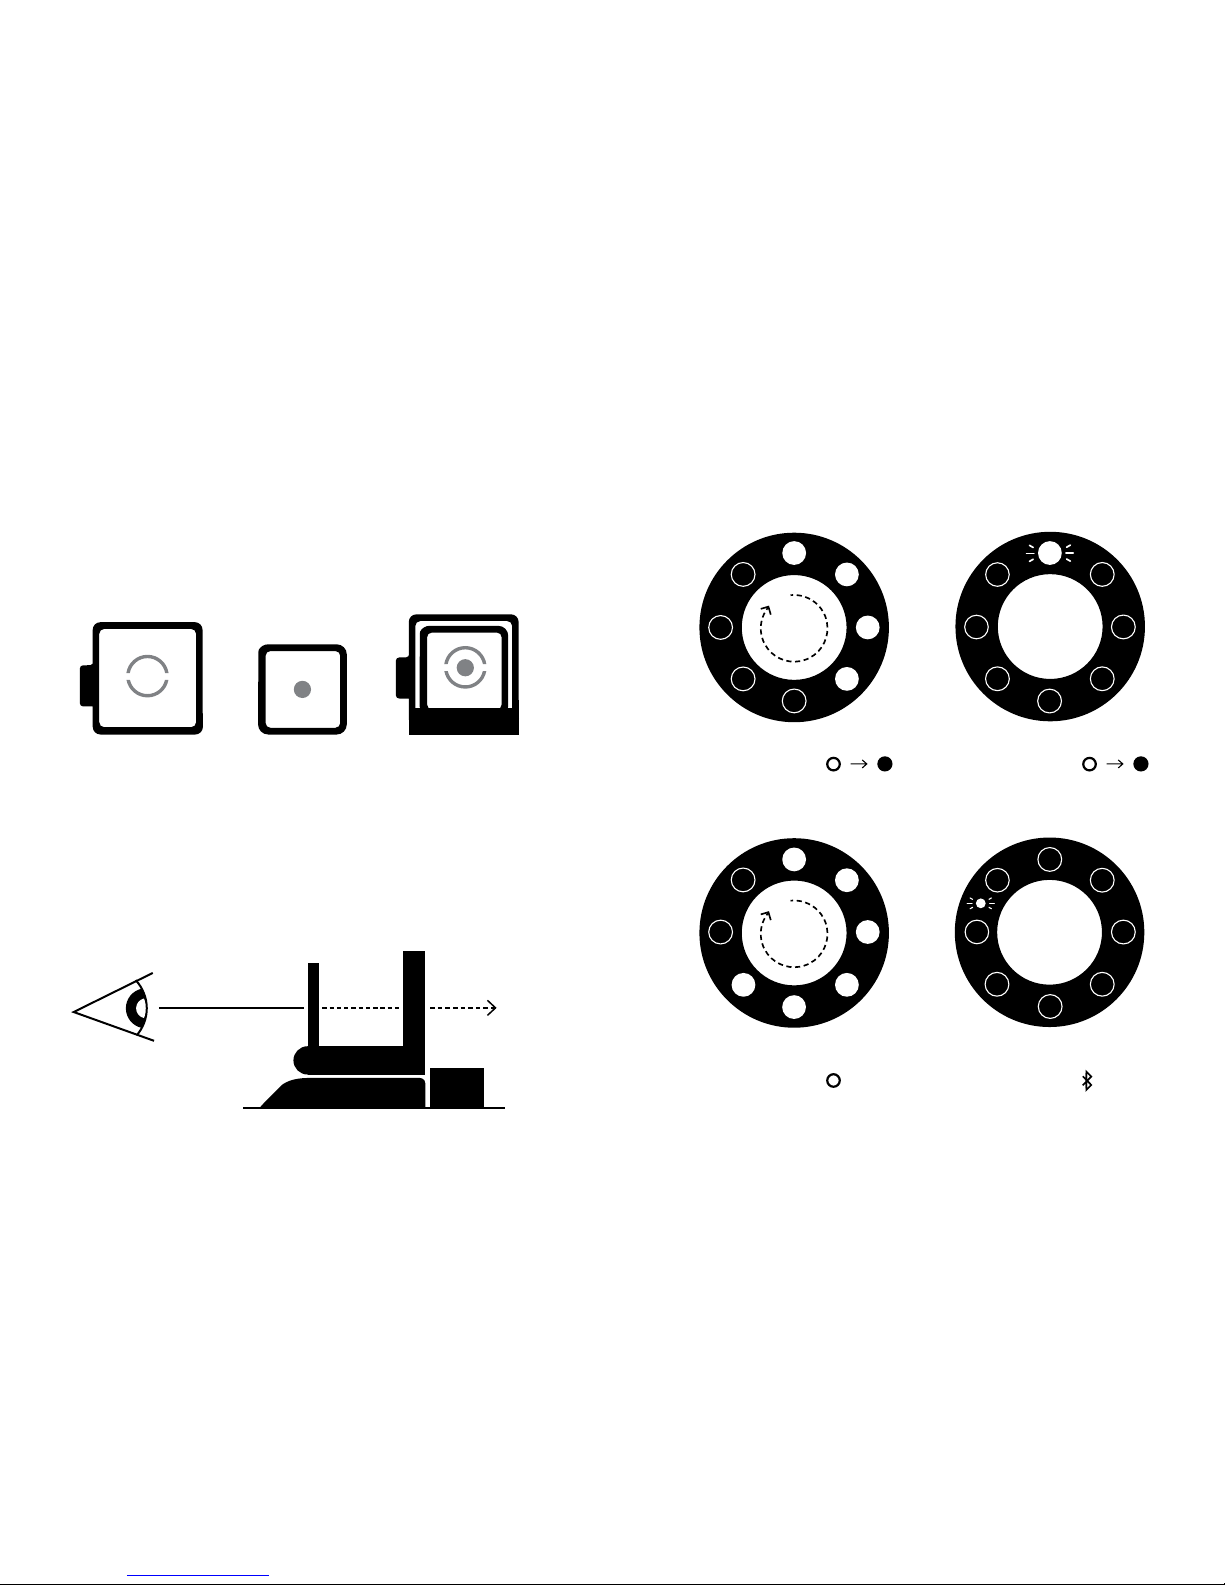
HOW THE RING FLASH WORKS
The I-1 ring flash is made up of
12 individual LEDs. 8 LEDs (1 red,
7 white) provide the main
light source and give status indica-
tions – these are supplemented by
4 smaller LEDs. When you
take a photo, all 12 LEDs will
flash at once, to provide a bright
but soft light.
Important: always use the flash for
every shot, unless you’re shooting in
bright, direct sunlight.
As well as lighting photos, the ring
flash also gives you information
about the camera’s current status.
You can use the ring flash to see:
How much film is left in the pack
Every time you turn the control
knob to the on position, the ring
flash will light up. The number of
LEDs which light up corresponds to
the number of shots you have left.
So e.g. if six LEDs light up, there
are six shots left in that film pack.
If you have used up all 8 shots in
your film pack, or if there is no film
pack inserted in the camera, then
the red LED (top) will blink rapidly
when you turn the camera on.
How much battery you have left
If you press the shutter button A
while the camera is switched off,
the number of LEDs which light
up will correspond to battery level.
So e.g. if six bulbs light up, your
camera’s battery is 6/8 charged.
When the I-1 battery is low (3 or
fewer ring flash LEDs light up),
then the red LED power indicator
Jwill blink on and off and the
flash will no longer work. At this
point you should only use the
camera for photography in bright,
direct sunlight.
Important: Due to the high power
requirements of the ring flash, we
recommend that you always charge the
I-1 before use, for about an hour, using
the USB charging cable provided.
FURTHER GUIDANCE
English | 15
COMPATIBLE FILM
The I-1 works with all Impossible
600-type and Impossible
I-type films, in either color or
black & white.
REMOVING THE VIEWFINDER
The viewfinder is removable. It’s
attached to the top of the camera
with magnets, which makes it easy
to detach and reattach. When you
want to reattach it, it will simply
slide and click into place. You will
need the viewfinder to compose all
your shots, but you can remove it
when you need to throw your cam-
era into a bigger bag or suitcase.
CLEANING THE VIEWFINDER
When cleaning the viewfinder,
we recommend that you only use
cleaning cloths made for optical
lenses, like the one included in the
I-1 box. Do not use any solvent,
such as alcohol, to clean the
viewfinder, as this may damage the
silver markings.
CLEANING THE CAMERA’S ROLLERS
To clean the camera’s rollers, first
make sure the I-1 is switched off.
Then open the film door L- the
rollers are two metal cylinders
located just inside. Position your
thumbs on top of the rollers on
either side, then gently turn in-
wards, towards the camera. Clean
the rollers as you go, using a soft
cloth slightly dampened with water.
Do not use solvents or chemical
cleaners, as these may damage the
camera. Then make sure you turn
the camera on before you close the
film door again. This will reset the
roller position.
POWER SUPPLY
Charge the I-1 fully before every
use to ensure it has enough power
for the duration of your shoot (see
"CHARGE THE CAMERA"). The red
power indicator LED Jswitches
off as soon as the battery is fully
charged. The rechargeable Li-ion
battery will typically last long
Otros manuales para I-1
1
Tabla de contenidos
Idiomas:


