iiNet TG-789 Manual de usuario

TG789
Broadband Gateway
Quick Setup Guide

2
What are you setting up today?
TYPE OF INTERNET
NBN™ Fibre to the Node / Building
Also known as NBN™ FTTN/B
NBN™ Fibre to the Curb
Also known as NBN™ FTTC
NBN™ Fibre to the Premises
Also known as NBN™ FTTP
NBN™ HFC
Also known as NBN™ Cable
NBN™ Wireless
Also known as NBN™ Fixed Wireless
NBN™ Satellite
Also known as NBN™ LTSS
iiNet FTTB without a Network Termination Unit (NTU)
iiNet FTTB with a Network Termination Unit (NTU)
4
6
9
5
7
8
10
11
How you plug in depends on which
type of internet service you have.
If you’re not sure, please check
the email and/or SMS from us
regarding your internet order,
or your customer invoice.
Just looking to customise
your WiFi network?
Turn to page 16.
TURN TO PAGE

3
Get to know your modem’s lights
Status
Orange - booting up
Red - Offline
Green - Online
Flashing orange -
Upgrade in progress
WiFi .GHz & GHz
Green - WiFi is on
Flashing - WiFi booting
up/WiFi activity
Off - WiFi broadcasting
is off. Press the Wireless
button to turn it back on.
WPS
Flashing orange – WPS
connection in progress
Green – Connection
successful
Red - Connection failed
Ethernet (LAN)
Green – Ethernet
connection
Flashing – Connection
Activity
USB
Green – USB device
connected
Wireless button
Turn WiFi broadcasting
on/off
Phone (VoIP)
Green - Netphone
enabled
Flashing - Call in progress
WAN
Green - DSL or WAN
port connection
Flashing – Connection
Activity
Internet
Green – Internet
connection
Red - Connection failed
Flashing – Connection
activity

4
Plug in for NBN™FTTN and FTTB
1. Using the power cable supplied, connect your
modem’s Power port to a power outlet.
2. Use the supplied Phone cable to connect your
modem’s grey DSL port directly to the phone
socket on the wall. Do not use a line filter.
3. If you wish to use your VoIP phone service,
connect a phone handset to your modem’s
Phone1 port.
4. You can use an additional Ethernet cable to
connect your computer to any of your modem’s 4
LAN ports. Alternatively, follow the steps later in
this guide to connect devices via WiFi.
Turn to page 12 to continue setup.
Ethernet Cable
Plug into your computer’s
Ethernet Port (Optional)
Phone Cable
Plug into handset (Optional) Power Cable
Plug into a power outlet
Phone Cable
Plug into the phone
socket on the wall

5
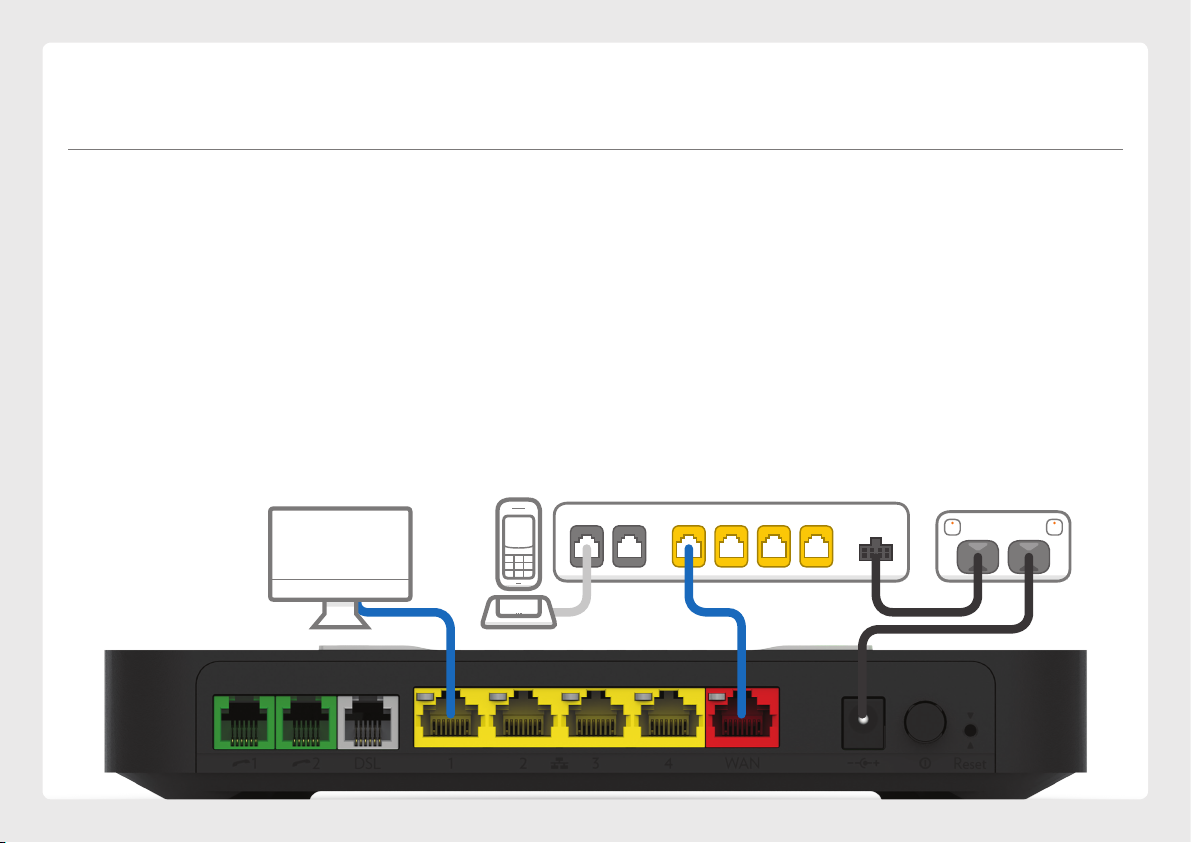
Plug in for NBN™FTTC
1. Using the power cable supplied, connect your
modem’s Power port to a power outlet.
2. Use the supplied Ethernet cable to connect your
modem’s red WAN port to the yellow GATEWAY
port on your NBN™ Connection Device.
3. If you wish to use your VoIP phone service,
connect a phone handset to your modem’s
Phone1 port.
4. You can use an additional Ethernet cable to
connect your computer to any of your modem’s 4
LAN ports. Alternatively, follow the steps later in
this guide to connect devices via WiFi.
Turn to page 12 to continue setup.
Ethernet Cable
Plug into your computer’s
Ethernet Port (Optional)
Phone Cable
Plug into handset (Optional) Power Cables
Plug into power outlets
NBN™ Connection Device
Connects to your modem via
Ethernet to the WAN Port
Phone Cable
Plug into the phone
socket on the wall
Before you get started...
If you received a new NBN™ Connection Device along with
your modem, please follow its setup guide to get it plugged in
and turned on before you set up your modem.

6
Plug in for NBN™HFC
1. Using the power cable supplied, connect your
modem’s Power port to a power outlet.
2. Use the supplied Ethernet cable to connect your
modem’s red WAN port to the UNI-D 1 port on
your NBN™ Connection Box (note that some
boxes may have one yellow LAN port instead).
3. If you wish to use your VoIP phone service,
connect a phone handset to your modem’s
Phone1 port.
4. You can use an additional Ethernet cable to
connect your computer to any of your modem’s 4
LAN ports. Alternatively, follow the steps later in
this guide to connect devices via WiFi.
Turn to page 12 to continue setup.
Ethernet Cable
Plug into your computer’s
Ethernet Port (Optional)
Phone Cable
Plug into handset (Optional) Power Cables
Plug into power outlets
Cable Socket
Connects to NBN™
Connection Box
NBN™ Connection Box
Connects to your modem via
Ethernet to the WAN Port
Before you get started...
If you received a new NBN™ Connection Box along with your
modem, please follow its setup guide to get it plugged in and
turned on before you set up your modem.
7
UNIV UNID UNID UNIV UNID UNID POWER
NBN™ Connection Box
Connects to your modem via
Ethernet to the WAN Port
Plug in for NBN™FTTP
1. Using the power cable supplied, connect your
modem’s Power port to a power outlet.
2. Use the supplied Ethernet cable to connect your
modem’s red WAN port to the UNI-D 1 port on
your NBN™ Connection Box. If UNI-D1 doesn’t
work, try each UNI-D port before contacting us
for a hand.
Ethernet Cable
Plug into your computer’s
Ethernet Port (Optional)
Power Cables
Plug into power outlets
3. If you wish to use your Fibre Phone service,
connect a phone handset to the UNI-V 1 port on
your NBN™ Connection Box.
4. You can use an additional Ethernet cable to
connect your computer to any of your modem’s 4
LAN ports. Alternatively, follow the steps later in
this guide to connect devices via WiFi.
Turn to page 12 to continue setup.
Phone Cable
Plug into handset
(Optional, FTTP only)

8
NBN™ Connection Box
Connects to your modem via
Ethernet to the LAN Port
Satellite Socket
Connects your NBN™
Connection Box to your
Satellite Dish
Plug in for NBN™Satellite
1. Using the power cable supplied, connect your
modem’s Power port to a power outlet.
2. Use the supplied Ethernet cable to connect your
modem’s red WAN port to the UNI-D 1 port on
your NBN™ Connection Box. If UNI-D1 doesn’t
work, try each UNI-D port before contacting us
for a hand.
Ethernet Cable
Plug into your computer’s
Ethernet Port (Optional)
Power Cables
Plug into power outlets
3. You can use an additional Ethernet cable to
connect your computer to any of your modem’s 4
LAN ports. Alternatively, follow the steps later in
this guide to connect devices via WiFi.
Turn to page 12 to continue setup.
SATELLITE
UNID UNID UNID UNID POWERSAT

9
UNID UNID UNID UNID POWER
Plug in for NBN™Wireless
1. Using the power cable supplied, connect your
modem’s Power port to a power outlet.
2. Use the supplied Ethernet cable to connect your
modem’s red WAN port to the UNI-D 1 port on
your NBN™ Connection Box. If UNI-D1 doesn’t
work, try each UNI-D port before contacting us
for a hand.
3. If you wish to use your VoIP phone service,
connect a phone handset to your modem’s
Phone1 port.
4. You can use an additional Ethernet cable to
connect your computer to any of your modem’s 4
LAN ports. Alternatively, follow the steps later in
this guide to connect devices via WiFi.
Turn to page 12 to continue setup.
Ethernet Cable
Plug into your computer’s
Ethernet Port (Optional)
Phone Cable
Plug into handset
(Optional) Power Cables
Plug into power outlets
NBN™ Connection Box
Connects to your modem via
Ethernet to the WAN Port

10
iiNet FTTB without a Network Termination Unit (NTU)
1. Use the supplied power cable to connect the
power port to a power outlet and ensure it is
turned on.
2. Use the supplied Phone cable to connect the grey
DSL port directly to the phone socket on the wall.
Do not use a line filter.
3. If you wish to use your VoIP phone service,
connect a handset to the Phone1 port.
4. You can use an additional Ethernet cable to
connect a computer to any of the 4 LAN ports.
Alternatively, follow the steps later in this guide
to connect devices via WiFi.
Turn to page 12 to continue setup.
Phone Cable
Plug into the phone
socket on the wall
Ethernet Cable
Plug into your computer’s
Ethernet Port (Optional)
Phone Cable
Plug into handset (Optional) Power Cable
Plug into power outlet
Otros manuales para TG-789
3
Tabla de contenidos
Otros manuales de Puerta de iiNet


Manuales populares de Puerta de otras marcas

LST
LST M500RFE-AS Manual de usuario

Kinnex
Kinnex Media Gateway Manual de usuario

2N Telekomunikace
2N Telekomunikace 2N StarGate Manual de usuario

Mitsubishi Heavy Industries
Mitsubishi Heavy Industries Superlink SC-WBGW256 Manual de usuario

ZyXEL Communications
ZyXEL Communications ZYWALL2 ET 2WE Manual de usuario

Telsey
Telsey CPVA 500 - SIP Manual de usuario


