Icom IC-706MKII Manual de usuario

KB2LJJ Radio Mods Database
KB2LJJ
Home Radio Mods Database and Manuals
Modifications for the Icom IC-706MKII
ICOM 706 MKII Extended transmit mod
Special on IC706mkII
TX range expansion for IC-706MKIIG
Expand only mod for the IC-706MkII
Mike Amp Mod for IC 706 MK II
mods IC706 MKIIG por EA1DOU (ver. Española)
Modifikation IC-706MKIIG für 9k6 PR und Pactor
IC-706MKIIG mod
More talk power on SSB from your Icom 706Mk2/Mk2G and Alinco
DX70TH
Mods for Japanese version IC-706MK2G
Icom IC-706MK2 cw keyer
IC-706MK2G increase recieve
Icom 706mkIIG Mic
Convert IC-706MK2G from American to European version
ICOM 706 Mk2G IF filter change
IC-706mkIIG fan mod
ICOM LDG interface and ICOM IC-706MKIIG
ICOM 706 MKII Extended transmit mod
From: "Len SantaMaria, KC2ADV"
This file may be freely distributed as long as it remains intact, with no modifications, additions, or deletions.
DISCLAIMER:
I assume no responsibility for damage or inaccuracies contained in this document. In other words, USE THIS AT YOUR OWN
RISK. It worked for me, however I don't know if it will work for you.
WARNING #1: This mod requires the ability to remove surface mount diodes. Only those who are qualified to do this should
attempt this mod.
WARNING #2: This mod seems to erase all memory channels, etc. You may want to save this info for reprogramming.
Disassembly:
1. Face the front of the radio towards you.
2. Remove the three screws in a row across the middle of the top of the radio.
http://www.kb2ljj.com/data/icom/ic-706-MKII.htm (1 di 30)23/08/2009 23.05.07
www.r6-ru4montesecchieta.it
IZ5CCV

KB2LJJ Radio Mods Database
3. Remove the two screws at the top rear (on the sides) of the radio.
4. Pry the top cover off from the back.
5. Disconnect the speaker at the connector.
Modification:
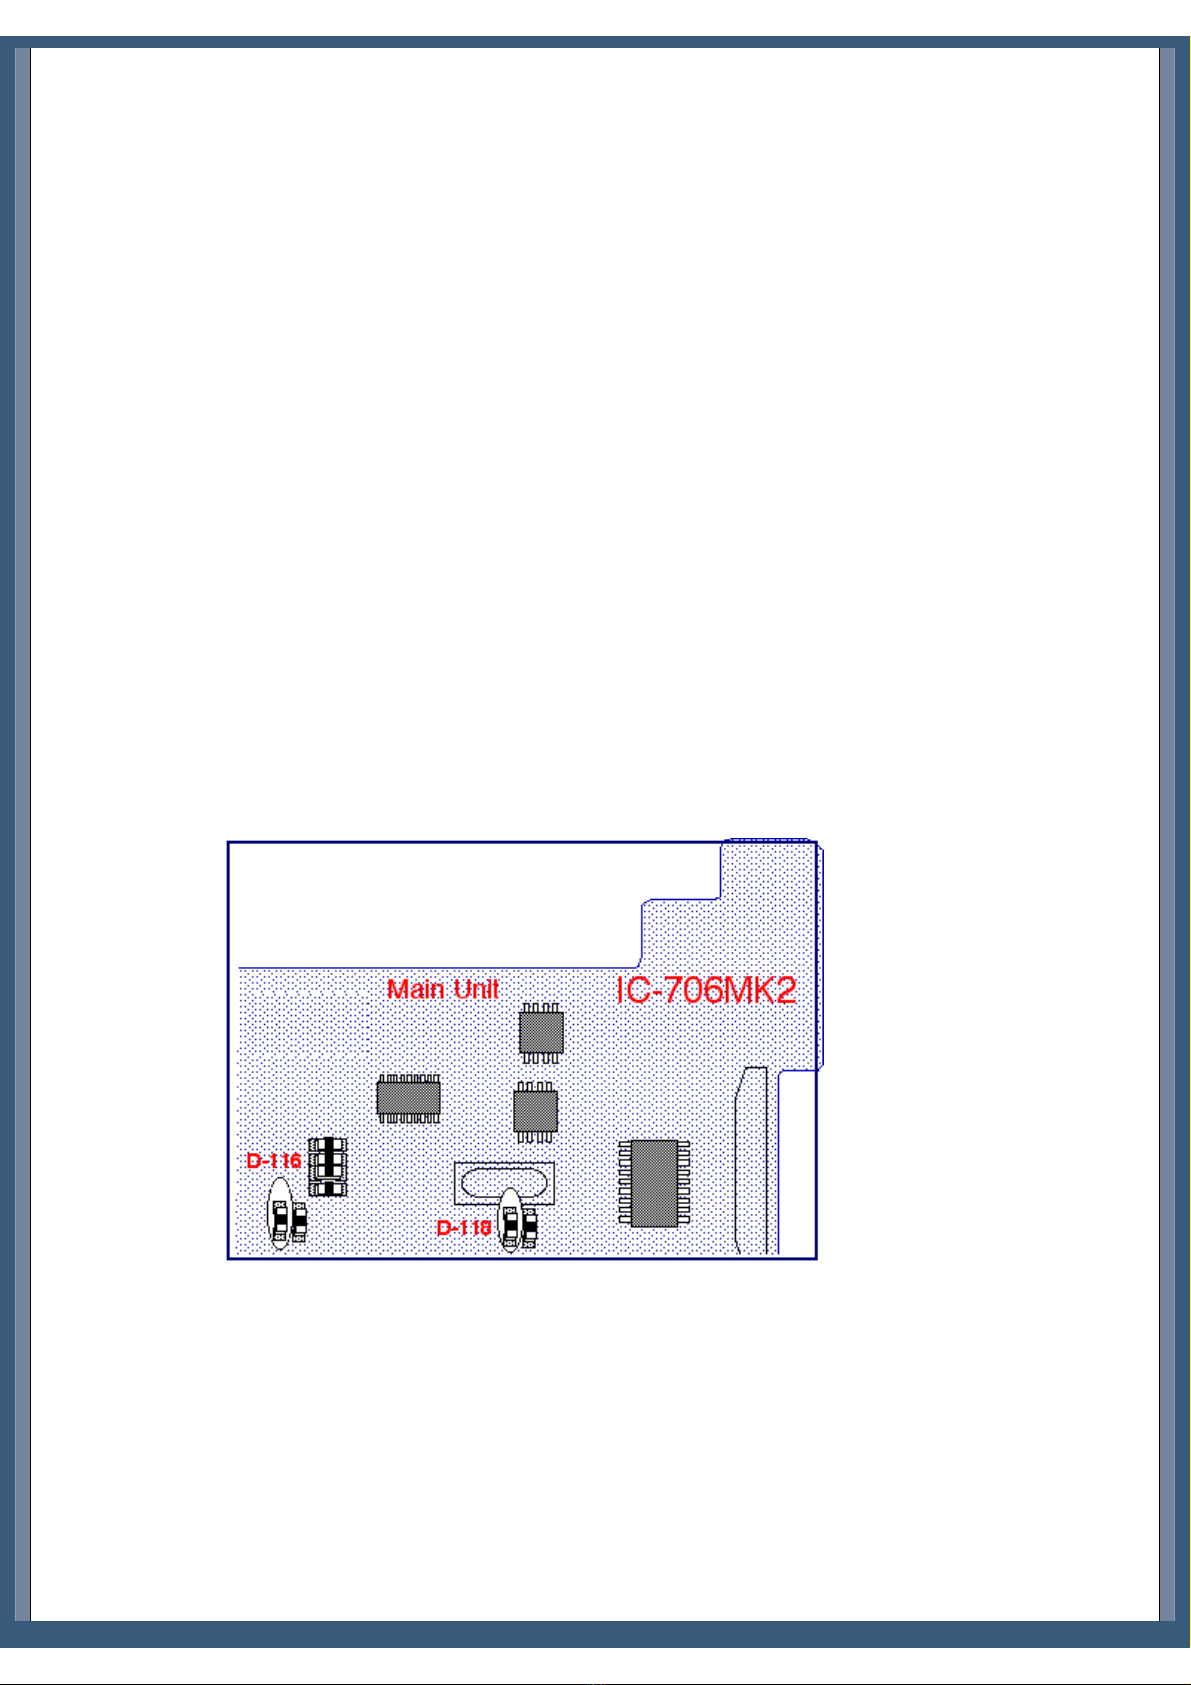
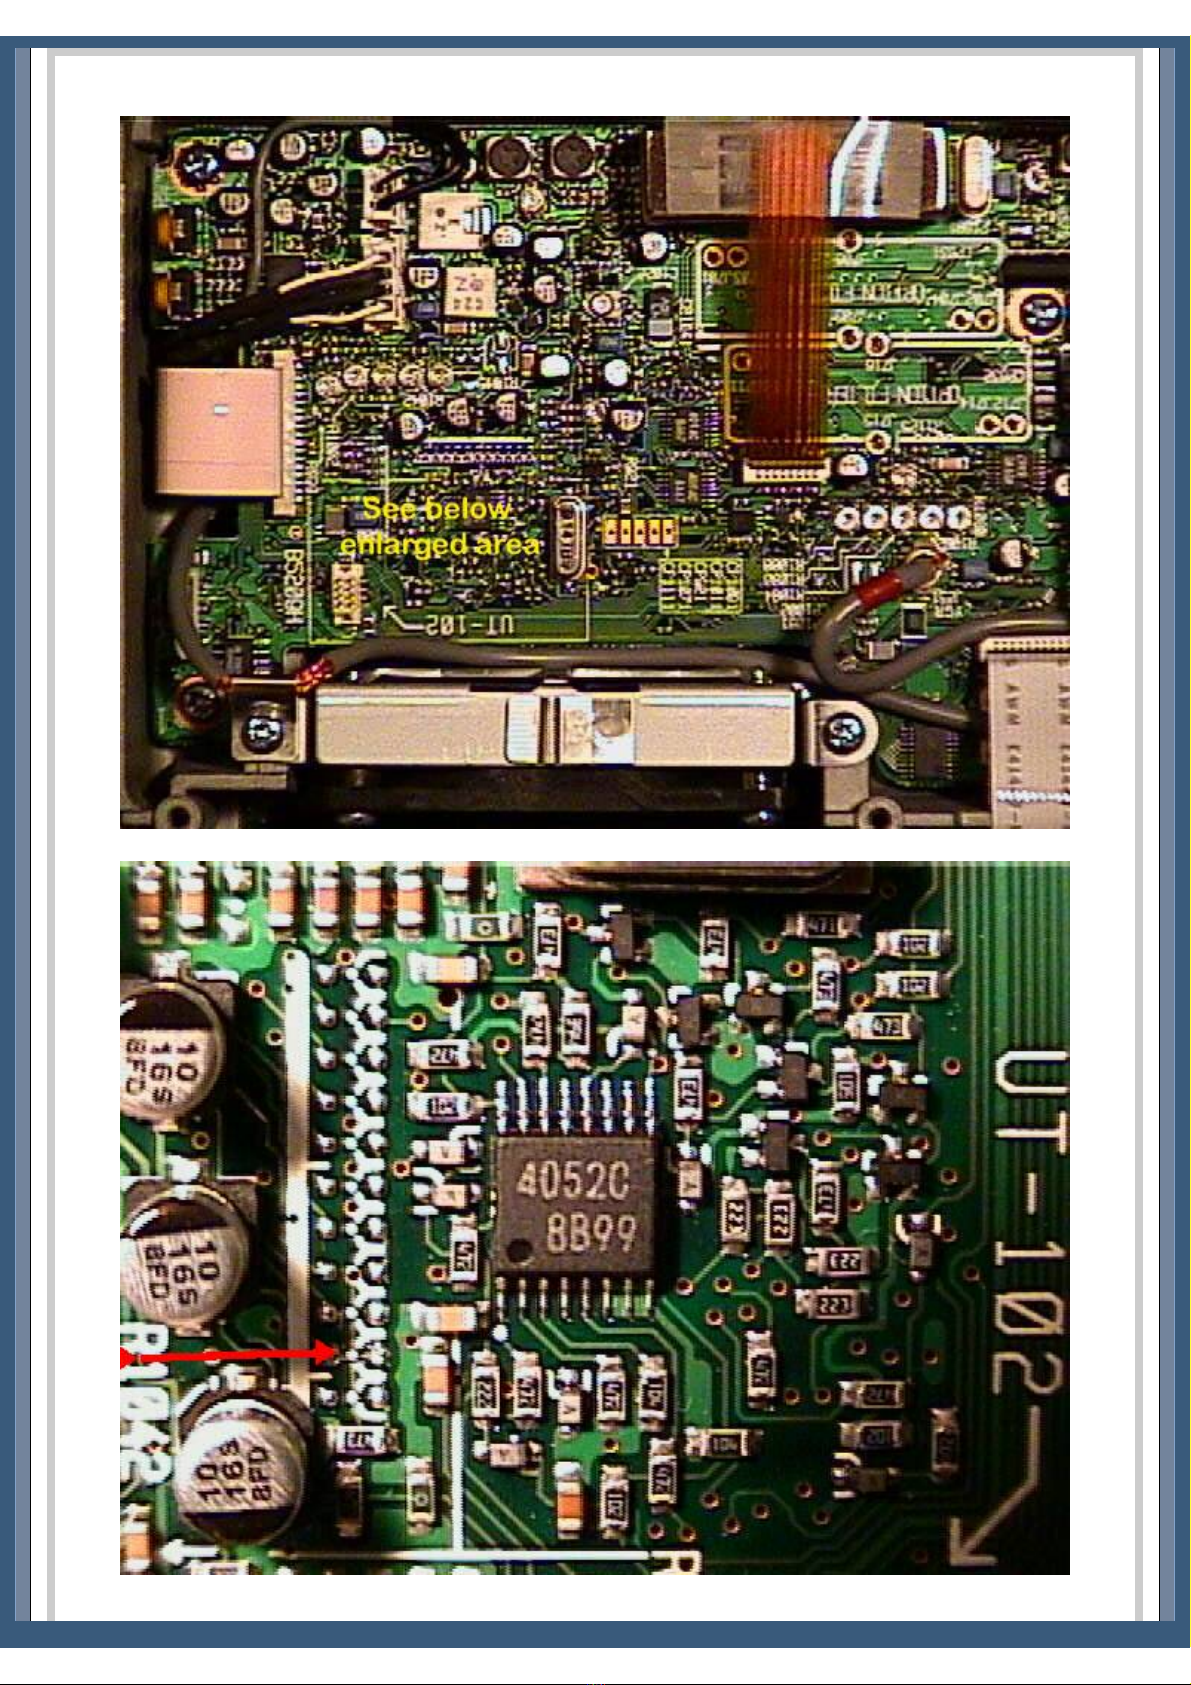
6. Near the top rear of the main circuit board, there is an small, oblong metal can. Directly below the right side of this can is
two surface mount diodes with a white silk-screened box around them. There is also what appears to be a circuit board part
number just to the left of it (mine says B4916D). Remove the LEFT diode in the box.
7. To the left of this, there is a test point marked CP3. Just to the left and above this test point is another box with two
*vertically* mounted surface-mount diodes (Note: there is also a place for 5 more *horizontally* mounted diodes, with 3
installed). Remove the LEFT vertically oriented diode.
Reassembly:
8. Reconnect the speaker.
9. Put the top cover back on. Insert the top cover tabs into the slots and lower into position.
10. Replace all of the screws.
My radio did not require a reset, however I did lose all of my channel memories. It seems to be able to transmit everywhere except
below .5 Mhz. I have not tested the power output at all frequencies yet.
I hope this helps everyone who have been waiting patiently for this mod.
Any comments can be directed to me:
Len - KC2ADV
email: [email protected].
If you can read this, its come from Your www:
Len - KC2ADV
email: [email protected]
... wrote:
...
>Modification:
>6. Near the top rear of the main circuit board, there is an small, oblong
>metal can. Directly below the right side of this can is two surface mount
>diodes with a white silk-screened box around them. There is also what
>appears to be a circuit board part number just to the left of it (mine
>says B4916D). Remove the LEFT diode in the box.
>7. To the left of this, there is a test point marked CP3. Just to the left
>and above this test point is another box with two *vertically* mounted
>surface-mount diodes (Note: there is also a place for 5 more *horizontally*
>mounted diodes, with 3 installed). Remove the LEFT vertically oriented
>diode.
For first, my circuit board part number is B4916F, i don`t understand you what diodes i must cut off, explain me, my smd diodes
looks like this:
O<>O 7
O O 6
O<>O 5
J25 O<>O 4
O<>O 3
O O O O
http://www.kb2ljj.com/data/icom/ic-706-MKII.htm (2 di 30)23/08/2009 23.05.07

KB2LJJ Radio Mods Database
1[] [] 2 B4916F 8[] []9
O O O O
CP3
<__]
Diodes: 1,2,3,4,5,7,8,9 are instaled
Diode: 6 is not instaled
My version is with Tone 1750Hz, European i think, RX 30kHz-200MHz, TX in amateur bands only, the serial number if needed
is: 02101 buyed in 18.06.97 as new in Poland.
Sorry for my bugs.
Can You type me what diodes ? I think 1 and 3.
Info on the diodes from another European user:
d129
---- (d111 none)
d112
d113
d114
d d d d
1 1 1 1
1 1 1 1
6 5 8 9
D116 and D118 are responsible for out of band TX. D115 and D119 enables RX from 30KHz to 200MHz. D113 is responsible for
6M RX and D114 is responsible for 6M TX. I do not have info about D129 and D112.
http://www.kb2ljj.com/data/icom/ic-706-MKII.htm (3 di 30)23/08/2009 23.05.07

KB2LJJ Radio Mods Database
Special on IC706mkII
From: SM6WXO
I have tried some special buttons on IC706mkII:
Push TS and DISPLAY while power up and you will see a strange power on check.
Push P.AMP/ATT and RIT/SUB while power up and you will be able to see SHIFT-ADJ on your 706mkII. Dont know what this
is for, recalibrating ?
I think that these things even works on the older version of 706, dont know.
73 - Dennis, SM6WXO @ SM6JZZ
TX range expansion for IC-706MKIIG
Author: Karel OK1DNH - [email protected]
TX range expansion on HF, VHF and UHF is very simple. When modified the radio will also transmit AM mode in the aircraft
band with approximately 1 watt at 118 MHz to about 17 watts am carrier at 136 MHz.
On MAIN BOARD under speaker near Xtal you can see two rows of solder dots for SMD components. Only on position 10 (from
left) is diode (D2030), which is necessary to remove.
Thats all.
After connecting power radio will be reseted and TX range is expanded.
http://www.kb2ljj.com/data/icom/ic-706-MKII.htm (4 di 30)23/08/2009 23.05.07

KB2LJJ Radio Mods Database
More pictures from Ken Bessler KG0WX.
http://www.kb2ljj.com/data/icom/ic-706-MKII.htm (5 di 30)23/08/2009 23.05.07

KB2LJJ Radio Mods Database
Transmit power output after modification
Power output in watts as measured from an uncalibrated Diawa CN-620 wattmeter with vhf,uhf dummy load. Power output on
radio set to highest level.
FREQ FM PWR AM CARR FREQ FM PWR
105 MHz 1.0 0.0 400 MHz 2.0
110 1.0 0.0 405 7.0
115 2.0 0.0 410 9.0
118 3.5 0.7 415 10.0
120 5.0 1.0 420 12.0
125 14.0 3.5 425 15.0
130 20.0 15.0 430 18.0
135 25.0 17.0 435 20.0
140 28.0 18.0 440 20.0
145 32.0 18.0 445 19.0
150 32.0 18.0 450 18.0
155 20.0 18.0 455 15.0
160 13.0 10.0 460 8.0
165 6.0 1.5 465 0.8
170 1.5 0.0 467 0.15
175 0.5 470 0.00
180 0.1
185 0.0
These are the readings I took after performing the mod. I took readings at key frequencies throughout the band to measure the
efficiencies of the different band pass filters, especially in the HF band. The attenuation at the edges of the filters are very visible
especially at the 8MHz cross point.
All readings were took with a bird wattmeter and a home made RF voltmeter, the latter is not reliable over 200MHz.
Thanks. Olivier, VE2NSM.
MHz V @ 50 Ohms W from Bird
Wattmeter W from RF Voltmeter
0.1 0,00 - 0,00
0.2 0,04 - 0,00
0.3 0,31 - 0,00
0.5 1,95 - 0,01
0.65 4,16 - 0,11
0.75 8,60 1,5 0,59
http://www.kb2ljj.com/data/icom/ic-706-MKII.htm (6 di 30)23/08/2009 23.05.07

KB2LJJ Radio Mods Database
0.85 24,20 7 5,25
0.95 52,00 18 25,01
1.2 98,20 75 90,37
1.5 99,40 80 92,61
1.995 104,70 87 102,82
2 107,90 86 109,25
3 101,40 92 96,40
3.995 104,60 95 102,62
4 95,80 92 85,98
6 103,40 96 100,27
7.995 88,60 75 73,45
8 99,70 95 93,17
10 103,20 98 99,88
14.995 101,90 96 97,36
15 102,40 96 98,32
20 102,40 96 98,32
21.995 101,80 95 97,17
22 102,20 96 97,94
25 101,20 94/92 96,02
28 99,50 90/90 92,80
29.995 97,90 86/87 89,81
30 95,60 82/82 85,61
35 93,80 80 82,40
38 91,30 76 78,03
40 89,30 77 74,62
43 95,10 85 84,71
48 97,30 89 88,71
50 98,00 90 90,00
54 100,20 93 94,12
56 100,90 94 95,45
58 99,10 90 92,05
59.5 94,10 82 82,93
59.995 89,90 72 75,64
60 13,50 1 1,56
62 16,50 1,25 2,37
65 26,40 3 6,27
70 55,40 14/22 28,44
75 63,30 22/37 37,25
78 71,00 27/50 46,98
80 71,90 2752 48,19
83 65,50 22/40 39,91
86 54,40 15/28 27,41
90 39,20 7/14 14,09
95 22,00 1,5/4 4,31
100 14,30 0,75/1,8 1,76
105 12,10 1,3 1,23
110 9,80 1 0,79
115 7,40 0,5 0,43
120 7,30 - 0,41
125 11,30 1 1,07
130 22,60 5,2 4,56
135 47,00 21 20,37
140 63,20 37 37,13
http://www.kb2ljj.com/data/icom/ic-706-MKII.htm (7 di 30)23/08/2009 23.05.07

KB2LJJ Radio Mods Database
145 70,30 48 46,05
150 72,20 52 48,59
155 60,00 34 33,42
160 39,50 15,5 14,31
163 29,90 9 8,10
165 22,10 5 4,35
167 15,50 2,5 2,08
169 10,60 1,2 0,93
171 7,40 0,5 0,43
174 4,40 - 0,13
178 1,91 - 0,01
183 0,33 - 0,00
190 0,16 - 0,00
195 0,35 - 0,00
199.995 0,60 - 0,00
400 6,33 0,8 0,30
405 14,10 3,8 1,70
410 18,30 6 2,94
415 20,70 7,5 3,80
420 24,10 10 5,20
425 31,10 17 8,78
430 30,20 16 8,27
435 29,20 15 7,72
440 30,90 16 8,67
445 30,30 16 8,32
450 28,00 14 7,08
455 27,40 13 6,77
460 20,60 8.5 3,76
463 14,50 4.5 1,81
466 7,80 1.6 0,48
468 4,50 0.6 0,14
470 2,35 - 0,03
2-30MHz plug
2-30Mhz plug / 25-60MHz plug
25-60MHz plug
25-60MHz plug / 100-250MHz plug
100-250MHz plug
200-500MHz plug
Not reliable
Expand only mod for the IC-706MkII
It should be well know, that the IC-706mkIIG does not offer the best frequency stability. You might have already recognized this
if you ever used your 706 for modes like JT65. For these modes is it very important to have a very low frequency drift.
Unfortunately, the TCXO (CR-282) doesn't really help in this case. It does improve the stability but not really the drift during the
first minute which is the most important one in WSJT since the TX-time is less than a minute. This modification consists two
things, replacing a varicap-diode by a capacitor and give the fan some power so he runs even in receive mode. Once this
modification is done, the frequency stability is improved a lot as seen in picture 1.
http://www.kb2ljj.com/data/icom/ic-706-MKII.htm (8 di 30)23/08/2009 23.05.07

KB2LJJ Radio Mods Database
Picture 1: frequency drift vs. temperature
Just a few steps to improve the frequency stability of your IC-706mkIIG:
1. Remove the lid on the back, then remove the little lid of the XO (as shown in picture 2).
Picture 2: open the lid of the XO
2. Locate the little varicap-diode right next to the L601 (picture 3). Remove this diode.
http://www.kb2ljj.com/data/icom/ic-706-MKII.htm (9 di 30)23/08/2009 23.05.07

KB2LJJ Radio Mods Database
Picture 3: diode is right next to the L601
3. Now replace this diode by a 33pF ceramic capacity (N470). The one leg to the upper solder pad where the diode was, the
other to ground. Ground can be easily found at the metal shielding.
4. As you know, the radio gets very hot just by receiving because the fan does not work if you do not transmit. The fan
should run all the time. This can be done by simply inserting a 100Ohm resistor (or two 56Ohm, ¼ Watt in serie) between
the red fan wire and the top of the inductivity as shown in picture 4. The fan runs now very slowly all the time.
5. You may now let the radio run for about 20minutes. Tune to 50MHz and check the frequency by transmitting. If the
frequency does not match, adjust it by tuning carefully with L601.
This modification has been done on several radios. It always worked very good but I cannot give a guarantee. I am not
responsible for any damages on your radio.
http://www.kb2ljj.com/data/icom/ic-706-MKII.htm (10 di 30)23/08/2009 23.05.07
Otros manuales para IC-706MKII
8
Tabla de contenidos
Otros manuales de Unidad de control de Icom
Manuales populares de Unidad de control de otras marcas

Festo
Festo Compact Performance CP-FB6-E Manual de lista de piezas

Elo TouchSystems
Elo TouchSystems DMS-SA19P-EXTME Manual de usuario

JS Automation
JS Automation MPC3034A Manual de usuario

JAUDT
JAUDT SW GII 6406 Series Guía rápida

Spektrum
Spektrum Air Module System Manual de usuario

BOC Edwards
BOC Edwards Q Series Manual de usuario


