Hyundai H-CCR8191M Manual de usuario

USB/SD-МЕДИАПЛЕЕРСО ВСТРОЕННЫМ3” ЖК-ДИСПЛЕЕМUSB/SD MEDIA PLAYER WITH BUILT-IN3” TFT-DISPLAYРуководство по эксплуатации Instruction manualH-CCR8191M

Contents2Dear customer!Thank you for purchasing our product. For safety, it is strongly recommended to read this manual carefully before connecting, operating and/or adjusting the product and keep the manual for reference in the future.121212121314141414151515151515151516Table of contents Before you start Utilization of the product Important safeguardsInstallation/ConnectionInstallationGeneral notesDIN front-mountDismantling the unitTrim frame installationConnectionConnection diagramUsing the ISO ConnectorParking wire connectionOperationControl elementsFront panelInner panelGeneral operationsTurning the unit on/offReset the unitTFT display on/offMode selectionVolume controlMute functionAudio parameter settingClockAux inputSystem setupRadio operationsBand selectAuto/Manual tuning Automatic store/preset scanProgramming tuner stationsMono/Stereo control2333444455666788881010101010101010111111121212121212Local radio station searchUSB/SD/MMC operationsConnecting USB/Memory cardPlaybackTrack selectFast forward/rewindPause/StopAspect ratioRepeat playbackGotoOSD (On-Screen Display)Selecting audio languageSelecting subtitle languageGeneral informationTroubleshooting guideCleaning the unit body AccessoriesSpecification

Before you start3If you want to dispose this product, do not mix it with general household waste. There is a separate collection system for used electronic products in accordance with legislation that requires proper treatment, recovery and recycling.Please contact your local authorities for the correct method of disposal. By doing so, you will ensure that your disposed product undergoes the necessary treatment, recovery and recycling and thus prevent potential negative effects on the environment and human health.Utilization of the productImportant safeguards• Read carefully through this manual to familiarize yourself with this high-quality sound system.• The beginning of operation is the moment of the unit installation. Before use the device in winter it is recommended to heat up the passenger compartment during 20 seconds or to the operation temperature.• Use the unit with the temperature that goes beyond the operation temperature greatly decreases the operation resource of the screen and other components of device and can result an outage.• Disconnect the vehicle’s negative battery terminal while mounting and connecting the unit.• When replacing the fuse, be sure to use one with an identical amperage rating. Using a fuse with a higher amperage rating may cause serious damage to the unit.• Make sure that pins or other foreign objects do not get inside the unit; they may cause malfunctions, or create safety hazards such as electrical shock.• Do not use the unit in places where it can be exposed to water, moisture and dust.• Do not open covers and do not repair yourself. Consult the dealer or an experienced technician for help.• Make sure you disconnect the power supply and aerial if you will not be using the system for a long period or during a thunderstorm.• Make sure you disconnect the power supply if the system appears to be working incorrectly, is making an unusual sound, has a strange smell, has smoke emitting from it or liquids have got inside it. Have a qualified technician check the system.• The unit is designed for negative terminal of the battery, which is connected to the vehicle metal. Please confirm it before installation.• Do not allow the speaker wires to be shorted together when the unit is switched on. Otherwise it may overload or burn out the power amplifier.

Installation/Connection4InstallationGeneral notes• Choose the mounting location where the unit will not interfere with the normal function of the driver.• Before finally installing the unit, connect the wiring and make sure that the unit works properly.• Consult with your dealer if installation requires drilling of holes or other modifications of the vehicle.• Install the unit where it does not get in the driver’s way and cannot injure the passenger if there is a sudden stop, like an emergency stop.• If installation angle exceeds 30° from horizontal, the unit may not perform properly.• Avoid installing the unit where it would be subject to high temperature, such as from direct sunlight, or from hot air, from the heater, or where it would be subject to dust, dirt or excessive vibration.1.DIN front-mount1. Car dashboard2. Sleeve21182531. Install the sleeve into the dashboard; ensure it is installed with the correct side and there are no obstacles (wires, dashboard elements, etc) for the unit installation.2. After installing the sleeve into the dashboard, bend tabs fitting to the size of the dashboard to fix the sleeve in place.3. Make the necessary wire connections. Ensure the connections are correct.4. Install the unit into the sleeve until the side locks are fixed.
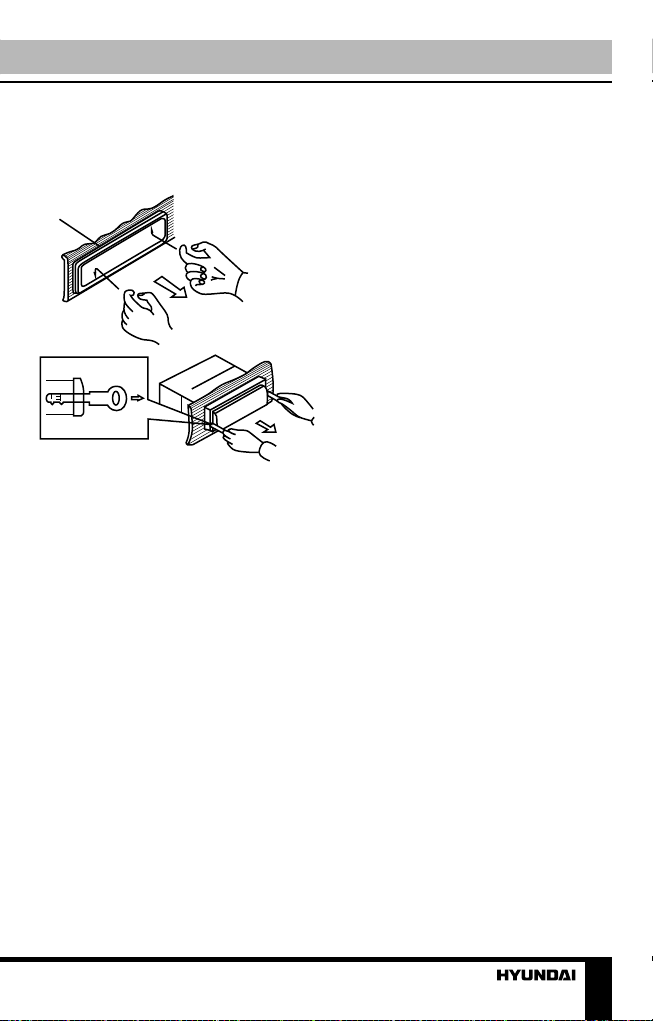
Installation/Connection5Dismantling the unita – Trim frameb – Frame uninstall directionc – Release key insertionвба1. Switch off the unit and detach the front panel.2. Insert your fingers into the groove in the front side of the trim frame (apply some effort to detach the frame). Pull the frame to detach it.3. Insert the supplied release keys into the both sides of the unit body to click, as shown in the picture. To extract the unit from the dashboard, pull the release keys or the unit body to pull it out. Before detaching the unit, ensure it is not fixed with the metal strap.Trim frame installationTo install the trim frame, press it to the unit body and push it to fix it in place. This should be done before installing the front panel; otherwise you are not able to install the trim frame. When the trim frame being installed, the side with the groove should face down and fixed first.

Installation/Connection6ConnectionConnection diagramRCA OUT
Left=White
Right=Red
Antenna
Socket
Fuse blade 5A
ISO connector
5A
Parking (green) Video output(yellow)
Using the ISO Connector1. If your car is equipped with the ISO connector, then connect the ISO connectors as illustrated. 2. For connections without the ISO connectors, check the wiring in the vehicle carefully before connecting, incorrect connection may cause serious damage to this unit.Cut the connector, connect the colored leads of the power cord to the car battery as shown in the color code table below for speaker and power cable connections.

Installation/Connection7LocationFunctionConnector AConnector B1Rear right (+) - Purple-2Rear right (-) - Purple/Black-3Front right (+) - Grey-4Front right (-) - Grey/BlackBattery +12V/Yellow5Front left (+) - WhiteAntenna power/Blue-White6Front left (-) - White/Black-7Rear left (+) - GreenIgnition/Red8Rear left (-) - Green/BlackGround/Black Antenna power wire is intended for power supply of the antenna and for remote control of an additional amplifier.Parking wire connectionParking brake leadBrake lightCar frameBatteryGreen WireIf parking cable is connected to hand brake switch, the video display of the monitor will be controlled by driving status, system setup and input video sources. When the car is moving ahead, if the video is played, the screen shows warning. The warning screen will prevent the driver from watching images.

Operation8Control elementsFront panel1. button2. 1/OSD button3. LIST button4. 2/RPT button5. APS/ button6. Display7. RESET button8. /TFT OFF button9. button10. MOD button11. 5 button12. 3/AUD button13. MUT button14. VOLUME knob/SELECT button15. 4/S-T button16. 6 button17. button18. BND/TYPE button19. USB port20. AUX in21. SD card slot128910345671112131415161718192021

Operation9General operationsTurning the unit on/offPress /TFT OFF button on the panel to turn the unit on. Press and hold the button to turn the unit off.Reset the unitOperating the unit for the first time or after replacing the car battery, you must reset the unit. Press RESET button (hole) with a pointed object (such as a ballpoint pen) to set the unit to initial state. When some errors occur, you can also press RESET button to resume to normal, and it will erase clock setting and some memorized functions.TFT display on/offWhen the unit is on, press /TFT OFF button on the panel to switch off the display. When the display is off, the video out signal will be available so that the connected monitor will show the screen of the unit. Press this button again to resume the image.Mode selection• Press repeatedly MOD button on the panel to select between Radio, USB, Memory Card and auxiliary input (AUX), operation modes. Modes of operation are indicated on the display. Memory card and USB modes are not available unless a memory card or USB device is connected.• Or, in radio or AUX modes, press button on the panel to display the main menu. In the menu select an operation mode by rotating VOLUME knob on the panel, then SELECT button on the panel to confirm selection.Volume controlAdjust volume by rotating VOLUME knob on the panel.Mute functionPress MUT button on the panel to switch off the sound; press it again or adjust volume to resume the sound.Audio parameter settingPress SELECT button on the panel repeatedly to select a parameter: VOL (volume) => BAS (bass) => TRE (treble) => BAL (balance) => FAD (fader) => EQ (equalizer) => Beep => Loud ON/OFF. Rotate VOLUME knob on the panel or pressing V+/V- buttons on the RC to adjust each mode:• Volume: from 0 to 39;• Bass/Treble: from -7 to 7;• Balance: L7 (left) to R7 (right);• Fader: from R7 (rear) to F7 (front);• EQ: select OFF/POP/ROCK/CLASSIC equalizer mode;• Beep on: the beep sound is heard when a button is pressed; beep off: the sound is not heard;• Loudness: select ON or OFF. Activating this feature will enhance bass and treble frequencies when listening to music at low volumes. When equalizer is in any mode except OFF, bass and treble are not adjustable.

Operation10Aux inputAUX-in jack is intended for connecting external audio equipment to amplify the sound. If connection is made correctly, the audio signal from the external source will be translated through the acoustics of the head unit. This enables to adjust volume and quality of sounding. For example, you can connect an MP3-player to listen to tracks using the car acoustic system.System setupIn radio or AUX modes, press button on the panel to display the main menu. Rotate VOLUME knob on the panel to select SETUP item, then SELECT button on the panel to confirm selection The system setup menu will be displayed, in which you can adjust some system parameters. Rotate VOLUME knob to select a parameter:• Language. Press SELECT button, then rotate VOLUME knob to select the menu language. Press SELECT button to confirm your selection.• Date. Rotate VOLUME knob to select year, month or day. Press SELECT button to confirm your selection, then rotate VOLUME knob to adjust the selected parameter. After adjustment press SELECT button to confirm.• Time. Rotate VOLUME knob to select hours, minutes or seconds. Press SELECT button to confirm your selection, then rotate VOLUME knob to adjust the selected parameter. After adjustment press SELECT button to confirm.• Brightness. Press SELECT button, then rotate VOLUME knob to adjust the image brightness. Press SELECT button to confirm.• Reset. Press SELECT button, then rotate VOLUME knob to select YES (resetting of all user’s adjustments to default) or NO (cancel). Press SELECT button to confirm.Radio operationsBand selectIn Radio mode press BND/TYPE button to select a radio band: FM-1, FM-2, FM-3, AM-1 (MW1), AM-2 (MW2). In each set of the bands you can store up to 6 preset stations, total 30 preset memory stations.Auto/Manual tuning• Manual tuning: Press and hold or button on the panel until the screen shows MANU SEEK. Press these buttons repeatedly to manually adjust the radio frequency.• Auto tuning: Press shortly or button, the radio will seek to the next up or down strong and clear frequency station automatically. Repeat this action to seek for other desired stations. To stop automatic search, press one of these buttons.Automatic store/preset scan• Automatic store: Press and hold APS/ button. The radio will automatically store the 6 strongest available stations in each subband of the current band (FM or AM). To stop auto store, press this button again.• Preset scan: Press APS/ button. The receiver will scan the saved stations in all subbands of the
Tabla de contenidos
Idiomas:
Otros manuales de Reproductor multimedia de Hyundai

Hyundai
Hyundai TRC 191 DRSU3 Manual de usuario

Hyundai
Hyundai H-F2010 Manual de usuario

Hyundai
Hyundai H-DVB02T2 Manual de usuario

Hyundai
Hyundai H-F4010 Manual de usuario

Hyundai
Hyundai TRC 333 AU3BT Manual de usuario

Hyundai
Hyundai MPC 883 FM Manual de usuario

Hyundai
Hyundai DV2X 255 DVBT Manual de usuario

Hyundai
Hyundai MPC 501 FM Manual de usuario

Hyundai
Hyundai H-CCR8091 Manual de usuario

Hyundai
Hyundai H-DVB03T2 Manual de usuario


