HTC Connected Home Instrucciones de uso

HTC HOME SECURITY Self-Install
User’s Quick Install Guide

2 | HTC Connected HOME
HTC Home Security Self-Install Checklist
Please complete Steps 1 through 4 detailed in this guide on pages 6 and 7 prior to contacting HTC
to activate your security system:
❑ 1. Install the Panel
❑3. Mount the Motion Sensor
❑ 2. Power Up the System
❑ 4. Mount the Door Sensors
Fill in the blanks with the location for each sensor. Please make sure the number on the front of the sensor corresponds
to the sensor and location below.
Example Front Door, Back Door, Patio Door, etc.
Sensor 1
Sensor 2
Sensor 3
Installation is complete –
you are ready to call HTC to activate your system!
(843) 369-7887
Please be sure to check out www.htcinc.net/SELF-INSTALL-SECURITY for instructional videos.

HTC HOME SECURITY SELF-INSTALL | 3
Contents
System Overview ..................................................................................................................................................................................................... 4
Your kit includes:............................................................................................................................................................................................................................. 5
Installation and Set Up Instructions .................................................................................................................................................................. 6
Step 1: Install the panel............................................................................................................................................................................................................... 6
Step 2: Power up the system. ..................................................................................................................................................................................................... 6
Step 3: Mount the motion sensor.............................................................................................................................................................................................. 7
Step 4: Mount the door sensors................................................................................................................................................................................................ 7
Step 5: Verifying Your System and Setting Up Monitoring. ........................................................................................................................................... 8
Step 6: Set up ALARM.COM through Welcome Email........................................................................................................................................................... 8
Step 7: Update Master Arm/Disarm Code and Master User Information................................................................................................................ 8
Step 8: Add Additional Users/User Codes. .......................................................................................................................................................................... 10
Step 9: Create Notifications.......................................................................................................................................................................................................11
Step 10: Edit Notifications...........................................................................................................................................................................................................11
Using Your Security System.................................................................................................................................................................................13
Arm from panel .............................................................................................................................................................................................................................. 13
Disarm from panel ........................................................................................................................................................................................................................ 14
Panel emergency keys (IMPORTANT – EMERGENCY USE ONLY) ........................................................................................................................................ 14
Central Monitoring Station...................................................................................................................................................................................................... 14
ALARM.COM App................................................................................................................................................................................................................................. 15

4 | HTC Connected HOME
System Overview
Congratulations on your HTC Connected Home Security System purchase! Your security system
is monitored around the clock by trained security agents to keep your home secure. In addition, your
HTC Connected Home Security System is powered by Alarm.com, which opens up a world of automation and
advanced security features. Turn on your lights and your thermostat automatically when you arrive home,
receive notifications on your mobile phone when the kids arrive safe and sound at the house, or see what’s
going on at your residence anytime with video monitoring – it’s all possible with HTC Connected Home
powered by Alarm.com.

HTC HOME SECURITY SELF-INSTALL | 5
Your kit includes:
PANEL AND POWER ADAPTER –The panel is the brain of the
system that communicates with all of your security and home
automation devices and smart phone/tablet or computer. It
indicates the status of your system and can be used to arm and
disarm your security system.
MOTION SENSOR – The motion sensor provides a safety
net should an intruder somehow gain access to your home.
It should be mounted approximately 7.5’ off the ground in a
room with views of likely entry points. This sensor detects the
infrared heat pattern that the body emits. Current technology, in
addition to detecting a human intruder, is sophisticated enough
to allow small pets (under 30 lbs.) to move freely within a
monitored area without triggering the alarm.
3 DOOR SENSORS – These sensors typically go on all exterior
doors. If there are not three doors, the other sensors may go on
windows. Door/window sensors trigger the alarm if a secured
door or window is opened while the system is armed.
3 HTC SECURITY WINDOW CLINGS – Apply these to
windows near points of entry to let potential intruders know
that your home is protected by HTC Security around the clock. A
complimentary yard sign is also available and can be picked up
at any HTC Branch Office location.

6 | HTC Connected HOME
Installation Instructions
Step 1: Install the panel.
The iotega panel will perform best on a flat, stable surface that’s free from vibration and shock, and near:
• An electrical outlet (no GFCI-protected outlets or outlets controlled by a light switch)
• A strong cellular signal
• A strong Wi-Fi signal (if available)
• Your main point of entry/exit (if preferred)
Step 2: Power up the system.
1. Pull out the battery tab from the bottom of the panel.
2. Connect the power adapter to the back of the panel.
3. Route the power cable through the strain-relief channel on the bottom of the panel.
4. Connect the other end of the power adapter into an electrical outlet. (This should not be plugged into
a GFCI-protected outlet or an outlet controlled by a light switch.) The keypad numbers will illuminate
in sequence, and the Power LED will illuminate after approximately 40 seconds.
5. For extra security, remove the electrical outlet’s plate screw and utilize the attached screw on the
power adapter to secure it in place.

HTC HOME SECURITY SELF-INSTALL | 7
Step 3: Mount the motion sensor.
The motion sensor should be mounted in the corner of a room in
view of each entry point you would like monitored for motion.
1. Attach the bracket to the back of the motion sensor.
Note: The wider portion of the motion sensor is
the top.
2. Use the provided double-sided tape to mount the
motion sensor to the wall approximately 7.5’ off the
ground. For a more secure mount, use the provided
screws in lieu of the double-sided tape to attach the
bracket to the wall.
Step 4: Mount the door sensors.
The three sensors typically go on exterior doors. If there are not
three doors, the other sensors may go on windows. The door
sensor consists of two pieces, transmitter (top) and the magnet
(bottom-the smaller piece). Each sensor is labeled with a “1”,
“2”, or “3”. Take note of the location you place each sensor on
page 2 of your quick install guide.
The transmitter typically goes on the doorframe/casing, and the
magnet on the door like shown to the right in Figure 1. However,
you may need to adjust this depending on the setup of your door.
Using the double-sided tape provided to mount sensors, make
sure to align the etched triangle on the magnet with the etched
triangle mark on the transmitter. If the magnet is installed on
the wrong side of the transmitter, or not aligned with the etched
marking, the sensor will not function properly and will remain
faulty until properly aligned. The magnet and the transmitter do
not have to be touching, but they should be within 5/8” of each
other, and the door should be able to properly open and close.
Top
Flat Mount
Bracket
Corner Mount
Bracket
FIGURE 1

8 | HTC Connected HOME
Step 5: Verifying Your System and Setting Up Monitoring.
You will need to call HTC at (843) 369-7887 to finalize the installation and activate the system. An HTC
Representative will walk you through testing your system to ensure proper installation. YOUR SYSTEM WILL
NOT MONITOR FOR ALARMS UNTIL YOU COMPLETE THIS STEP. The monthly billing for your service
will begin once you call to activate your system or seven days after your security system has been delivered –
whichever occurs first.
Step 6: Set up ALARM.COM through Welcome Email
You will receive a “Getting Started” email from HTC at the email address
provided at the time of sale. From your “Getting Started” email, click on
the link to set up your Alarm.com account. This link will walk you through
creating the password you will use to log into the Alarm.com website and
app. You will also create a security question in case your password needs
to be reset in the future. If you do not see the email, check your Junk/
Spam folder.
Step 7: Update Master Arm/Disarm Code and Master User Information.
Using a web browser, go to Alarm.com/us/htcsecurity and click the LOGIN button. Use the email address
and password just created to log into your account. Here, you will update the Master Access Code that is used
to arm/disarm the panel.
(A) From the left side of the menu, select “Users.”
(B) On the right side of the page, select the pencil icon to edit.
Step 7B
Step 7A

HTC HOME SECURITY SELF-INSTALL | 9
(C) Scroll down to the bottom of the page. Here, it will allow you to update the Master Access Code that will
be used to arm/disarm the system and change from the default. Type in a unique 4-digit code. Click “Save”
to update.
NOTE: The Master Access Code cannot be deleted, only changed.
(D) To update the Master User Contact Information, select “Add”
on the right side of the page. Add any telephone numbers or
email addresses where you would like important notifications
to be sent.

10 | HTC Connected HOME
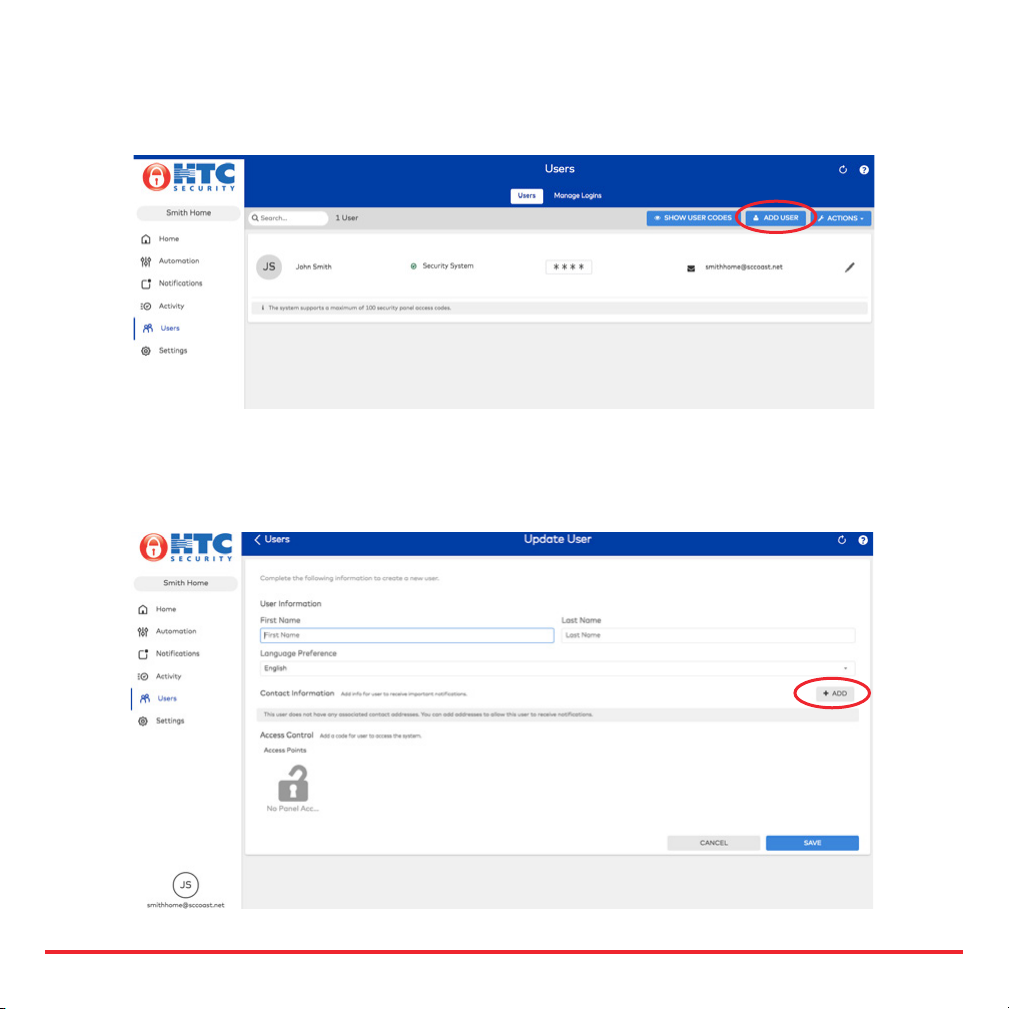
Step 8: Add Additional Users/User Codes.
(A) If you would like to add additional users with separate user codes, select “Add User” from the main
“Users” tab.
(B) Fill in the User Information section. Under Contact Information, select “Add” on the right side to add a
telephone number or email address for the user to receive notifications.
Tabla de contenidos
Manuales populares de Sistema de seguridad de otras marcas

EDM
EDM Solution 6+6 Wireless-AE Manual de usuario

Highway Safety Group
Highway Safety Group EA401 Manual de usuario

Siren
Siren LED GSM Manual de usuario

Detection Systems
Detection Systems 7090i Instrucciones de montaje

Se-Kure Controls
Se-Kure Controls MicroMini SK-4841 Manual de usuario

Siemens
Siemens FDM273 Manual de usuario