Hartmann BELITEC Guía de configuración

1
General assembly drawing for
BELITEC foldaway beds
Singlebed
with integrated side cladding and
front plate
80, 90, 100, 120, 140, 150 cm width
60 cm cabinet depth
D:\montage\montageanleitungen\englisch\2018\eb-eng_11-2018.pub
Rev: Novembre 12 2018
Please destroy older assembly drawings!
We do not assume any liability in cases of non-adherence to the assembly manual.
- We reserve the right to make modifications -
The statutory warranty period applies!

2
Safety instructions
This device can be used by children aged 8 and older or persons with reduced physical, sensory or
mental abilities or lack of experience and knowledge, provided they are supervised or
have been informed how to use the device in a safe manner and understand the resulting risks!
Ensure that children cannot play with the device.
Do not move the bed from the installation site which has been deemed "safe" by the installer.
A safe installation site must have sufficient space around the system travel path,
so that there is no direct danger caused by getting caught and / or crushing.
When using the device, ensure that there are no objects which may get caught between the moving components.
Do not touch moving components during operation to avoid severe personal injuries / damage to property!
There is a risk of crushing injuries, fractures and / or limbs being severed.
It is prohibited to smoke or handle open flame in close proximity to the device!
Due to the risk of electric shock, a damaged power cable may only be replaced
by the manufacturer or a specialist company.
When installing the system, ensure that there is sufficient space
and provide a sufficiently large safety area!
If spaces and / or the safety area are too small,
there is a risk of crushing, fractures and / or limbs being severed.
Protect all electrical lines and connections from damage and water and
install them so that they are freely accessible to prevent electric shocks.
Reliably prevent unintentional changes to the control system, the electrical system
and all moving components.
Prevent misuse of the remote control by unauthorised persons.
Fasten the hand switch at the highest possible position to prevent misuse.
Only allow expert personnel who have received
the required instruction to assemble the BELITEC system!
It is recommended that you as the prodcuer of the complete furniture keep this assembly instruction safe to your technical
documentation in case of control by authority.

3
Parts list
- 1 set of bend guides A LH and RH
- 1 set of bend guides B LH and RH
- 1 carriage unit + drawer + side cladding
- 1 chain frame + 4 screws
- 1 mattress
- 1 drive unit
- 1 SB - drive 1.2
- 1 SB - drive 1.1 with yellow dot
- 1 synchronous shaft + 2 couplings
- 1 control + hand - held switch +
emergency lowering
- wooden slats as required
- 12 hardness adjusting slides as required
- 2 stops retraction / extension
- 2 x 2 guide rails
- 8 ventilation rings
- 1 metal feet with rollers for the front plate
- 2 belts
- 2 belt holders
- 4 belt hooks
- 4 plastic plugs
A
B
Hand held switch
to initialize
- push the buttons A + B at the same time and hold.
- the drives retract the system and stop at the end position.
- there is sounding a beep for successful operation.
regular service
Button A Reclining area is retracted. Press button until the desired position is reached.
Button B Reclining area is extended. Press button until the desired position is reached.
ATTENTION!
In case of a power failure, you can extend the system by pressing
the button (*) on the emergency lowering.
After that the control system needs an additional teach-in run!
Do not extend the bed completely in case of a power failure, as the system
may otherwise be damaged.
Only extend and retract the bed while unloaded!
The system is protected against malfunctions and improper handling by an
integrated overload protection in the controls.
After twice run in / out service to take a break time of 18 minutes is required
to prevent the drive motors from overheating!
*
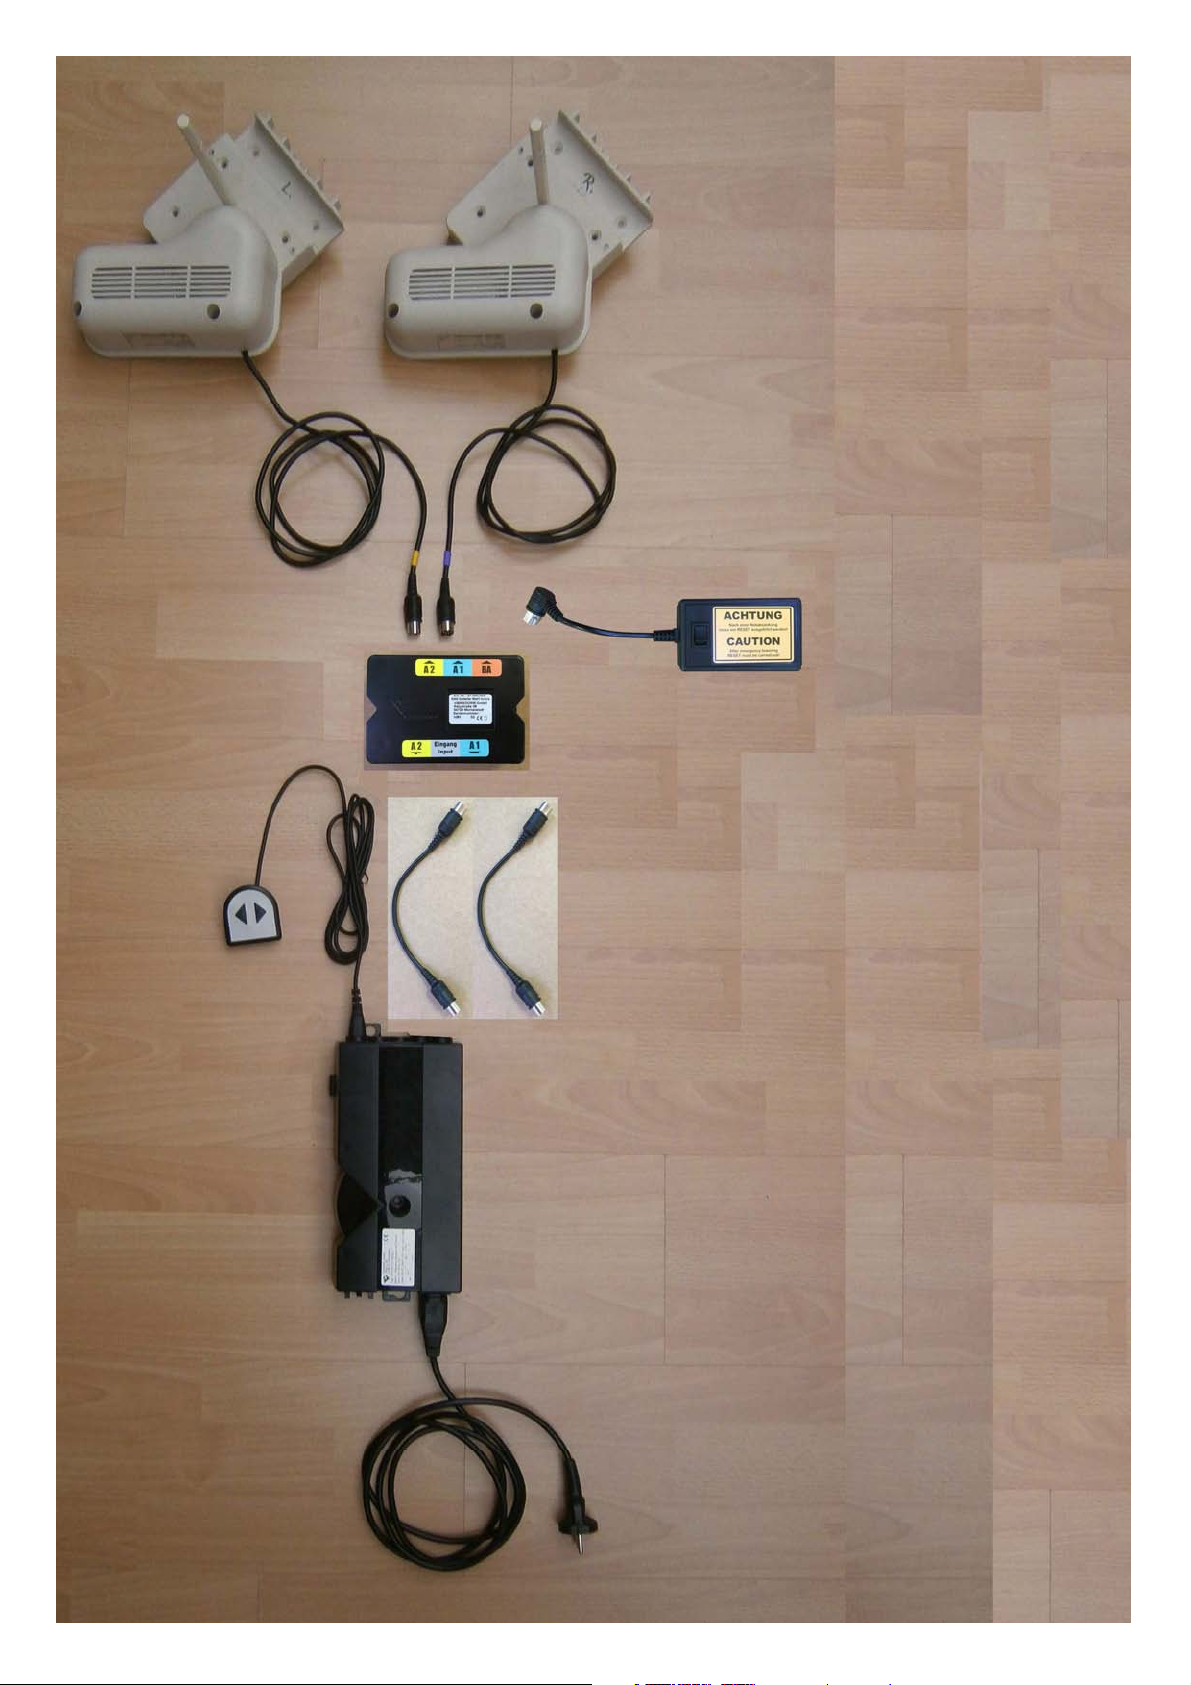
4
The electrical system of controls and
drives consists of five components.
Plug the main electrical connection (1) into
the control block (2). Then plug the block for
emergency lowering (3a) into the control
block and connect the switch (3b) with
housing. Connect the plugs of the drive
motors (5) with the remaining two couplings
on the block of the emergency lowering.
Push the plug of the actuator with the yellow
mark (*) and chain guide (*) into the remaining
coupling on the block of the emergency
lowering. After that connect the hand-held
switch (4) with the control block.
With this hand-held switch the system will be
controlled.
1
2
3b
3a
4
5
chain guide (*)
(*)
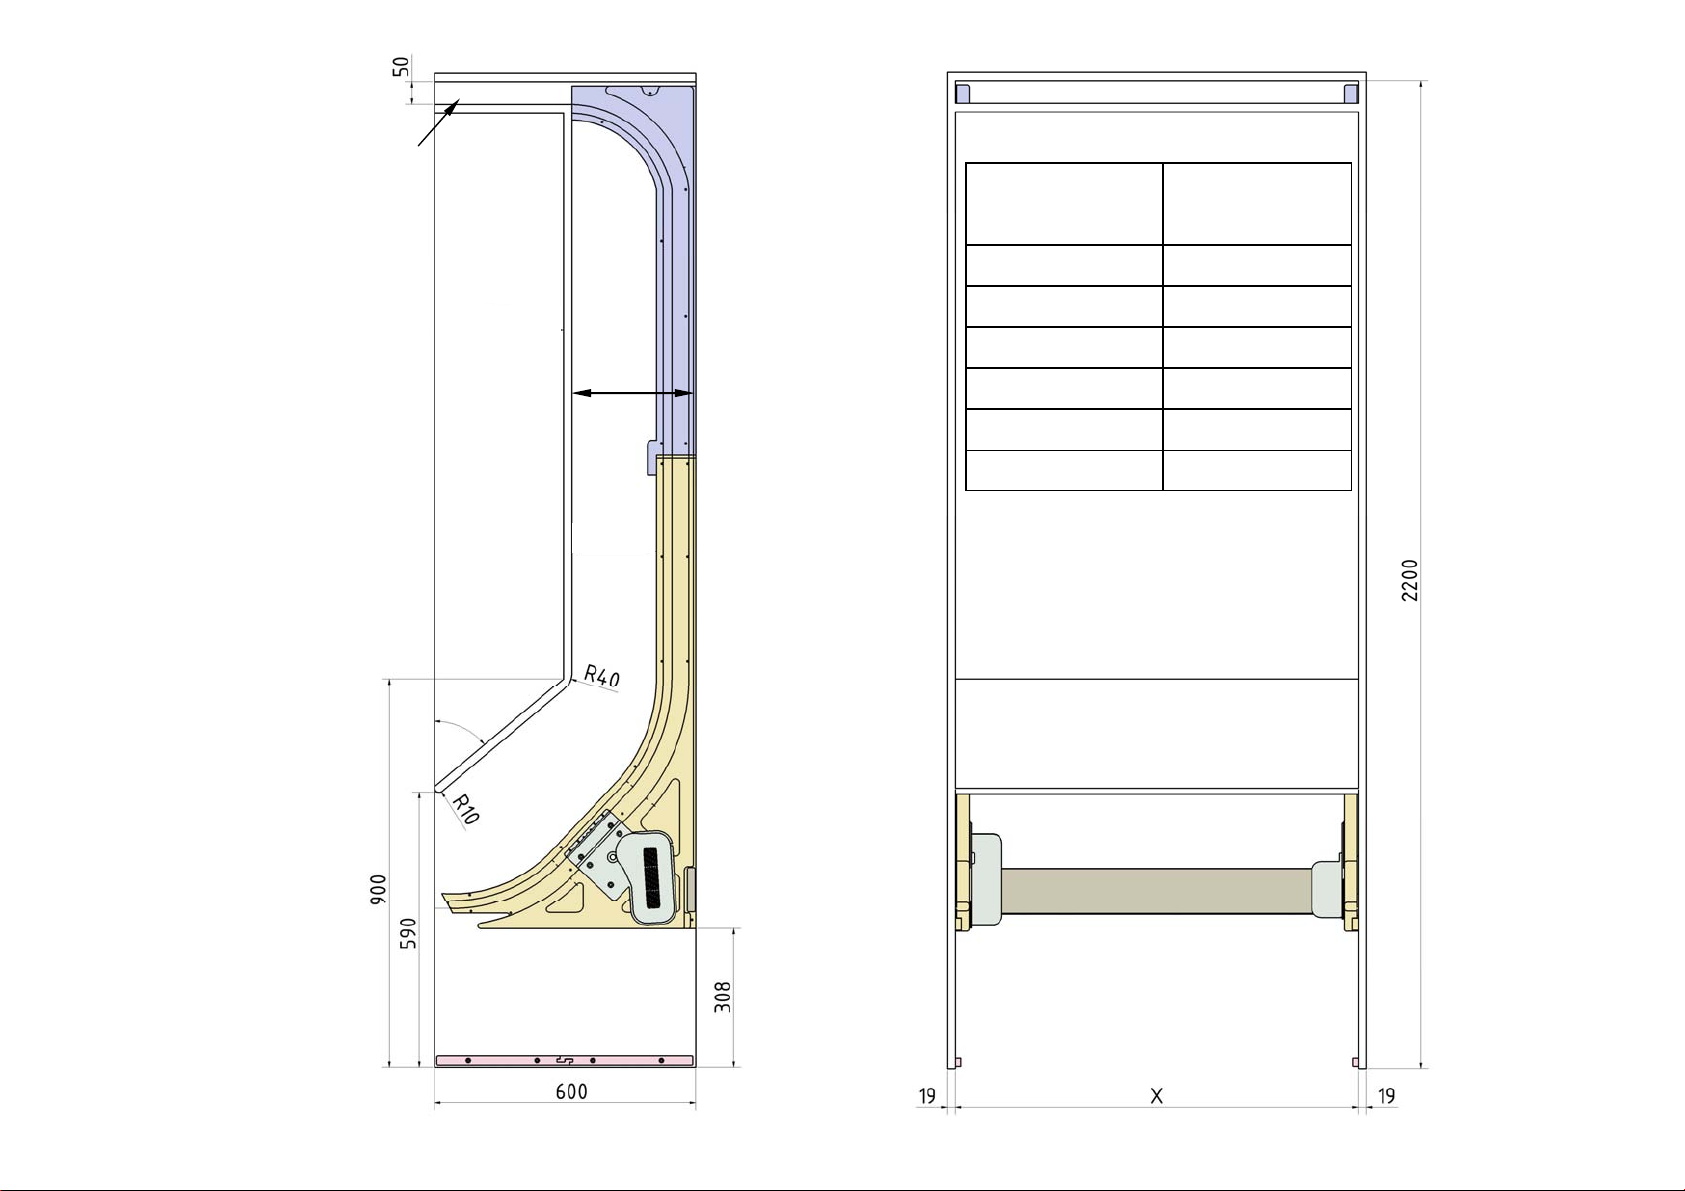
5
foldaway
bed system
internal dimension
X (mm)
80 796
90 896
100 996
120 1196
140 1396
150 1496
component A
componentpart B
component E
chain outlet
front view
side view
X
component F
min.
280 mm
47°

6
See our construction video on Youtube.
https://youtu.be/cIQPZ1ZVIsg
Assembly information
To ensure long-term safety when using your foldaway bed, it is necessary to adhere to basic safety
rules, both for use and control system installation in the foldaway bed.
- Ensure that the installation location is dry and free of dust. The controls of the electrical
system should not be exposed to direct sunlight.
- The ambient temperature for use of the control system may not be higher than 40 °C or
lower than 5 °C.
- For this reason, do not install / operate the controls:
* above or in front of heat sources (e.g. radiators)
* near highly inflammable materials
* hear high-frequency devices (e.g. transmitter, radiation devices, etc.)
- Ensure that the connection cables are not bent, pulled or otherwise subjected to
mechanical stress.
- For protection from electrical surges, which may occur during a thunderstorm, it is
recommended that you install a surge protection. Get advice from an electrician.
- The control system must be fastened in place (recommendation: screw-fitting). This will
prevent malfunctions caused by loose plug-in connections or generation of unwanted
noise.
- The control system must remain freely accessible even after installation of the foldaway
bed, so that it can be accessed for service work.
- The control system only generates very little heat, but sufficient air circulation should
nevertheless be ensured.
- Electrical lines should only be installed by qualified personnel.
Liability disclaimer
We would like to point out that Hartmann asytec GmbH & Co. KG will not assume any liability for
injuries, material damage or other damage caused by
- failure to adhere to this assembly manual.
- modifying the foldaway bed without our approval.
- using spare parts that have not been manufactured or approved by
Hartmann asytec GmbH & Co. KG.
Note:
For systems with internal doors, the side walls must be doubled
accordingly to ensure that the depth dimension of 600 mm is maintained!
The system cannot be moved separately, i.e. both carriages always move simultaneously.

7
Eliminang malfuncons of the foldaway bed control
Possible malfunction Solution
The foldaway bed no longer responds after moving for 2 min. Disconnect the controls from the mains for approx. 5 sec
Controls do not respond to use of the hand switch Disconnect the controls from the mains for approx. 5 sec,
perform a new reference run as described,
see page 16, section 14
The emergency lowering function was used after a power failure perform a new reference run as described,
see page 16, section 14
The system does not respond after a pause time of
min. 18 min.
Disconnect the controls from the mains for approx. 5 sec,
perform a new reference run as described,
see page 16, section 14
If these measures are unsuccessful, please contact your service partner to have the controls replaced, if necessary.

8
Note:
For systems with internal doors, the side walls must be doubled
accordingly to ensure that the depth dimension of 600 mm is maintained!
308 mm
2.
Install the bend guides on the RH and LH side
(component B) at a height of 308 mm, flush with
the rear edge.
LH
Assembly instructions
1.
Read carefully, adhere to specified dimensions,
note the RH / LH side, route cable precisely,
install the controls and the corresponding
receiver so that they are freely accessible!
Recommendation:
On the top of cabinet unit
Ensure that the floor on which the system is
installed is horizontal and level.
The carriage frame cannot compensate for the
height, even if the cabinet is adjusted to the floor.
RH

< 10 mm
50 mm
3.
Install component A. Leave a gap of minimum 50 mm
in the cabinet lid area and ensure that the chain outlet
is sufficient. Pay attention to cabinet lighting cables
etc., increase dimension, if necessary.
Ensure that the gap between component A and the
rear of the cabinet storage space is no more
than 10 mm.
4.
Install side guide rails (component F) at the bottom of
the side walls .

10
5.
Install the drive housing (SB - drive 1.1) with the chain guide (*) and
the yellow mark on the RH, the other drive housing on the RH side wall.
*
Leave off the screws intended for the stops..
SB - drive 1.1
SB - drive 1.2
Otros manuales para BELITEC
1
Este manual sirve para los siguientes modelos
1
Tabla de contenidos
Otros manuales de Mobiliario de interior de Hartmann


