Hama 00176592 Manual de usuario

00176592
00176593
WIFI HEATING CONTROL
“Add-On” (00176592),“Starter-Kit” (00176593)
GOperating Instructions DBedienungsanleitung

GOperating Instructions
Thank you for choosing a Hama product.
Take your time and read the following instructions
and information completely. Please keep these
instructions in a safe place for future reference. If
you sell the device, please pass these operating
instructions on to the new owner.
Controls and displays
1. Control dial / On/Off button
2. LED display
3. WLAN connection
4. Mode
5. Heating phase
6. Low battery level
7. Temperature
8. Blue status LED
9. Red status LED
10. Reset / Pairing
11. Micro-USB socket
1. Explanation of warning symbols and notes
Risk of electric shock
This symbol indicates a risk of electric shock from touching product parts carrying hazardous voltage.
Warning
This symbol is used to indicate safety instructions or to draw your attention to specic hazards and risks.
Note
This symbol is used to indicate additional information or important notes.
1
27
8 9
10 11
3 4 5 6

2. Package contents
00176592
1 x radiator thermostat
2 x AA batteries
1 x adapter set
00000000
WIFI HEATING CONTROL
"Add-On" (00176592), "Starter kit" (00176593)
1x
1x
1x
1x
2x
1x
00176593
2 x radiator thermostats
1 x central control unit
4 x AA batteries
2 x adapter sets
1 x USB power supply unit
00000000
WIFI HEATING CONTROL
"Add-On" (00176592), "Starter kit" (00176593)
2x 1x
1x
1x
2x
2x
2x
4x
2x

3. Safety instructions
•The product is intended for private, non-commercial use only.
•Use the product only for the intended purpose.
•Protect the product from dirt, moisture and overheating and use it in dry rooms only.
•The product is intended only for use inside buildings.
•Only use the article under moderate climatic conditions.
•As with all electrical products, this device should be kept out of the reach of children.
•Do not operate the product outside the power limits specied in the technical data.
•Do not use the product in areas in which electronic products are not permitted.
•Do not use the product in a damp environment and avoid splashing water.
•Do not drop the product and do not expose it to any major shocks.
•Do not modify the product in any way. Doing so voids the warranty.
•Keep the packaging material out of the reach of children due to the risk of suffocation.
•Dispose of packaging material immediately in accordance with the locally applicable regulations.
•Route all cables so that there is no risk of tripping.
•Do not bend or crush the cable.
•Always pull directly on the plug when disconnecting the cable, never on the cable itself.
Risk of electric shock
•Do not open the device or continue to operate it if it becomes damaged.
•Do not use the product if the
AC adapter, the adapter cable or the mains cable are damaged.
•Do not attempt to service or repair the product yourself. Leave any and all service work to qualied experts.

4. Getting started
4.1 Inserting / changing the batteries
Warning - Batteries
•When inserting batteries, note the correct polarity
(+ and - markings) and insert the batteries
accordingly. Failure to do so could result in the
batteries leaking or exploding.
•Only use batteries (or rechargeable batteries) that
match the specied type.
•Before you insert the batteries, clean the battery
contacts and the polar contacts.
•Do not allow children to change batteries without
supervision.
•Do not mix old and new batteries, or batteries of
different types or from different manufacturers.
•Remove the batteries from products that are not
being used for an extended period (unless these
are being kept ready for an emergency).
•Do not short-circuit batteries.
•Do not charge batteries.
•Do not burn batteries.
•Keep batteries out of the reach of children.
•Never open, damage or swallow batteries or allow
them to enter the environment. They can contain
toxic, environmentally harmful heavy metals.
•Remove spent batteries from the product and
dispose of them without delay.
•Avoid storing, charging and using in extreme
temperatures and at extremely low atmospheric
pressures (such as at high altitudes).
30 sec.
Flashing
1 2
5
3
4
•Press the battery symbol on the housing and pull the housing cover upwards over the control dial.
•Remove the spent batteries and dispose of them if required. Insert two new batteries of type AA. Take care to
ensure the correct polarity as shown in the diagram in the battery compartment.
•"LA" ashes on the display.
•Close the battery compartment by pushing the housing cover back onto the control dial.
•Wait for around 30 seconds until the "LA" display lights up solid. The thermostat can now be tted to the
radiator.

4.2 Fitting the adapter
•Thanks to the union nut, the thermostat can be tted to all valves with the thread dimensions M30 x 1.5 mm
from the most common brands such as Heimeier, MNG, Junkers, Landis+Gyr (Duodyr), Honeywell-Braukmann,
Oventrop, Schlösser, Comap, Valf Sanayii, Mertik Maxitrol, Watts, Wingenroth (Wiroex), R.B.M, Tiemme,
Jaga, Siemens and Idmar.
•With the adapters included in the extent of delivery, the device can also be tted to radiator valves of type
Danfoss RA, Danfoss RAV, Cale and Giacomini.
To t the attachments, please follow the instructions below for the respective part.
Danfoss RA and Danfoss RAV
•While tting, ensure that the pins inside the adapter cover the same position as the notches on the valve.
•Fully attach the adapter appropriate for your valve.
•During tting, you may need to use a screwdriver and bend the adapter slightly in the area of the screw
bushing. This will enable the adapter to be pushed more easily onto the valve. After locking it onto the body
of the valve, secure the adapter using the enclosed screw and nut.
Danfoss RAV
•On Danfoss RAV valves, the tappet extension must be placed on the valve pin before tting.
Cale
•Please place the Cale adapter directly on the valve.
Giacomini
•To t the Giacomini adapter, please rst attach the top piece, then place the tappet extension on the valve
pin, and then nally secure the piston to the thermostat.
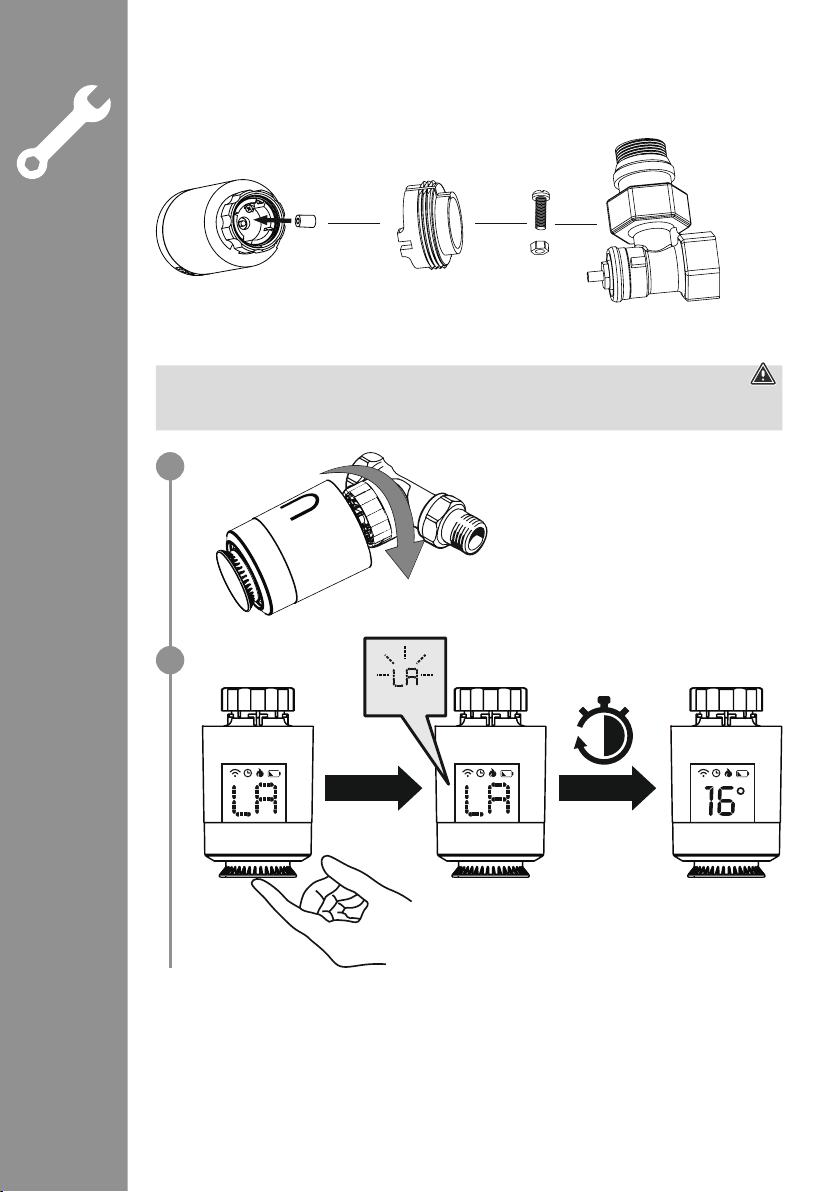
4.3 Fitting on the radiator valve
Warning - tting
•Never apply force during the tting process. This can damage your device.
•Ensure that the radiator is switched off and has cooled down before starting to t any attachments.
•Place the thermostat straight on the valve and tighten the union nut.
•Fit the thermostat so that the LED indicator remains visible for you.
•Press the control dial (1). The "LA" display starts to ash. The radiator thermostat now carries out an
adaptation run.
•Once the adaptation run has been carried out, the display shows the current temperature. If it does not, carry
out the above steps again.
1
2
30 sec.
Flashing

4.4 Fitting the central control unit
Flashing
Warning
•Only operate the product from a socket that has been approved for the device. The socket must be installed
close to the product and must be easily accessible.
•Disconnect the product from the power supply using the On/Off switch – if this is not available, unplug the
power cord from the socket.
•If using a multi-socket power strip, make sure that the total power consumption of all connected devices
does not exceed the power strip's maximum throughput rating.
•If you will not be using the product for a prolonged period, disconnect it from mains power.
•Connect the enclosed micro-USB cable to the micro-USB socket and the USB power supply unit.
•Connect the power supply unit to a properly installed and easily accessible mains socket.
•The LEDs start to ash.
4.5 Installing the app
•Download the "Hama Smart Solution" app using the QR code and install it.
https://de.hama.com/
smarthome#smart-solution

4.6 Integrating devices into the Hama Smart Solution app
Pairing the central control unit
•To pair the radiator thermostat with the Hama Smart Solution app, you must rst integrate the central control
unit into the Hama Smart Solution app.
•Ensure that the central control unit is connected to the power supply and that the LEDs are ashing.
•Open the app and select "My home" at the bottom left-hand edge of the screen.
•Then tap the "+" at the top right-hand edge of the screen
and select the category "Heating control".
•Conrm in the app that the central control unit is ashing.
•Now enter the name of your WiFi network and the password.
Conrm your entry with "OK". The central control unit is now connected.
•Once successfully connected, the red LED lights up solid and the app conrms
that the central control unit has been connected. You can now assign it a different name if you wish.
•Touch "Done". The procedure is complete.
Lights up
solid
1
2
3

•Now connect the radiator thermostats with the central control unit.
•To do this, select your central control unit in the app from the list of found devices.
•The following screen appears:
Radiator thermostat pairing
•Turn the control dial on the radiator thermostat to the left
until the display shows "OF".
•The "OF" becomes visible if you look at the display from the direction of the control dial.
If no "OF" appears, turn the dial in the opposite direction.
•If the display goes out, turn the dial slightly until the display lights up again.
1
Otros manuales para 00176592
2
Este manual sirve para los siguientes modelos
1
Tabla de contenidos
Idiomas:
Otros manuales de Unidad de control de Hama


Manuales populares de Unidad de control de otras marcas

Festo
Festo Compact Performance CP-FB6-E Manual de lista de piezas

Elo TouchSystems
Elo TouchSystems DMS-SA19P-EXTME Manual de usuario

JS Automation
JS Automation MPC3034A Manual de usuario

JAUDT
JAUDT SW GII 6406 Series Guía rápida

Spektrum
Spektrum Air Module System Manual de usuario

BOC Edwards
BOC Edwards Q Series Manual de usuario


