Gerber Tempo 600 Manual de usuario

Gerber Tempo 600
Setup Manual and Quick Start Guide
Gerber Tempo 600 Setup Manual............................................................................................2
1. Check the shipment..........................................................................................................................2
2. Prepare the connection cable...........................................................................................................3
3. Prepare the power source................................................................................................................3
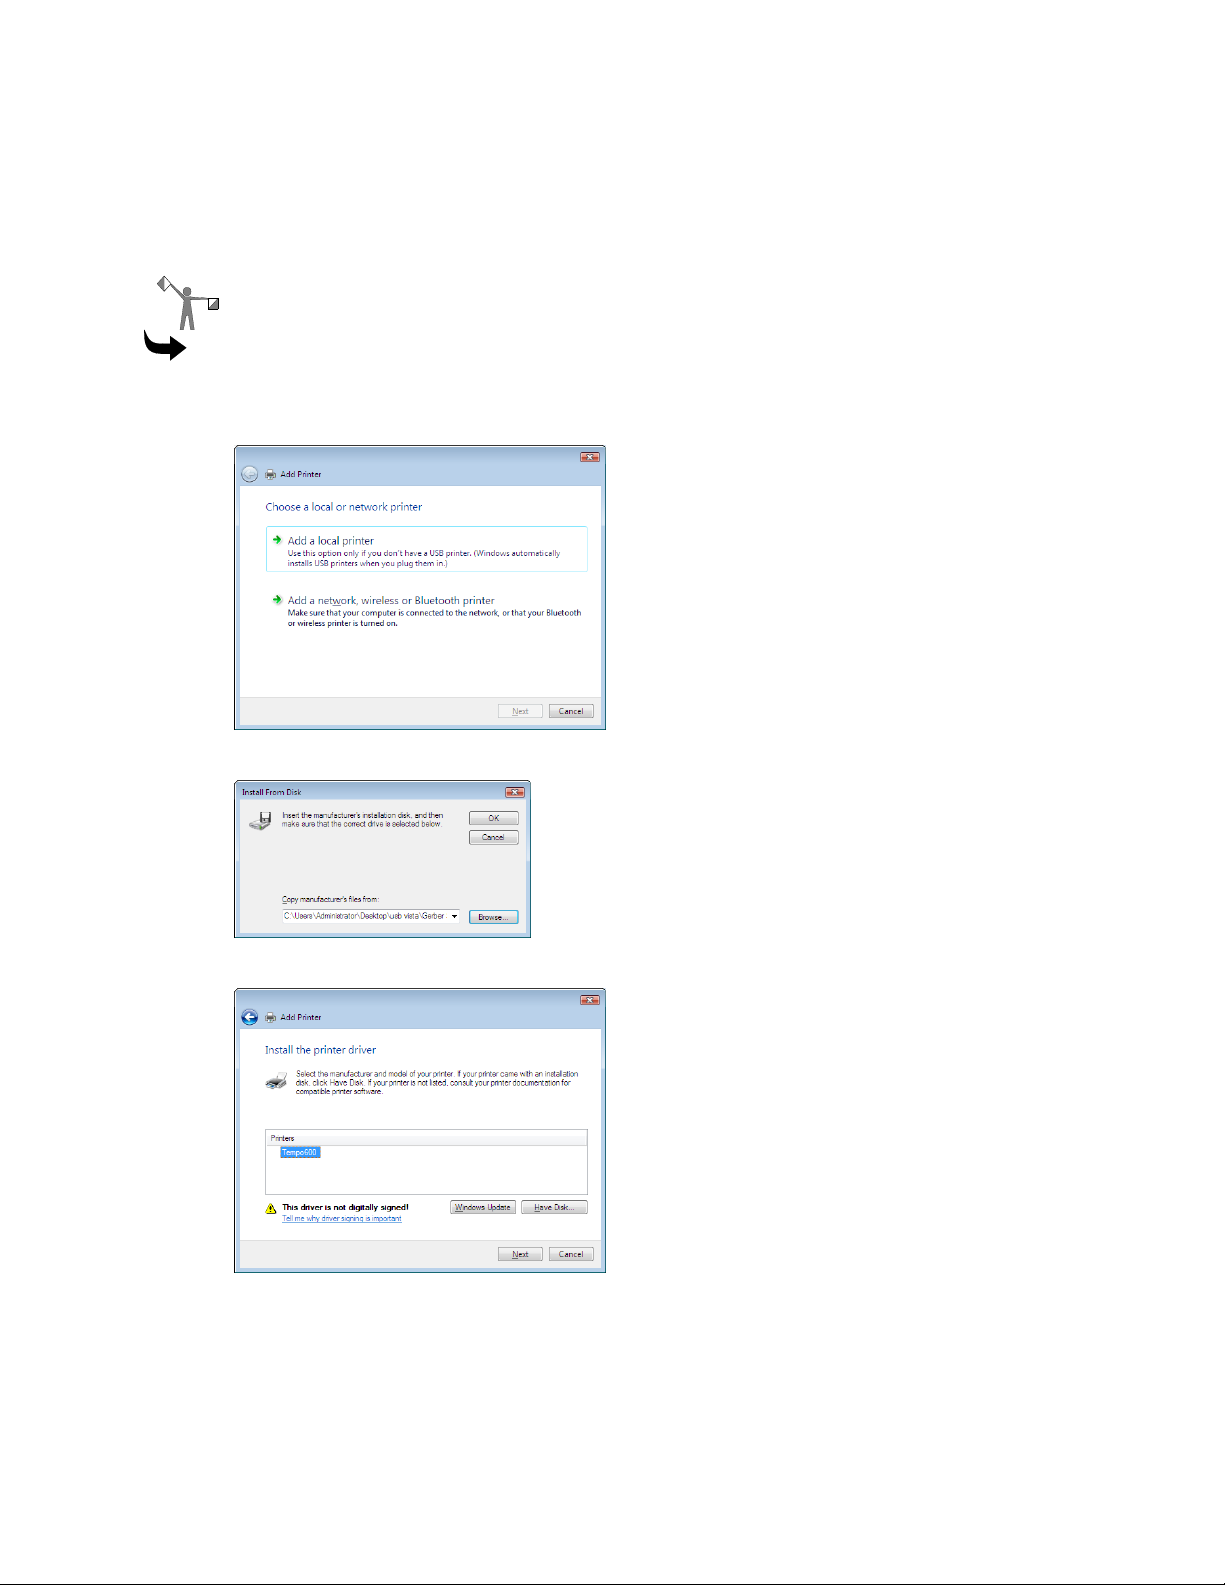
4. Install the plotter driver...................................................................................................................3
5. Installing Gerber Tempo 600 in OMEGA ......................................................................................7
6. Sending jobs to the plotter from GSPPlot......................................................................................8
7. Installing Gerber Tempo as a Windows Printer ...........................................................................9
Quick Start Guide...................................................................................................................... 11
1. Prepare the cutter blade and pen plunger...................................................................................11
2. Mount the pen plunger ..................................................................................................................11
3. Load the media................................................................................................................................12
4. Turn on the Tempo 600..................................................................................................................13
5. Select the media mode....................................................................................................................13
6. Set the cutting conditions ..............................................................................................................14
P82502A Copyright © 2008 Gerber Scientific International.
Windows XP and Windows Vista are registered trademarks in the USA and other countries. Adobe Illustrator is a
registered trademark of Adobe Systems Inc.

Gerber Tempo 600 Setup Manual
This manual describes the procedure required to setup the Gerber Tempo 600. The Gerber
Tempo 600 Quick Start Guide begins on page 11. For details on the operation of the plotter, refer
to the Gerber Tempo 600 Owner’s Guide which is included on the Gerber Tempo 600 CD.
1. Check the shipment
1 Check the contents of the shipment.
2 In addition to the plotter, the following accessories are included in the shipment. Refer
to the list and check the accessories.
2 of 15

2. Prepare the connection cable
Connect the plotter to the computer using the USB cable.
3. Prepare the power source
Note: Remove all transportation tape.
1 Locate the power cord connection and power switch on the left side of the printer.
2 Plug the power cord into the plotter but do NOT connect it to the power source until
instructed to do so during installation.
4. Install the plotter driver
There are two sets of instructions for installing the plotter driver – Windows XP® or Windows
Vista®. Follow the instructions that pertain to your computer’s operating system.
Windows XP
1 Insert the Gerber Tempo 600 CD into the computer drive.
2 Browse the CD to locate MultiSetup.exe and double click it to open the installation
program.
3 Click the Install Tempo 600 USB Driver button.
4 The screen displays the following message. Make sure the Tempo 600 is NOT
connected to the power outlet.
3 of 15

5 Click OK and the following message displays.
6 Read the message and click OK. The Port Name screen displays.
7 Choose USB from the drop down menu and click OK. The Windows warning
displays.
8 Click Continue Anyway to complete the driver installation.
9 Click OK. Plug the Gerber Tempo 600 into the power source and turn on the power
switch. The Found New Hardware Wizard displays.
10 Choose No, not at this time and then click Next >.
4 of 15

11 Choose Install the software automatically (Recommended) and click Next >. If the
Windows warning displays again, click Continue Anyway.
12 When the Tempo 600 driver installation is complete the following screen displays.
Click Finish to close the Wizard.
Windows Vista
1 Insert the Gerber Tempo 600 CD into the computer drive.
2 Browse the CD to locate MultiSetup.exe and double click it to open the installation
program.
3 Click the Install Tempo 600 USB Driver button.
4 The confirmation message displays. Click OK to begin driver installation.
5 of 15

5 The screen displays the following message. Make sure the Tempo 600 is NOT
connected to the power outlet.
6 Click OK and read the following message about Digital Signatures.
7 Click OK. The following screen displays.
8 Choose USB from the Port Name drop-down menu and click OK. The following
warning displays.
9 Click Install this driver software anyway and when the driver installation is complete
the following message displays. You can now connect the Gerber Tempo 600 to the
power outlet.
6 of 15

5. Installing Gerber Tempo 600 in OMEGA
To install the Gerber Tempo plotter for use with OMEGA™ software you must first install
OMEGA 2.6.1 and then install OMEGA SP1. Follow the README instructions included with
the disks.
To install the Gerber Tempo 600 in OMEGA
1 Install Gerber OMEGA 2.6.1.
2 Install Gerber OMEGA SP1.
3 Right click the GSPTray icon located in the bottom right corner of the Windows
task bar.
4 From the displayed menu choose Install Plotter/Router and the Add or Delete
Plotter/Router dialog box displays
5 Choose GerberTempo600 from the list of available plotters.
6 Select USB for the Local Port and click Add. The Add - Name Device dialog box
displays.
7 Accept the default name for the plotter or enter your own name and click OK.
8 The Gerber Tempo 600 is installed in OMEGA and the name appears in the Installed
Plotter/Router list. You can select GerberTempo600 from the list and click Preference
to make the Tempo your default plotter. Click Close when you are finished.
7 of 15

6. Sending jobs to the plotter from GSPPlot
You can send a cut-only job from GSPPlot to the Gerber Tempo 600, or if you have created a
print/cut job, print Graphtec Type 2 (right angle) targets using the GERBER EDGE® and the
Gerber Tempo can automatically acquire them.
To print Graphtec Type 2 targets
1 In GSPPlot, open the print/cut job.
2 Click Setup > Print Options to open the Print Options dialog box.
3 Click Targets to open the Target Configuration dialog box.
4 Turn on Graphtec Type 2 targets to print right angle targets in the four corners.
5 Optionally, turn on Graphtec Intermediate Targets to add extra targets along the edge
of the graphic.
6 Click OK.
7 Print the job with the Graphtec Type 2 targets on the GERBER EDGE.
To send jobs to the Gerber Tempo 600 from GSPPlot
1 Open a cut-only or print/cut job in GSPPlot.
2 Click Setup > Device Select and choose the Gerber Tempo 600 and click OK.
3 Click Cut/Pounce to send the job to the plotter.
8 of 15

7. Installing Gerber Tempo as a Windows Printer
It is not necessary to install the Gerber Tempo as a Windows printer to send jobs from OMEGA.
Installing the plotter through Windows gives you additional flexibility to use the plotter from
other programs such as Adobe Illustrator®.
Note: The following instructions are for Windows Vista.
To install the Gerber Tempo using the Windows Add Printer Wizard
1 Click Start > Control Panel > Hardware and Sounds > Printers. Click Add a printer to
display the wizard.
2 Choose Add a local printer, and then click Next.
3 Browse to the location of the driver, and then click OK.
4 Select Tempo600 from the list of Printers, and then click Next.
9 of 15

5 Enter Tempo600 as the printer name. Do NOT turn on Set as the default printer. Click
Next.
6 In the Printer Sharing dialog box, choose Do not share this printer and click Next.
7 When the installation successful message displays click Finish. Do not attempt to print
a test page. The following “devices are ready to use” message displays.
10 of 15
Tabla de contenidos
Otros manuales de Cortador de Gerber
Manuales populares de Cortador de otras marcas

Milwaukee
Milwaukee HEAVY DUTY M12 FCOT Manual de usuario

Makita
Makita DCS552 Manual de usuario

SignWarehouse.com
SignWarehouse.com Bobcat BA-60 Manual de usuario

Makita
Makita 4112HS Manual de usuario

GEISMAR STUMEC
GEISMAR STUMEC MTZ 350S Manual de usuario

Hitachi
Hitachi CM 4SB2 Guía de solución de problemas


