FrontRow CB6000 Instrucciones de montaje

CB6000
Installer Guide

YOU’RE ABOUT TO MAKE
LEARNING MORE ACCESSIBLE
Welcome to FrontRow — the teacher- and tech-friendly way
to improve the learning environment in every classroom.
To make your installation of the FrontRow CB6000 as
efficient as possible, we recommend that you first read the
section in this guide called Before You Begin, and from
there proceed to Steps 1 through 6.
If you follow the steps set out in this Installer Guide and
organize everything you need beforehand, you’ll find
setting up your FrontRow CB6000 touch control panel to be
quite simple. Of course, if you run into any obstacles, you can
always find contact information for our technical support
representatives at www.gofrontrow.com/contact-us.
Thank you for choosing FrontRow! You're just steps away
from a more productive classroom.

Read Me
CONTENTS
Be sure to read the helpful tip boxes found throughout this guide. Of
course, if you need further assistance, you can always call us at one of the
numbers found on the back page.
Step 1......................................................................................1-5
Before You Begin
Step 2........................................................................................6
Get Your Configuration Files
Step 3.....................................................................................7-12
Configuring Your CB6000s
Step 4.......................................................................................13
Physical Installation Prep
Step 5.......................................................................................14
Plan Your installation
Step 6....................................................................................15-16
Install Your CB6000
Appendix A ...............................................................................17-23
Control Logic Programming
Appendix B ...............................................................................24-26
Creating Your Own User Interface
Appendix C...............................................................................27-31
Setting Preferences
Appendix D...............................................................................32-34
ICR-01 Smart Receiver/Juno Connect Commands
Appendix E ..................................................................................35
CM3000 Commands
Appendix F ..................................................................................36
CA1000 Commands
Appendix G..................................................................................37
Setting Up An Alert Button
Appendix H..................................................................................38
Controlling the CMBT Bluetooth Audio Receiver Remotely
Appendix I...................................................................................41
Troubleshooting

Make sure you’ve got everything you need to install your FrontRow CB6000. By taking the time to prepare,
you’ll help ensure the actual set-up is as quick and problem-free as possible.
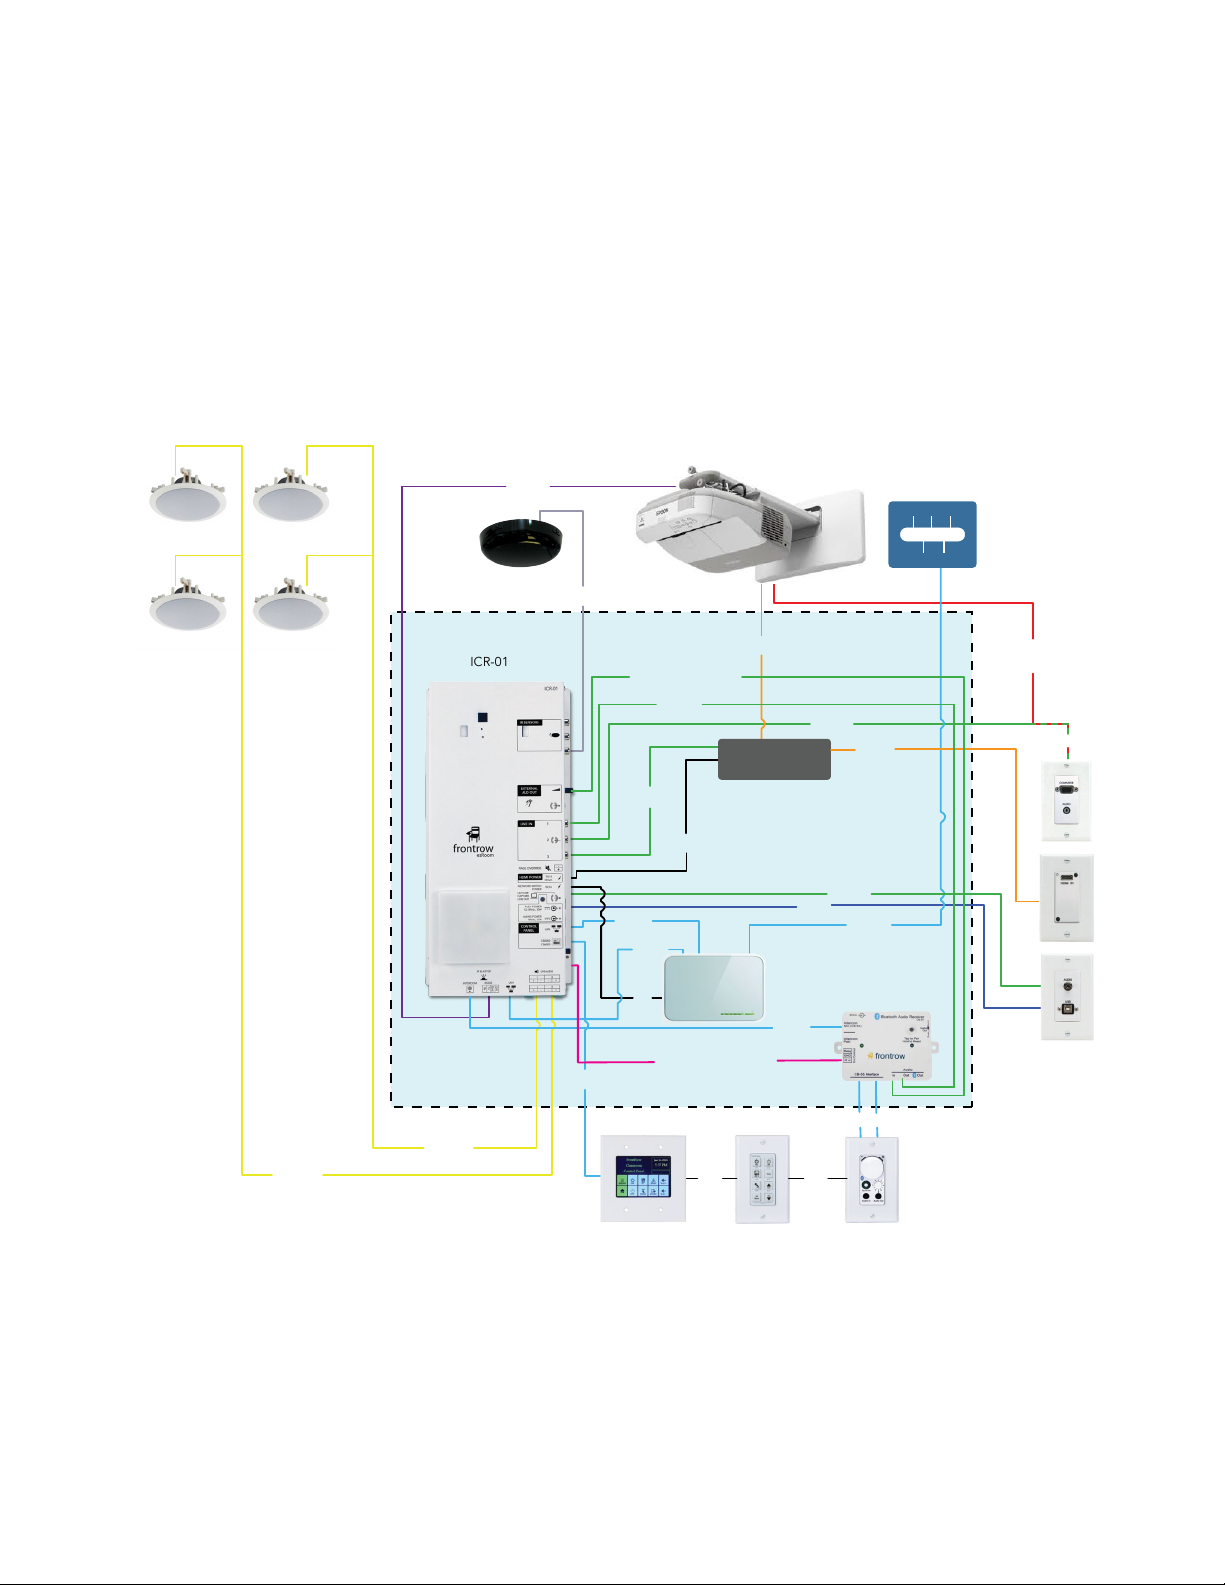
1. Visualize your goal
When your FrontRow system CB6000 is installed, it may look something like this:
Step 1: Before you begin
1
The CB6000 can also be paired with FrontRow Teacher Edition for iOS to control the classroom from an
iPad or iPhone. Available on the App Store, Teacher Edition instantly supports all the actions and buttons
you program into the CB6000, making it easy to configure, and easy for teachers to learn and use.
Download the Teacher Edition for iOS Setup Guide from the FrontRow website for instructions on configuring
an iPad with the CB6000.

2. Get familiar with the touch screen
Date/time display
User control buttons
Info screen
Built-in functions menu
Home button
Backlight level
Backlight controls
Stopwatch/timer
Information about this unit Run diagnostics**
Reset IP address and web login password**
Clear priority message*
Calibrate screen**
*Password required. Use either installer password (1538) or touch panel password (default is 1357; see Appendix C.7)
**Password required. Use installer password (1538)
Network jack
Auxiliary jack (standalone power and other user functions)
Main Screen
Menu Screen
Back of CB6000
2
3
3. What do you want to control? How do you want to control it?
Your CB6000 can let teachers control or communicate with practically any device or person. Now is the time
to plan what you want to do.
Example 1: Typical ezRoom setup with projector
In this example, the CB6000 works with other ezRoom components to turn a projector on and off, switch
inputs, handle the transport controls for a DVD player, and control audio volume from the teacher’s com-
puter, an MP3 player, and two FrontRow wireless microphones. If FrontRow Conductor™ is being used in
the school, the CB6000 could also initiate intercom calls and trigger alerts.
Network
Switch
5V / 18V
ICR-01
Audio
VGA
HDMI
Audio Extractor
LAN
Audio
HDMI
CAT5
CAT5
CAT5
CAT5
COAX
5V
AV Cable
18AWG
18AWG
Serial
OR
USB Audio
HDMI
OR
CAT5
Relay (CB6000 only)
CAT5
Audio (CB55 only)
Audio
CMBT
ezRoom Installation

4
Example 2: Using CB6000 as a stand-alone controller
You can also use the CB6000 as a stand-alone serial controller. In this configuration, the FrontRow TB14 adapter
included with your CB6000 standalone kit supplies power, routes commands, and feeds data back (in the case
of bidirectional serial devices). In combination with powerful tools like FrontRow Maestro™, this can allow you to
‘network’ and manage projectors that are otherwise not online. Below are the basic connections for controlling a
projector and amplifier serially, and a DVD player via infrared remote.
Serial Controlled
Amplifier
Screen or interactive
white board
CB6000
Control
Panel
TB14 Projector
Power
LAN
Cat 5 cable
Serial cable
Control + power
RS232
Speaker
Speaker
AUX
Speaker cable
RS232
NOTE: This is a schematic illustration
intended to clarify the relationship of
components to each other. The location
of jacks shown here may not reflect their
true position on specific devices.
NETWORK
AUX
Power
POWER IN
DVD
Player
IR
IR
Other cable

5
4. Gathering information
You will save a lot of time by working with the school to:
• Make a list of all rooms to be outfitted and the equipment to be controlled in each
• Set aside IP addresses for each CB6000, ICR-01 Smart Receiver or CM3000, and any other FrontRow
components or servers
To help organize this important information, we have an ezRoom Installer Planning Template available for
you to download at www.gofrontrow.com/ezroom under the Downloads section. Of course, you can also
create your own. It should look something like this:

6
Your CB6000s need a script to tell them what the user interface should look like, what other devices they
need to communicate with, and how. If your configuration — the collection of commands you want to issue
from the CB6000 and the devices you want to control — is the same in each room in your installation, then
you will need only one configuration base file which you will modify with specific IP addresses unique to
each room. If the situation is different from room to room, you will need different base files that are tailored
to each configuration.
There are several ways to create your configuration files:
• Go to gofrontrow.com/base-files and find the Base Configuration File library. Each Base Configuration
File stored here includes both the user interface and control logic programming needed for the most
common applications.
• If your configuration is uncommon enough that it’s outside the scope of the Base Configuration File
library, and you have some basic familiarity with programming, you can easily build your own user
interface designs or control logic programming. See Appendices A, B, and C for a detailed description
of how to do this.
Step 2: Getting Your Configuration Files

7
Estimated time for this step: 5-10 minutes per CB6000
Here’s where you wake up your CB6000s and let them know what their mission is. You can of course recon-
figure them at any point if your setup changes or you make a mistake — but it’s best to plan ahead so that
you don’t have to (see Step 1).
For greatest efficiency, we recommend configuring your CB6000s all at once in the office prior to going to
the installation site, but you can also do it room by room at the school if you prefer.
1. Gather your configuration tools
To configure your CB6000s, you will need to collect:
• Your CB6000s
• Any of the following power sources:
• 1 FrontRow ICR-01 Smart Receiver or CM3000 amplifier/switch with power supply (included in most
full ezRoom systems); or
• 1 FrontRow TB14 adapter with power supply (included in the kit for using the CB6000 as a
stand-alone controller)
• 2 lengths of Cat 5 cable (one of these must be a crossover cable if using the TB14 as a power source —
see 2.b below)
• A computer with RJ45 connection and a web browser installed
• A completed ezRoom Installer Planning Template or other detailed information about the school’s
available IP addresses for your CB6000s, ICR-01 Smart Receivers or CM3000s, and other components
(see Step 1)
• Your Base Configuration File(s) (see Step 2)
• Masking tape or labels and a marker
2. Connect your configuration setup
Take your first CB6000 and connect it to your configuration equipment in either of the ways shown here:
a. With ICR-01 Smart Receiver as power source
WARNING: CONNECT THE ICR-01 TO THE CB6000’S ‘NETWORK ONLY’ JACK!
YOU CAN DAMAGE YOUR DEVICES IF YOU CONNECT TO THE ‘AUX‘ JACK.
Step 3: Configuring Your CB6000s
CONTROL
PANEL LAN
CB2000
CB6000 CB6000
Control
Panel
NETWORK
ICR-01
Smart
Receiver
Power
NETWORK
5-port
Ethernet
Switch
Computer
NETWORK
NETWORK
Cat 5 cable
5V,1A
NETWORK SWITCH
POWER POWER
NOTE: This is a schematic illustration
intended to clarify the relationship of
components to each other. The location
of jacks shown here may not reflect their
true position on specific devices.
Other cable
Tabla de contenidos
Otros manuales de Panel de control de FrontRow


