Franklin Chef FWC120 Manual de usuario

120-Bottle Wine Cellar
Rafraîchisseur à vin 120-bouteille
Enfriador de vinos 120-botella
Use and Care Guide (pages 1-7)
Mode d’emploi (les pages 8-14)
Manual del usuario (las páginas 15-21)
Be sure wine cellar is standing upright 24 hours
prior to plug-in.
Soyez sûrs que le rafraîchisseur à vin se tient debout 24 heures
avant que l'unité se branche.
Esté seguro que el enfriador de vinos esté parado en posición
vertical 24 horas antes que sea conectado.
Model/Modèle/Modelo
FWC120
FRANKLIN INDUSTRIES, LLC
4100 First Avenue
Brooklyn, NY 11232-3321
Tel.: 877-261-9867
Website: www.franklinindustries.com


IMPORTANT SAFEGUARDS
Read all instructions before using this appliance. When using
this appliance, always exercise basic safety precautions,
including the following:
1.Use this appliance only for its intended purpose as
described in this instruction manual.
2.This Wine Cellar must be properly installed in accordance
with the installation instructions before it is used. See
grounding instructions in the Installation section.
3.Thismodelcanbebuiltin. Built-inunitsventatthebottom
front and airflow at the front of this vent must be
unimpeded.
4.Iftheunitisplacedonastand,the frontsurfaceofthedoor
must be 3” or more back from the edge of the stand in
order to avoid accidental tipping of the appliance during
normal usage.
5.Never unplug the unit by pulling on the power cord.
Always grip the plug firmly and pull straight out from the
outlet. Repair or replace any cord that is frayed. Do not
useacordthatshowscracksorabrasionsalongitslength.
6.Iftheunithasapluginthemiddleofthemoisturechannel
inthebackoftheunit,removethisplugandallowthedrain
to remain clear at all times when in operation.
SAVE THESE INSTRUCTIONS!
DANGER!
Avoid the risk of child entrapment. If product is not in use,
removethedoorsothatsmallchildrencannotgettrappedinside.
1

Table of Contents
Safety Instructions ·············· 1
Technical Specifications ··········· 2
Installation·················3 - 4
Operation of Your Wine Cellar ······4 - 5
Care and Cleaning ·············· 6
Troubleshooting ··············· 6
Limited Warranty ··············· 7
Technical Specifications
Model Number: FWC120
Capacity: 120 standard wine bottles
Electrical Input: 115VAC ~ 60Hz
Current Rating: 2.6 A
Unit Dimensions: 26“W x 28¼“D x 60¼“H
2

Installation
Remove the exterior and interior packaging. Use a soft dry
cloth to wipe down the outside of the wine cellar thoroughly.
Use a clean cloth dampened with lukewarm water to wipe
down the inside of the cellar.
Air must circulate freely in front of the wine cellar. Avoid
placing the cellar near any source of heat or moisture, or in
direct sunlight. Direct sunlight may affect the finish, and
nearbyheatsourceswillcausehigherelectricalconsumption.
The FWC120 wine cellar is designed to be built-in. A
motorized fan at the back of the unit directs
compressor-generated heat away from the compressor and
through the front of the unit. There are no clearance
requirements for this unit.
Once thewine cellar is positioned, the leveling legsat the front
of the unit should be turned to level the appliance. This will
reduce vibrations.
Electrical Connection
Important! For your personal safety, this appliance must
be properly grounded. In the event of an electrical short
circuit, grounding reduces the risk of shock by providing an
escape wire for the electric current. This appliance is
equippedwith a cordhavinga groundingwirewith a grounding
plug. The plug must be inserted into an outlet that is properly
grounded and installed. Consult a qualified electrician if you
do not completely understand these grounding instructions.
DO NOT UNDER ANY CIRCUMSTANCES CUT OR
REMOVE THE THIRD (GROUND) PRONG FROM THE
POWER CORD.
3
Use of Extension Cords
Avoid the use of an extension cord because of potential safety
hazards under certain conditions. If it is necessary to use an
extension cord, be sure to use only a 3-wire extension cord
that has a 3-blade grounding plug. Use a 3-slot outlet that will
accept the plug. The marked rating of the extension cord must
be equal to or greater than the electrical rating of the
appliance.
Operation of Your Wine Cellar
Do not plug in the wine cellar for 24 hours after unit is set in
place. Failure to do so may result in the unit working
improperly.
Plug in the wine cellar to turn it on. The COMPRESSOR ON
Indicator LED on the control panel will light, and will remain lit
while the compressor is operating.
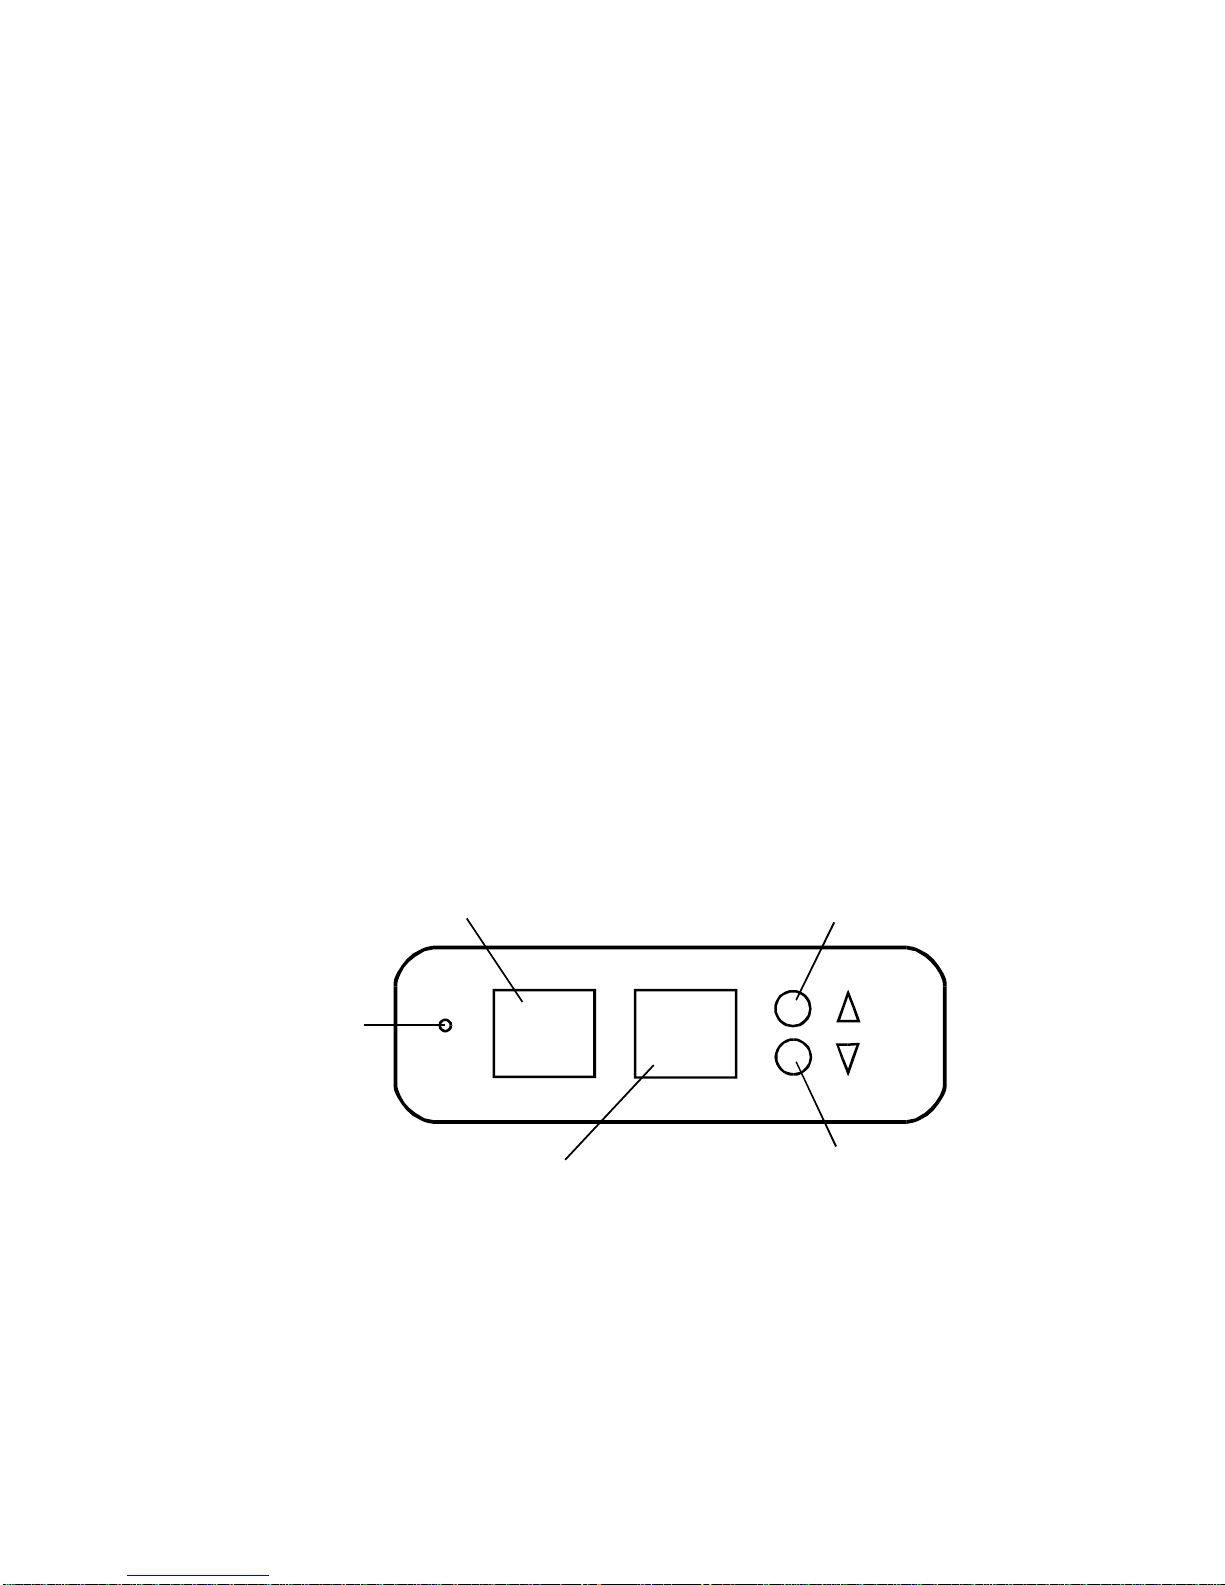
Control Panel
Set the desired cooling temperature by pressing the arrow
keys up or down. (Settings range from 46ºF to 64ºF.) The
temperatureyou setwillbe shown inthe TEMP SETwindow of
the control panel. The actual temperature inside the unit will
appear in the DISPLAY window. This temperature will vary
4
RUN
DISPLAY TEMP SET DOWN
UP
ºF ºF
Shows temperature inside cellar
(Temperature range : 0 - 99ºF)
COMPRESSOR ON
Indicator
Temperature setting
(Temperature range : 46 - 64ºF) Adjust temperature
setting down
Adjust temperature
setting up

depending on the number of bottles stored and how frequently
the door is opened.
To temporarily stop the cooling cycle, unplug the wine cellar.
For longer periods of time, disconnect the plug and leave the
door partially open.
NOTE: If you unplug or turn off the wine cellar, allow 3 minutes
beforerestarting or pluggingbackin. Theunit willnotrestartin
less than 3 minutes.
Wine Temperature Ranges: While wines store best at
temperatures around 56-58 degrees Fahrenheit, this wine
cellar is built to allow wine to be stored at drinking temperature
andthereforethere is atemperaturevariationinthewinecellar
for reds and whites. Reds should be kept at a temperature
close to 60-62 degrees whereas whites should be at a
temperature of 54-55 degrees. Both of these temperature
rangescanbeachievedbyadjustingthetemperaturesetting.
PLEASE NOTE: Cold air falls and warmer air rises, and there
will be a temperature variation from the bottom to the top of the
unit. The temperature sensor is located near the top of the
wine storage compartment and records the temperature at the
top of the unit. The temperature at the bottom of the unit will
always be slightly colder.
Interior Light
The interior light can be operated manually by pressing the
toggle switch located to the left of the control panel.
Shelving
The shelves in your unit are chrome-plated so they will not
rust. These shelves pull out only 1/3 of the way. This is a
safety feature so that neither the machine nor the shelf will tip
over.
5

Care and Cleaning of Your Wine Cellar
Cleaning the Outside
Clean the outside of your unit with mild soapy water. Dry
thoroughlywith a softcloth. Tocleanthe doorgasket,useonly
mild soapy water. Never use harsh cleansers or scouring
pads to clean any part of your cellar.
Cleaning the Inside
Unplug your wine cellar and remove all bottles. Rinse the
inside surface with plain water and dry the chrome trays.
Defrosting the Cellar
The cellar uses an automatic defrost system in which the
refrigerated surfaces of the wine cellar defrost automatically.
Defrost water drains into a hole in the floor of the wine storage
compartment and is channeled into a drain pan located at the
back of the cellar near the compressor. Heat transferred from
the compressor evaporates any water that has collected in the
pan. Be sure the drain hole in the floor of the wine cellar is
clear and unobstructed.
Cellar Troubleshooting
Cellar does not turn on
Not plugged in.
Fuse blown or circuit breaker tripped.
Noise or vibration
Check that unit is level. If not, adjust leveling legs.
Cellar is too warm
Check that door is properly closed and sealed.
Check temperature setting.
Check if door has been opened frequently.
6

Limited Warranty
Franklin Industries, L.L.C., warrants this product to be free from defects in materials and
workmanshipforaperiod ofone yearfrom thedate oforiginal purchaseor delivery. Anyparts
that are determined to be defective will be replaced or repaired by Franklin at no charge as
longas the unitwas operated inaccordancewith theinstructionsfurnished withtheproduct. If
the unit proves to be defective, your first course of action should be to follow the retailer’s
return policy.
This warranty covers units only in the continental United States and does not cover the
following: •Damage from improper voltage or installation
•Damage in shipping
•Defects other than manufacturing defects
•Glass, trim or light bulbs
•Any damage or loss to cellar contents as the result of failure of the unit to
perform as expected
•Labor or repairs after the first 12 months
•Damage from abuse, misuse, accident, alteration or lack of proper care or
routine maintenance.
•Improper or incorrectly performed maintenance or repairs
•Damage due to acts of God
This limited warranty is given in lieu of all other warranties expressed or implied. This
warranty does not cover incidental or consequential damages. Some States do not allow the
exclusion or limitation of incidental or consequential damages, so the above limitation or
exclusion may not apply to you.
This warranty provides you with specific legal rights and you may have other rights that vary
from State to State. Consult the written materials accompanying your product for the safe and
proper operation.
This warranty may not be assigned.
For warranty service, contact:
Franklin Industries, L.L.C.
4100 First Avenue
Brooklyn, NY 11232-3321
Tel.: 1-877-261-9867
Website: www.franklinchef.com
When service is required, have on hand the Model and Serial numbers found on the rating
label on the back of the unit, as well as proof of purchase such as a sales or gift receipt.
7

SAUVEGUARDES IMPORTANTES
Lire toutes les instructions avant l'utilisation de cet appareil.
En utilisant cet appareil, toujours exercer les précautions de
sûreté fondamentales, y compris les suivantes:
1.Utiliser cet appareil seulement pour son but projeté
comme décrit dans ce manuel d'instruction.
2.CeRafraîchisseuràVindoitêtreconvenablementinstallé
conformément aux instructions d'installation avant qu'il
soit utilisé. Voir des instructions au sujet du mettre à la
terre dans la section d'Installation.
3.Ce modèle peut être encastré. Les unités encastrées
donnent vent à l’avant inférieur et l’écoulement d'air au
devant de ce conduit doit être libre d'entraves.
4. Si l'unité est placée sur un plate-forme, la surface de
devantdelaportedoitêtre3poucesouplusenretraitdu
bord du plate-forme afin d'éviter le renversement
accidentel de l'appareil pendant l'usage normal.
5.Ne jamais débrancher l'unité en tirant sur le cordon
d'alimentation. Toujours saisir le bouchon fermement et
tirer directement hors de la sortie. Réparer ou remplacer
n'importequellecordequiestéraillée.Nepasutiliserune
corde qui montre des fissures ou des frottements le long
de sa longueur.
6.Sil'unitéauntamponaumilieuduconduitd'humiditédans
l’arrière de l'unité, enlever ce tampon et permettre que
l'égout reste clair à tout instant quand l'unité est dans
l'opération.
EPARGNER CES INSTRUCTIONS!
DANGER!
Eviterle risquede l’attrapement desenfants. Sile produitn'est
pas dans l'usage, enlever la porte pour que les petits enfants
ne puissent pas devenir attrapés à l'intérieur.
8
Otros manuales para FWC120
2
Tabla de contenidos
Idiomas:
Otros manuales de Enfriador de vino de Franklin Chef

Franklin Chef
Franklin Chef FWC35 Manual de usuario

Franklin Chef
Franklin Chef FCW16T Manual de usuario

Franklin Chef
Franklin Chef FWC120 Manual de usuario

Franklin Chef
Franklin Chef FWC24 Manual de usuario

Franklin Chef
Franklin Chef FWC20T Manual de usuario

Franklin Chef
Franklin Chef FWC35 Manual de usuario

Franklin Chef
Franklin Chef FWC36 Manual de usuario

Franklin Chef
Franklin Chef FWC120 Manual de usuario

Franklin Chef
Franklin Chef FWC36 Manual de usuario

Franklin Chef
Franklin Chef FCW120 Manual de usuario


