Eico VKG 671 W Manual de usuario
VKG 671 W
GB Instructions for use
DE Bedienungsanleitung
FR Mode d’emploi
DK Brugsanvisning

2
GB
As the appliance contains a
ammable refrigerant, it is es-
sential to ensure that the refrig-
erant pipes are not damaged.
The quantity and type of the
refrigerant used in your appli-
ance is indicated on the rating
plate.
Standard EN378 species that
the room in which you install
your appliance must have a
volume of 1m³ per 8 g of hydro-
carbon refrigerant used in the
appliances. This is to avoid the
formation of ammable gas/air
mixtures in the room where the
appliance is located in the event
of a leak in the refrigerant circuit.
WARNING:
Keep ventilation openings in
the appliance’s cabinet or in the
built-in structure clear of obstruc-
tion
WARNING:
Do not use other mechanical
devices or other means to ac-
celerate the defrosting process
than those recommended by the
manufacturer
WARNING:
Do not damage the refrigerant
system
WARNING:
Do not use electrical appli-
ances inside the refrigerated
storage compartment, unless
they are of a type recommended
by the manufacturer
WARNING:
Do not expose the appliance to
rain
WARNING:
This appliance is not intended
for use by children and above
and persons with reduced physi-
cal, sensory or mental capabili-
ties or lack of experience and
knowledge if they have been
given supervision or instruction
concerning use of the appliance
in a safe way and understand
the hazards involved
WARNING:
Danger risk of re or explosion if
ammable refrigerant are used.
To be repaired only by trained
personnel.
Warning
3
GB
WARNING:
Do not store explosives, such
as aerosol cans with ammable
propellants in the unit.
WARNING:
Cleaning and user maintenance
shall not be made by children
without supervision
●Always keep the keys in a sep-
arate place and out of reach of
children
●Before servicing or clean-
ing the appliance, unplug the
appliance from the mains or
disconnect the electrical power
supply
●If the supply cord is damaged,
it must be replaced by the
manufacturer, its service agent,
or similarly qualied persons in
order to avoid a hazard
●Relevant for Australia: Sup-
ply cord tted with a plug com-
plies with AS/NZS 3112.
●Frost formation on the interior
evaporator wall and upper
parts is a natural phenom-
enon. Therefore, the appliance
should be defrosted during
normal cleaning or mainte-
nance.
●Please note that changes to
the appliance construction will
cancel all warranty and product
liability
●This appliance is intended to
be used exclusively for the
storage of wine
●
CLASS 1 LED PRODUCT

4
GB
Before operating your new appliance,
please read the following instructions care-
fully as they contain important information
on safety, installation, operation and main-
tenance. Keep the instructions for future
reference.
On receipt, check to ensure that the appli-
ance has not been damaged during trans-
port. Transport damage should be reported
to the local distributor before the appliance
is put to use.
Remove the transport protector before the
appliance is put to use. Hang it on one of
the shelves as it can be used to readjust the
door.
Before starting the appliance
Contents
Transport protection
Warning ..................................................2
Before starting the appliance ..................4
Get to know ............................................5
Electrical connection...............................6
Installation ..............................................6
Ventilation ...............................................7
Control panel ..........................................8
Reversing the door .................................9
Fault nding ..........................................13
Defrosting, cleaning and maintenance . 14
Warranty, spare parts ...........................15
Disposal ................................................16
5
GB
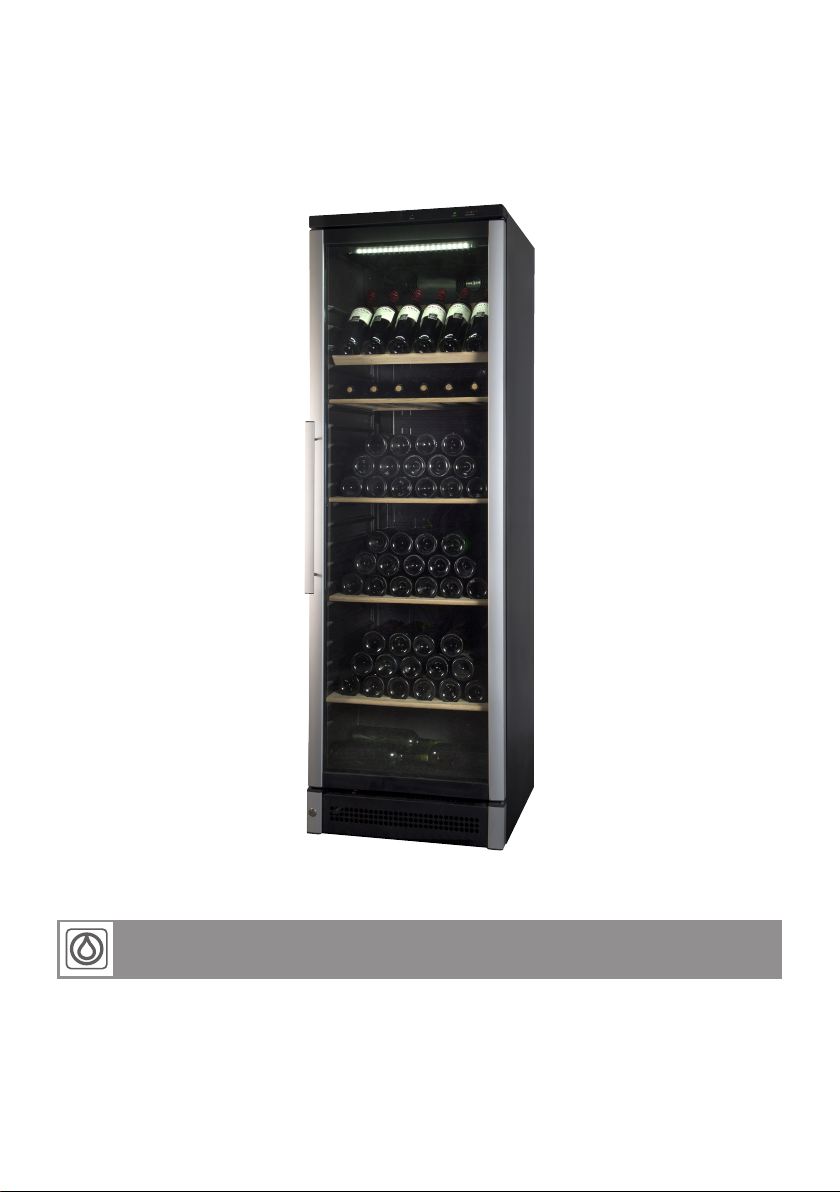
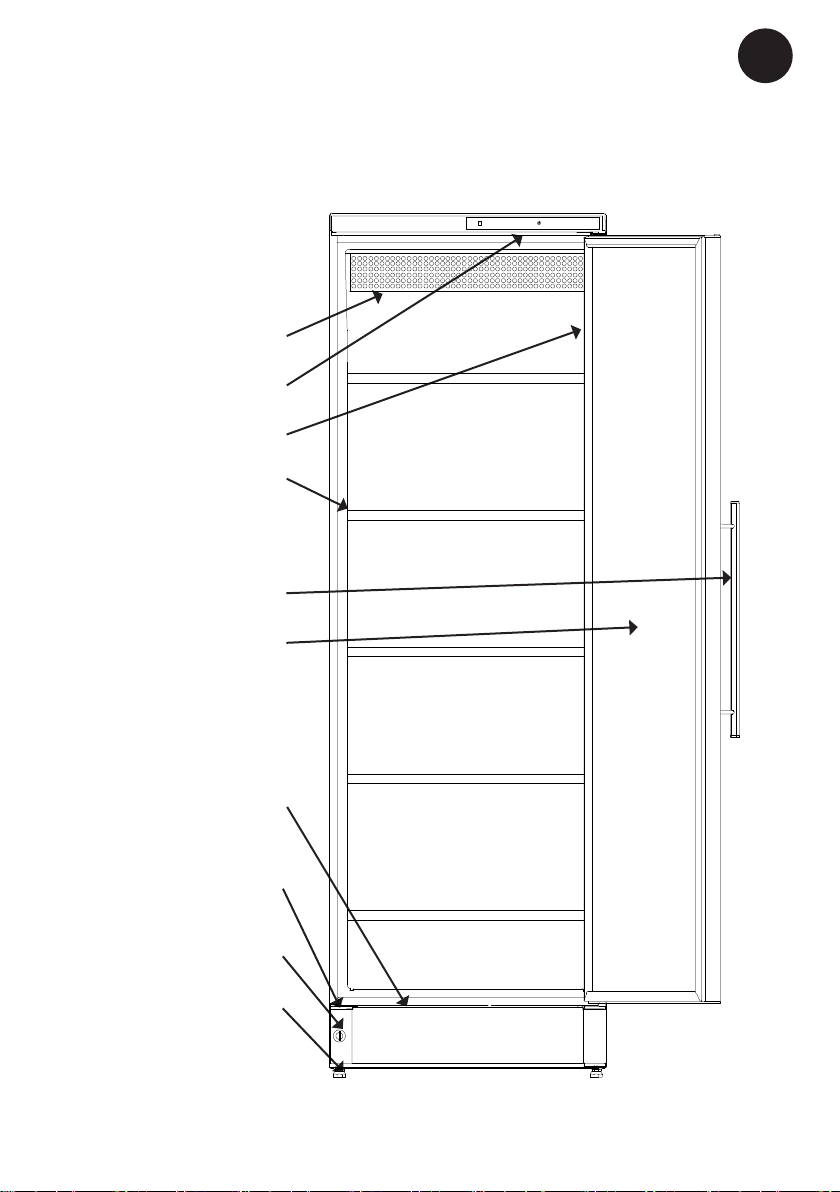
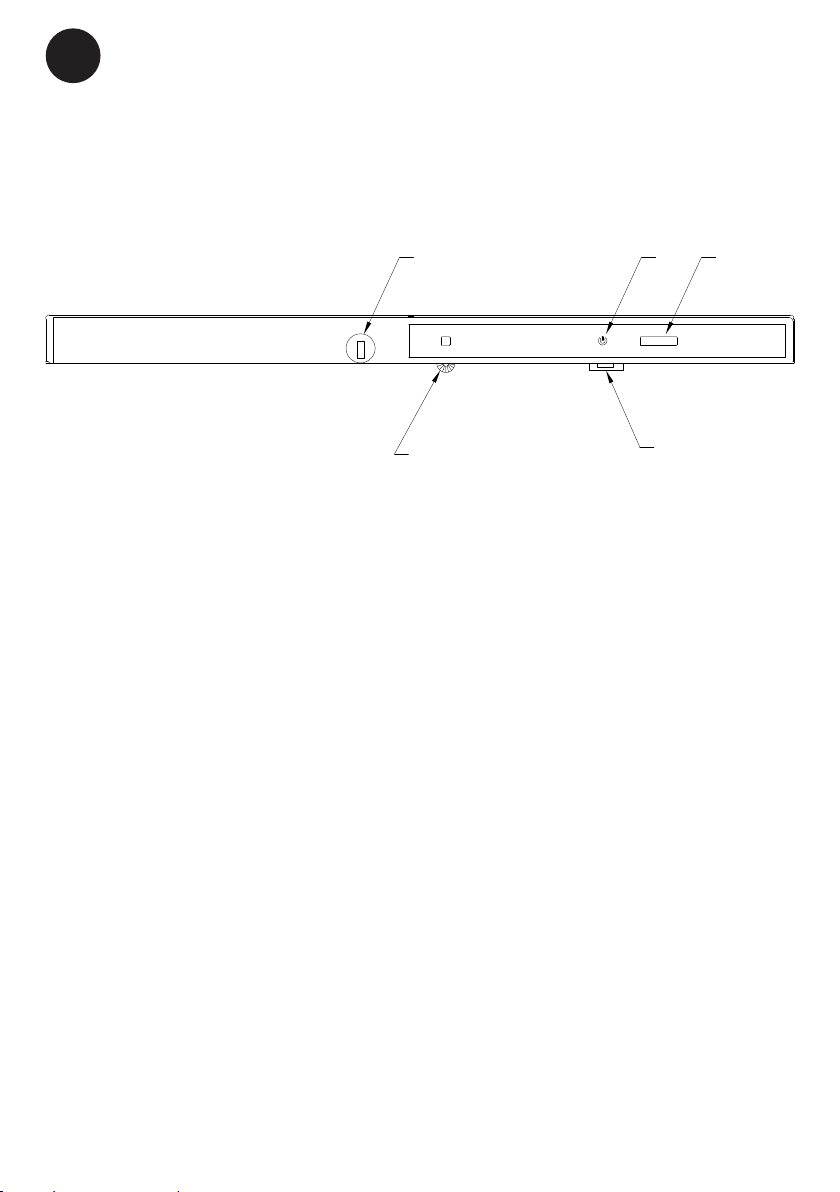
Get to know your wine or bottle cooler:
Lock
Control panel
Name plate
Shelf
Door handle
Glass door
Kick plate
Adjustable feet
Fan
g. 1
Transport protection
adj ust power

6
GB
Electrical connection
Wiring and connections in power supply
systems must been all applicable (local and
national) electrical codes. Consult these
codes lengths and sizes prior to cabinet
installation.
This device complies with relevant EU
directives including Low Voltage Directive
2014/35/EU and Electromagnetic Compat-
ibility Directive 2014/30/EU
The socket should be freely accessible.
Connect the appliance only to 220/240 V
/ 50Hz alternating current via a correctly
installed earthed socket.
The socket must be fused with a 10-13 A
fuse.
If the appliance is to be operated in a non-
European country, check on the rating plate
whether the indicated voltage and current
type correspond to the values of your mains
supply.
Information regarding voltage, current or
power are given on the rating plate
The power cord may be replaced by a
technician only.
The rating plate provides various techni-
cal information as well as type and serial
number.
Placement
For safety and operational reasons, the ap-
pliance shall not be exposed to rain.
The appliance should be placed on a level
surface in a dry, well ventilated room (max.
70% relative air humidity). Never place
the appliance close to sources of heat and
avoid placing it in direct sunlight.
The surface on which the appliance is to be
placed must be level. Do not use a frame or
similar.
The appliance can be installed as a free-
standing unit against a wall or side-by-side
with other appliances (see g. 4)
Room temperature
The climate class is stated on the name
plate (see g. 1). This species the optimum
room temperature.
Note that the appliance operates best at
room temperatures from 10°C to 32°C.
Installation and start-up
g. 2
Close the two ventilationguards placed on
the rear of the appliance, to ensure su-
cient air circulation
Installation of ventilation quard
7
GB
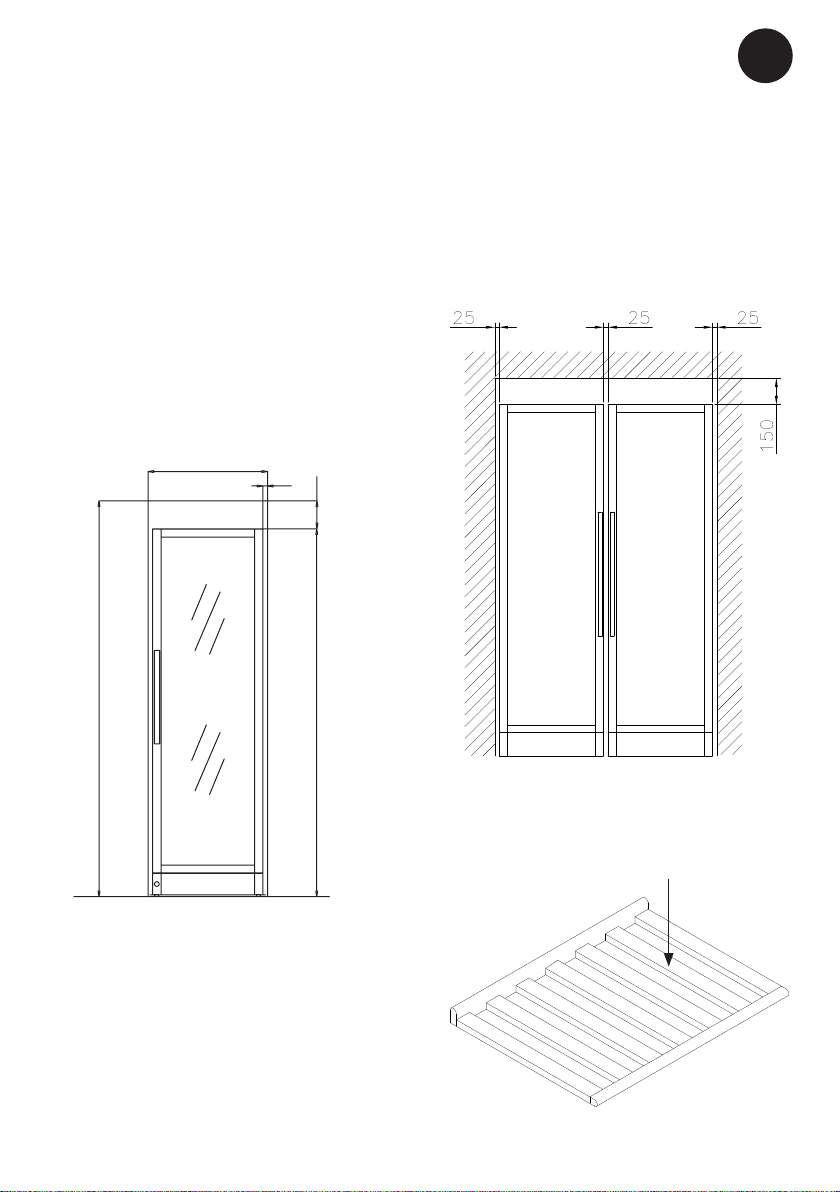
Ventilation
g. 3
2000 150
Min. 2150
650
25
Side by side
In side-by-side arrangement, there must be
at least 25 mm between and at the sides of
the cabinets, so the doors can be opened
freely
g.4
It is important that the appliance be well
ventilated and that air can circulate unhin-
dered above, below and around it. Keep
ventilation openings, in the appliance
enclosure or in the built-in structure, clear
of obstruction. The gures below illustrate
the clearance necessary to achieve the
required air circulation.
OBS: There must be at least 30 mm be-
tween the cabinet and the wall behind it.
Max. 85 kg.
8
GB
Control panel
Connect the appliance to the socket outlet.
A green light indicates that the appliance
has been switched on.
The thermostat knob is adjustable from 0
(stop) to 7 (coldest). Find the position of
the therm ostat which gives you the desired
temperature. Start at position 4.
adjust power
1
3
2
4
ECO
°C
temperature
5
1. Lock (Not all Appliances has lock in top,)
2. Green light indicating power on
3. Thermostat button.
4. Light and fan switch
5. Thermometer
The ECO switch (4) is for turn the light and
fan on and o at the same time.
ECO = Low energy concumption
OBS:
Please note the inside temperatures can
get low by high ambient temperatures. To
avoid damage to the stored wine bottles,
please adjust thermostat setting to get your
target inside temperature!

9
GB
Reversing the door
If reversing the door with the unit in normal position, then it is recommended to be two people.
Else the unit can be placed on its back on the oor. If this method is used the unit must be
placed in normal upright position at least two hours before connecting to power.
Left door hinge is optional. (See p.18)
1. Disconnect the power supply
Loosen the two screws in the top panel.
Pull out carefully the top panel.
2. Unscrew the two screws in the lower panel.
3. Remove the cover by using suitable tool
and a hammer
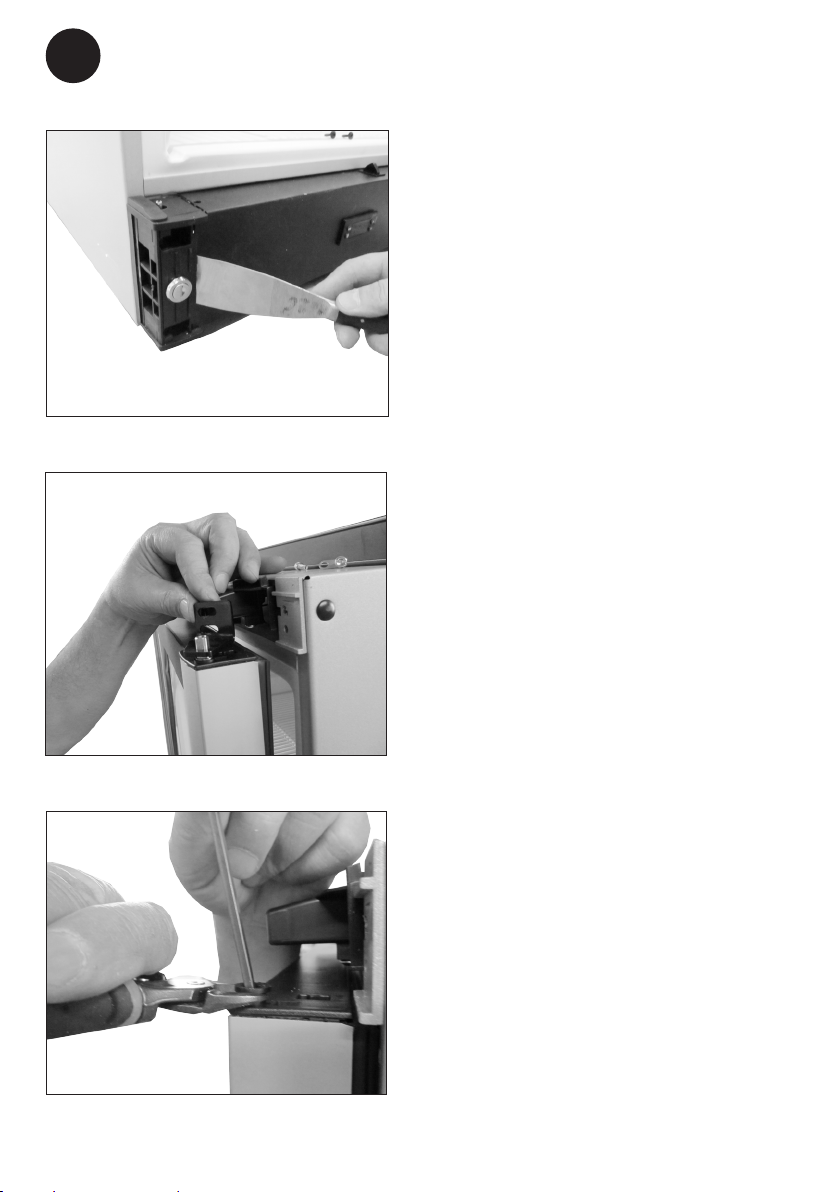
10
GB
4. Remove the lower panel by use of a
suitable tool.
Place the lower panel in front of the unit
without pulling in the wires
5. Unscrew the bracket in the top.
NOTE: The door is now loose!
Be careful that the door does not fall
down!
6. Remome the bush and door closer by
use of a pincher.
Place the bush in the opposite side of
the door. Do not place the door closer
yet.
Tabla de contenidos
Idiomas:


