DoubleSight DS-227PS Manual de usuario

Full Motion Dual Monitor Arm, Pole Mount
Model: DS-227PS
Quick Installation Guide
Please Review the entire Quick Installation Guide prior to installation.
If you have any questions regarding the compatibility of this Mount with your
Monitor please contact DoubleSight Customer Service prior to beginning the
installation. It may also be helpful to check your Monitor’s Manual for any
special mounting requirements outlined by the Monitor manufacturer.

Full Motion Dual Monitor Arm, Pole Mount
Model: DS-227PS
Please contact DoubleSight Displays Service and Support if you are missing any of the package
contents or need assistance.
Getting Started Model: DS-227PS
Instruction Manual
Images may differ from actual product.
Disclaimer
DoubleSight intended to make this manual completely all right. However, DoubleSight makes no claim that the
information comprised herein covers all conditions or details in connection with installation or use of this product.
The information comprised here is subject to change without notice or obligation of any kind. DoubleSight
assumes no responsibility for accuracy or adequacy of information comprised in this document.
A warning alerts you to the possibilities of personal injury or damage to equipment if you do not follow the
corresponding instructions. It is installer's responsibility to make sure all components are properly assembled and
installed using the instructions manual provided.
Using of improper screws size may damage your display. If spacers are required, be sure to use correct size of
screws. Proper screws used will easily and completely thread into the display mounting holes. Inadequate thread
engagement in the display may cause display falling.
It is installer’s responsibility to make sure the combined weight of all components does not exceed weight
capacity. Exceeding weight capacities can result in severe personal injury or damage to equipment. It is installer’s
responsibility to make sure the combined weight of all components does not exceed weight capacity of 9kg
(19.8lbs).
Allowing any part of your component cables to be caught between movable parts can result in serious personal
injury or damage to equipment.
The table installed must be strong and stable enough for supporting this LCD Arm and LCD

Read the following warning before installing
●Verify all parts are included. Do not install if the product if hardware is damaged. Not all
hardware included will be used.
●Please contact a qualified installer
●This product contain moving parts, Use with caution
●This product contains small item, keep these items away from children
●Do not exceed the maximum weight capacity for this product. Exceeding the weight capacity
can result in serious personal injury or damage to equipment!
●The table installed must be strong and stable enough for supporting this LCD Arm and LCD.
Please contact DoubleSight Displays Service and Support if you are missing any of the package
contents or need assistance.
Getting Started Model: DS-227PS
Specifications
Weight Capacity
19.50 lbs. per monitor
LCD Flat Panel Displays
Up to 27”
Maximum Extension
18.37 per monitor”
Pole Width
2.6”
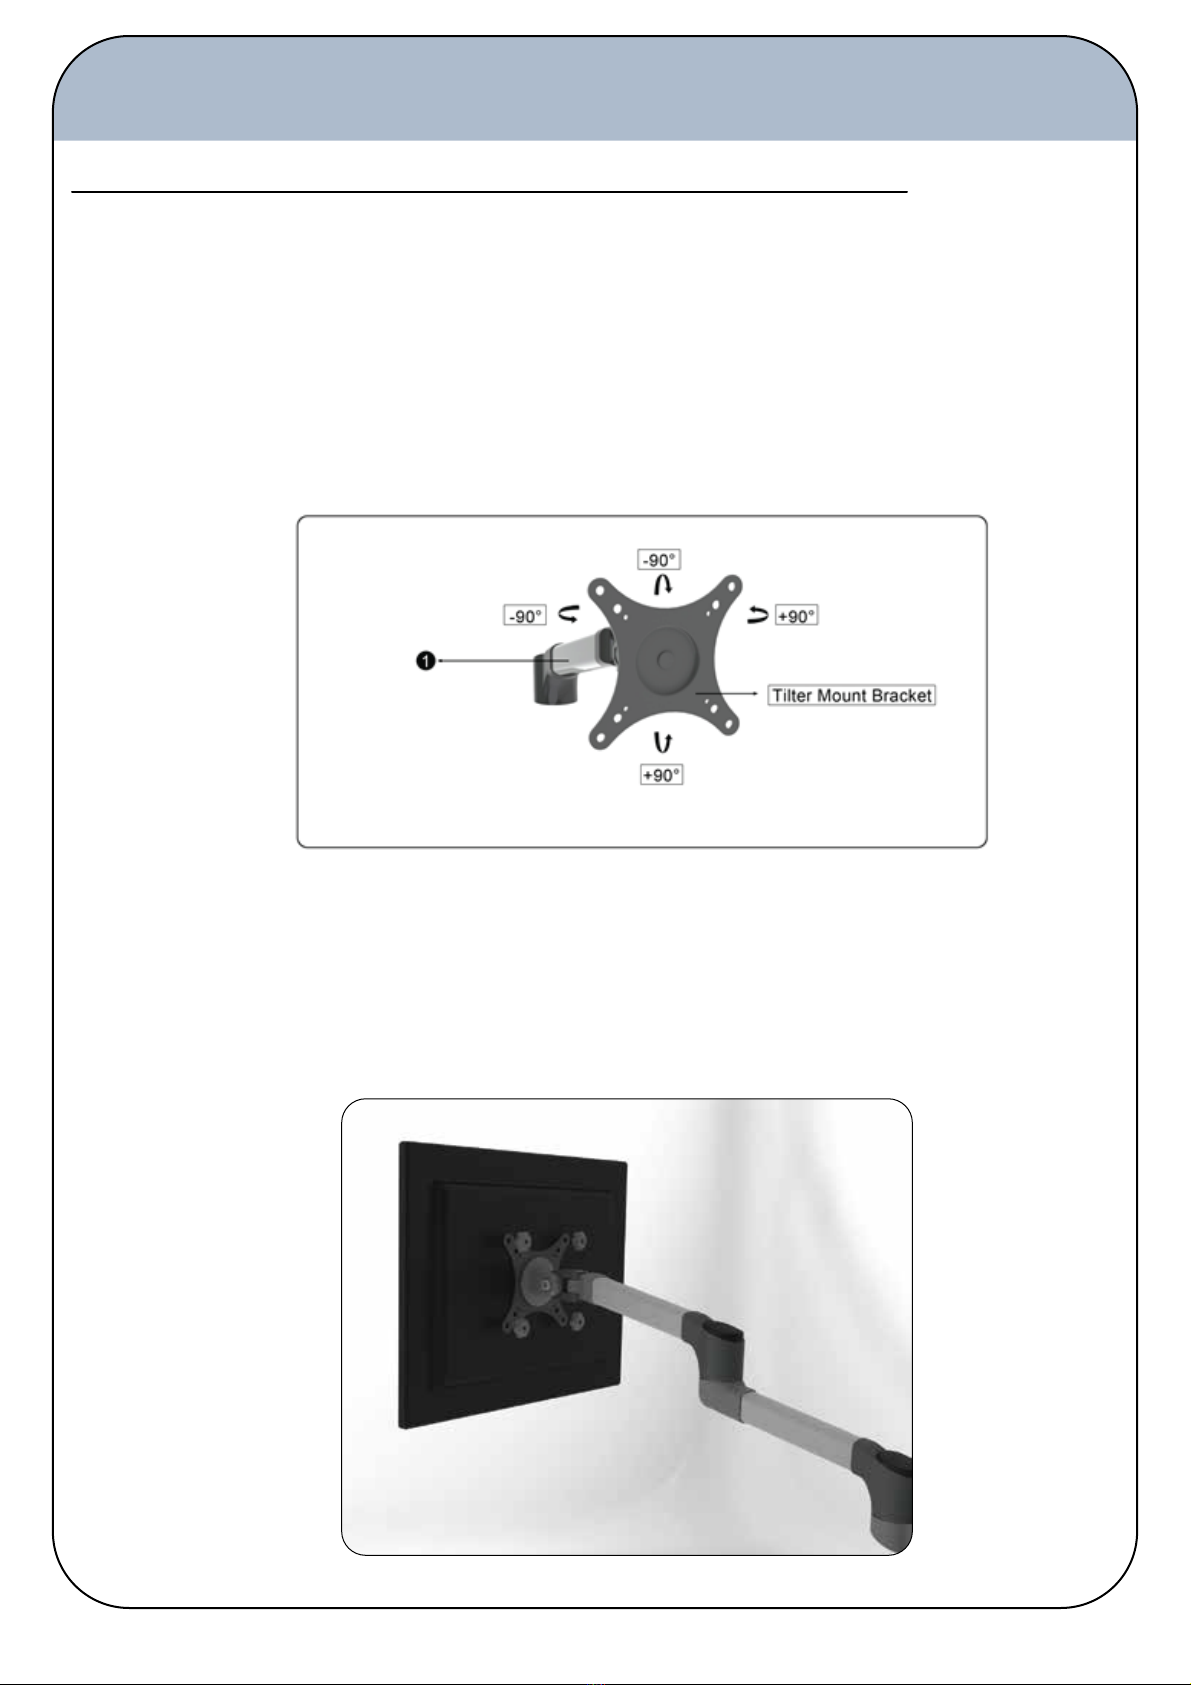
Tilt adjustment
+/-90 degree
Display Pan Swing- Side to side
+/- 90 degree
Pivot (Desk / Display / Arm)
180°
Maximum Mounting Surface Thickness
2.95” (75mm)
VESA Compatibility
75x75mm and 100x100mm

Parts List
ASSEMBLY and INSTALLATION
INSPECT THE MOUNT BEFORE ASSEMBLY
Note: Read all assembly instructions before staring the installation process.
Please contact DoubleSight Displays Service and Support if you are missing any of the package
contents or need assistance.
Getting Started Model: DS-227PS
Carefully inspect the mount components to ensure all components are present.
Dual Arm Bracket
Qty.1
Arm Cover
Qty.2
Arm Cover Screw
Qty.2

Base Installation - Desk Clamp
Note: Do not over tighten the Handle. Stop immediately if you encounter any resistance.
1. Insert Left Cover and L Plate within the base of the Pole(3). (See Figure 1)
2. Fix the pin of L Plate Connection into the hole of L Plate. (See Figure 2)
Note: Other tools may be required depending on your method of installation.
Note: It is installer’s responsibility to make sure the desktop structure to which this product is attached can
support the combined weight of all compnents.
Assemble the Desk Clamp
Figure 1
Figure 2
INSTALLATION Model: DS-227PS
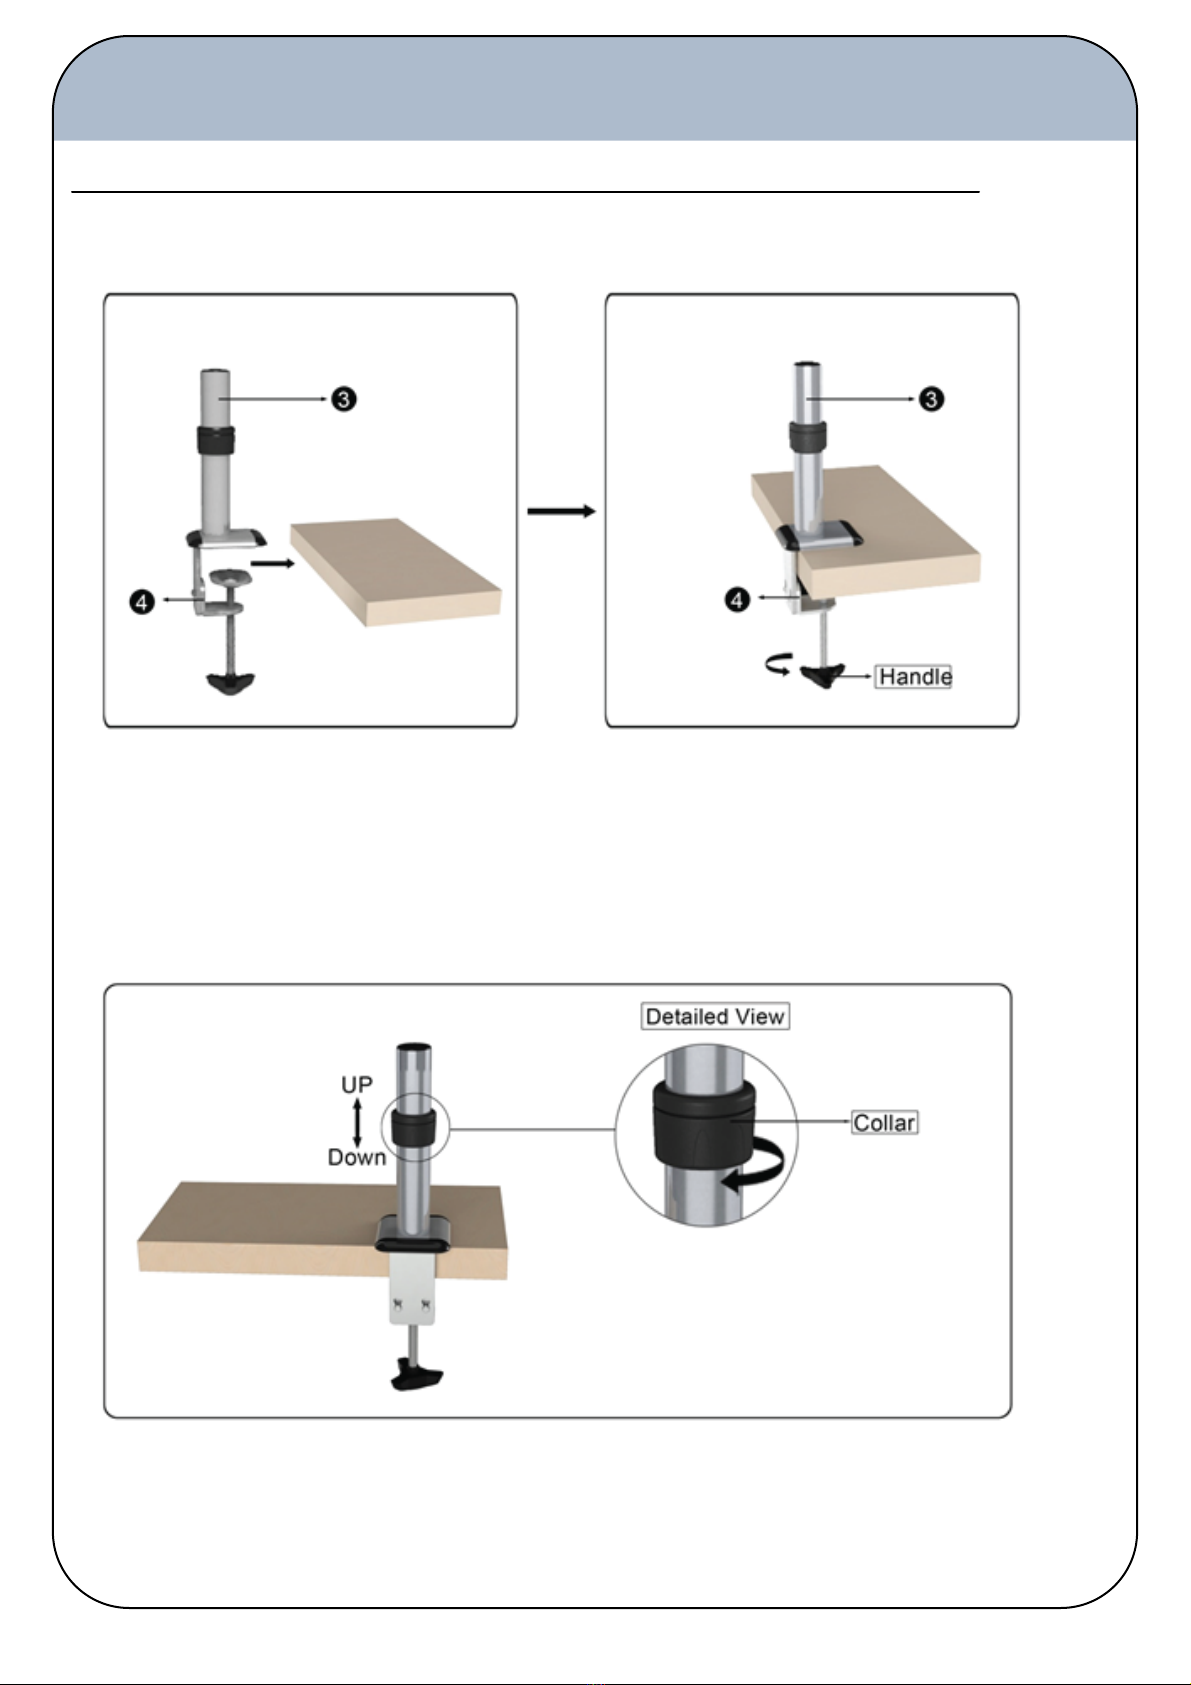
Install the Pole Assembly to Desk Edge
1. Place the Pole Assembly (3) over the open edge of the desk in the desired location. (See Figure 3).
Tighten the Clamp (4) by turning the handle until the Pole Assembly is securely in place. (See Figure 4)
2. To adjust the height of your monitor arm, loosen the Collar as shown. Position the Collar at desired height
and tighten with hand so the Collar assembly is firmly in place. (See Figure 5)
Figure 5
Figure 3 Figure 4
INSTALLATION Model: DS-227PS

Alternate Installation - Install the Pole Assembly through Desk’s Cable Guide
1. Insert Left Cover and L Plate within the base of the Pole (3). Fix the pin of L Plate Connection into the hole of L Plate. Insert
Left cover and L plate within the base of the pole. (See Figure 6).
2. Place L Plate through the desk hole. Then attach the pins of the L Plate Connection into the hole of L Plate. Turn and
tighten the Handle by hand to ensure that the Pressure Plate fully contacts to surface of the desk and it is secure in place as
shown. (See Figure 7)
Figure 7
Figure 6
INSTALLATION Model: DS-227PS

Attaching the Monitor Arms to the Pole Assembly
Figure 8
1. Attach the 2 LCD Arm (1) sections to the Dual Arm Bracket (2) as shown. (Figure 8)
2. Secure in place by inserting Arm Cover (8) and tightening with appropriate Arm Cover Screw(10). (Figure 8-10)
Figure 9
Figure 10
INSTALLATION Model: DS-227PS

Attaching the Monitor Arms to the Pole Assembly
Figure 11
3. Slip Dual Arm Bracket and Arms onto Pole Assembly as shown. (Figure 11-12)
4. Secure in place by tightening the Bracket screw as shown. (Figure 13)
Figure 12
Figure 13
INSTALLATION Model: DS-227PS
Installing your Monitor
Figure 14
Figure 15
Note: Using of improper screws size may damage your display. If spacers are required, be sure to use correct size of
screws. Proper screws used will easily and completely thread into the display mounting holes. Inadequate thread
engagement in the display may cause display falling.
Note: It is installer’s responsibility to make sure the combined weight of all components does not exceed weight capacity.
Exceeding weight capacities can result in severe personal injury or damage to equipment.
Attaching the Monitor to the VESA Bracket
Attaching the Monitors to the Dual Arms
1. Ensure VESA Bracket on the LCD Arm (1) is able to swivel and tilt easily. (Figure 14)
2. Hold Monitor flush to the VESA Bracket and secure with the provided Monitor Screws. (Figure 15).
3. Repeat with second Monitor.
INSTALLATION Model: DS-227PS
Tabla de contenidos
Otros manuales de Rack y soporte de DoubleSight


