Dishlex DSF6104WA Manual de usuario

Dishwasher User Manual
DSF6104WA, DSF6104XA

05
03
CONTENTS
PRODUCT OVERVIEW
6
02
04
06
1
01 SAFETY INFORMATION
3
Earthing Instructions
Disposal
3
5
INSTALLATION INSTRUCTION
About Power Connection
Position The Appliance
Water Supply And Drain
Connection Of Drain Hoses
7
7
8
8
9
USING YOUR DISHWASHER
Control Panel
Function Of The Rinse Aid And Detergent
Filling The Rinse Aid Reservoir
Filling The Detergent Dispenser
Basket Used Tips
Preparing And Loading Dishes
Loading The Baskets According To AS/NZS 2007.1
10
10
12
13
14
15
16
19
PROGRAMMING THE DISHWASHER
Wash Cycle Table
Starting A Cycle Wash
Changing The Program Mid-cycle
Forget To Add A Dish?
21
21
22
22
23
MAINTENANCE AND CLEANING
External Care
Internal Care
Caring For The Dishwasher
24
24
24
27

TROUBLESHOOTING TIPS
Error Codes
28
31
NOTE:
Reviewing the section on troubleshooting Tips will help you solve some
common problems by yourself.
If you cannot solve the problems by yourself, please ask for help from a
professional technician.
The manufacturer, following a policy of constant development and updating of
the product, may make modifications without giving prior notice.
If lost or out-of-date, you can receive a new user manual from the manufacturer
or responsible vendor.
07
08
2
TECHNICAL INFORMATION
Product Fiche
32
33
Important Information that may impact your
Manufacturer’s Warranty
Adherence to the directions for use in this manual is extremely important
for health and safety. Failure to strictly adhere to the requirements in this
manual may result in personal injury, property damage and affect your
ability to make a claim under the Electrolux manufacturer’s warranty
provided with your product. Products must be used, installed and operated
in accordance with this manual. You may not be able to claim on the
Electrolux manufacturer’s warranty in the event that your product fault is
due to failure to adhere to this manual.
3
SAFETY INFORMATION
WARNING
When using your dishwasher, follow the precautions listed below:
Earthing Instructions
This appliance must be earthed. In the event of a malfunction or breakdown,
earthing will reduce the risk of an electric shock by providing a path of least
resistance of electric current. This appliance is equipped with an earthing
conductor plug.
Installation and repair can only be carried out by a qualified technician.
This appliance is intended to be used in household and similar applications such as:
-staff kitchen areas in shops, offices and other working environments;
-farm houses;
-by clients in hotels, motels and other residential type
environments;
-bed and breakfast type environments.
This appliance can be used by children aged from 8 years and above and persons
with reduced physical, sensory or mental capabilities or lack of experience and
knowledge if they have been given supervision or instruction concerning use of the
appliance in a safe way and understand the hazards involved.
Children shall not play with the appliance. Cleaning and user maintenance shall not
be done by children without supervision.
This appliance is not intended for use by persons (including children ) with reduced
physical, sensory ormental capabilities, or lack of experience and knowledge, unless
they have been given supervision or instruction concerning use of the appliance by a
person responsible for their safety.
Packaging material could be dangerous for children!
This appliance is for indoor household use only.
To protect against the risk of electrical shock, do not immerse the unit, cord or plug
in water or other liquid.
Please unplug before cleaning and performing maintenance on the appliance.
Use a soft cloth moistened with mild soap, and then use a dry cloth to wipe it
again.

4
The plug must be plugged into an appropriate outlet that is installed and earthed
in accordance with all local codes and ordinances.
Improper connection of the equipment-earthing conductor can result in the risk of
an electric shock.
Check with a qualified electrician or service representative if you are in doubt
whether the appliance is properly grounded.
Do not modify the plug provided with the appliance; If it does not fit the outlet.
Have a proper outlet installed by a qualified electrician.
Do not abuse, sit on, or stand on the door or dish rack of the dishwasher.
Do not operate your dishwasher unless all enclosure panels are properly in place.
Open the door very carefully if the dishwasher is operating, there is a risk of
water squirting out.
Do not place any heavy objects on or stand on the door when it is open. The
appliance could tip forward.
When loading items to be washed:
1) Locate sharp items so that they are not likely to
damage the door seal;
2) Warning: Knives and other utensils with sharp
points must be loaded in the basket with their
points facing down or placed in a horizontal
position.
Some dishwasher detergents are strongly alkaline. They can be extremely
dangerous if swallowed. Avoid contact with the skin and eyes and keep children
away from the dishwasher when the door is open.
Check that the detergent powder is empty after completion of the wash cycle.
Do not wash plastic items unless they are marked “dishwasher safe” or the
equivalent.
Use only detergent and rinse agents recommended for use in an automatic
dishwasher.
Never use soap, laundry detergent, or hand washing detergent in your
dishwasher.
The door should not be left open, since this could increase the risk of tripping.
If the supply cord is damaged, it must be replaced by the manufacturer or its
service agent or a similarly qualified person in order to avoid a hazard.
During installation, the power supply must not be excessively or dangerously bent
or flattened.
Do not tamper with controls.
For unmarked plastic items not so marked, check the manufacturer's
recommendations.
5
The appliance needs to be connected to the main water valve using new hose sets.
Old sets should not be reused.
To save energy, in stand by mode , the appliance will switch off automatically
while there is no any operation in 30 minutes .
Disposal
For disposing of package and the appliance please go to a
recycling center. Therefore cut off the power supply cable and
make the door closing device unusable.
Cardboard packaging is manufactured from recycled paper and
should be disposed in the waste paper collection for recycling.
By ensuring this product is disposed of correctly, you will help
prevent potential negative consequences for the environment and
human health, which could otherwise be caused by inappropriate waste handling
of this product.
For more detailed information about recycling of this product, please contact your
local city office and your household waste disposal service.
DISPOSAL: Do not dispose this product as unsorted municipal waste.
Collection of such waste separately for special treatment is necessary.
6
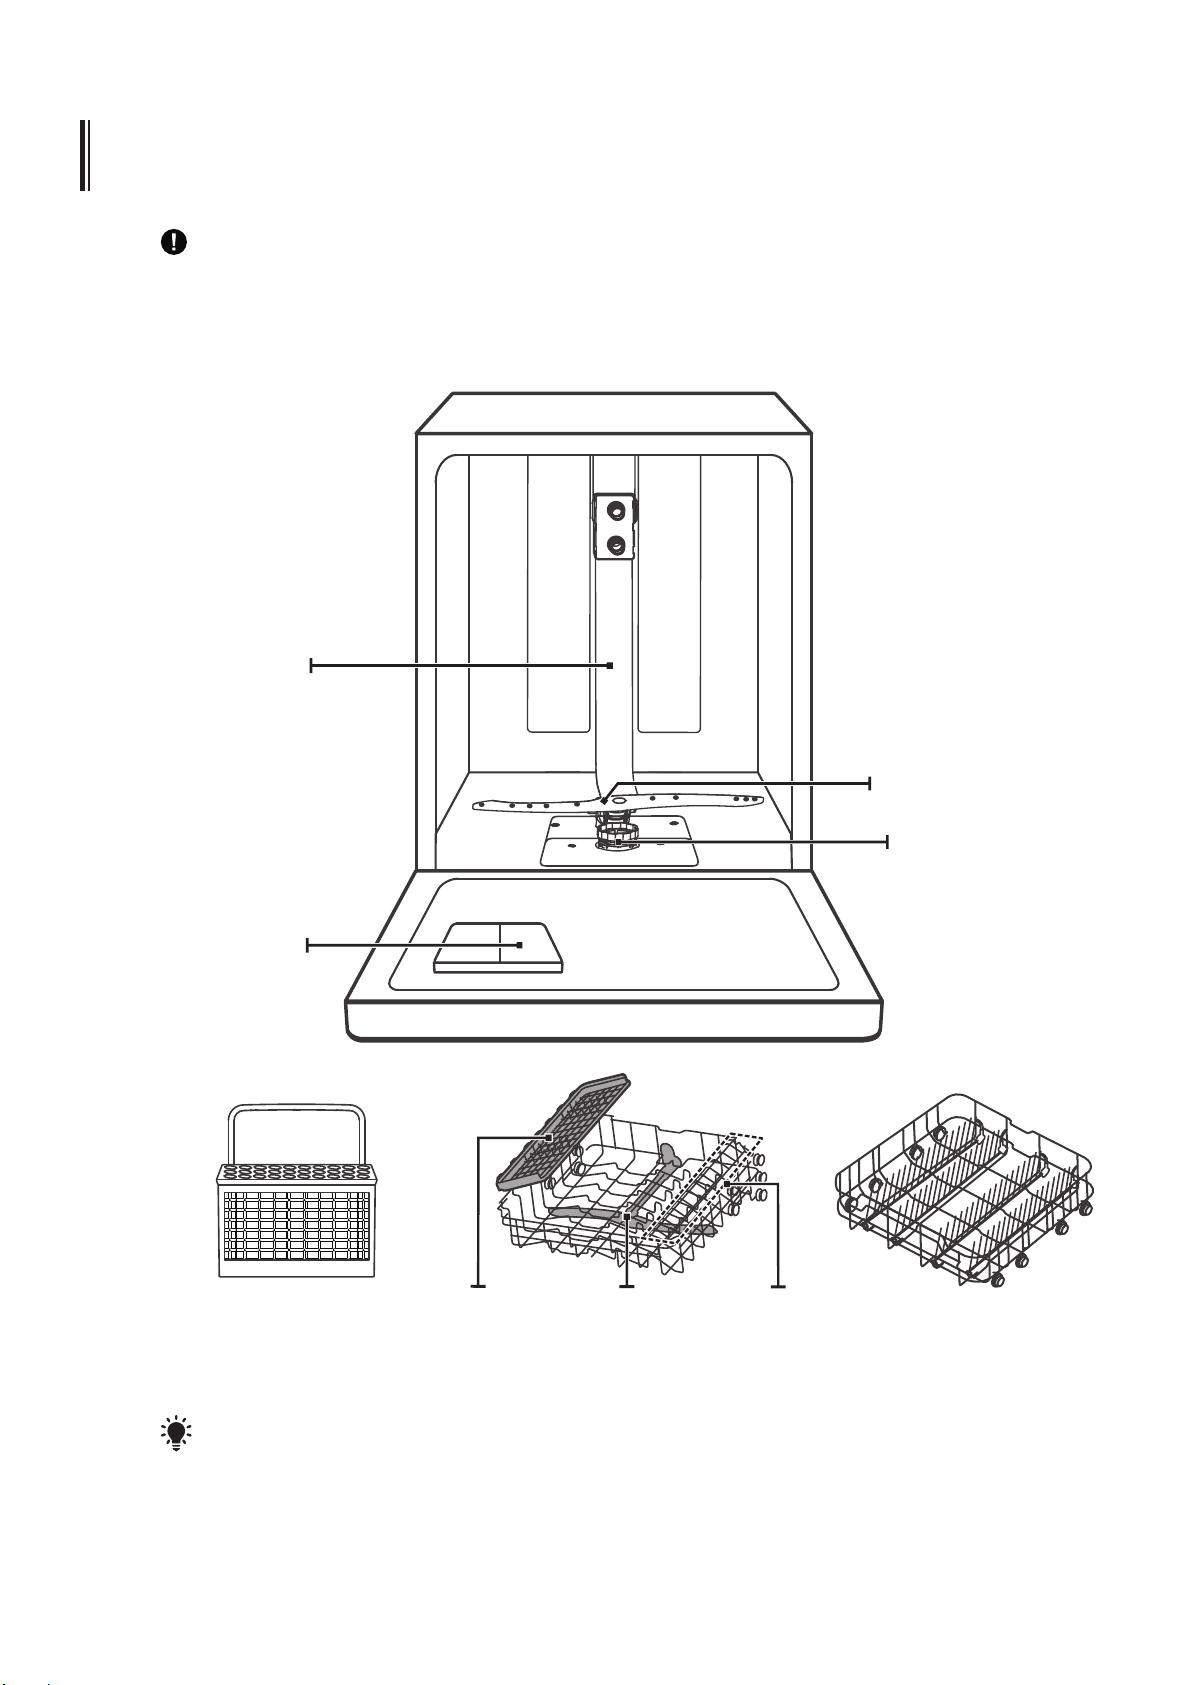
PRODUCT OVERVIEW
To get the best performance from your dishwasher, read all operating instructions
before using it for the first time.
IMPORTANT:
Pictures are only for reference, different models may be different.
NOTE:
Dispenser
Filter assembly
Lower spray arm
Inner pipe
Cutlery basket Lower basket
Upper spray arm
Upper basket
Cutlery rack Cup rack
7
INSTALLATION INSTRUCTION
Ensure the voltage and frequency of the power being corresponds to those on the
rating plate. Only insert the plug into an electrical socket which is earthed properly. If
the electrical socket to which the appliance must be connected is not appropriate for
the plug, replace the socket, rather than using a adaptors or the like as they could
cause overheating and burns.
Electrical requirements
Electrical connection
Ensure that proper earthing exists before use
About Power Connection
WARNING
For personal safety:
Do not use an extension cord or an adapter plug with this appliance.
Do not, under any circumstances, cut or remove the earthing connection
from the power cord.
The installation of the pipes and electrical equipments should be done by professionals.
Attention
WARNING
Electrical Shock Hazard
Disconnect electrical power before installing dishwasher.
Failure to do so could result in death or electrical shock.
Please look at the rating label to know the rating voltage and connect the dishwasher
to the appropriate power supply. Use the required fuse 10A, time delay fuse or circuit
breaker recommended and provide separate circuit serving only this appliance.
8
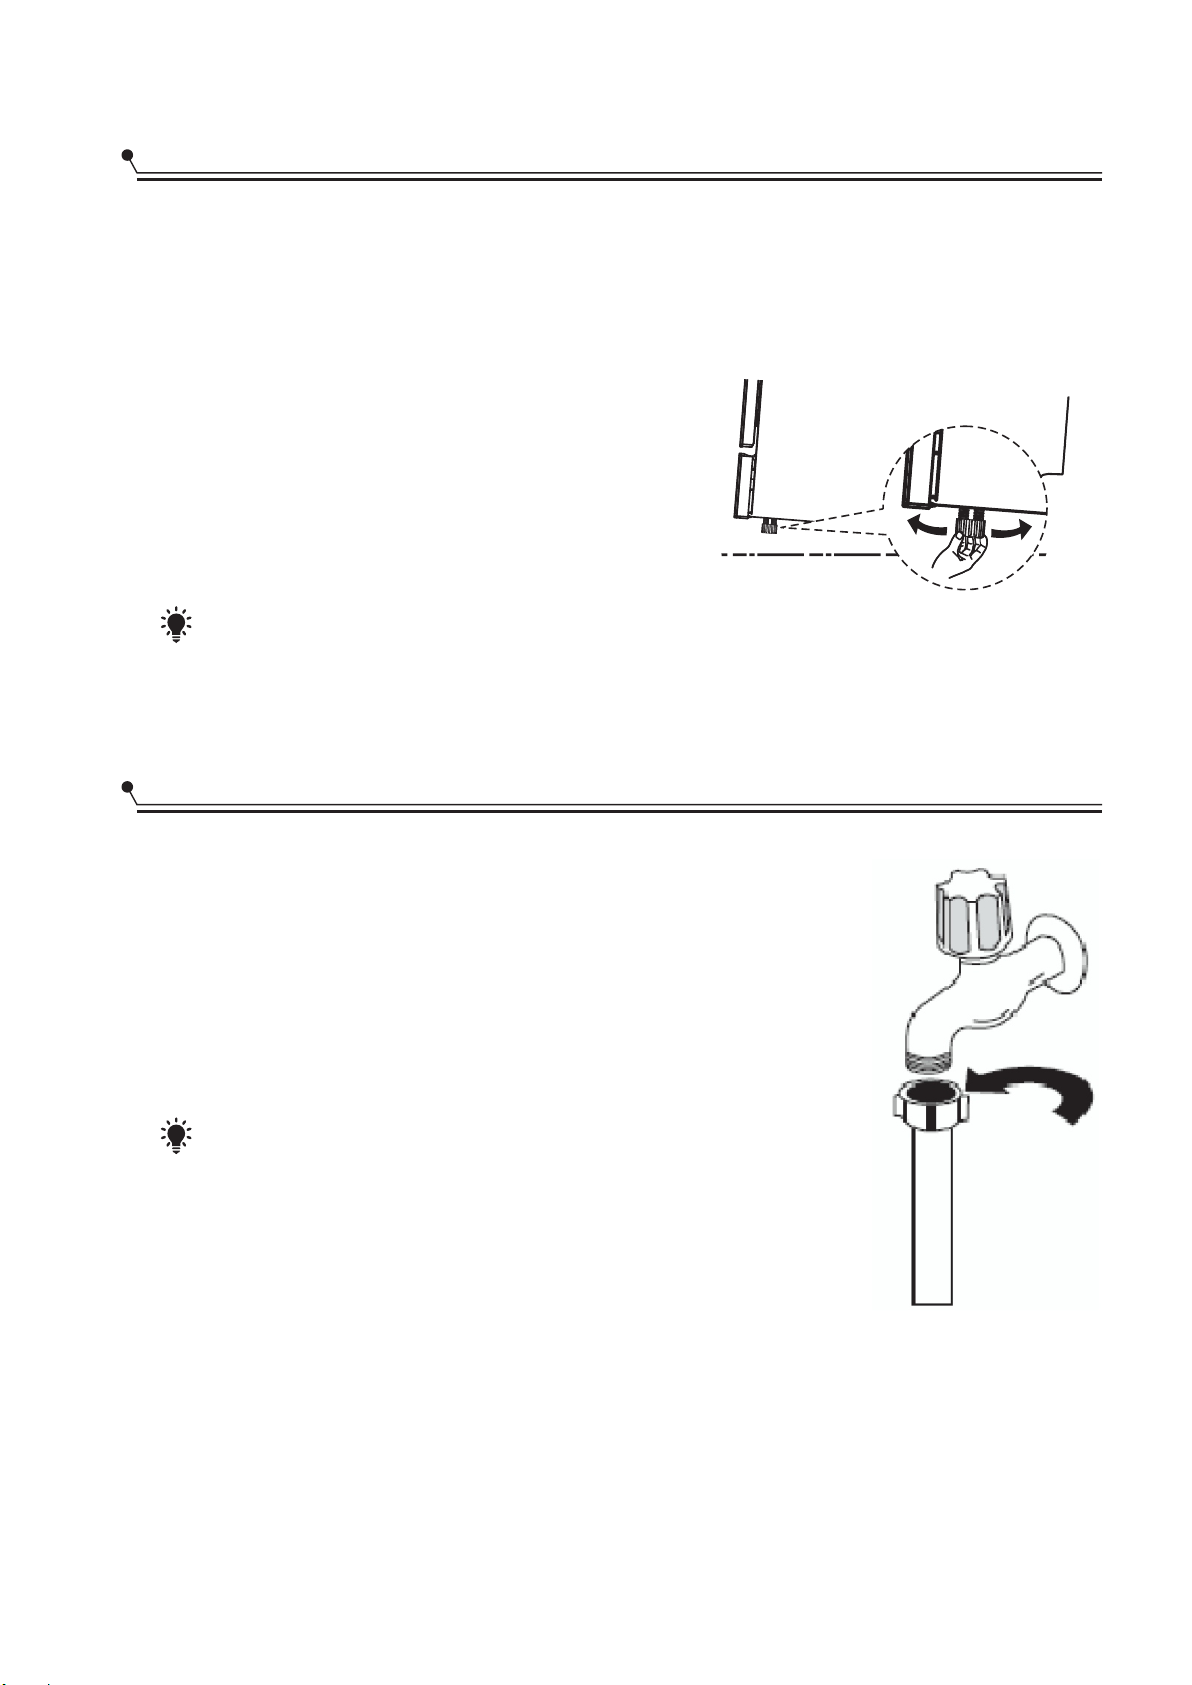
Water Supply And Drain
Cold water connection
Connect the cold water supply hose to a threaded 3/4(inch)
connector and make sure that it is fastened tightly in place.
If the water pipes are new or have not been used for an
extended period of time, let the water run to make sure that
the water is clear. This precaution is needed to avoid the risk of
the water inlet to be blocked and damage the appliance.
NOTE:
Position The Appliance
Position the appliance in the desired location. The back should rest against the wall
behind it, and the sides, along the adjacent cabinets or walls. The dishwasher is
equipped with water supply and drain hoses that can be positioned either to the right
or the left sides to facilitate proper installation.
Levelling the appliance
Once the appliance is positioned for levelling,
the height of the dishwasher may be altered via
adjustment of the screwing level of the feet.
In any case, the appliance should not be inclined
more than 2°.
NOTE:
Only apply to the free standing dishwasher.
of time, turn the water tap off and switch off power supply
If the machine is not going to be used for an extended period
Connect to Cold water supply only.
from wall socket.
Extension hose
Water outlet
How to drain excess water from hoses
Syphon connection
If the sink is 1000 higher from the floor, the excess water in hoses cannot be drained
directly into the sink. It will be necessary to drain excess water from hoses into a bowl
or suitable container that is held outside and lower than the sink.
Connect the water drain hose. The drain hose must be correctly fitted to avoid water
leaks. Ensure that the water drain hose is not kinked or squashed.
The waste connection must be at a height less than 100 cm (maximum) from the
bottom of the dish. The water drain hose should be fixed .
If you need a drain hose extension, make sure to use a similar drain hose.
It must be no longer than 4 meters; otherwise the cleaning effect of the dishwasher
could be reduced.
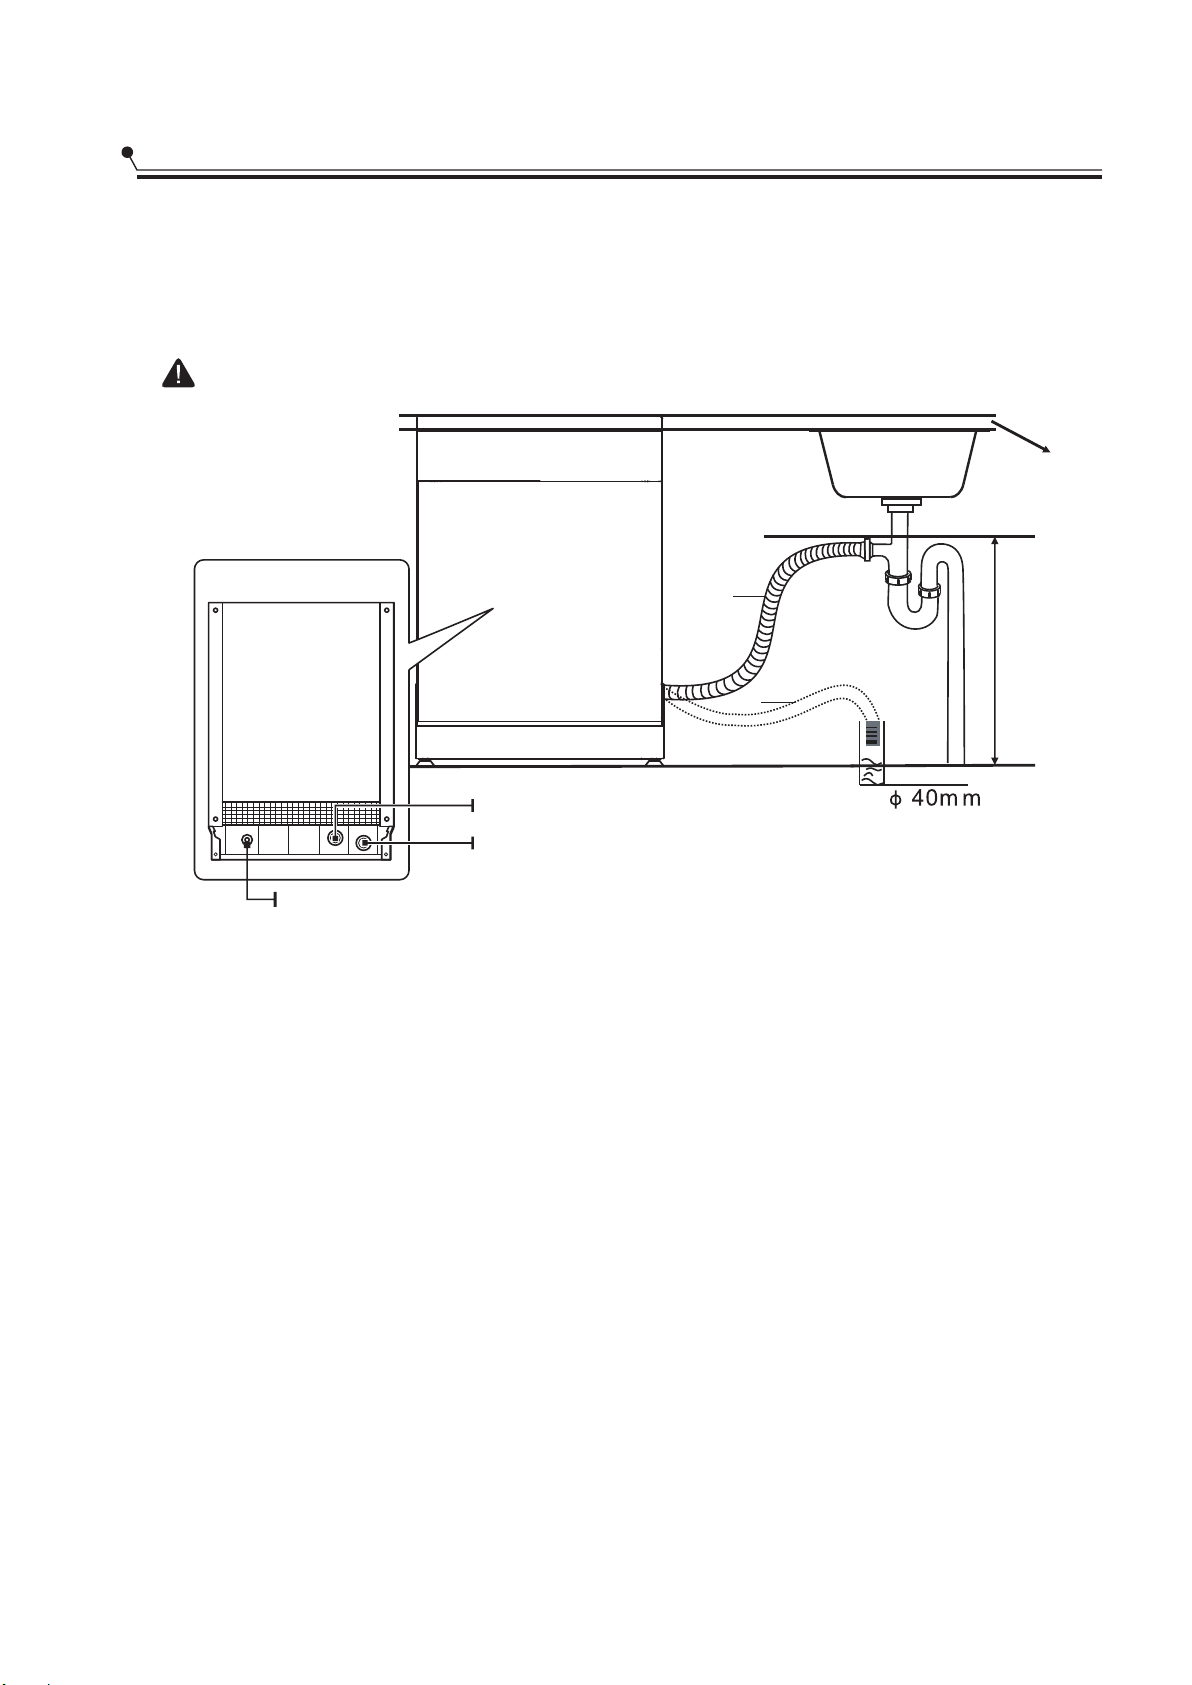
Connection Of Drain Hoses
Please securely fix the drain hose in either position A or position B
B
A
MAX 1000mm
Counter
Drain hose
Insert the drain hose into a drain pipe with a minimum diameter of 4 cm, or let it run
into the sink, making sure to avoid bending or kinking it. The height of drain pipe
must be less than 1000mm. The free end of the hose must not be immersed in water
to avoid the back flow of it.
Back of dishwasher
Water Inlet
Drain Pipe
Mains Cable
9
Este manual sirve para los siguientes modelos
1
Tabla de contenidos
Otros manuales de Lavavajillas de Dishlex

Dishlex
Dishlex DSF6106X Manual de usuario

Dishlex
Dishlex DX 203 Manual de usuario

Dishlex
Dishlex DSF6305W Manual de usuario

Dishlex
Dishlex Global Series Manual de usuario

Dishlex
Dishlex DX103 Manual de usuario

Dishlex
Dishlex DX103 Manual de usuario

Dishlex
Dishlex DSF6105W Manual de usuario

Dishlex
Dishlex DSF6206W Manual de usuario

Dishlex
Dishlex DSF6205W Manual de usuario

Dishlex
Dishlex DX103 Manual de usuario


