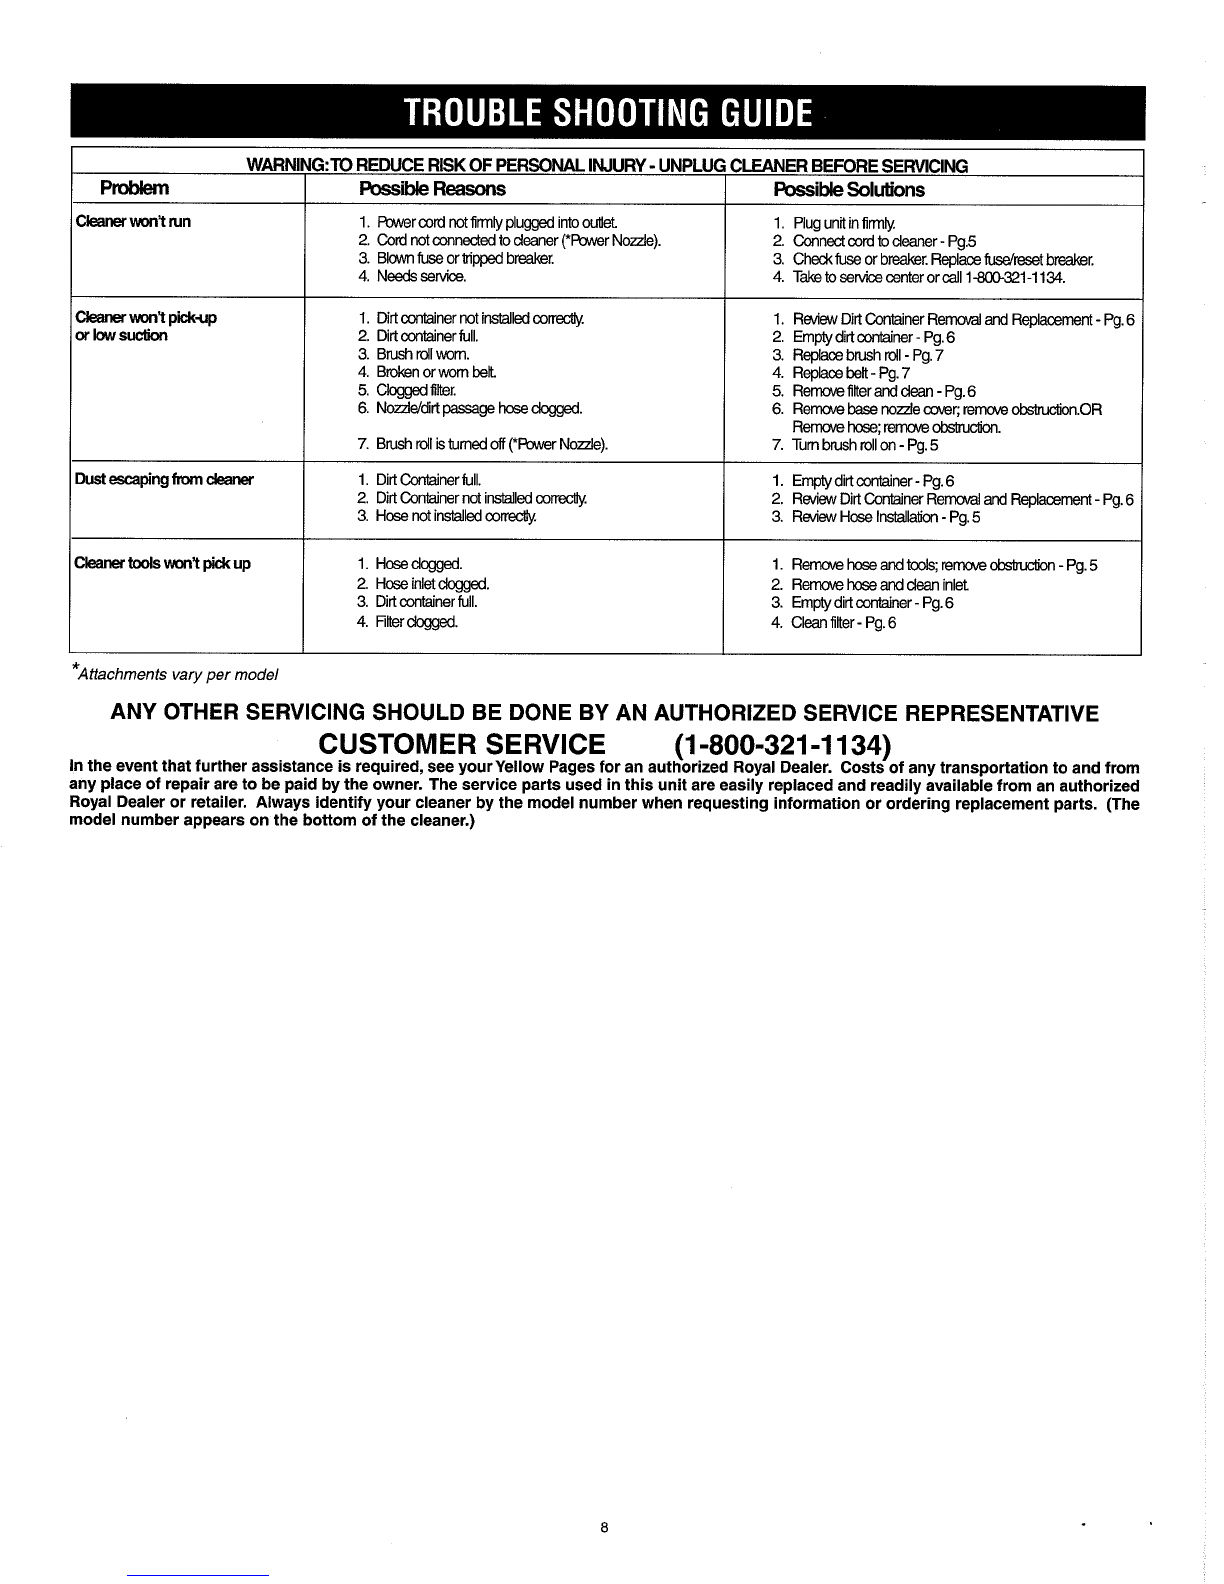
HOW TO ASSEMBLE:
HOSE INSTALLATION AND REMOVAL
WARNING:
TO REDUCETHERISKOFINJURY
-
UNPLUG CLEANER
BEFORE REMOVINGOR INSTALLINGHOSE.
1.
Holdhoseandmatchtabs to align with slot inletsof canister (Diagram
1).
2. lnsert hose.Turn clockwise until hose locks into place (Diagram2).
ATTACHMENT INSTALLATIONAND REMOVAL
1. The hosecan beusedaloneor with many combinationsof wands andtools.
2.
Attachments are packaged separetlv inthe box.To store onthe unit,
-
~
4. yo remove thitool, pull apart gently.You may gently rotatethe attachment back and forth a little to makethe removal easier.To unlockthe wand, push pin,
rotate and then pull apart.
s~mplyshde them Intothe tool cl~palready locatedon one of the
extens~onwands
3. Chooseany of the handy
accessories
to meet your vanous cleanmg
needs.Then slmply push ~tflrmly onto the hose or wand end unt~lthe
in
locks Into dace
HOWTO OPERATE:
1. Snap together the two interlockingwands until pin locks into place.
2. Push assembledwands into desired cleaning nozzle (carpet nozzle or bare floor nozzle).
a. Caroet cleanina
-
Select careet settina on nozzleto Hiah Pile
or Low Pile.
b.
Bare Floor Cleanina
-
Attach Floor Nozzleand use.
3. lnsert handleend of hose into assembledwands.
4. Push power switchto turn the unit on.
5.
Pull handle back into the operating position.
NOTE:
Forcleaning drapes, throwrugs, or other loose items, you mayneedto reduce the suction to prevent sucking the iteminto
the cleaning tool.
To
reduce suction, twist the plastic endon the handle grip untilthe hole
in
the grip isexposed. Uncover the hole
untilthe desired amount ofreducedsuction isachieved.
Diagram
1
Holdhose and align with slot inletsof canister.
POWER NOZZLEASSEMBLY
(REFERTO FIGUREA).
WARNING:
TO REDUCETHE RlSKOF
INJURY FROM MOVING PARTS
-
UNPLUG
CLEANER BEFORE CONNECTINGOR
DISCONNECTING POWER NOZZLE.
1. Push togetherthe two interlocking
wands until pin locks in place.
2. lnsert assembledwands into power nozzle.
3. Presscord into slots on back of wands.
4. lnsert handleend of hose into
assembledwands.
5.
Plug power nozzlecord into hose.
Diagram
2
lnsert hose.Turn clockw~seuntil
hose
locks
lnto place.
HOSE INSTALLATIONAND REMOVAL
WARNING:
TO
REDUCETHE RISK
OF
INJURY
-
UNPLUGCLEANER BEFORE REMOVING OR INSTALLING HOSE.
1.
Hold hose and matchtabs to align with slot inlets of canister (Diagram1).
2. lnsert hose.Turn clockwiseuntil hose locks into place (Diagram
2).
3. Plugthe cord from the hose into the outlet on the cleaner locatedjust in front of carry handle (Diagram3).
ATTACHMENT INSTALLATIONAND REMOVAL
1.
Chooseany of the handy accessories to meet your variouscleaning needs.Then simply push it firmly onto
the hose or wand end.
2. Attachmentsare packaged separetly in the box.To store on the unit, simply slide them into the tool clip already located on one of
the extensionwands.
3. The hose can be used alone or with many combinationsof wands and tools. Pushthe wand into the hose
handle until the pin locks into place.
4. To removethe tool, pull apart gently. You may gently rotate the attachment back and forth a littleto make the
removaleasier.To unlockthe wand, push pin, rotate and then pull apart.
HOWTO OPERATE:
1. Pull handle back intothe operatingposition.
2. Push power switch on POWER PAK nozzle as shown (Diagram4).
3.
Selectcarpet or bare floor cleaning (Diagram
4).
a. For Carpet Cleaning
-
Push power switch on the power nozzle.
Be sure brush roll is rotatingfor effectivecleaning and grooming.
.
b. For Bare Floor Cleaning, push power switch onthe power nozzle. Be sure brush roll stops rotating.
5
FIGUREA
Power
Nozzle