Digital-Ally DVM-800 Manual de usuario

Operation Guide
DVM-800
Copyright © 2017, Digital Ally, Inc. All Rights Reserved. This publication may not be repro-
duced, stored in a retrieval system, or transmitted in whole or part in any form or by any
means electronic, mechanical, recording, photocopying, or in any other manner without
the prior written approval of Digital Ally, Inc.
860-00186-00 Rev L

Copyright © 2017 Digital Ally, Inc. 1-A
Table of Contents
Section 1
Introduction to the DVM-800 System ......................................................................... 1-1
1.1 Overview of Features...............................................................................................1-1
1.2 DVM Features Diagram............................................................................................1-2
Section 2
DVM Conguration Overview ..................................................................................... 2-1
2.1 Manually Updating the DVM Conguration..........................................................2-1
2.2 Wireless Conguration Updates.............................................................................2-1
Section 3
Device Conguration ................................................................................................... 3-1
3.1 Default Conguration ..............................................................................................3-1
3.2 Using VuVault to Congure your DVM-800 ...........................................................3-2
3.3 General .....................................................................................................................3-3
Location ..........................................................................................................................................3-3
Local Time Zone...................................................................................................................... 3-3
Date Format............................................................................................................................. 3-3
Clock Source ............................................................................................................................ 3-3
Daylight Saving........................................................................................................................ 3-3
Time Format ............................................................................................................................ 3-3
Display.............................................................................................................................................3-4
LCD Brightness........................................................................................................................ 3-4
Record LED Behavior.............................................................................................................. 3-4
LCD Mode ................................................................................................................................ 3-4
Power...............................................................................................................................................3-5
Ignition Shutdown Timer ....................................................................................................... 3-5
Days in LPS (Low Power Standby) ........................................................................................ 3-5
Settings ...........................................................................................................................................3-6
Audio Mute .............................................................................................................................. 3-6
Login Mode.............................................................................................................................. 3-6
Entry Timeout.......................................................................................................................... 3-6
3.4 Prole.........................................................................................................................3-6
Event Id Enable........................................................................................................................ 3-6
Incident Enable ....................................................................................................................... 3-6
Ethnicity Prole ....................................................................................................................... 3-6
Age Prole................................................................................................................................ 3-7
Gender Prole......................................................................................................................... 3-7
3.5 Record........................................................................................................................3-7
Recording Details..........................................................................................................................3-7
Record Quality......................................................................................................................... 3-7
FPS (Record Frames Per Second).......................................................................................... 3-8
Event Audio.............................................................................................................................. 3-8
Pre-Event Buer Time ............................................................................................................ 3-8
Record Mode ........................................................................................................................... 3-9
Event Loop............................................................................................................................... 3-9
Number of Channels ............................................................................................................ 3-10
Cameras........................................................................................................................................3-10
Source 1 ................................................................................................................................. 3-10
Source 2 ................................................................................................................................. 3-10
IR LED ..................................................................................................................................... 3-10
3.6 Radar........................................................................................................................3-11
Radar Type ...................................................................................................................................3-11
Radar Baud Rate.........................................................................................................................3-11
Radar On Screen Display..........................................................................................................3-11

Copyright © 2017 Digital Ally, Inc. 1-B
3.7 Motion......................................................................................................................3-12
Accelerometer.............................................................................................................................3-12
Vehicle Speed..............................................................................................................................3-13
Speed Source ........................................................................................................................ 3-13
Vehicle Speed Limit .............................................................................................................. 3-13
VSS Pulses per Mile............................................................................................................... 3-13
3.8 Sensor ......................................................................................................................3-14
IF Box Input Sensors..................................................................................................................3-14
Name...................................................................................................................................... 3-15
Type ........................................................................................................................................ 3-15
Detection ............................................................................................................................... 3-15
Threshold............................................................................................................................... 3-15
Record Ends By ..................................................................................................................... 3-15
Event Cameras ...................................................................................................................... 3-15
LCD ......................................................................................................................................... 3-16
Input Sensor Device Detection, Threshold, and Wiring Guide .......................................3-17
How to Congure a Backup Camera .....................................................................................3-18
Reverse Record Override .........................................................................................................3-18
Event Priority ...............................................................................................................................3-18
Output Alarm...............................................................................................................................3-19
Output Alarm Name............................................................................................................. 3-19
Output Enable ....................................................................................................................... 3-19
3.9 Data Transfer ..........................................................................................................3-20
Network.........................................................................................................................................3-20
Mode ...................................................................................................................................... 3-20
Secure Video Uploads .......................................................................................................... 3-20
Wtm Settings ......................................................................................................................... 3-21
USB ................................................................................................................................................3-21
USB Port................................................................................................................................. 3-21
3.10 GPS .........................................................................................................................3-21
GPS Locations .............................................................................................................................3-21
Latitude (degrees)................................................................................................................. 3-21
Longitude (degrees).............................................................................................................. 3-21
Max Distance ........................................................................................................................ 3-22
Locations of Interest..................................................................................................................3-22
Time in Location.................................................................................................................... 3-22
Latitude .................................................................................................................................. 3-22
Longitude............................................................................................................................... 3-22
Radius (miles) ........................................................................................................................ 3-22
3.11 Activating your SD card within VuVault.............................................................3-23
Section 4
DVM Operation.............................................................................................................. 4-1
4.1 Buttons for Operation .............................................................................................4-1
4.2 Display and On Screen Information.......................................................................4-1
LCD Forced On Mode..................................................................................................................4-2
4.3 Charging Information ..............................................................................................4-2
4.4 SD Card Installation & Removal..............................................................................4-2
4.5 Powering On and O ...............................................................................................4-2
4.6 DVM Menu Functions...............................................................................................4-3
Viewing Current Conguration..................................................................................................4-3
Logging into the DVM..................................................................................................................4-3
Setting the Date and Time ........................................................................................................4-4
Adjusting LCD Brightness ..........................................................................................................4-4
Logging out of the DVM ..............................................................................................................4-4
4.7 External 12XC Camera Control Buttons ................................................................4-5
4.8 Video Recording........................................................................................................4-6
Start a Recording..........................................................................................................................4-6
Stop a Recording ..........................................................................................................................4-6
Place Marks in a Recording........................................................................................................4-6
Audio................................................................................................................................................4-6

Copyright © 2017 Digital Ally, Inc. 1-C
Muting the Audio..........................................................................................................................4-6

4.9 Video Playback..........................................................................................................4-7
Playback Control...........................................................................................................................4-7
4.10 Covert Operation....................................................................................................4-7
4.11 Uploading Files into VuVault.................................................................................4-8
Option 1: SD Card .......................................................................................................................4-8
Option 2: Wi-Fi ..............................................................................................................................4-8
4.12 Event Id Information Entry....................................................................................4-8
Section 5
Wireless Microphone Operation ................................................................................. 5-1
5.1 Syncing a Transmitter to a Receiver Cradle..........................................................5-1
5.2 Basic Operation ........................................................................................................5-1
5.3 Using the Lapel Microphone...................................................................................5-1
5.4 Notication Alert Switch .........................................................................................5-2
5.5 Out of Range .............................................................................................................5-2
5.6 Charging Information ..............................................................................................5-2
5.7 Status Indicators ......................................................................................................5-2
5.8 Low Battery Warning ...............................................................................................5-3
5.9 Remote Record Button ............................................................................................5-3
5.10 Remote Accessory Control ....................................................................................5-3
5.11 Muting the Wireless Microphone Audio..............................................................5-3
5.12 Muting the Audio for the In-Car Microphone .....................................................5-3
Section 6
Event Recording Management .................................................................................... 6-1
6.1 Video Playback and Management .........................................................................6-1
Section 7
Wireless File Transfer .................................................................................................. 7-1
Basic ................................................................................................................................................7-1
Advanced........................................................................................................................................7-1
Section 8
Status Indicators........................................................................................................... 8-1
Section 9
Specications ............................................................................................................... 9-1
Section 10
Support & Troubleshooting ...................................................................................... 10-1
10.1 Firmware Updates................................................................................................10-1
10.2 Firmware Update Instructions ...........................................................................10-1
Manual Method...........................................................................................................................10-1
Wireless Method.........................................................................................................................10-2
10.3 External SD Card Maintenance ..........................................................................10-3
SD Card Requirements .............................................................................................................10-3
Formatting Requirements ........................................................................................................10-3
10.4 Troubleshooting ...................................................................................................10-3
10.5 DVM Error Messages............................................................................................10-6
10.6 Performing a Reset ..............................................................................................10-6
10.7 Product Repair......................................................................................................10-6
Reset Button................................................................................................................................10-6
10.8 Warranty Information .........................................................................................10-7
10.9 FCC Notice .............................................................................................................10-8
Section 11
Contact ........................................................................................................................ 11-1

Digital Ally, Inc. |Introduction 1-1
DVM-800 Operation Guide |860-00186-00 Rev L
Go Back To Table of Contents
1.1 Overview of Features
• External road facing Camera with 12x variable optical zoom
• Two cameras built into the rear view mirror:
◦One forward road facing.
◦One passenger facing with IR illumination.
• Back Seat camera
• Optional License Plate backup camera system available
• Capable of recording full D1 on two video channels simultaneously
• Integrated 3.5” color monitor – only visible when in use
• Wireless Microphone with 3000 foot range
• Two in-car covert microphones
• Recordings can be started by any of the following:
◦Automatically by the G-Force sensor (cornering, braking, and
collision), GPS coordinates, Vehicle Speed, IF Box sensors (sirens,
lights, covert switch, etc.)
◦Manually by using the Record Button
◦Wireless Microphone
• Recordings end:
◦When active input sensor trigger ends
◦Manually by using the Record Button
• Pre-Event recording will capture up to 30 seconds prior to the start of a
recording. Pre-Event Record time is adjustable in 6 second increments
• Records metadata with the audio and video, including device serial number,
vehicle speed, date, time, sensors, radar, and GPS coordinates
• Automated wireless 802.11(n) upload of video events to your back oce server
• Conguration and device updates can be wirelessly downloaded to each vehicle
• Easy to use with minimal or no driver interaction required
• Secure user login to the DVM
• User may add trac stop prole information at time of event
• Integrated playback controls for in-vehicle viewing
• LED and LCD status indicators
• Congurable LCD monitor integrated behind the one-way rear-view mirror glass
• Congurable LCD brightness for day and night modes
• Compact interface box to allow multiple automatic record trigger options
• Output Alarm that can turn on/o a device when an event recording begins
• VuVault® back oce software available for organizing and viewing video event
les, and advanced device conguration
Section 1
Introduction to the DVM-800 System

Digital Ally, Inc. |Introduction 1-2
DVM-800 Operation Guide |860-00186-00 Rev L
Go Back To Table of Contents
1.2 DVM Features Diagram
1LCD Display: Used for viewing video. LCD is behind the mirror and is not visible when o.
2Internal Microphone: Records audio from the passenger compartment.
3Manual Record button: This button is used to start/stop a manual event recording.
4LED Status Indicators (Passenger Facing & Road Facing): These visible indicators give the
operator feedback on the operational status of the DVM.
5Infrared Illuminators: Automatically provides Infrared illumination for the passenger
facing camera during low light conditions.
6Integrated Passenger Facing Camera: Records video of the vehicle passenger area.
7Ambient Light Sensor: Senses ambient light to automatically adjust LCD brightness.
8Menu and Playback Buttons: Used to navigate the DVM menus, play back videos, and log
into the system.
9External SD Card: A removable SD card is installed behind the external SD door. The SD
card is installed at a slight angle and positioned with the connector pads as shown above.
10 External Audio Input: The Digital Wireless Microphone audio cable is connected here.
11 External SD Card door: Provides access to the removable SD memory card.
12 USB Port: For data transfer and Wi-Fi download.
13 External Camera 1 Port: An external camera can be connected to the DVM with this port.
14 External Camera 2 Port: A 2nd external camera is connected to the DVM here.
15 GPS Port: The GPS antenna is connected here.
16 Power Port: Provides power to the DVM or can be used to attach the Interface Box to the
system.
17 Reset Button: Used to perform a hard reset of the system.
18 Integrated Road Facing Camera: Records the view in front of the vehicle.
1
2 3
10
4
11
12
13 14 15 16 417 18
5
6 7 8
9

Digital Ally, Inc. | DVM Conguration Overview 2-1
DVM-800 Operation Guide |860-00186-00 Rev L
Go Back To Table of Contents
Many customizable features are available for the DVM-800. The le that is used to
update the DVM conguration is named “devicecong”. This le contains all of the
necessary wireless settings, operational settings, and user logins. Section 3 will guide
you through the process of creating the conguration le using the DVM-800 Settings
tab within the VuVault® back oce software. You will then save the le using the Media
Card Admin Tab within VuVault (Refer to Section 3.11 for details).
Once the conguration le has been created within VuVault, use one of the following
methods to update the DVM:
2.1 Manually Updating the DVM Conguration
1. Copy the “devicecong” le to the SD card.
2. Install the SD card into the external card slot of the DVM.
3. The DVM will reboot and load the settings from the new conguration
le. The old conguration settings will be overwritten and discarded.
Once the update process has started:
◦Do not remove power
◦ Do not turn the ignition o
◦Do not remove the external SD card
2.2 Wireless Conguration Updates
The DVM must be initially be congured for wireless communication using the
SD card method before Wireless Updates can be utilized.
1. Once the new conguration is saved in VuVault, go to “Media Card
Admin”, select the device type, and click “Save to Folder”. Navigate to
the local hard drive folder to which you wish to save the “devicecong”
le.
2. Open the WTM Lite program and click the “Update Devices” button,
then the “Deploy Update Files” button. (See the “VuVault Wireless Server
Setup Guide” for details).
3. Navigate to the hard drive location for “devicecong”, select the le
then click OK.
4. Select the specic device or devices to update and press “Done”.
5. When the DVM reconnects to the FTP server, it will download
and install the settings from the new conguration le. The old
conguration settings will be overwritten and discarded.
Section 2
DVM Conguration Overview

Digital Ally, Inc. | Device Conguration 3-1
DVM-800 Operation Guide |860-00186-00 Rev L
Go Back To Table of Contents
The DVM-800 is shipped with a default conguration so it can be used immediately after
installation. However, many parameters can be congured and saved as an activation
le. The activation le is saved to a local hard drive or external SD card. The DVM-800
is activated and congured using Digital Ally’s VuVault® back-oce software. Use the
“VuVault Installation Guide” to install the VuVault software. Once installed, follow the
instructions in this section to congure and activate your DVM.
ONCE THE DESIRED SETTINGS HAVE BEEN ENTERED, CLICK SAVE AND
PROCEED TO SECTION 3.11 TO ACTIVATE YOUR SD CARD.
3.1 Default Conguration
If the unit has never been activated, it will use the following default settings preset from
the factory.
• User Name/Password login entry
• English language
• Central Standard Time
• Date format: mm/dd/yy
• Time format: 12 hour
• Daylight saving time (DST) enabled
• STANDBY mode, 30 second pre-event recording turned on.
• External triggers: emergency lights and wireless microphone
• Audio is o for pre-event, audio is on during event recording
• LCD Auto Mode
• 60 second entry timeout
• Recording resolution is D1 @ 30 frames per second
• ECA®(Evidence Capture Assurance®) is enabled
• Dual Channel Recording
• All proling screens disabled
• Accelerometer disabled
• 30 minute ignition shutdown timer
Section 3
Device Conguration

Digital Ally, Inc. | Device Conguration 3-2
DVM-800 Operation Guide |860-00186-00 Rev L
Go Back To Table of Contents
3.2 Using VuVault to Congure your DVM-800
VuVault is used to manage DVM-800 settings as
well as activate a DVM device or an external
memory card for use in a DVM-800.
Before you can congure your device for use
within VuVault, the DVM serial number must
be added into the system. Add your device into
VuVault by selecting Admin > Devices > Advanced >
Add Device. Find the device serial number located
on the back of the DVM and type it into the
wizard (do not include the hyphen). Assign it a
name and description. When done, press Save.
For more information consult the “VuVault
Administrator Guide” Adding Devices section.
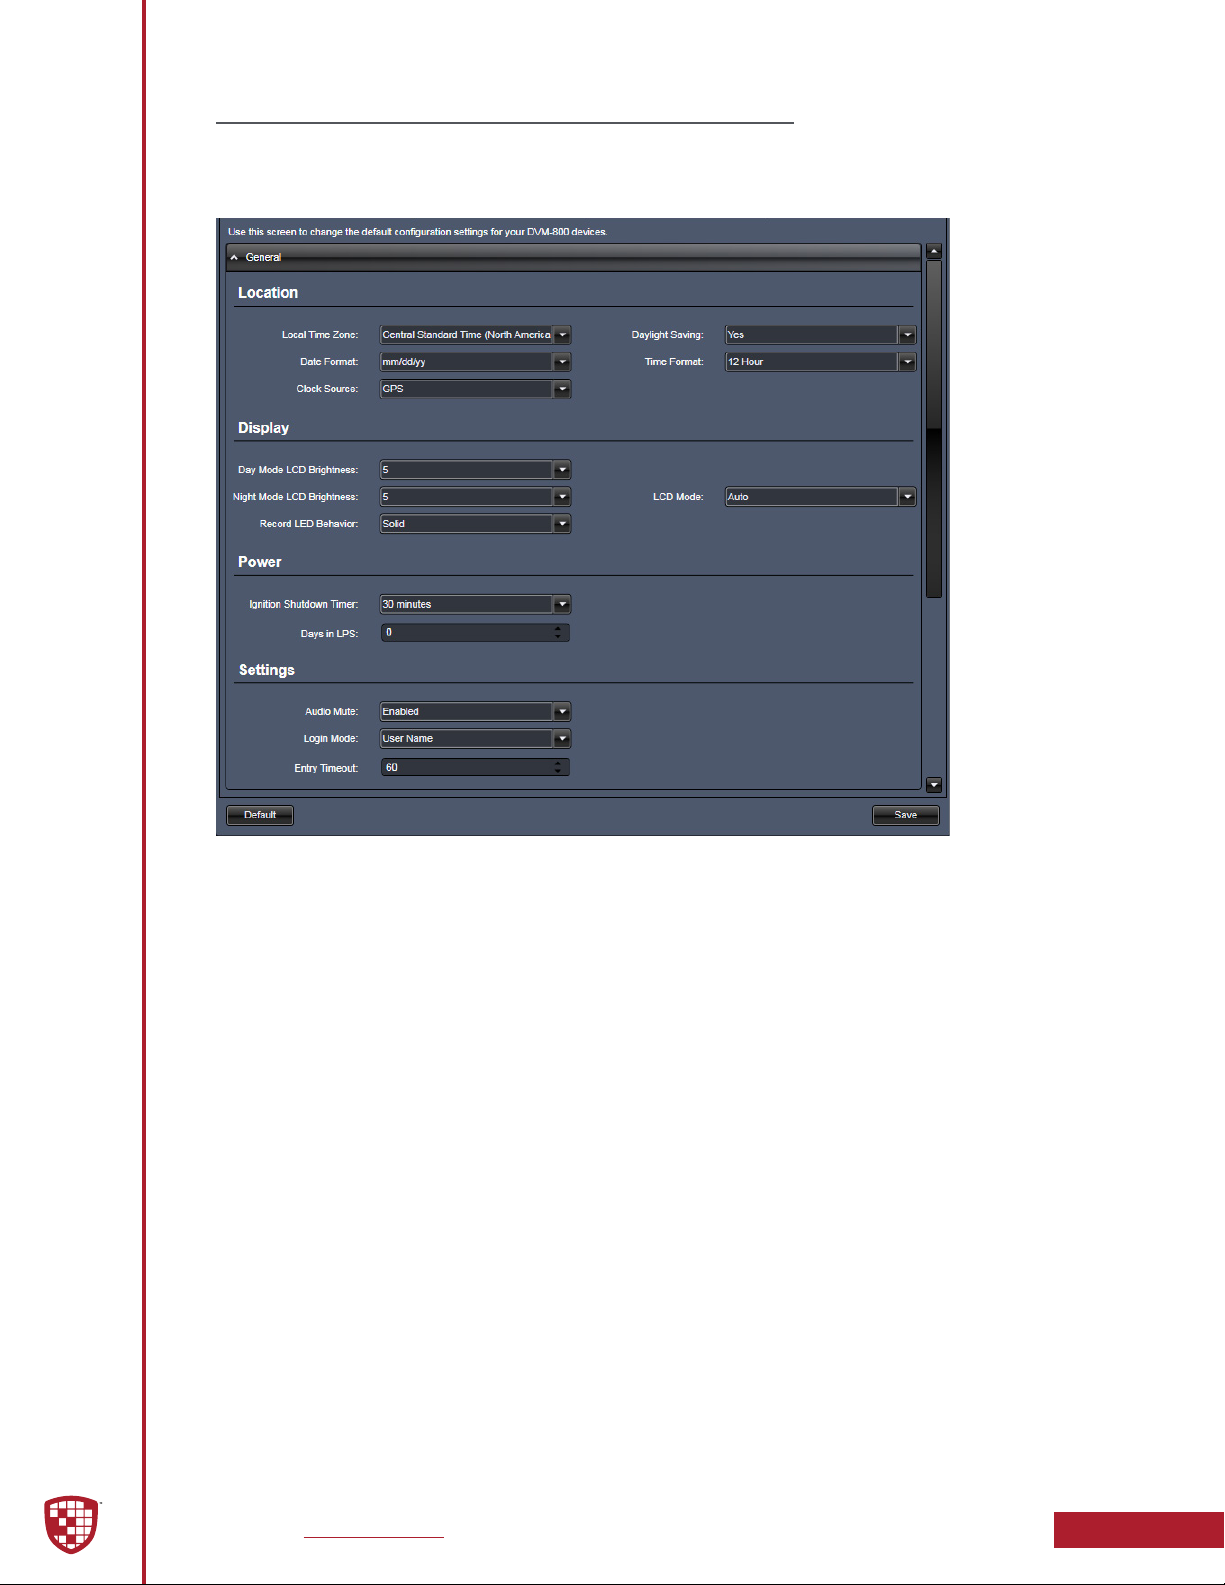
Go to the Admin > Devices Tab. A separate conguration eld for DVM-800 Settings will
be available once a valid serial number for the device has been added into the system.
These settings will dene how all users will interface with the DVM. Click on each sub-
heading to reveal the available conguration options. When nished, press Save.
The Default button in the lower left-hand part of the main screen can be used to reset
all congurations for this device to the factory settings.

Digital Ally, Inc. | Device Conguration 3-3
DVM-800 Operation Guide |860-00186-00 Rev L
Go Back To Table of Contents
3.3 General
Location
Below are the conguration items for localization which are provided to address Date/
Time settings and display formats.
Local Time Zone
The local time zone is used to adjust the device when synchronizing to the Greenwich
Mean Time through the GPS antenna. Choose the time zone for your location.
Date Format
The date format displayed on the event recordings is selected through this setting.
Settings: mm/dd/yy [default]; yy/mm/dd; dd/mm/yy
Clock Source
Choose to receive the time setting automatically through the GPS signal or manually
through the DVM menu.
Settings: Manual, GPS [default]
Daylight Saving
Enable Daylight Saving setting and the time will be automatically adjusted for Daylight
Saving for the congured Local Time Zone. If this is disabled, time will not be adjusted
for Daylight Saving.
Settings: No, Yes [default]
Time Format
This time format allows the DVM-800 to be congured in a 12-hour format or a 24-hour
format.
Settings: 24 Hour, 12 Hour [default]
Otros manuales para DVM-800
2