Dicota Laser USB Notebook Mouse Stream Manual de usuario

1
Stream
Laser USB Notebook Mouse
www.dicota.com
english
User’s Guide
Laser USB Notebook Mouse
deutsch
Bedienungsanleitung
Laser USB Notebook-Maus
français
Guide d’utilisation
Souris Laser optique USB pour ordinateur portable
español
Manual de instrucciones
Ratón USB laser para portátil
italiano
Manuale d’uso
Mouse per Notebook Laser USB
czech
Manuál
Laserová myš k notebooku na USB
russian
User’s Guide
Лазерная USB мышка для ноутбука
hungarian
Használati útmutató
Optikai USB Notebook egér
polish
Przewodnik użytkownika
Laserowa mysz USB do notebooka
slovakian
User’s Guide
Laserová USB myš k notebooku

2
Please DO NOT direct the class 1 laser beam at anyone’s eye.
Caution:
To use this product properly, please read the user’s guide before
installation.
Please adhere to the following warnings and safety instructions to pre-
vent injury:
1.)
Never shine the class 1 laser beam into a person’s eyes, or stare
into
the class 1 laser beam. This is very dangerous and can cause
instant
temporary vision dysfunction!
2.) Do not point the class 1 laser beam at mirror-like surfaces!
3.) Never aim the class 1 laser beam anywhere on any person or
animal!
4.) The class 1 laser beam is not a toy. Keep the device out of
reach of small children!
Your mouse uses a new generation technology – invisible laser module that re-
places the traditional LED optical sensor and provides amazing tracking ability.
The invisible laser module accurately scans the surface in 30 times sensitive of
LED optical sensor. You can work with your mouse in most surfaces perfectly.
english

3
Safety notice:
1. This product complies with IEC 60825-1, class 1 laser product.
2. This product complies with FCC and CE rules.
3. This product has no serviceable parts. Use of controls or adjustments
of procedures other than the user guide mentiones may result in mal-
function or dangerous.
SETUP the Mouse
The mouse is connected to your computer via the USB cable. It needs to be
plugged in to your Notebook or PC by a USB port or a mouse port.
For PS/2 mouse port installation
Please turn off your computer before installing your mouse.
Plugging and unplugging cables to your computer’s mouse
port while the computer is running can damage the mouse
port or your computer.
For USB port installation
Windows 98 (or higher) is required for USB port installation.
Connect the receiver cable to the USB port on the computer.
For Windows, you may be prompted to insert the Windows
software CD.
Insert the Windows driver CD into the computer’s CD-ROM drive when asked
to do so. Follow the instructions steps.
CAUTION:
Change or modifications not expressly approved by the manufacturer
responsible for compliance could void the user’s authority to operate the
equipment.
PS2 Mouse Port
USB Port

4
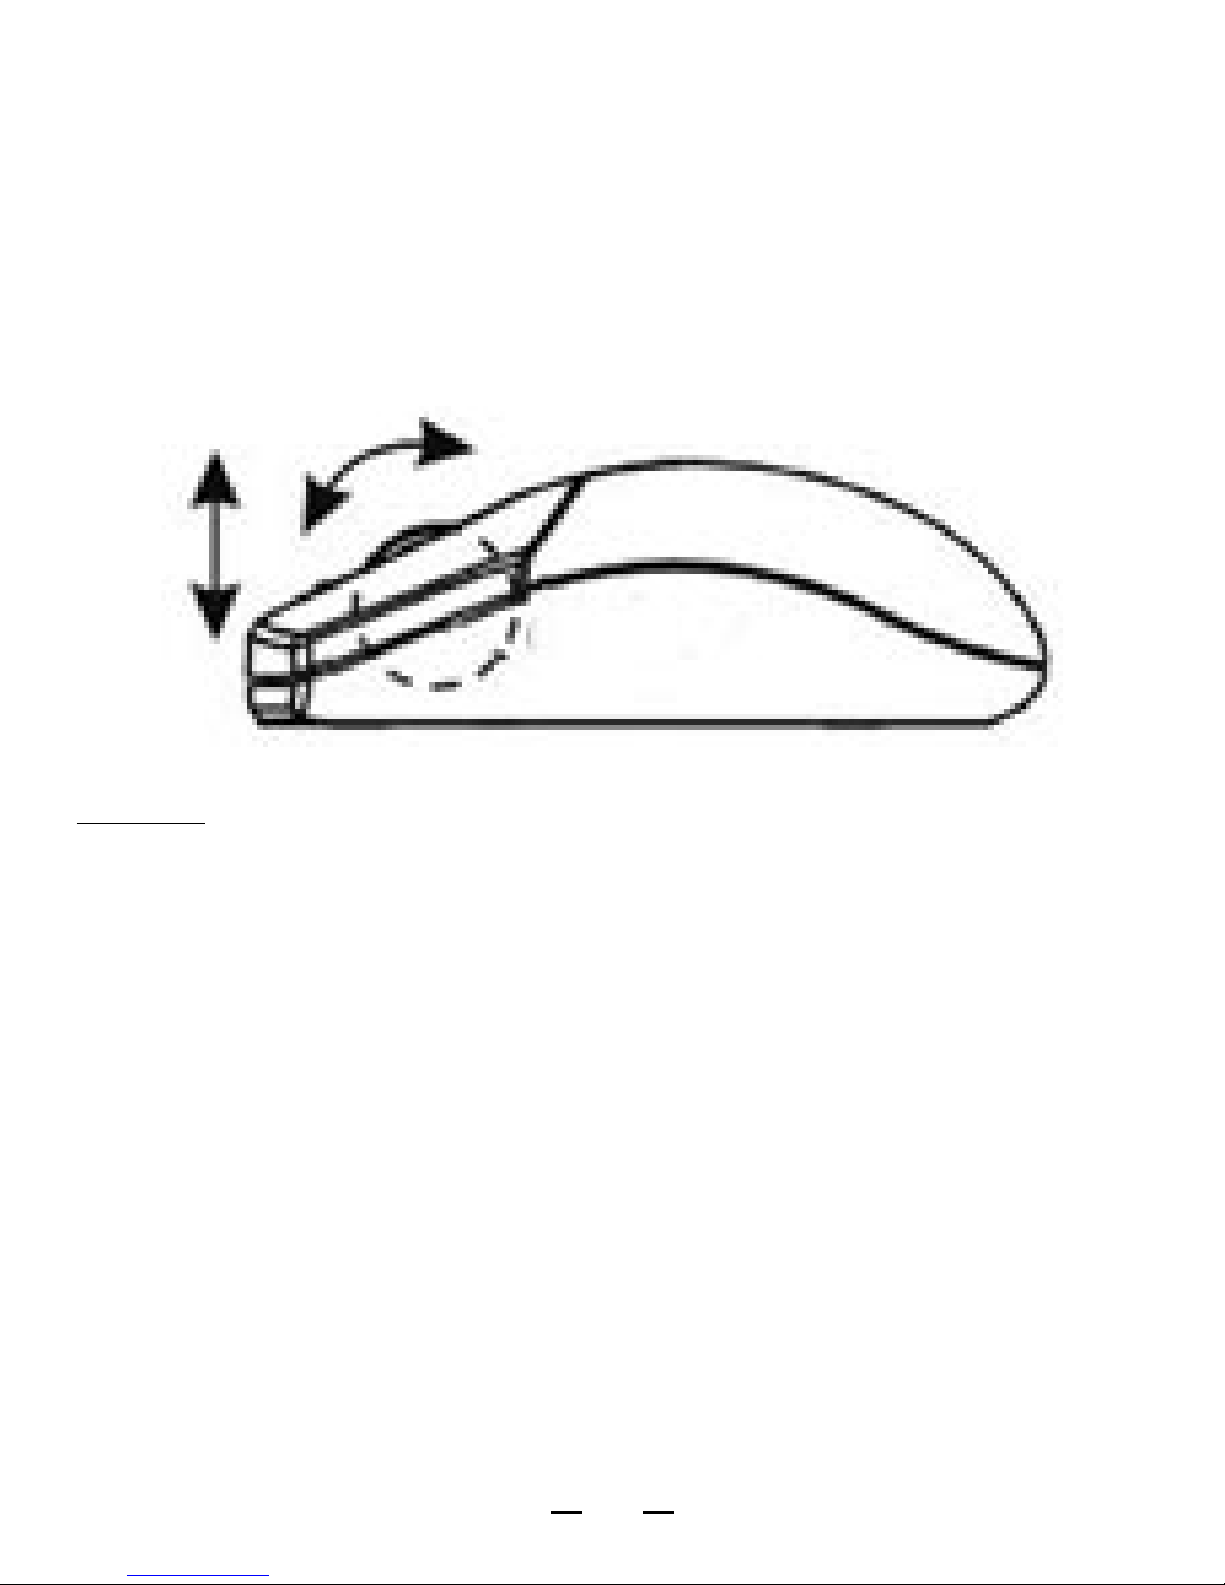
Using your mouse
How to use the wheel
Your mouse has a wheel that functions both as a wheel for Windows scrolling
and also as a customized button. It can be used as a standard mouse button,
click (press down) the wheel. To use the middle button, directly press down the
wheel. For scrolling the screen, simply move the wheel.
Caution: It may sometimes interfere the sensor of the mouse, if your
tabletop surface is in red color, transparent as glass or highly reflective
like a mirror. Try to use a mouse pad or use your mouse on a different
tabletop surface.
Troubleshooting
Mouse does not work upon installation.
Try one or more of the following:
• Make sure you have installed the mouse correctly.
• Make sure the cable is plugged into the right mouse or USB port.
• Unplug the mouse and then plug in the mouse again. Make sure that the
mouse has been detected by the operating systems properly.
• Make sure your mouse port has the proper configuration. Refer to your
computer documentation for the correct port configuration.

5
Disclaimer
Information in this document is subject to change without notice. The
manufacturer does not make any representations or warranties (im-
plied or otherwise) regarding the accuracy and completeness of this
document and shall in no event be liable for any loss of profit or any
commercial damage, including but not limited to special, inciden-
tal, consequential, or other damage. No part of this document may be
reproduced or transmitted in any form by any means, electronic or
mechanical, including photocopying, recording or information record-
ing and retrieval systems without the express written permission of the
manufacturer.
Customer Service:
If you encounter any problem with your Stream, please contact our local
subsidiary, partner or dealer, or send us your inquiry to [email protected].
2 years warranty. Please find the complete text in our guarantee on the
internet: www.dicota.com.
All the products and software mentioned above are registered trademarks
of their respective owners. Errors and omissions excepted.
N1879
This symbol (crossed out bin wheelie symbol according to
WEEE Annex IV) indicates separate collection of waste elec-
trical and electronic equipment in the EU countries. Please do
not throw the equipment into the domestic refuse. Please use
the return and collection systems available in your country for
the disposal of this product.

6
Den Laserstrahl bitte NICHT auf die Augen richten!
VORSICHT:
Lesen Sie vor Installation das Benutzerhandbuch, um eine korrek-
te Verwendung des Gerätes gewährleisten zu können.
Bitte beachten Sie folgende Warnungen und Sicherheitshinweise, um
Verletzungen zu vermeiden:
1.)
Richten Sie den Laser der Klasse 1 niemals auf die Augen oder
schauen Sie hinein. Dies ist sehr gefährlich und kann sofortige,
vorübergehende Sehbehinderungen zur Folge haben!
2.)
Zeigen Sie mit dem Laser der Klasse 1 nicht auf Spiegel-ähnliche
Oberflächen!
3.)
Richten Sie den Laser der Klasse 1 niemals auf eine Person oder
ein Tier!
4.)
Der Laser der Klasse 1 ist kein Spielzeug. Bewahren Sie das Gerät
außerhalb der Reichweite von Kindern auf!
Ihre Maus verwendet eine Technologie der neuesten Generation – eine unsicht-
bare Lasermodul, welches den herkömmlichen optischen Sensor ersetzt und
über erstaunliche Abtastfähigkeiten verfügt. Das unsichtbare Lasermodul tas-
tet die Oberfläche 30-mal so akkurat ab wie ein optischer LED Sensor. Mit Ihrer
Maus können Sie auf fast allen Oberflächen perfekt arbeiten.
deutsch

7
Sicherheitshinweis:
1.
Dieses Gerät stimmt mit IEC 60825-1, Laserprodukt der Klasse 1 überein.
2. Ihr Gerät stimmt mit FCC- und CE-Richtlinien überein.
3. Dieses Gerät hat keine Verschleißteile. Die anders als im Benutzerhand-
buch angegebene Verwendung der Bedienelemente oder Einstellungen
kann zu Fehlfunktionen oder Gefahr führen.
SETUP der Maus
Die Maus wird mit einem USB-Kabel mit Ihrem Computer verbunden. Es muss
über einen USB- oder Mausanschluss mit Ihrem Notebook oder PC verbunden
werden.
Installation an einem PS/2 Mausanschluss
Bitte schalten Sie Ihren Computer ab, bevor Sie die
Maus installieren. Das Ein- und Ausstecken von Kabeln
an Ihrem Mausanschluss während der Computer läuft
kann Ihren Computer oder den Mausanschluss
beschädigen.
Installation an einem USB-Anschluss
Für eine Installation an einem USB-Anschluss ist
Windows 98 (oder höher) notwendig. Schließen Sie
den Empfänger am USB-Anschluss Ihres Computers
an. Bei Windows könnte es vorkommen, dass Sie
eine Meldung erhalten, die Windows Software-CD
einzulegen.
Für eine Installation an einem USB-Anschluss ist Windows 98 (oder höher) not-
wendig. Schließen Sie den Empfänger am USB-Anschluss Ihres Computers
an. Bei Windows könnte es vorkommen, dass Sie eine Meldung erhalten, die
Windows Software-CD einzulegen.
VORSICHT:
Veränderungen oder Modifikationen, die nicht ausdrücklich vom Hersteller,
der für die Zustimmung verantwortlich ist, unterstützt werden, können das
Recht des Benutzers, das Gerät zu verwenden, ungültig werden lassen.
PS2-Mausanschluß
USB-Anschluß
8
Ihre Maus im Einsatz
Wie man das Mausrad verwendet
Ihre Maus hat ein Rad, welches sowohl als Bildlauf in Windows-Programmen
als auch als frei belegbare Taste fungiert. Es kann als Standardtaste verwendet
werden, klicken (nach unten drücken) Sie das Rad. Um die mittlere Taste zu
verwenden, drücken Sie das Rad gerade nach unten. Um den Bildlauf zu ver-
wenden, bewegen Sie das Rad einfach.
Vorsicht: Es kann den Sensor stören, wenn Ihre Arbeitsoberfläche rot,
transparent oder sehr reflektierend ist, wie ein Spiegel. Sollte dies passie-
ren, verwenden Sie ein Mauspad oder verwenden Sie Ihre Maus auf einer
anderen Arbeitsoberfläche.
Problemlösung
Maus funktioniert nach Installation nicht.
Versuchen Sie es mit diesen Vorgehensweisen:
• Stellen Sie sicher, dass Sie die Maus korrekt installiert haben.
• Stellen Sie sicher, dass das Kabel in den richtigen Maus- oder USB-An-
schluss eingesteckt ist.
• Stecken Sie die Maus aus und dann wieder ein. Stellen Sie sicher, dass das
Betriebssystem die Maus korrekt erkannt hat.
• Stellen Sie sicher, dass Ihr Mausanschluss korrekt konfiguriert ist. Schauen
Sie hierzu im Benutzerhandbuch Ihres Computers nach.

9
Haftungsausschluss
Die Information in diesem Dokument kann ohne Vorwarnung geändert
werden. Der Hersteller übernimmt keine Verantwortung oder Gewähr (we-
der implizit noch explizit) in Bezug auf die Genauigkeit und Vollständigkeit
und kann in keinem Fall für irgendeine Art von entgangenem Gewinn oder
gewerblichem Schaden, inklusive Schäden spezieller, zufälliger, als Fol-
ge von oder einer sonstigen Schadensart haftbar gemacht werden. Kein
Teil dieses Dokuments darf in irgendeiner Form, weder elektronisch noch
mechanisch reproduziert oder übertragen werden, auch nicht durch Foto-
kopie, Aufnahme oder Informationsaufzeichnung, ohne die ausdrückliche
schriftliche Erlaubnis des Herstellers.
Kundendienst:
Sollten Sie Probleme im Umgang mit dem Stream haben, dann setzen Sie
sich mit Ihrem örtlichen Händler oder Distributor in Verbindung. Ansonsten
können Sie uns unter [email protected] kontaktieren
2 Jahre Garantie. Sie finden den vollständigen Text zu unseren Garantiebe-
dingungen im Internet: www.dicota.com.
Alle in diesem Dokument erwähnten Produkte und Software sind registrierte
Marken und gehören dem jeweiligen Markeninhaber. Fehler vorbehalten.
N1879
Dieses Symbol (durchgestrichene Mülltonne nach WEEE An-
hang IV) weist auf die getrennte Rücknahme elektrischer und
elektronischer Geräte in EU Ländern hin. Bitte werfen Sie das
Gerät nicht in den Hausmüll. Informieren Sie sich über das in
Ihrem Land gültige Rücknahmesystem und nutzen dieses zur
Entsorgung.

10
Ne PAS diriger le faisceau laser vers les yeux richten!
ATTENTION:
Nous vous invitons à lire le manuel d’utilisation de votre souris,
afin d’en assurer le bon usage.
Veuillez respecter les avertissements et consignes de sécurité suivants
pour éviter tout accident:
1.)
Ne jamais diriger le faisceau du laser de la classe 1 vers les yeux, ni
regarder à l’intérieur de l’ouverture. Cela pourrait s’avérer dangereux et
provoquer des troubles immédiats et temporaires de la vue !
2.) Ne jamais diriger le laser de la classe 1 vers des surfaces réfléchissan-
tes, telles que des miroirs !
3.)
Ne jamais diriger le laser de la classe 1 vers une personne ou un animal!
4.) Le laser de la classe 1 n’est pas un jouet. Veuillez le conserver dans un
endroit hors de portée des enfants !
Votre souris fait appel à une technologie de pointe – avec son module laser invi-
sible, qui remplace le senseur optique conventionnel et qui dispose d’aptitudes
à la lecture étonnantes. Le module laser invisible procède à 30 détections avec
une précision équivalente à celle d’un senseur optique LED. Vous pouvez utili-
ser votre souris de façon optimale sur la plupart des surfaces.
français
Tabla de contenidos
Idiomas:
Otros manuales de Ratón de Dicota

Dicota
Dicota BlueStar Manual de usuario

Dicota
Dicota Store Manual de usuario

Dicota
Dicota Stow Manual de usuario

Dicota
Dicota Hover Manual de usuario

Dicota
Dicota Vent Manual de usuario

Dicota
Dicota Optical Mouse Manual de usuario

Dicota
Dicota BlueLight Manual de usuario

Dicota
Dicota Phasor Manual de usuario

Dicota
Dicota Optical USB Notebook Mouse Manual de usuario


