DATA FROM SKY TrafficDrone Manual de usuario

TrafficDrone: How to start
A step by step guide to your real-time monitoring drone

TrafficDrone: How to start page 1
TrafficDrone: How to start
A step by step guide to your real-time monitoring drone
Thank you for purchasing the TrafficDrone unit and joining the FLOW family of next-gen
traffic analytic intelligence! You have purchased the most powerful and versatile traffic AI
available – it is waiting in the box to be unleashed by your creativity.
We wish you an exciting journey towards a smoother and safer traffic of tomorrow. Let
the traffic FLOW.
On behalf of the whole DataFromSky team
David Herman, CEO

page 2 TrafficDrone: How to start
Contents
Contents 2
Unboxing 3
TrafficDrone video processing unit 4
Powering TrafficDroneUnit 5
Attaching the power cord 5
Detaching the power cord 6
Interfacing TrafficDroneUnit 6
Video input 6
Video output 7
General purpose interfaces 7
Configurations 7
Quick start guide 10
Frame grabber analytics 12
Knowledge base 14
File streamer analytics 15
Optional RTSP stream 16
Remote access 17
Integration 19
Remote support 19
Camera framing 20
Specifications 21
DataFromSky contact information 22

TrafficDrone: How to start page 3
Unboxing
First things first - let’s check all the bits and pieces that landed on your table. Depending
on the selected configuration, you should be able to find the following:
● TrafficDrone processing unit
● How To Start guide
● Wireless keyboard
● Wireless mouse
● Touchscreen 15.6” complete with accessories and cables
● Carrying case for the touchscreen and cables
Optional accessories
● DJI M210 V2 drone complete with accessories and manuals
● Elistair Ligh-T V4 tethering system complete with accessories and manuals
Cabling
● Power cable with powerCON NAC3FCA terminal
● Spare powerCON NAC3FCA terminal for custom power cable assembly
● Ethernet cable RJ45 with etherCON NE8MC6-MO terminal
● HDMI video input cable
● SDI video input cable

page 4 TrafficDrone: How to start
TrafficDrone video processing unit
The TrafficDrone unit is basically a powerful AI inferencing computer in a rugged Pelican
case enclosure. The unit is intended to be directly connected to an UAV ground station.
This way it can extract insights based on video stream from the aerial vehicle in real-time,
on the spot.
Data outputs
Handle
Data inputs
Cooling air inlets
Power input
Power switch, on/off, reset
USB-C Thunderbolt cable
USB ports
Accessories
Mouse
Keyboard
Cables
TrafficDrone: How to start page 5
Powering TrafficDroneUnit
The unit is powered by a single 100-230V AC input. The power source shall be capable of
delivering 11 A @ 100 V or 5.5 A @ 240 V.
Under typical operating conditions the unit consumes approximately 450W of power.
It can be supported by mains electricity, a portable generator or a battery power station.
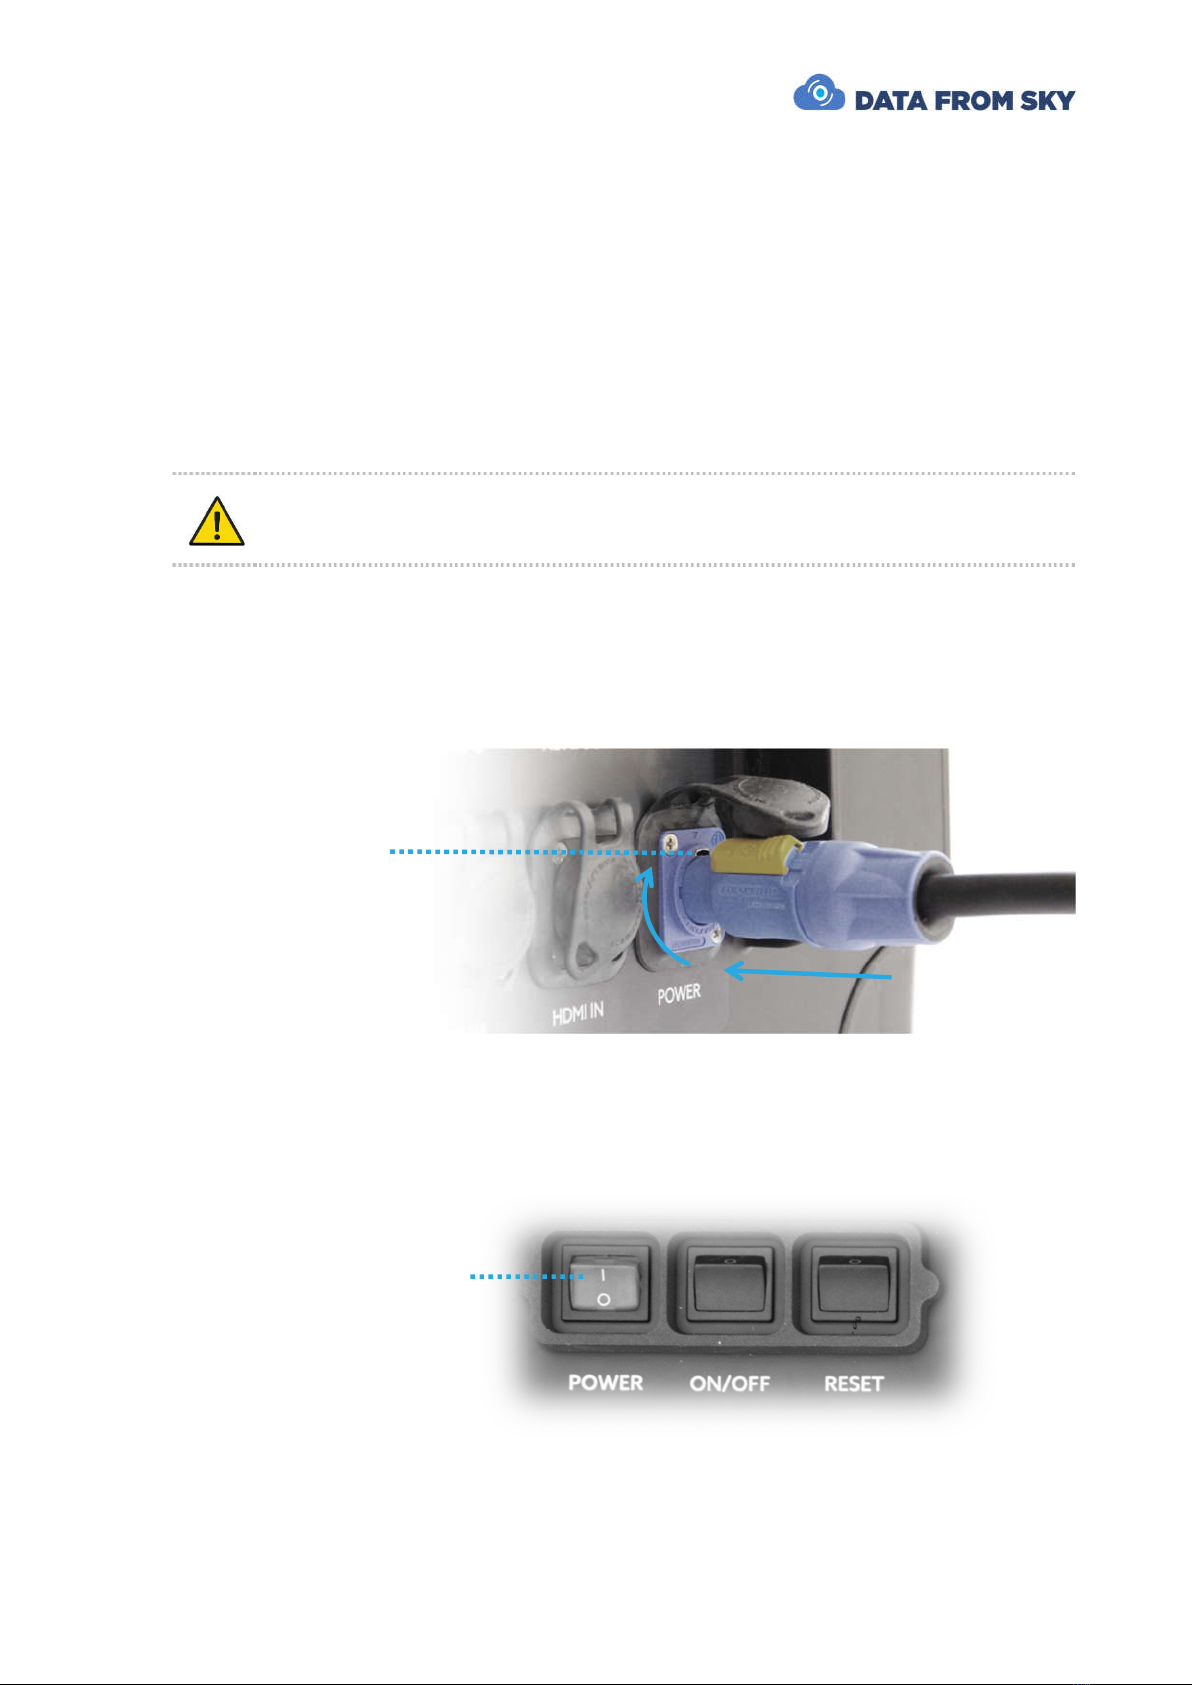
Attaching the power cord
Prior connecting power cable please make sure the main power switch is
turned off
The power port features a lockable powerCON terminal for durable and reliable
connection. To connect the power cable, insert the powerCON plug into the receptacle
placed on back side of the Unit and turn it clockwise until the security latch clicks into its
place.
Check that the connection is secure by trying to turn the plug. The connector must not
allow any movement or detachment.
Once the power cable is secured and plugged into a power source, turn on the main power
switch on the Unit.
1. Plug in
2. Turn clockwise
3. Click
Main power switch

page 6 TrafficDrone: How to start
Detaching the power cord
Turn off the main power switch on the unit. Disconnect the power cord from the power
source. Then unlock the yellow security latch and turn the powerCON plug counter-
clockwise. You are now free to remove the terminal from the receptacle.
Interfacing TrafficDroneUnit
Video input
Apart from power, the TrafficDroneUnit requires only a video signal for successful
operation. The signal can be provided by any of these interfaces:
- HDMI Input
- SDI Input
- Network RTSP stream
The HDMI and SDI inputs are designed to be connected directly to the UAV ground station
video output. All standard resolutions and formats are supported. However, for best
results, FullHD 1080p30 format is recommended.
The video signal should not include any overlays, composition lines etc. Clean video is
desired for best results.
Should overlay-free signal not be available, the affected areas can be omitted by means
of “Region of interest – image cropping” function present in FLOW Insights analytics
settings.
3. Remove
2. Turn anti-clockwise
1. Pull the latch

TrafficDrone: How to start page 7
Video output
The TrafficDroneUnit features three video outputs that can be used for monitoring of the
unit:
- 2x HDMI output on the rear panel
- 1x USB-C Thunderbolt cable inside the case
General purpose interfaces
The TrafficDroneUnit features four USB interfaces that can be used for connecting
external storage devices, memory card readers or other peripherals
- 2x USB-C
- 2x USB-A
A Gigabit Ethernet interface is available:
- 1x RJ-45 capable of receiving standard RJ45 connectors. The original etherCON
enclosure provides additional shielding and mechanical protection.
Configurations
The TrafficDrone Unit is designed to be extremely versatile. It can be deployed in a
number of scenarios and configurations. Here are a few typical setups:
1. Remote operation
- The unit is closed
- Only power cord, video input and network (either wired or wireless) are
connected
- The unit is controlled remotely by a FLOW Insights application running on a
different computer. FLOW Insights for Windows can be downloaded here:
http://www.datafromsky.com/download/flow/demokit/FLOW_Demokit.exe
2. Stand-alone configuration with external monitor
- The unit is closed
- Network connection is not required
- External monitor is connected to one of the HDMI outputs on the back side of
the unit
- The unit is controlled by wireless keyboard and mouse. Alternatively, touch
interface can be utilized.

page 8 TrafficDrone: How to start
3. Stand-alone configuration with internal monitor
- The unit is opened
- Network connection is not required
- Monitor is connected to the internal Thunderbolt port. Monitor is fixed in place
by magnetic holder
- The unit is controlled by wireless keyboard and mouse. Alternatively, touch
interface can be utilized. Magnetic holder is available for the keyboard.
HDMI to Mini HDMI
USB-A to USB-C
Touchscreen
Wireless keyboard
USB-C Thunderbolt
Touchscreen
Wireless keyboard

TrafficDrone: How to start page 9
A typical setup for tether-supported persistent surveillance use case is depicted on the
following figure:
Tabla de contenidos


 Manual de usuario")


