CUBO CB1-0-01 Manual de usuario

Model:CB1-0-01
CUBO
INSTRUCTION MANUAL
Read this instruction manual carefully before operating this machine!


IMPORTANT SAFEGUARDS
When using electrical appliances, basic safety precautions should always be followed
including the following:
a ) Read all instructions.
b ) To protect against risk of electrical shock do not put in water or other liquid.
c ) This appliance is not intended for use by persons (including children) with reduced physical,
sensory, or mental capabilities, or lack of experience and knowledge, unless they are closely
supervised and instructed concerning use of the appliance by a person responsible for their
safety. Close supervision is necessary when any appliance is used by or near children. Children
should be supervised to ensure that they do not play with the appliance.
d ) Unplug from outlet and remove all parts such as podbin and water tank before cleaning.
Flashing light indicates either the machine is with top lid open and ready to operate or some parts
of the machine are not attached.
e ) Avoid contacting moving parts.
f ) Do not operate any appliance with a damaged cord or plug or after the appliance
malfunctions, or is dropped or damaged in any manner. Contact us through our customer service
telephone number +1 (844) ONECUBO for information on examination, repair, or adjustment.
g ) The use of attachments not recommended or sold by the manufacturer may cause fire,
electric shock or injury.
h ) Do not use outdoors.
i ) Do not let cord hang over edge of table or counter.
j ) Keep hands and utensils out of container while working to reduce the risk of severe injury
to persons or damage to the machine. A scraper may be used but must be used only when the
machine is not working.
k ) Blades are sharp. Handle carefully.
l ) Always operate machine with cover in place.
m ) Do not touch hot surfaces. Use handles or knobs.
n ) Do not place on or near a hot gas or electric burner, or in a heated oven.
o ) Always attach plug to appliance first, then plug cord into the wall outlet. To disconnect, turn
any control to off, then remove plug from wall outlet.
p ) Do not use appliance for other than intended use.
FCC ID Warning
Warning: Changes or modifications to this unit not expressly approved by the party responsible
for compliance could void the user’s authority to operate the equipment.
Note: This equipment has been tested and found to comply with the limits for a Class B digital
device, pursuant to part 15 of the FCC Rules. These limits are designed to provide reasonable
protection against harmful interference in a residential installation. This equipment generates, uses
and can radiate radio frequency energy and, if not installed and used in accordance with the
instructions, may cause harmful interference to radio communications. However, there is no
guarantee that interference will not occur in a particular installation. If this equipment does cause
harmful interference to radio or television reception, which can be determined by turning the
equipment off and on, the user is encouraged to try to correct the interference by one or more of the
following measures:
- Reorient or relocate the receiving antenna.
- Increase the separation between the equipment and receiver.
- Connect the equipment into an outlet on a circuit different from that to which the receiver is connected.
- Consult the dealer or an experienced radio/TV technician for help.

Déclaration d’IC sur l’exposition aux radiations:
Cet équipement est conforme aux limites d’exposition aux radiations définies par le Canada pour
des environnements non contrôlés.
Cet émetteur ne doit pas être installé au même endroit ni utilisé avec une autre antenne ou un
autre émetteur.
This device contains licence-exempt transmitter(s)/receiver(s) that comply with Innovation,
Science and Economic Development Canada’s licence-exempt RSS(s).
Operation is subject to the following two conditions:
(1) This device may not cause interference.
(2) This device must accept any interference, including interference that may cause
undesired operation of the device.
IC Radiation Exposure Statement:
This equipment complies with Canada radiation exposure limits set forth for uncontrolled
environments.This transmitter must not be co-located or operating in conjunction with any other
antenna or transmitter.
L’émetteur/récepteur exempt de licence contenu dans le présent appareil est conforme aux CNR
d’Innovation, Sciences et Développement économique Canada applicables aux appareils radio
exempts de licence. L’exploitation est autorisée aux deux conditions suivantes:
1) L’appareil ne doit pas produire de brouillage;
2) L’appareil doit accepter tout brouillage radioélectrique subi, même si le brouillage est susceptible
d’en compromettre le fonctionnement.

Content
PRODUCT OVERVIEW .......................................................................... 1
OPERATING INSTRUCTIONS .............................................................. 1
1. Before use ...................................................................................... 1
2. First time cleaning ........................................................................ 2
3. Variations and adjustments ........................................................ 3
4. Auto cleaning .................................................................................. 4
CUBOPODS ........................................................................................... 4
1. Storing CUBOPODS .................................................................... 4
2. Using CUBOPODS ........................................................................ 4
SETTINGS MENU .................................................................................. 4
1. Order CUBOPODS ....................................................................... 5
2. Cleaning options menu .............................................................. 5
CLEANING .............................................................................................. 5
1. Quick flush ...................................................................................... 5
2. Detergent cleaning ....................................................................... 5
3. Deep cleaning .................................................................................. 6
4. Descaling ........................................................................................... 6
FUNCTIONAL INFORMATION ............................................................. 8
1. CUBOPOD reading ....................................................................... 8
2. Sleep and Low power ................................................................... 8
3. Removable parts ............................................................................. 8
4. LEDs ..................................................................................................... 9
WARNING SCREENS ........................................................................... 9
1. Water Tank warnings ................................................................... 9
2. Podbin warnings ............................................................................ 10
3. Spout warning ................................................................................ 11

ERROR SCREENS .................................................................................... 11
1. CUBOPOD errors .......................................................................... 11
2. Crushing errors .............................................................................. 11
3. Preparation error ............................................................................ 12
4. Power-on exception ...................................................................... 12
5. System errors ................................................................................... 13
TROUBLESHOOTING ............................................................................. 15
TECHNICAL PARAMETERS AND COMPLIANCE ............................... 15
LIMITED WARRANTY............................................................................... 16

>> PRODUCT OVERVIEW
>> OPERATING INSTRUCTIONS
1. Before use
Connect power cable. Make sure the water tank is
properly seated.
Fill the water tank up to the
MAX indication.
Check if the tank level magnet
can freely move inside the rail.
Make sure the spout is properly
placed and latched.
Place magnetic podbin
beneath the machine body.
LID
LED
WATER TANK
POWER ON
SWITCH
(behind)
WATER TANK LID
TANK LEVEL
MAGNET
DRIPTRAY
AND DRIPGRID
PODBIN
SPOUT
DISPLAY
(Add water without
removing lid)
1

Close the lid making sure no
CUBOPOD is inserted.
Switch On.
When you turn on the machine for the first time, after the welcome screen
appears, you will be asked to watch a brief presentation. Touch WATCH NOW
or MAYBE LATER to skip.
After first-time cleaning cycle, and every time the machine is turned on, the
homescreen indicates it is ready to prepare a beverage.
The SHOW ME button will display a brief demonstration.
On any animation screen, if you touch LINK, a QR Code will appear linking
you to online help resources. All SHOW ME buttons direct to a brief
demonstration.
At the first time, it is mandatory to do a self-cleaning cycle.
Touch CLEAN to get started.
2. First time cleaning
Beverage preparation
2

After reading the CUBOPOD, machine will display the START screen:
It is possible, for most drinks, to add a personal touch by changing the temperature and dilution.
▪ Dilution selection.
Touch DILUTION and the icon will change indicating the current selection:
Less water – concentrated
Recommended water amount – standard
More water – diluted
Icy – colder than standard temperature
Cold – standard temperature for cold serving
Cool – mildly cold
▪ Cold beverage selection.
If you touch COLD button in a cold beverage preparation, the icon will change indicating the current
temperature selection:
The amount of water added on each selection is predetermined in order to ensure the optimal taste.
Some CUBOPODS have fewer options, and others do not allow changes. In this case,
the icon and button will not be displayed.
Touch START to begin preparation.
Open lid. Close lid.Insert frozen CUBOPOD. Extend tray and place a cup.
3. Variations and adjustments
3
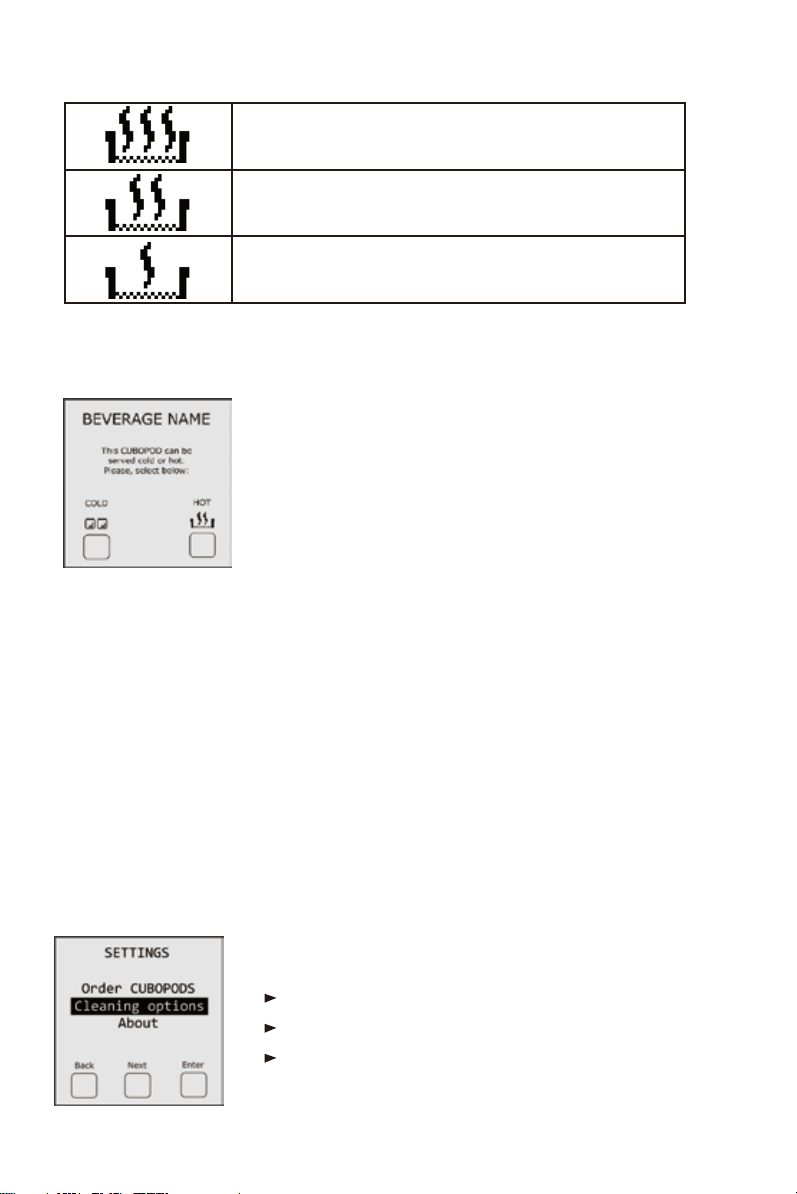
Hotter – hotter than standard temperature
Hot – standard temperature for hot serving
Warm – mildly hot serving
▪ Hot beverage selection.
If you touch HOT button in a hot beverage preparation, the icon will change indicating the current
temperature selection:
The temperature of each selection is predetermined. Some CUBOPODS have fewer options and others do
not allow changes. In this case, the icon and button will not be displayed.
SETTINGS MENU
EXIT button takes you back to home screen.
NEXT button moves selection bar to next option.
ENTER button confirms selected option.
4. Auto cleaning:
▪ Cold or Hot serving selection.
Some CUBOPODS can be enjoyed cold or hot. Choose before preparation.
NOTE: in all menus, the selected option is displayed with a dark background.
After selecting your preference, the START screen is displayed.
After every preparation, the machine will perform a self-cleaning cycle, ensuring it is always neat
and ready for a new CUBO. You may enjoy your beverage while the machine takes care of itself.
1. Storing CUBOPODS
CUBOPODS must be kept in the freezer. The best storage condition is 0°F (-18°C).
2.Using CUBOPODS
To guarantee quality, insert the frozen CUBOPOD within 5 minutes from removing from freezer. If a CUBOPOD
stays more than 5 minutes out but is still solid, it should be put back in the freezer to become usable again.
IMPORTANT: Once thawed, the CUBOPODS cannot be used, and should be discarded.
At the homescreen, if you press the Config button (center) you will access the SETTINGS MENU:
>> SETTINGS MENU
>> CUBOPODS
4
Tabla de contenidos
Manuales populares de Sistema de elaboración de cerveza de otras marcas


Curtis
Curtis ThermoPro G4 Series Manual de usuario

Animo
Animo ComBi CB5 Manual de usuario

MoreBeer
MoreBeer BrewSculpture Manual de usuario

Keurig Hot
Keurig Hot Commercial Series Manual de usuario

Keg King
Keg King KEGMASTER XL Manual de usuario

Blichmann Engineering
Blichmann Engineering BrewEasy Compact TC Instrucciones de instalación