Clipcomm CP-100 Manual de usuario

1
1. CP-100/100D FEATURES.............................................................................................................................. 2
2. PARTS CHECKLIST....................................................................................................................................... 3
3. INSTALLATION ............................................................................................................................................... 4
4. CONTROLS AND FUNCTIONALITIES....................................................................................................... 6
5. PHONE CONFIGURATION............................................................................................................................ 8
6. MAKING / RECEIVING PHONE CALLS ................................................................................................... 22
7. ADDITIONAL FUNCTIONS ......................................................................................................................... 23
8. WIRELESS-LAN EXTENSION.................................................................................................................... 29
9. FIRMWARE UPGRADE ............................................................................................................................... 30
10. CHARACTER INPUT USING KEYPAD................................................................................................... 32
Contents

2
1. CP-100/100D Features
zStand-alone H.323/SIP-based VoIP phone.
zEasy menu system with 16*2 character LCD and keypad.
zApplicable for private Internet line, ADSL (by PPPoE) and Cable Modem (by DHCP).
zOperable as a switching hub in a 2 IP environment.(CP-100D only)
zAutomatic Answering Machine function.
zTwo-way speakerphone function.
zUser configurable ringer melodies.
zPhonebook editing and speed dialing.
zWorks as a wireless LAN access point or station when a wireless LAN PCMCIA card is
inserted.
1. CP-100/100D Features
3
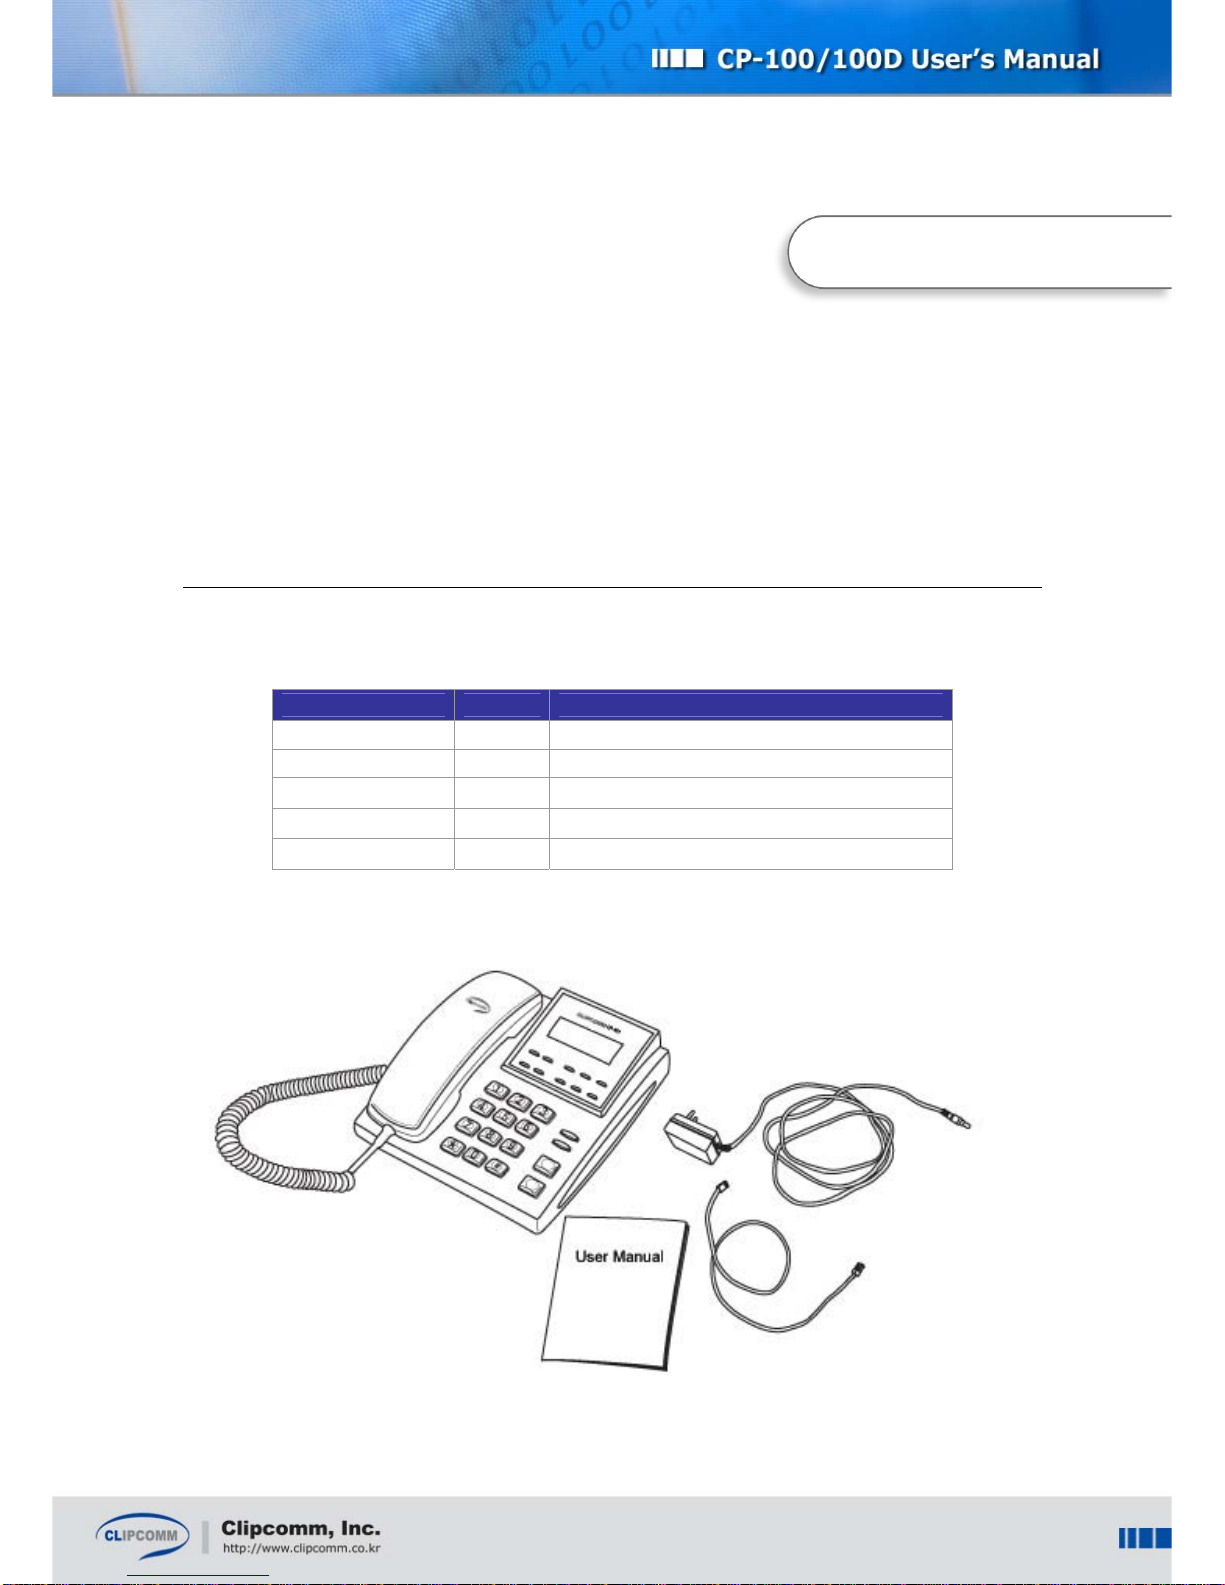
2. Parts Checklist
Please check to ensure that you have all the following components in the package:
Item Quantity Usage
CP-100/100D 1 CP-100/100D Main Body
User Manual 1 This user manual
Handset 1 CP-100/100D Handset
Power Adaptor 1 DC 12V power supply
LAN Cable 1 RJ45 LAN cable for network access
2. Parts Checklist
4
3. Installation
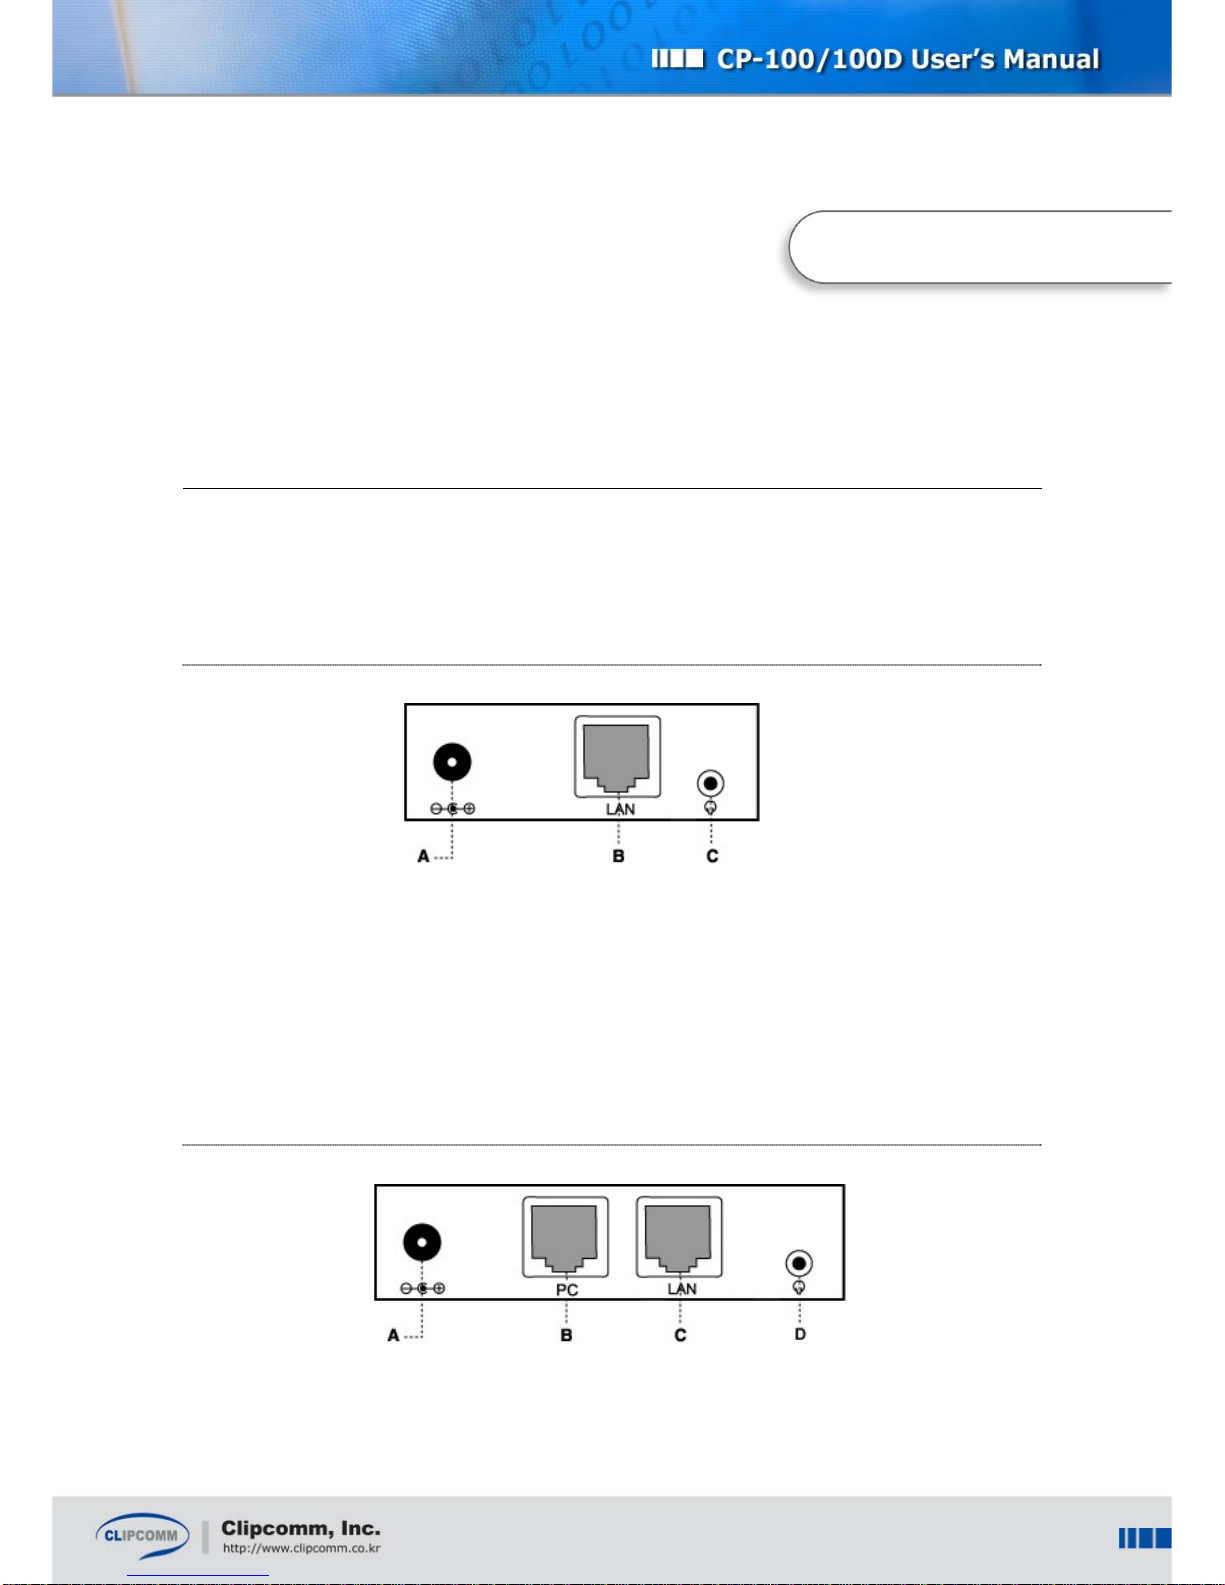
Check the location of each port and follow the below instruction to install your CP-100/100D correctly.
3.1. CP-100
① Connect handset to your CP-100 body.
② Connect UTP cable linked with ADSL/cable modem/hub to the ‘LAN’ port at the rear panel of your
CP-100/100D. (Figure’s “B”)
③ Connect the supplied power adapter (12V DC) to the power input jack. (Figure’s “A”)
④ Connect the wired headset. (Figure’s “C”)
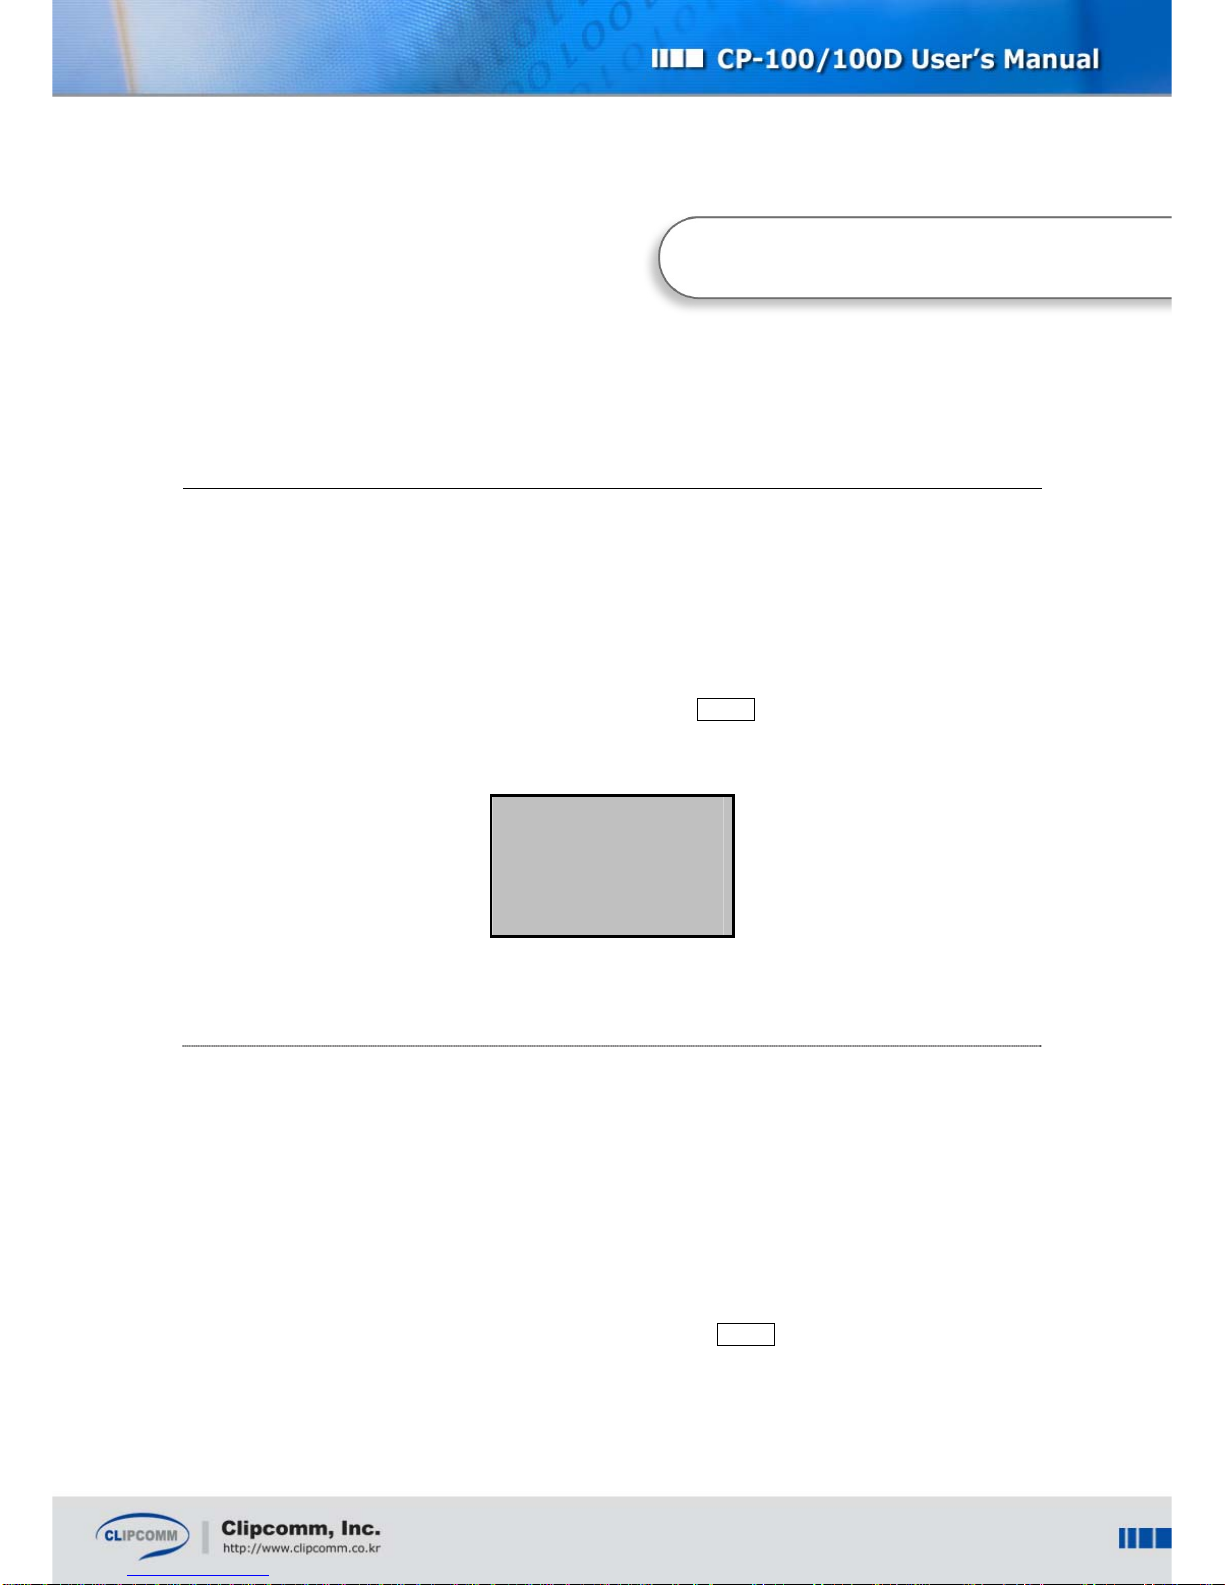
3.2. CP-100D
① Connect handset to your CP-100D body.
② Connect UTP cable linked with ADSL/cable modem/hub to the ‘LAN’ port at the rear panel of your
3. Installation

5
CP-100/100D. (Figure’s “C”)
③ Connect the supplied power adapter (12V DC) to the power input jack. (Figure’s “A”)
④ Connect the LAN cable from PC’s LAN port to the ‘PC’ port to use NAT. (Figure’s “B”)
⑤ Connect the wired headset. (Figure’s “D”)
³Caution: Please be sure to use only the supplied AC power adapter. Otherwise, proper
function of your CP-100/100D is not guaranteed.

6
4. Controls and Functionalities
4. Controls and Functionalities

7
Controls Functionality
Handset ♦Used for normal telephone functionality.
LCD display ♦Displays system status and user information.
START ♦Restarts network access viaADSL, DHCP, Static IP mode.
MUTE ♦Deactivates your handset microphone.
MENU
♦Initial state: activates main menu.
♦Character input state: changes input mode
(upper case/ lower case/ numeric/ symbolic).
♦Phonebook lookup state: displays edit menu.
♦Message check state: plays previous message.
CLEAR
♦Character input state : same as backspace
♦Phonebook delete menu : deletes phonebook.
♦Message check state : deletes current message and plays the
next message.
♦All the other states : activates previous level menu.
ENTER ♦Activates inverted menu item.
♦Confirms input of character string or numeric constants.
♦Message check state: plays next message
TRF/FLASH ♦Initiates call transfer.
♦While you are dialing, you can re-dial using this button.
HOLD ♦Holds current call and transmits hold signal to the held peer.
VOL(▲▼)
♦During conversation: adjusts receiver volume.
♦In ringer setting menu: adjusts ringer volume.
♦During other menu manipulation: navigates among menu
items.
Button
Part A
END ♦Returns to main menu.
♦During conversation: finishes call session.
AutoAnswer ♦Toggles auto answer mode. If auto answer mode is enabled,
its LED is ON.
Message ♦Plays received voice messages. If new message(s) arrived, its
LED flashes.
VoIP ♦If VoIP call is valid, its LED is ON. If registration is failed or
VoIP call is invalid, its LED flashes.
SPEAKER ♦Activates speaker phone mode.
Button
Part B
SEND ♦Makes an outgoing call after phone number input.
Dial buttons ♦Used for phone number or character input.
♦Also used for direct selection of menu item.
8
5. Phone Configuration
After installation, you need to configure your CP-100/100D according to your environment. You can
configure your CP-100/100D by either the LCD menu or internal Web interface. From now on, LCD
and keypad based configuration method is going to be explained. For Web based configuration,
please refer to section 5.6 “Internal Web Interface.”
To begin phone configuration using LCD and keypad, select MENU button Æ“3:Phone Mgmnt” then,
phone configuration sub-menu appears as follows:
1: Set Network
2: Set VoIP
3: Call Forward
4: Wireless LAN
5: Change Pwd
5.1. Network Configuration
To use your CP-100/100D IP Phone functionality, you need to subscribe for an Internet access line
from your local ISP (Internet Service Provider). It could be leased line, ADSL or Cable modem. If your
CP-100/100D is directly connected to an external ADSL modem, you need to configure your system to
use ADSL. If your CP-100/100D is directly connected to a Cable modem or receives IP address
configuration from a DHCP server in your local network, you need to configure your system to use
DHCP. Otherwise, you need to configure your CP-100/100D with static IP address information.
To begin network configuration using LCD and keypad, select MENU button Æ“3:Phone Mgmnt” Æ
“1:Set Network” then, network configuration sub-menu appears as follows:
5. Phone Confi
g
uration
9
1: Current Info
2: Change Config
5.1.1. Static IP Setting
① Select MENU Æ“3: Phone Mgmnt”Æ“1: Set Network” Æ“2:Change Config”.
1: Static IP
2: DHCP
3: ADSL
② Select “1:Static IP”, if you want to configure your CP-100/100D in static IP environment.
③ Select “1:IP Address” and enter required IP address using keypad. To confirm or cancel your input,
press ENTER or END button. You can enter dots (“.”) in the IP address using # button.
IP address
211.12.23.34_
④ Gateway, DNS, and Netmask addresses can be set by the same procedure.
⑤ Updated static IP configuration will take effect only after restarting the system. You can restart
your system with the new configuration simply by power cycling or selecting “5:Restart Network”
and press ENTER at static IP sub menu.
5.1.2. Dynamic IP (DHCP) Setting
① Select MENU Æ“3: Phone Mgmnt”Æ“1: Set Network” Æ“2:Change Config”.
1: Static IP
2: DHCP
3: ADSL
② Select “2: DHCP ” if you want to configure your CP-100/100D in DHCP environment.
Use DHCP mode?
Yes[ * ] No[ ]
Este manual sirve para los siguientes modelos
1
Tabla de contenidos
Otros manuales de Teléfono IP de Clipcomm


