Chris Coffee Service Silvano Manual de usuario

Silvano
PID Controlled
Espresso Machine
by
Made In Italy
Owner’s Manual

Silvano Espresso Machine
1
Diagrams .................................................................................................................................. 2
Introduction .............................................................................................................................. 3
First Time Set Up ..................................................................................................................... 3
Before Each Use ...................................................................................................................... 5
Normal Operation .................................................................................................................... 5
Gauge ....................................................................................................................................... 5
Lights ........................................................................................................................................ 5
Switches ................................................................................................................................... 6
Pump......................................................................................................................................... 6
Water Reservoir ....................................................................................................................... 7
Drip Tray ................................................................................................................................... 7
Accessories ............................................................................................................................. 7
PID Controller .......................................................................................................................... 8
Changing Brew Temperature .................................................................................................. 8
PID Controller Advanced Settings ......................................................................................... 9
Brewing Espresso ................................................................................................................. 10
Quantity of ground coffee ..................................................................................................... 10
Tamping .................................................................................................................................. 10
The grind ................................................................................................................................ 10
Consistency ........................................................................................................................... 10
Cleaning Tip ........................................................................................................................... 10
Steaming Milk - Basics .......................................................................................................... 11
Milk.......................................................................................................................................... 11
Temperature ........................................................................................................................... 11
Frothing Pitcher ..................................................................................................................... 11
Amount of Milk ....................................................................................................................... 11
Stretching the milk ................................................................................................................ 11
Texturizing the milk ............................................................................................................... 11
Steaming Milk – Technique ................................................................................................... 12
Steaming Milk - Tips .............................................................................................................. 13
Maintenance ........................................................................................................................... 13
Backflushing .......................................................................................................................... 13
Plain water backflushing ....................................................................................................... 13
Backflushing with espresso machine cleaner .................................................................... 14
Setting Pump (Brew) Pressure ............................................................................................. 14
Setting Pump Pressure On Older Models ............................................................................ 14
Group Gasket Replacement .................................................................................................. 15
Shower Screen Removal ....................................................................................................... 15
Descaling ................................................................................................................................ 16
Troubleshooting .................................................................................................................... 16
No Steam From Steam Wand ................................................................................................ 16
Not Heating ............................................................................................................................ 17
Espresso Coming Out Too Slow Or Not At All .................................................................... 18
Espresso Coming Out Too Fast ........................................................................................... 18
Warranty ................................................................................................................................. 19
We Are Here To Help ............................................................................................................. 19

Silvano Espresso Machine
2
Diagrams
1. PID Controller
2. Pump (Brew) Pressure Gauge
3. Grouphead
4. Portafilter
5. Drip Tray
6. Cup Warming Tray
7. Water Reservoir
8. Steam Wand
9. Steam Tip
10. 3 Position Power Switch
0 – Off
1 – Fill Mode (Coffee Boiler Off)
2 – Heating/Normal Operation Mode
11. Brew Switch
12. Steam Switch
13. Power Indicator Light
14. Coffee Boiler Heating Light
15. Steam Bank Heating Light
16. Steam Bank Power Switch
17. Power Cord Receptacle
18. Double Portafilter
19. Cleaning Brush
20. Backflush Disc
21. Single Insert Basket
22. Coffee Tamper/Scoop

Silvano Espresso Machine
3
Introduction
First of all, thank you for your business! You are going to love your new Silvano espresso
machine. It combines classic beauty, value, and the latest PID technology to provide great
performance for making the best espressos, cappuccinos, and lattes you‟ve ever tasted!
These instructions include tips that will help bring out the Barista that‟s hidden within!
First Time Set Up
Warning: It is very important to follow the first time set up procedure below or damage
to the coffee boiler heater will occur which will not be covered under warranty.
Before using your machine, test your water for hardness using the provided test
strips. Fill a glass with cold tap water; dip the tip of the test strip into the water for
one second, then pull the strip out of the water and hold it horizontally for fifteen
seconds. After fifteen seconds, compare the color of the strip to the chart on the
side of the package to determine how many grains of hardness is in your tap water.
Three grains or less of hardness is acceptable to be used in the machine.
Note: Should your water‟s hardness level exceed three grains, then it is strongly recommended to
use a different source of water that has been tested for hardness. Some bottled water can be
extremely hard and should always be tested before using. Using a Brita or PUR style pitcher or faucet
filter does NOT remove any hardness from the water and should only be used in the machine if your
water source is under 3 grains of hardness. Using hard water in the machine will affect its
performance and may cause damage to the machine which is not covered under warranty.
Remove the water reservoir from the machine and
rinse thoroughly before use. Fill the reservoir with
cold soft water being careful not to overfill.
Return the reservoir to the machine and slowly push
it in to avoid splashing water into the machine.
Be sure that the long tubes shown in the picture to the
right are at the bottom of the reservoir and they are not
kinked.
The short tubes should hang into the reservoir
as shown and will discharge a small amount of water
whenever one of the pumps are engaged.

Silvano Espresso Machine
4
First Time Set Up, Continued
Before plugging the machine in be sure that all three of the switches on the front of
the machine are in the off position.
Machines with the 3 way power switch, LEFT is the off position for the brew and steam switch.
Machines with a standard on/off switch, RIGHT is the off position for the brew and steam switch.
Plug the power cord into the receptacle in the back left of the machine and then plug
the other end into a grounded 3 prong 110V outlet. Do not plug the machine into an
extension cord or adaptor. The use of a GFI outlet is strongly recommended. The
machine may be placed on a timer as long as it is rated for 110V 15A and is 3 prong
and grounded.
Turn the power switch to the “1” position and then activate the brew switch to fill the
boiler. For older machines with a standard on/off switch, turn the power switch to the
on position and then Immediately activate the brew switch to start filling the boiler.
The pump will turn on to start filling the coffee boiler and water will start coming out
of the grouphead. Keep the brew switch on for an additional 15 seconds after water
starts coming out of the grouphead to assure that the boiler is completely filled and
then turn off the brew switch.
After filling the boiler turn the power switch to the “2” position to start heating.
Lock the portafilter into the group head with either the single or double basket
installed, whichever you intend to use.
The coffee boiler heating light will illuminate and the temperature on the PID display
should start rising.
The coffee boiler should get up to temperature in about 5 minutes, but it is
recommended that the machine be heated for at least 15 minutes for better
temperature stability.
If you plan on steaming milk then turn on the steam bank power switch in the back
left of the machine. The steam bank should be ready to use in less than 5 minutes.
The steam bank can be turned on and off independently from the coffee boiler to
conserve energy if you do not plan on steaming milk.
It is advised to always keep the portafilter in the grouphead and your espresso cups
on the top cup warming tray. An espresso shot is very small so if any part is cold it
will greatly affect the quality of the shot and can make it taste sour.
You are now ready to start pulling some shots!

Silvano Espresso Machine
5
Before Each Use
Verify the steam and brew switch are in the off position.
Fill the reservoir with cold softened water.
Place the portafilter into the grouphead and then turn the power switch to the “2”
position.
Let the machine warm up for at least 15 minutes for optimal performance.
Normal Operation
Gauge
The gauge is for your pump (brew) pressure. When sitting idle the gauge is reading
trapped pressure and may vary. To get an accurate pump pressure reading, install
the backflush disc in the portafilter and lock it into the grouphead and raise the brew
lever. After a few seconds the pressure should rise to about 9-10 bar. When you
make espresso the pressure will be slightly less which is normal. This can be helpful
in setting your grind. If your pressure is 9-10 bar with the backflush disc, but when
you make espresso it is less than 8 bar then you need to go finer with your grind
which will create more resistance to raise the pressure. Should you need to adjust
the pump pressure please refer to the maintenance section of the owner‟s manual.
Lights
On the front of the machine there are 3 indicator lights. The green power light on the
top will illuminate when the main power switch is on.
The amber coffee boiler heating light in the middle will illuminate whenever the
coffee boiler is heating. The light will cycle on and off to maintain the temperature in
the coffee boiler.
The amber steam bank heating light on the bottom will illuminate whenever the
steam bank is heating. The light will cycle on an off to maintain temperature in the
steam bank. The steam bank power switch on the back of the machine must be in
the on position for it to function.

Silvano Espresso Machine
6
Switches
There are 3 switches on the front of the machine. The top switch is the main power
switch. When the power switch is on, the green power indicator light will illuminate.
There are 3 positions for the power switch. 0 is off, 1 is fill mode, and 2 is heating
mode for normal operation. The fill mode is used for the first time set up, if the
machine has not been used for a long time, or if the boiler has been drained. Older
style machines have a standard on/off switch.
The switch in the middle is the brew switch. The brew switch is used to activate the
pump for brewing espresso. Activate the switch to start the shot and when the shot
has reached the desired level then turn the switch off to stop the shot.
The bottom switch is to activate the steam wand. The steam bank power switch on
the back of the machine must be on to create steam. Turn the steam switch on to
start steaming and when you are done turn the steam switch off to stop. Be sure the
steam tip is still below the milk surface when you turn it off or splashing can occur if
you remove the tip while the steam is still activated. After turning the steam switch
off, remove the wand from the pitcher and hang it into the drip tray or into a cloth and
then turn the switch on and off for a second to blow out any trapped milk in the
steam tip and then immediately wipe the steam arm down with a damp cloth to
prevent milk from drying on the steam arm.
In the back of the machine is the steam bank power switch. This switch is used to
turn the steam bank on and off independently from the coffee boiler. If you regularly
steam milk then the switch can be left in the on position. If you do not steam milk
regularly and want to conserve energy then the switch can be turned off.
Pump
The machine is equipped with two vibratory pumps. Vibratory pumps can be loud by
nature and their tone may change during the course of a shot which is normal.
Both pumps are equipped with a klixon thermal fuse for protection. Should the
pumps run for an extended period of time the klixon will kill power to the pump and
then will restore power once it has had time to cool off.
The larger pump is used for brewing espresso. The pump pressure is regulated by
an expansion valve. Should you need to adjust your pump (brew) pressure then
please refer to the maintence section of the manual.
There is also a smaller pump that is used for steaming. The steam pump pressure is
not adjustable.

Silvano Espresso Machine
7
Water Reservoir
The water reservoir is located in a cut out on the right side of the machine. Only cold
soft water should be used in the reservoir.
When refilling the reservoir be careful not to over fill it and then slowly push it back
into the machine being careful not to splash any water inside.
There are four tubes that go into the reservoir. The longer tubes have a screen on
the end which may need to be periodically cleaned. The shorter tubes will discharge
a small amount of water into the reservoir whenever the pump is engaged which is
normal.
The reservoir should be cleaned at least once a week with mild dish detergent and
rinsed thoroughly before use. DO NOT PUT IN DISHWASHER!!!
Depending on your water quality it may be necessary to periodically sanitize the
reservoir or if you are using hard water and have a mineral build up inside. White
vinegar can be used to sanitize and will also remove the mineral deposits that can
accumulate. Fill the reservoir with white vinegar and then let it sit for an hour and
then rinse and clean the reservoir thoroughly. If the reservoir still has a vinegar taste
or odor you can mix some baking soda and water in the reservoir to remove the
taste and odor and then clean it normally.
Drip Tray
The drip tray should be periodically emptied and cleaned. It may be cleaned with
mild dish detergent. It should not be used in a dishwasher. If hard water marks
accumulate in the drip tray it can be cleaned with vinegar.
On the right side of the drip tray there is a discharge tube that comes from the group
solenoid valve. Whenever you turn off the brew switch a small amount of water will
be discharged into the drip tray to relieve the pressure in the grouphead which is
normal.
Accessories
The machine ships with a double portafilter which can be used with either the single
or double insert basket. It also comes with a backflush disc, group head cleaning
brush, and a coffee tamper and scoop.

Silvano Espresso Machine
8
PID Controller
The PID controller uses the latest technology to provide a more stable and accurate
brewing temperature to bring out the best taste characteristics of the coffee you are
using. It also gives you the option to easily change the brew temperature to match
different coffee blends and experiment with the different tastes that are brought out
at various temperatures.
The PID controller has been configured for optimum performance and should not
require any adjustment other than the temperature. The default temperature has
been set to 200, but can be easily changed to match the coffee blend you are using
The temperature shown on the display may vary from the set temperature while
heating or pulling a shot and is normal. As long as the machine has had adequate
time to warm up then the temperature hitting the coffee will be consistent with the set
temperature despite the variance shown on the display.
Changing Brew Temperature
To change the brew temperature with the
machine on, press and release the down
arrow key. When the display reads PrG,
press and release the up arrow key to
display the set temperature. Use the arrow
keys to change to the desired temperature.
After a few seconds the display will revert
back to normal operation.
The recommended brew range is between
195°- 205° Fahrenheit or 90°- 96° Celsius.
The hotter the temperature the more it will
bring out the bitter sweet chocolate tones.
Going too hot may make the shots taste
very bitter.
The colder the temperature the more it will bring out the fruity tones. Going too cold
may make the shots taste sour. Feel free to experiment with different temperatures
to bring out different tastes in the coffee you are using.
Silvano Espresso Machine
9
PID Controller Advanced Settings
These instructions will allow the user to change the temperature from Fahrenheit to
Celsius as well as other advanced settings. It is not recommended to change the
advanced settings unless the user has a thorough understanding of how a PID
controller operates.
To change the advanced settings, with the machine turned off hold down both arrow
keys and then turn the main power switch on. When F.03 appears on the
display then release the arrow keys.
Press the up arrow key to select and change the existing setting.
After changing a setting you must wait a few seconds for the display to revert back
and then you can press the down arrow key to cycle to the next setting.
To save the new settings turn the machine off and then back on again.
The PID calculation algorithm involves three separate constant parameters, the
proportional, integral, and derivative values. These values can be interpreted in
terms of time: P depends on the present error, I on the accumulation of past errors,
and D is a prediction of future errors based on the current rate of change. These 3
settings work together to determine when and how to apply power to the heating
element.
The PID controller allows for a more precise temperature control than a traditional
thermostat or pressure stat controlled system. It also enables you to quickly and
easily change the brew temperature to match your personal tastes.
The offset is the difference between the temperature drop from when the water
leaves the coffee boiler and then hits the coffee. This setting has been calibrated
using a Scace device and should not be changed.
To learn more about PID controllers please visit the link below.
http://en.wikipedia.org/wiki/PID_controller
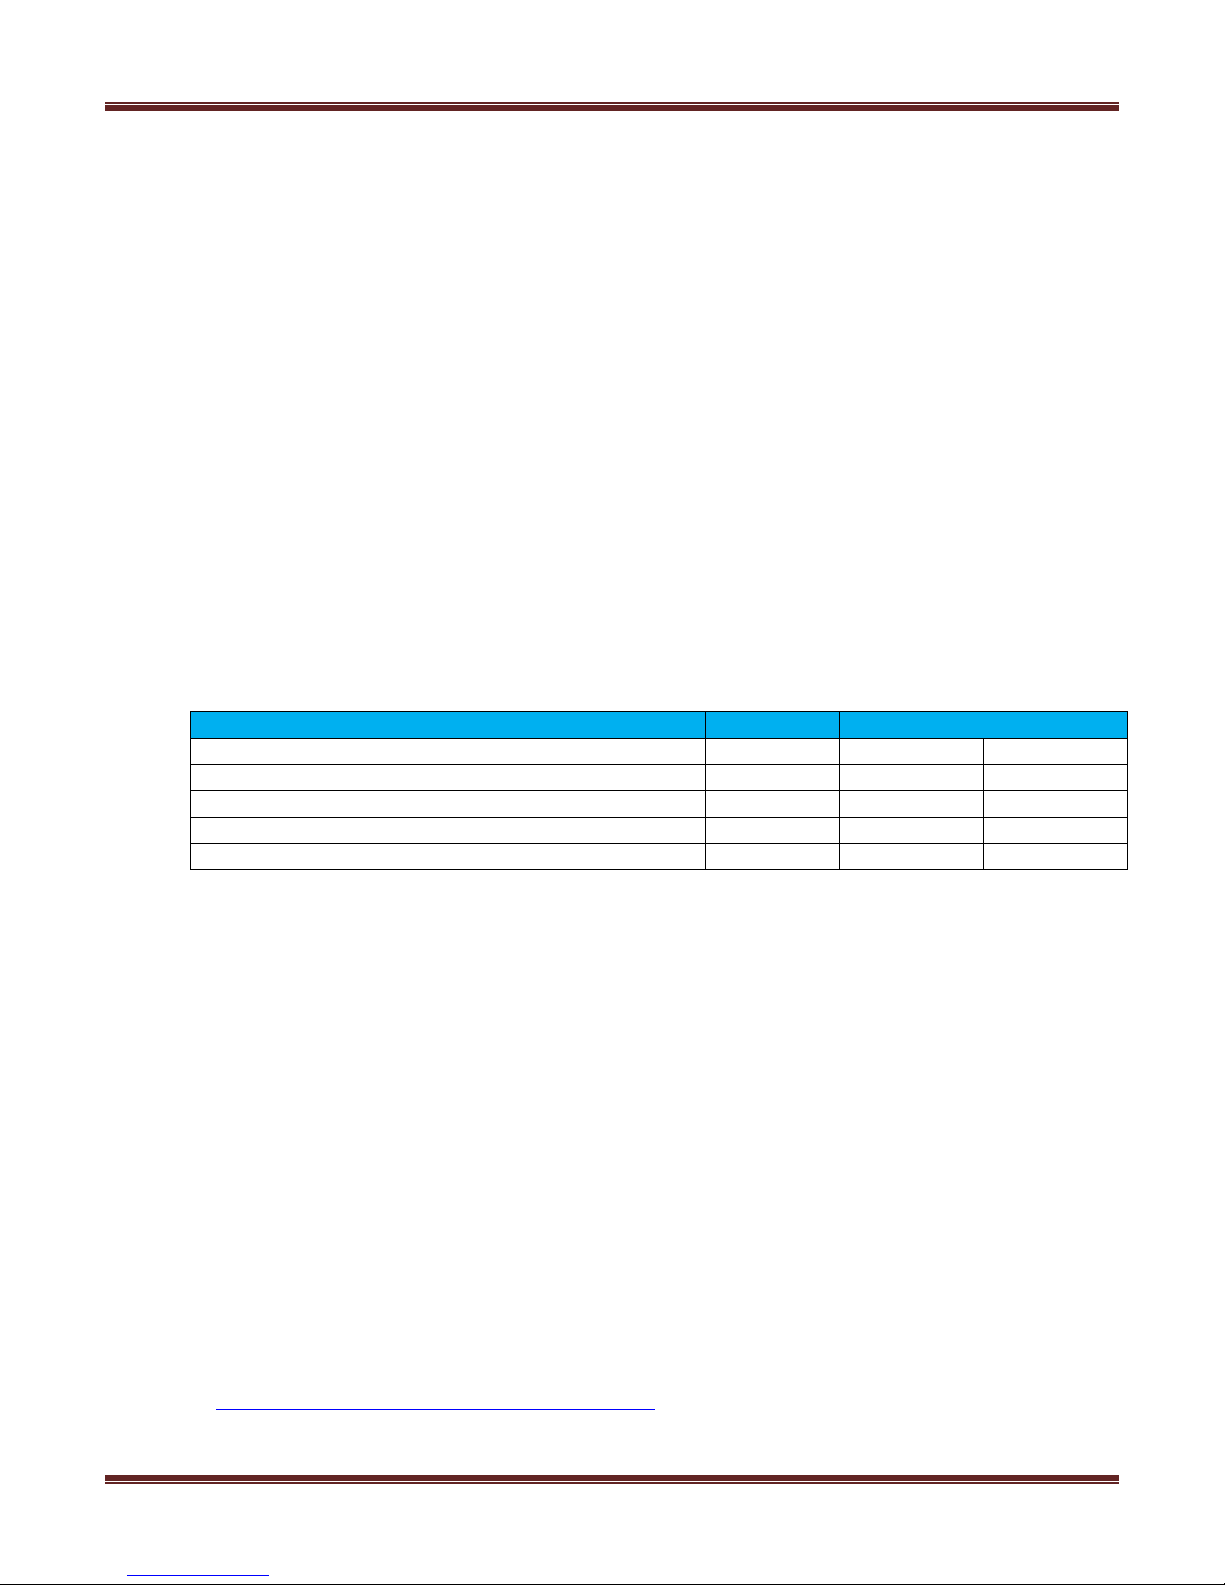
ADVANCED SETTINGS
DISPLAY
DEFAULT SETTINGS
Fahrenheit Or Celsius Mode
F.03
F
C
Proportional Value
P
.5
3
Integral Value
I
0
.05
Derivative Value
D
3
2
Offset (temperature between boiler and group)
F.04
25
12
Tabla de contenidos
Otros manuales de Cafetera de Chris Coffee Service


