Canon GP-E2 Manual de usuario

使用説明書
INSTRUCTION MANUAL
MODE D’EMPLOI
BEDIENUNGSANLEITUNG
MANUALE DI ISTRUZIONI
MANUAL DE INSTRUCCIONES
INSTRUCTIEHANDLEIDING
ɂɇɋɌɊɍɄɐɂə ɉɈ ɗɄɋɉɅɍȺɌȺɐɂɂ
日本語
English
Español
Français
Deutsch
Italiano
Nederlands
Ɋɭɫɫɤɢɣ

2
The GPS Receiver GP-E2 can geotag your shots and record the route
you travel. Using the provided software Map Utility, you can view
shooting locations and the route traveled. The receiver can also set the
camera time via GPS.
Before use, check whether your camera menu displays [GPS device
settings].
Cameras that display the settings
All features described in this manual
are supported by the receiver.
However, note that the EOS 7D does
not support recording the direction
that the receiver faces.
Cameras that do not display the
settings
Geotagging images (and adding
direction information) is not supported
while shooting.
Only the logging function (<
LOG
>
mode) is available. Using this
information, you can geotag images
later in Map Utility.
EOS 5D Mark III and EOS 7D Users
If [GPS device settings] is not displayed on your EOS 5D Mark III or
EOS 7D camera, update the camera firmware to a version compatible
with the receiver. The menu item will be displayed after you update the
firmware.
For details, contact a Canon Service Center.
Introduction
Before Use
Example of menu display

3
Supported by cameras that display
[GPS device settings] in the menu.
Shots taken while the receiver is
attached to the camera are
geotagged, adding location
information*1(latitude, longitude,
elevation, and shooting time (UTC*2))
to images.
Shooting locations of geotagged
images can be viewed on a virtual
map on a computer.
Images can also be tagged with the
shooting direction using the receiver’s
digital compass (magnetic north
standard) (except with the EOS 7D).
*1: Some traveling conditions or receiver settings may cause inaccurate location
information to be added to images.
*2: Coordinated Universal Time, abbreviated UTC, is essentially the same as
Greenwich Mean Time.
In logging mode (p.16), the receiver
keeps a record of location information
along the route traveled. The route
can be viewed on a virtual map.
Logs can also be used to geotag
images at a later time.
* Some traveling conditions, locations, or
receiver settings may cause inaccurate
location information to be added to images.
Features
Geotagging Images and Adding the Shooting Direction
Logging Routes Traveled with the Receiver

Features
4
Supported by cameras that display [GPS device settings] in the
menu, except the EOS 7D.
The camera time can be set using GPS signals. On the EOS-1D X,
high-precision adjustment is performed with a margin of error of
approx. ±0.02 second relative to UTC time, and on other cameras,
the margin is approx. ±1 second.
Shooting locations and the route traveled with the receiver can be
viewed on a virtual map, using the Map Utility software on the
provided CD-ROM.
Images can be tagged with location
information recorded in logging mode
(p.3). You can geotag JPEG and
RAW images (file extension: CR2)
shot with EOS DIGITAL cameras
(p.11).
Setting the Camera Time
Viewing Images on a Virtual Map
Geotagging Images on a Computer
Map data ©2012 ZENRIN -
Map data ©2012 ZENRIN -

5
Storage and Carrying Cases
Before using the storage case, insert the receiver in the carrying case to
prevent scratches. The storage case also accommodates the
connecting cables.
Connecting Cables
Use the 25 cm / 9.8 in. or 1.5 m / 4.9 ft. connecting cable if your EOS
camera displays [GPS device settings] in the menu.
Use the 25 cm / 9.8 in. cable to connect the receiver to the EOS 7D.
Also use this cable when attaching the receiver to the optional
Accessory Bracket AB-E1 (p.28).
Use the 1.5 m / 4.9 ft. cable when connecting the receiver to your
camera while it is in the provided carrying case.
Item Checklist
GP-E2 Storage case
Approx. 25 cm / 9.8 in.
GPS Receiver Solution Disk
(Software and instruction
manuals)
Carrying case
Connec ing cables
Approx. 1.5 m / 4.9 ft.
Instruction Manual
(this guide)
Regulation
leaflet

6
Introduction....................................................................................... 2
Features ........................................................................................... 3
Item Checklist................................................................................... 5
Conventions Used in this Manual..................................................... 7
Nomenclature ................................................................................... 8
Inserting the Battery ......................................................................... 9
Attaching and Detaching the Receiver ........................................... 10
Turning the Receiver On ................................................................ 11
Acquiring GPS Signals................................................................... 12
Geotagging Images as You Shoot ................................................. 15
Logging the Route Traveled ........................................................... 16
Setting the Positioning Interval....................................................... 18
Using the Digital Compass ............................................................. 20
Setting Time from GPS on the Camera.......................................... 23
GPS Precautions............................................................................ 24
Provided Software .......................................................................... 25
Using a Bracket (Sold Separately) ................................................. 28
Specifications ................................................................................. 29
Safety Precautions ......................................................................... 30
Contents

7
Meaning of Symbols
: Warning to prevent shooting problems.
: Supplemental information.
(p.**) : Reference page numbers for more information.
The icons and markings indicating the receiver’s controls and settings
used in the manual correspond to the icons and marking on the camera
and on the receiver.
Basic Assumptions
All operations in this manual assume that the power switches of both
the camera and receiver are set to <
ON
>.
The EOS 5D Mark III is used as an example for illustrations and
screens in this manual. Note that the screens displayed on your
camera may differ, depending on the camera model used.
Conventions Used in this Manual
Windows is a trademark or registered trademark of Microsoft
Corporation in the United States and other countries.
Macintosh is a registered trademark of Apple Inc. in the United
States and other countries.
Google™ , Google Maps™ , and Google Earth™ are
trademarks of Google Inc.
Map Utility uses Google Maps™ to display images and routes
traveled on a map.
All other corporate and brand names in this manual are
trademarks or registered trademarks of their respective owners.

8
Nomenclature
Contacts
<C> terminal
Signal acquisition
indicator
<
ON
>: Power switch/
<
LOG
>: Logging switch
Battery indicator
Mounting foot locking
lever
Release button
Mounting foot locking pin
Battery
compartment
cover

9
Insert one AA/LR6 battery as follows.
1Open the cover.
Slide the battery compartment cover
as shown by the arrows to open the
cover.
2Insert the battery.
Insert the battery with the negative
terminal first, all the way in.
3Close the cover.
Close the cover and slide it as shown
by the arrows.
Battery Life
The receiver can be used for about 39 hours under default settings with
a new AA/LR6 alkaline battery (based on Canon testing standards).
Battery life varies depending on the positioning interval for location
information, as well as GPS signal conditions (p.19).
Inserting the Battery
Using AA/LR6 batteries other than the alkaline type may cause improper
battery contact due to the irregular shape of battery contacts.
NiMH and Li-ion AA/LR6 batteries can also be used.
10
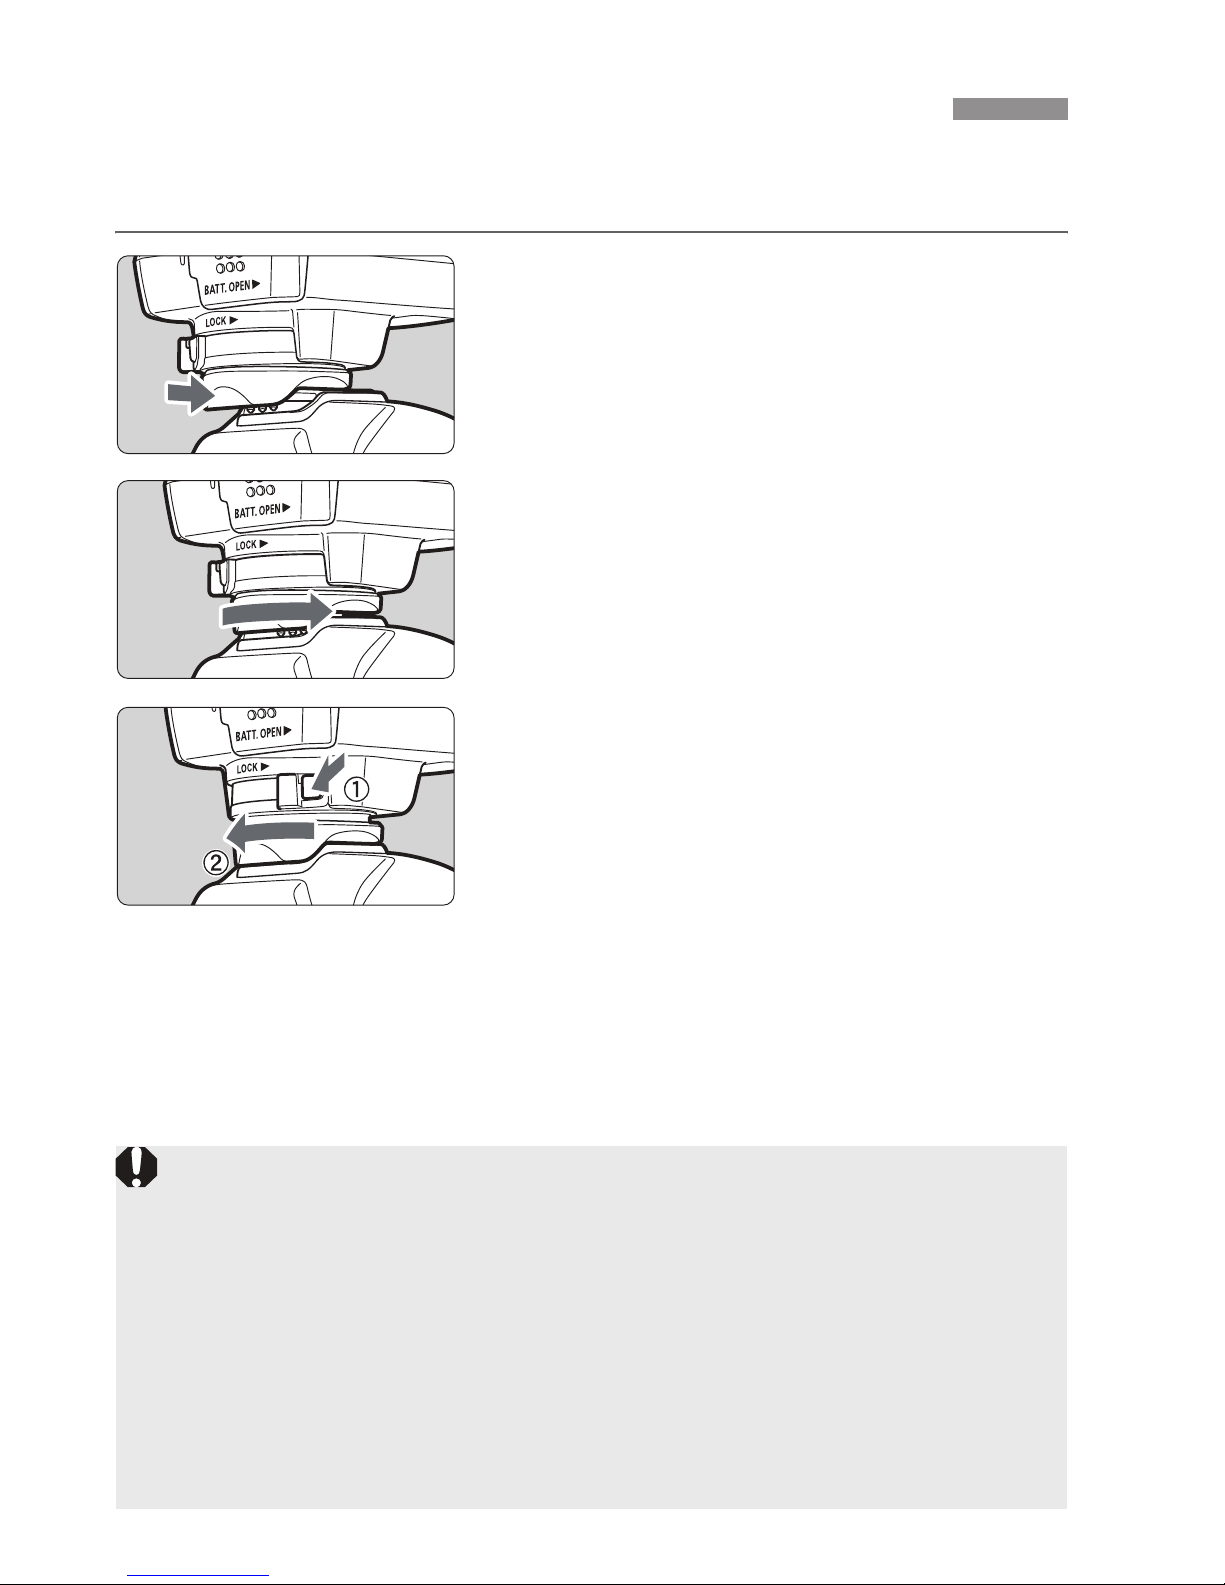
The receiver can either be attached directly to your camera or carried
with you in the carrying case.
1Attach the receiver.
Turn off the receiver.
Insert the receiver’s mounting foot
fully into the hot shoe.
2Secure the receiver.
Slide the mounting foot locking lever
to the right.
XThe locking lever will click into place.
3Detach the receiver.
Turn off the receiver.
While pressing the release button,
slide the mounting foot locking lever
to the left and detach the receiver
from the camera.
Attaching and Detaching the Receiver
Always make sure to turn the receiver off before attaching or detaching
it.
Depending on the camera model, if you turn on/off the GP-E2 or
connect/disconnect the interface cable during Live View shooting or
movie shooting, Live View shoo ing or movie shooting may stop.
Attaching the receiver directly to the camera will prevent you from using
the camera’s built-in flash or an external flash unit. To use flash, keep
the receiver in the carrying case and connect it to the camera wi h the
provided 1.5 m / 4.9 ft. cable, or attach the receiver to the Accessory
Bracket AB-E1 (sold separately, p.28).
Otros manuales para GP-E2
3
Tabla de contenidos
Otros manuales de GPS de Canon


