Cafe C7CDAAS3PD41 Manual de usuario

It’s time appliances had a personality. Yours.
Drip Coffee
OWNER’S MANUAL
ENGLISH/ESPAÑOL

2
THANK YOU FOR MAKING CAFÉ A PART OF YOUR HOME.
We take pride in the craftsmanship, innovation and design that goes
into every Café product, and we think you will too. Among other things,
registration of your appliance ensures that we can deliver important product
information and warranty details when you need them.
Register your Café appliance now online. Helpful websites are available in
the Consumer Support section of this Owner’s Manual. You may also mail in
the pre-printed registration card included in the packing material.

3
Table of Contents
Model: C7CDAAS3PD41 / C7CDAAS2PS11 / C7CDAAS3PD31
/ C7CDAAS3PD21 / C7CDAAS4PW21 / C7CDAAS2PS31 /
C7CDAAS2PS21 / C7CDAAS4PW41 / C7CDAAS4PW31 /
C7CDAAS2PS41
SAFETY INFORMATION ...................................................4
COMPONENTS ...........................................................5
GETTING STARTED .......................................................6
SETUP ...................................................................7
Clock .................................................................7
Strength...............................................................8
Temperature ...........................................................9
BREWING ............................................................... 10
Auto Brew .............................................................11
PAIRING ................................................................ 12
WIFI .................................................................... 12
REGULATORY INFORMATION. . . . . . . . . . . . . . . . . . . . . . . . . . . . . . . . . . . . . . . . . . . . . .13
CARE AND CLEANING.....................................................14
LIMITED WARRANTY ..................................................... 16
CONSUMER SUPPORT ....................................................17

4
WARNING To reduce the risk of fire, explosion, electric shock, or injury when using
your coee maker, always follow these basic safety precautions.
■ READ ALL INSTRUCTIONS BEFORE USING
■ Use only a 120 V, 60 Hz standard electrical supply that is properly grounded
in accordance with the National Electric Code and local codes and
ordinances.
■ Do not touch hot surfaces. Use handles and knobs.
■ To protect against electric shock, do not place cord, plug, or base unit in
water or other liquids.
■ Product is for household use only. Do not use outdoors.
■ To avoid a possible burn hazard, make sure the carafe is clean, empty and
the lid is locked prior to brewing.
■ Do not let cord hang over edge of table or counter, or touch a hot surface.
■ Scalding may occur if the lid is removed during the brewing cycle .
■ Unplug appliance before cleaning and when not in use.
■ Do not operate if any component, including the cord or plug, is damaged.
■ Appliances should not be used by or near children.
■ To reduce the risk of fire or electric shock, do not attempt to disassemble,
repair, modify, or replace any part of your product.
■ Use this product only for its intended purpose as described in this user
manual.
■ Use of any accessories not recommended by the manufacturer can cause
injuries.
■ Keep ventilation openings in the appliance enclosures or in the built-in
structure, clear of obstruction.
■ Do not place on or near a hot gas or electric burner, or in a heated oven.
■ To disconnect, make sure no coffee brewing, then remove the plug from wall
outlet.
■ This appliance has a polarized plug (one blade is wider than the other). To
reduce the risk of electric shock, this plug is intended to fit into a polarized
outlet only one way. If the plug does not fit fully into the outlet, reverse the
plug. If it still does not fit, contact a qualified electrician. Do not attempt to
modify the plug in any way.
■ Do not use an extension cord.
IMPORTANT SAFETY INFORMATION
READ ALL INSTRUCTIONS BEFORE USING THE APPLIANCE
READ AND SAVE THESE INSTRUCTIONS

5
Components
ATank Lid
BWater Reservoir
CStrength Button
DTemperature Button
EAuto Brew Button
FBrew/Cancel/Select Dial
GMesh Basket Filter
HBrew Basket Insert
IDrip Stop Lever
JShowerhead
KThermal Carafe
LMeasuring Scoop
MCarbon Filter
G
H
I
J
K
L
M
F
E
D
C
B
A

6
INSTALLATION REQUIREMENTS
■ Product is designed to be installed indoors. Do not use your coffee maker
outdoors.
■ Product must be installed upright on a flat, level surface that is able to support
the total weight when full of water.
■ Install the product in a well-ventilated area with an ambient temperature
between 55°F and 90°F.
■ Do not place the product near heat sources such as ovens or cooktops.
■ Do not place the product in direct sunlight.
■ Make sure product can not be accessed by children or animals.
Getting Started
PREPARE COFFEE MAKER FOR USE
1Carefully remove packing material. Do not use sharp tools that can damage the
box contents.
2Ensure all components are present. If any item is missing, please contact us at
cafeappliances.com (in Canada, contact us at cafeappliances.ca).
3Place the coffee maker upright on a flat, level surface. Make sure the coffee
maker is UNPLUGGED at this time.
4Wipe the exterior with a soft, damp cloth. Wash the mesh filter, brew basket,
and carafe in warm, soapy water and a soft cloth. Do not use abrasive
cleansers, pads or cloths which can scratch the surface. Rinse and dry
thoroughly. Coffee maker parts are NOT dishwasher safe.
5Plug the coffee maker into an electrical outlet. Clock flashes AM 12:00.

7
SetUp
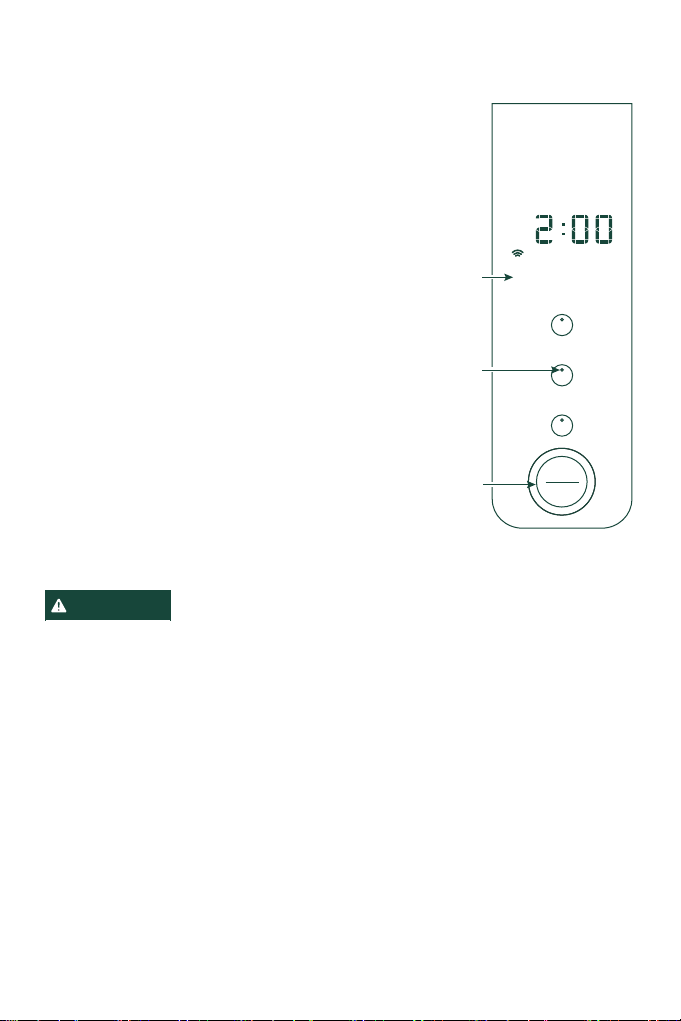
CLOCK
■ Push the Temperature button and
hold for 3 seconds. Clock illuminates
on the display and the white dot
on the Temperature button will
illuminate.
■ To set AM/PM: Rotate the Brew/
Select knob and push to select.
To set Hour: Rotate the Brew/Select
knob and push to select.
To set Minutes: Rotate the Brew/Select
knob and push to select.
After you confirm to quit, the outer
ring will illuminate. The ring will not
illuminate to confirm each selection.
NOTE: Push and hold the Brew/Select
knob for 3 seconds at any time to exit
the sub-menu and revert to the previous
settings.
Auto Brew
Hold to Program
Temperature
Hold to Set Clock
Strength
Hold to Descale
AM
Select
Brew
H
o
l
d
t
o
C
a
n
c
e
l
PM
Clock
Button Dot
Illuminates
“Clock”
Illuminates
Push to Select

8
SetUp
STRENGTH
■ Push the Strength button. The
strength options and Strength button
illuminate. The Strength options are
Gold, Light, Medium, and Bold.
GOLD: Brewing to the optimum
strength using set parameters. This
selection will brew coffee to the
highest quality. Cups available are
1 - 10. The temperature selection is
not changeable in GOLD. If at high
elevation, over 5000 feet, do not use
this selection.
For a more personal experience or
at high elevation (over 5000 feet)
utilize the Light, Medium, or Bold
strength. The cup selection is from 1
to 10 by whole cup increments. The
temperature selection is between 185
to 205°F. Recommendation is from
195-205°for best flavor extraction.
LIGHT: Brewing to the lighter strength
is for those who prefer a little lower
extraction of flavor.
MEDIUM: Brew to the optimum
strength with the option to brew
different cup sizes and to brew at
different temperatures.
BOLD: Bold is for those who prefer a
little higher extraction of flavor.
■ Rotate the Brew/Select knob to
select the strength and push to
select or push the Strength button
to confirm your selection. The outer
ring of the Brew/Select knob will
illuminate to confirm selection when
pushed.
Auto Brew
Temperature
Strength
Select
Brew
Strengths
Illuminate
Push to Select
Button Dot
Illuminates
Light Medium BoldGold
Hold to Program
Hold to Set Clock
Hold to Descale
H
o
l
d
C
a
n
c
e
l
to

9
SetUp
TEMPERATURE
This coffee maker is regulated for
temperatures between 185 and 205°F.
It is recommended to brew between 195
to 205°F for best flavor extraction. For
altitudes over 5000 feet, use 185° F to
prevent water from boiling.
NOTE: Temperature can not be changed
if Gold Setting is selected.
■ Push the Temperature button. The
Temperature button illuminates and
the display shows 200.
■ Rotate the Brew/Select knob to
select the temperature and push
to select or push the Temperature
button to confirm your selection. The
outer ring of the Brew/Select knob
will illuminate to confirm selection
when pushed.
■ To switch from Fahrenheit to Celsius,
press and hold the Strength and
Temperature buttons simultaneously
for 3 seconds.
CAUTION
High Altitude: For
use in high altitudes, adjust temperature
down to 185°F so water will not boil.
Auto Brew
Temperature
Strength
Select
Brew
°F
Temp
Button Dot
Illuminates
“Temp”
Illuminates
Push to Select
Hold to Program
Hold to Set Clock
Hold to Descale
H
o
l
d
C
a
n
c
e
l
to

10
Brewing
■ Ensure the brew basket insert and drip stop lever in the bottom of the insert are
clean and that the brew basket insert is in the brew basket.
■ Use either the mesh basket filter (included) or a No. 4 paper filter (not included)
and place into the brew basket insert.
■ Ensure the carafe (included) is clean, empty, and the lid is locked. Make sure the
carafe is in place before brewing. This coffee maker will NOT brew without the
carafe in place. The top of the carafe MUST be engaged with the drip stop lever
on the bottom of the brew basket. If not, the water won’t flow into the carafe and
the basket may overflow during the brewing cycle. If the carafe is not in place
when the brewing cycle is selected, the display will show “CUPS” and the coffee
maker will chime.
■ Water: This coffee maker is designed to use only the amount of water for the
number of cups selected to be brewed. Fill the water reservoir with fresh, clean,
and odorless (free of chlorine and sulfur) water up to the MAX level indicator. DO
NOT overfill the water reservoir. Water should have some minerals for best flavor.
Reverse Osmosis (RO) systems or distilled water does not have minerals and is
not recommended for coffee brewing.
During brewing, if there is not enough water in the reservoir for the number
of cups to be brewed, an error message (Add H2O) will show on the display
telling you to add more water and a chime will sound. Push the knob to confirm
that you are adding water. Once the water is added, push the knob again to
continue brewing. DO NOT add water during brewing unless the error message
is displayed.
■ Coffee: The type of coffee and freshness is a large factor in the flavor, taste and
aroma of brewed coffee. The grind size of the coffee is for brewing using the drip
method.
■ Use the scoop (included) to measure the correct amount of coffee for the number
of cups you are brewing. The measuring scoop is designed for one level scoop of
coffee per 4.5 oz serving of coffee being brewed (4.5 oz of water per serving is
the common measurement for a regular cup of coffee).
Place the coffee into the filter in the brew basket.
TO BREW:
■ After setup of strength and temperature, push the Brew/Select knob. The number
of cups will illuminate on the display along with the last strength that was chosen.
Rotate the Brew/Select knob to choose the number of cups of coffee you want to
brew. Push the Brew/Select knob to confirm. Brewing will start.
Otros manuales para C7CDAAS3PD41
1
Este manual sirve para los siguientes modelos
9
Tabla de contenidos
Idiomas:
Otros manuales de Cafetera de Cafe