Brickhouse Security IShot 2.0 Manual de usuario

Page 1 BrickHouse Security User’s Guide
IShot 2.0
User’s Guide

Page 2BrickHouse Security User’s Guide
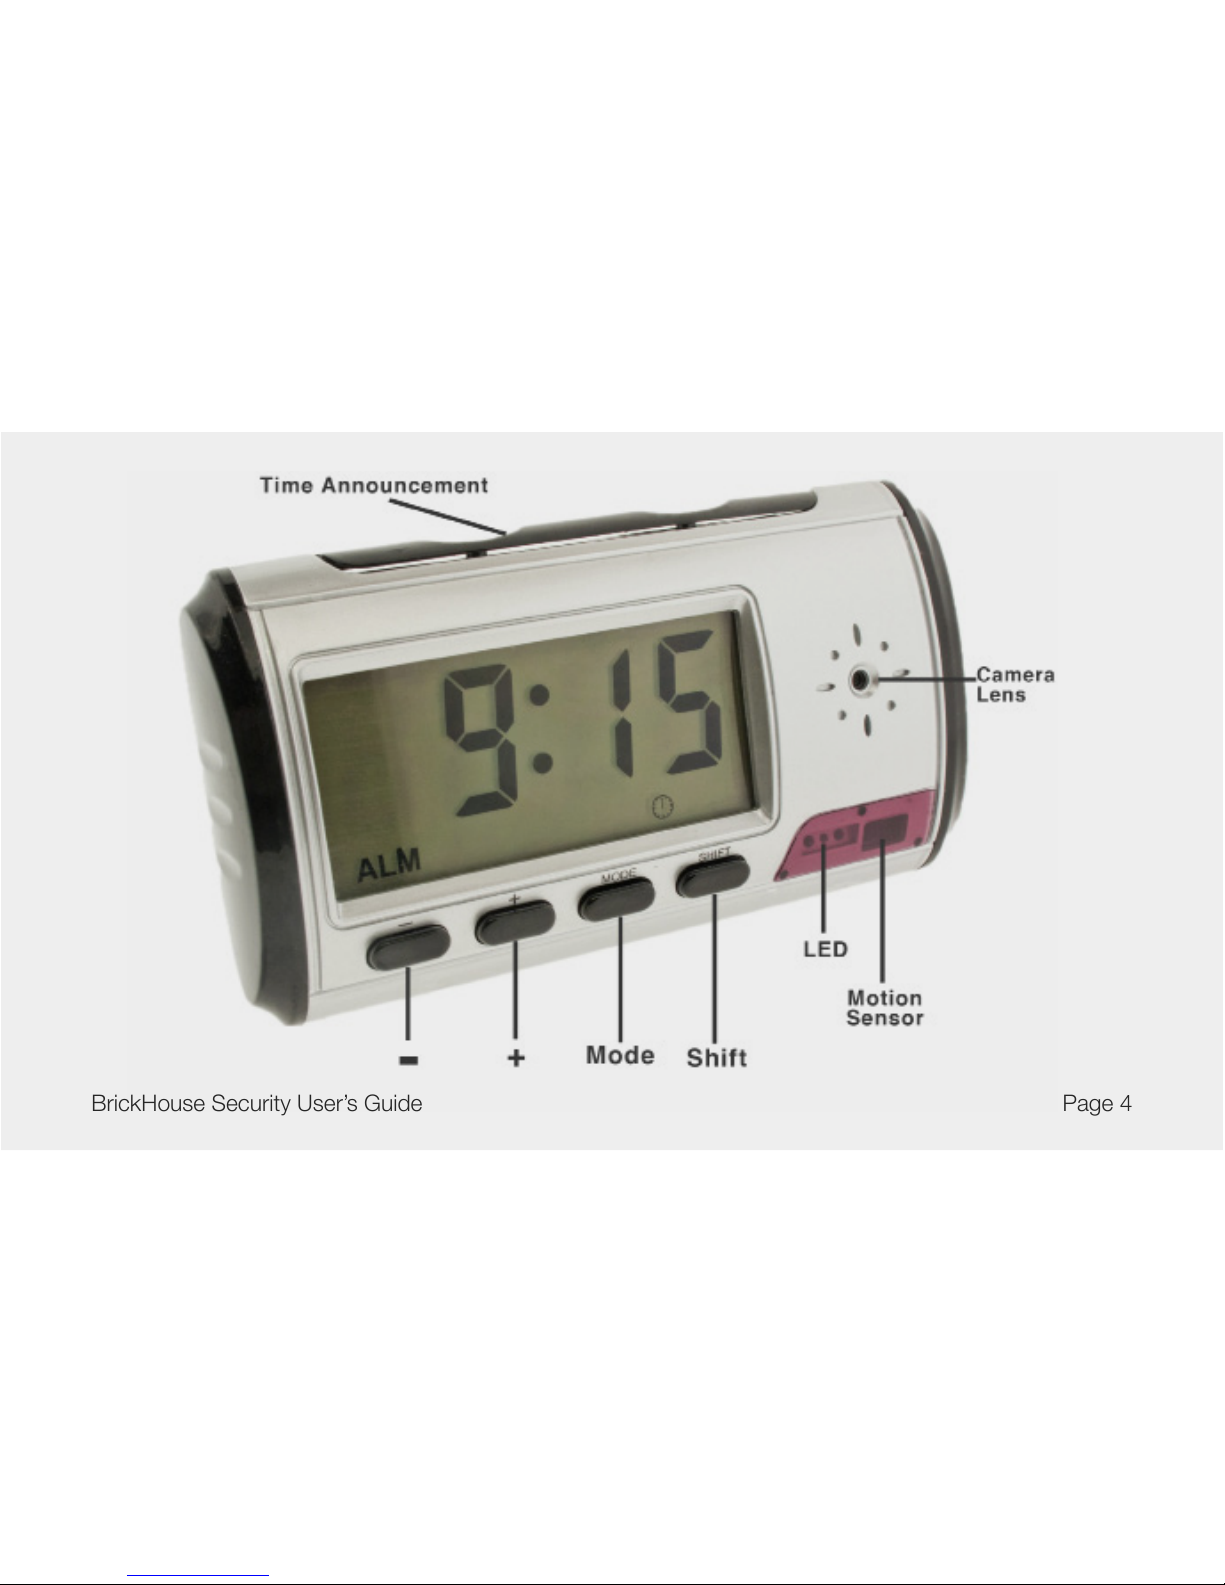
The IShot 2.0 from BrickHouse Security is a simple-to-use
covert video recording device. Hidden in a fully functional
alarm clock, this camera will record up to 10 hours of video
on a single charge.

Page 3 BrickHouse Security User’s Guide
In the Box
Your box contains the IShot 2.0, a remote
control, a battery, a USB cord, an AC power
adapter, a manual, and a disc containing
drivers that will allow the device to be used
as a webcam (32-bit Windows systems
only).
Page 4BrickHouse Security User’s Guide

Page 5 BrickHouse Security User’s Guide

Page 6BrickHouse Security User’s Guide
Getting Started
The rst step in using the IShot 2.0 is to insert the battery and charge it. Charge the device by plugging the
included cord into the USB mini port on the clock and connecting the other end into either the AC adapter or a
USB port on a computer. While charging, the red LED will ash on the device and will glow solid when the battery
is full. Before rst use, we suggest charging the device for at least 12 hours.
Before inserting a micro SD card, make sure the card is formatted correctly. The device can record in the FAT
16/32 format. If you aren’t sure how to format an SD card, you can nd instructions here: http://www.ehow.com/
how_2112408_format-memory-card.html. The IShot 2.0 is compatible with micro SD cards up to 16GB capacity.
Once it has been formatted, insert the micro SD card in the memory card slot on the device with the gold contacts
facing forward (toward the LCD screen). When secure, you will feel the card “click” into place. To remove the card
later, simply push on it and it will spring out.
Recording Video
To record video, move the switch under the concealing plate to the ON position. The red LED will turn on, glowing
red to indicate it is in Standby mode. If the device remains in Standby mode for longer than 1-2 minutes, it will
power down.

Page 7 BrickHouse Security User’s Guide
To begin recording video, press the Video button on the remote. The Red LED will blink quickly 3 times and shut off
to indicate that the device is recording. To stop recording, press the Video button again, and the device will return to
Standby mode.
*Note: When inputting commands through the remote control, the device may take a moment to process.
Motion-Activated Recording
To record motion-activated video, move the switch under the concealing plate to the ON position. The red LED will
turn on, glowing red to indicate it is in Standby mode.
Press the Motion Detection button on the remote control. The LED will turn off to indicate the device has entered
motion detection mode. When the device detects movement, it will automatically begin recording video. The device
will record in 2 minute clips as long as motion continues.
To turn off motion detection and return to Standby mode, simply press the Motion Detection button on the remote
control.
*Note: If aimed at a bright white surface, i.e. a white wall under uorescent lights, motion detection may not behave
properly. Once motion is detected, the device may simply continue to record in 2 minute clips.

Page 8BrickHouse Security User’s Guide
Taking Photos
To take photos, move the switch under the concealing plate to the ON position. The red LED will turn on, glowing
red to indicate it is in Standby mode. If the device remains in standby mode for longer than 1-2 minutes, it will
power down.
Press the Photo button on the remote control. The red LED will blink once to indicate that a photo has been
recorded.
Viewing Recorded Files
To view your les on a computer, simply connect the device via the supplied USB cord with the micro SD
card properly inserted into the device, making sure it is powered Off. It will connect as a removable drive, and
depending on the settings on your PC, it may automatically notify you that new hardware was detected. If so,
select Open Folder to View Files.
If it is not automatically detected, click Start on your desktop. Select My Computer if you are using Windows XP,
or Computer if using Windows Vista or Windows 7. The device should be listed as a Removable Disk under the
Devices With Removable Storage section. Open that drive, which will contain a folder called DCIM. Within that
folder is another folder labelled 100MEDIA. This folder contains your videos and photos.

Page 9 BrickHouse Security User’s Guide
If your media player has any problems opening recorded videos, you can use VLC Player, which can be
downloaded for free at http://www.videolan.org.
When disconnecting your device from a computer, always be sure to use the Safely Remove Hardware utility in
Windows.
Setting the Time/Date Stamp on Photos and Videos
Setting the time and date stamp on your device is easy. Simply create a .txt le on your computer and name it
“TAG”. In that le you will enter the date and time in the following format:
[date]
2011/06/24
14:40:20
The time must be entered on a 24-hour clock (military time) and it must be entered exactly.
There is a sample .txt le on the included CD.

Page 10BrickHouse Security User’s Guide
Once you’ve created the le, connect the device to your computer via USB and save the .txt le to the device’s
root directory. When you connect the device to your computer, it will be assigned a drive letter (ex. C:, D:, E:).
When you open that drive, you are in the root directory, or topmost level of the drive.
After you have loaded the le, safely disconnect the device from your computer, turn the device on and off, and
the time and date you loaded should now appear on any new videos and photos you record.
Setting the Time on the Clock
In Time Display mode, Hold down the Mode button for 2 seconds, until you hear a beep and the hour ashes.
Use the + and - buttons to change the time and tap mode to move to the hour and date elds.
Press the Shift button when nished.
To change your display from a 12 to a 24 hour clock, press the - button in Time Display mode.
Tabla de contenidos
Otros manuales de Sistema de seguridad de Brickhouse Security


Manuales populares de Sistema de seguridad de otras marcas


EDM
EDM Solution 6+6 Wireless-AE Manual de usuario

Highway Safety Group
Highway Safety Group EA401 Manual de usuario

Siren
Siren LED GSM Manual de usuario

Detection Systems
Detection Systems 7090i Instrucciones de montaje

Se-Kure Controls
Se-Kure Controls MicroMini SK-4841 Manual de usuario

Siemens
Siemens FDM273 Manual de usuario