BED BATH & Beyond PP305654 Manual de usuario

Operation Instructions
PP305
The chair set is delivered with 2 boxes.We recommend assembling the set after you
receive all the boxes.
6
54&PP305
6
55
Massage Chair

PRODUCT FEATURES
•Power Reclining
IMPORTANT SAFETY INSTRUCTIONS
When using an electrical appliance,basic precautions should always be
followed,including:
•Always unplug the power chair from the power source after use, and
before cleaning.
•Do not touch power chair if large amounts of liquid have spilled on it.
Unplug immediately.
•The chair should never be open unattended when plugged in. Unplug
from the outlet when not in use or before putting on or taking off parts
or attachments.
•Do not use outdoors.
•Do not carry this appliance by the attached power cord; do not use it as a
handle.
•Keep the cord away from heated surfaces.
•Close supervision is necessary when this appliance is used by or near
children, invalids or disabled persons.
•This unit is not a toy. Children should not use or play with it.
•Do not operate where aerosol (spray) products are being used or where
oxygen is being administered.
•Do not use near eyes or other highly sensitive areas.
•To disconnect, press the OFF button, make sure all functions are
stopped, then remove the plug form the outlet.
•Use this appliance only for its intended use as described in this manual.
Do not use attachments that haven’t been provided with the unit.This
appliance is not untended use for persons (including children) with
reduced physical,sensory or mental capabilities, or lack of experience and
knowledge, unless they have been given supervision or instruction
concerning use of appliance by a person responsible for their safety,
children should be supervised to ensure that they do not play with the
appliance.
~2 ~

HEALTH CAUTION
•If you have any concerns regarding to your health, consult your doctor
before using this product.
•Individuals with pacemakers should not use this product.
•If you have pain in muscle or joint after using for a prolonged period of
time, discontinue using and consult your doctor.Persist pain could be a
symptom of a more serious condition.
MAINTAINANCE INSTRUCTIONS
TO STORE:
Place unit in its box or safety dry and cool place. Avoid putting chair
in contact with sharp edges or pointed objects which might cut or
puncture the fabric. Do not wrap attached power cord around the
unit.DO NOT pull the unit by power cord.
TO CLEAN:
•Ensure the unit is unplugged from the power source, and allow the
unit to cool down before cleaning.
•Do not use any liquid to clean.Clean fabric cover by wiping with a
damp sponge, using a mild detergent or suds. Pat with clean, dry
cloth.
~3 ~

First of all,check if local voltage is consistent with the transformer power supply.
If available , then plug in , to set up an electric circuit.
The top of the hand controller comes with a USB port to facilitate charging
of electronic products such as mobile phones.
Product require DC 29V Power,Boot indicator light up after electrify ;
LIFT : Automatic lift function button. Just one click,the chair will lift up to top
position;
RECLINER : Automatic recline function button . Just one click , the chair will
recline to max unfold position ;
LIFT/RECLINE the 2 buttons can be changed at any time. For safety, when you
click new button , the last function will stop , and execute new function.
Up arrow button:should keep pressing to work,the chair will get down,then
unfold to max recliner position .
Down arrow button:should keep pressing to work,the back & footrest will
remover , then lift up to top position .
“Heat” key : Individual control switch,if users want the product to have the
spontaneous heat, they can press heating switch key for heating .The maximum
heating value is 65℃ and it takes about 15 minutes to reach the maximum
heating value.There is built-in protective chip in the product,and the continuous
heating will not make the heat value exceed the maximum peak value.
Time” key: timing regulation key. Press “10-20-30” to regulate the time
and the corresponding mode indication lamp will be on.
Intensity” key: it has three-gear strength regulation key H-M-L. Press
the key, the strength indication lamp will flicker and the strength will change as
per the sequence: M-L-H cycling.
“Mode ” key : it has three- modes switchover key. When the vibrating
motor is in a start state , the key can realize vibrating mode switchover ,such as
M1→M2→M3→M4……and the corresponding indication lamp will be on in
certain mode.
Power On /Off, vibration massage power.
Operation Instructions
~
4
~

Assembly Instructions
Please read the following instructions prior to assembling this product:
1.
To avoid damage, assemble this product on a not-abrasive surface such as
carpet.
2.
Make sure all bolts are tightly fastened before use.
3.
For home use or light commercial use only.
4.
Please make sure you have all parts before assembly.
GENERAL ASSEMBLY INFORMATION GUIDE
~5 ~

~6 ~
A*1B*1C*1
D*1E*1F*1
QTY 1pc QTY 1pc QTY 1pc
QTY 1pc QTY 1pc QTY 1pc
Parts List (BOX-1:PP )
Parts List (BOX-2:PP )
Back Right Arm Left Arm
Seat Wire
Transformer
305654
305655
A*1B*1C*1
QTY 1pc QTY 1pc QTY 1pc
Parts List (BOX-1:PP )
Back Right Arm Left Arm
305654
A*1B*1C*1
QTY 1pc QTY 1pc QTY 1pc
Parts List (BOX-1:PP )
Back Right Arm Left Arm
305654
A*1B*1C*1
QTY 1pc QTY 1pc QTY 1pc
Parts List (BOX-1:PP )
Back Right Arm Left Arm
305654
G*1
QTY 1pc
Remote

Step 1
①
Place the Seat (D) on its back on a flat smooth surface.
Take out the bag which holds a rectangle box.
②
Take out the transformer (E) & w ire (F)
& Remote ( G) from
the top of the seat.
~7~
QTY 1pc QTY 1pc
G
QTY 1pc
EF
D
Step 2
①
②
Attach handrest (B&C) to seat (D) by aligning the metal grooves on handrest
to brackets on sides of the seat (D) as shown.
Ensure the handrest (B&C) slides down fully over the brackets on the right
side and left side of the seat (D) respeectively.
~8~
8
C

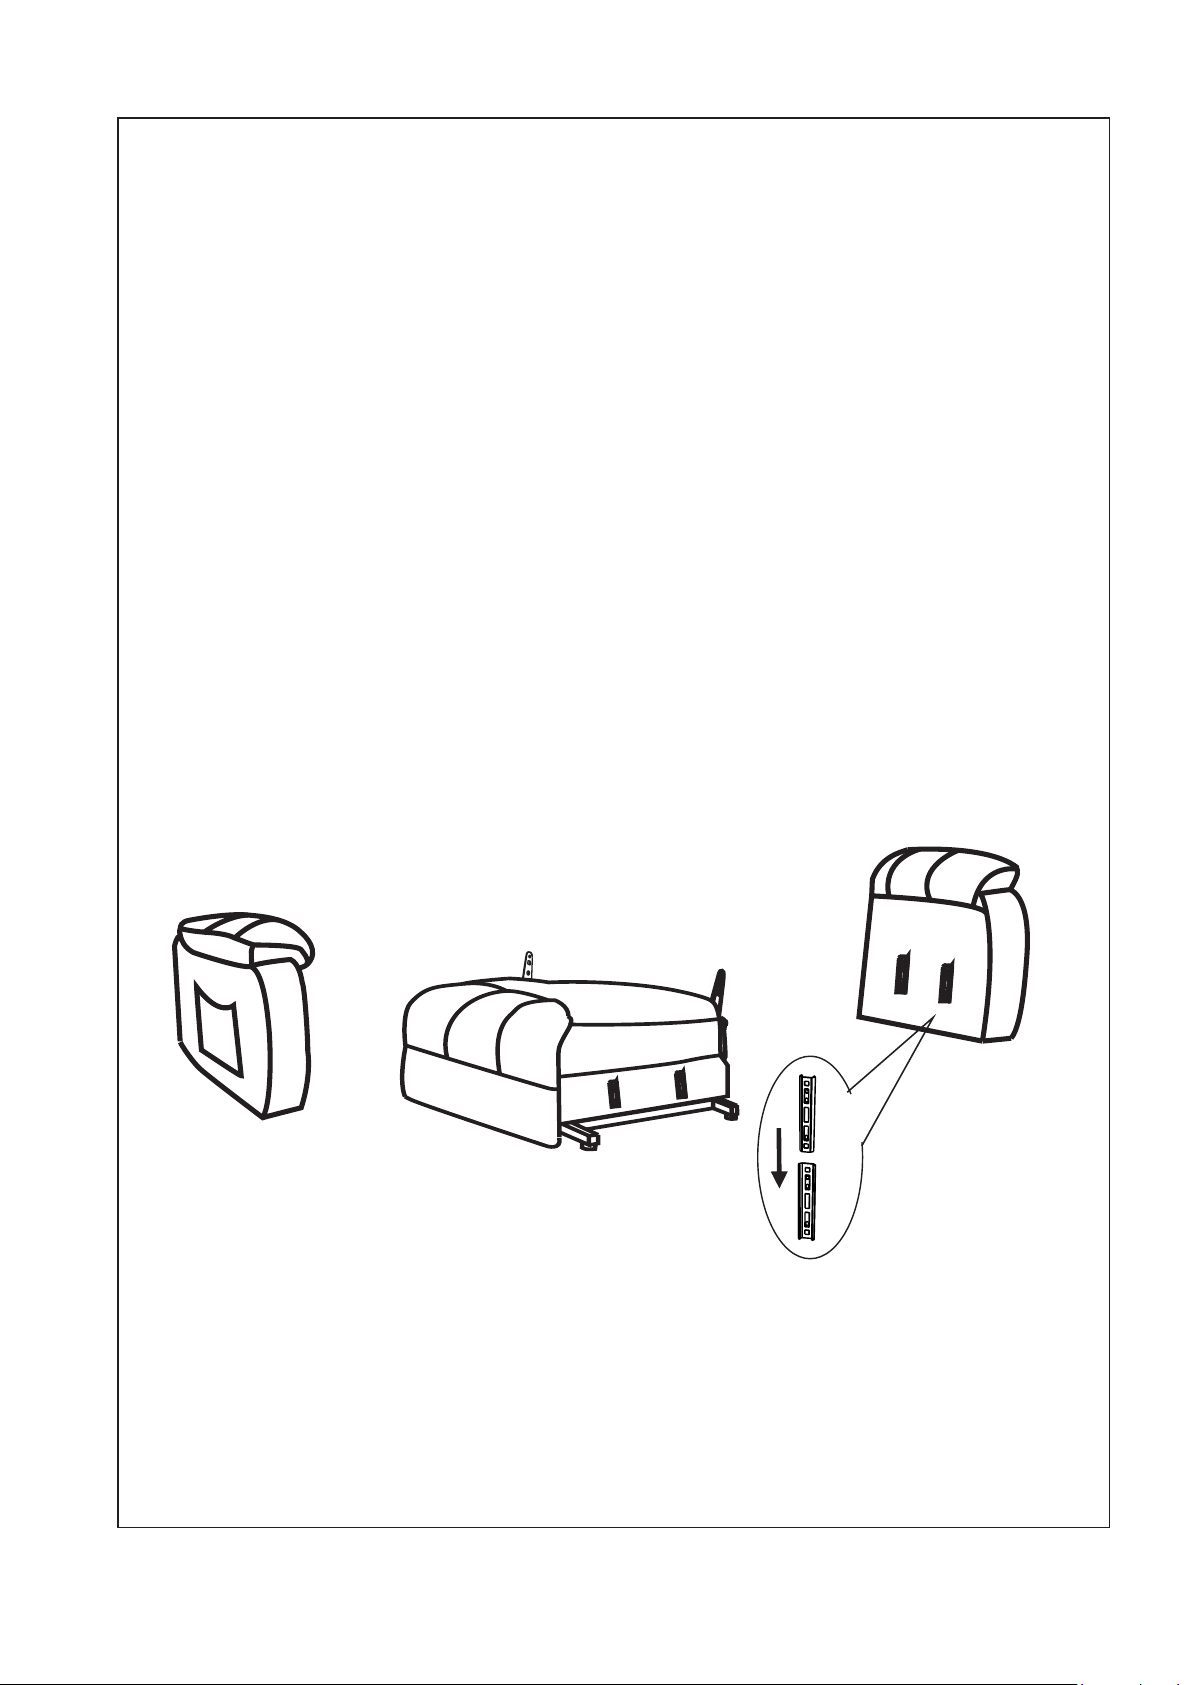
Step 3
Ensure the backrest (A) slides down fully over the brackets on the
seat(D).
~
9
~
8
C

Step 4
~~
①Attach the transformer(E) to the plug on the back of seat (D).
②Connect the transformer(E) with the wire plug (F) and insert the wire
plug into a wall outlet for power.
F
E
TOP
TOP
TOP
TOP
10
Este manual sirve para los siguientes modelos
1
Tabla de contenidos


