bbluv Viyu Manual de usuario

Please read the instruction manual carefully before use.
Veuillez lire attentivement le manuel d’instructions avant l’utilisation.
Lea atentamente el manual de instrucciones antes de usar.
Leggere attentamente il manuale d’istruzioni prima dell’uso.
Vor Gebrauch bitte die Bedienungsanleitung sorgfältig durchlesen.
Leia o manual de instruções com atenção antes de utilizar.
Viyü
EN Wi-Fi Camera
FR Caméra Wi-Fi
ES Cámara Wi-Fi
IT Videocamera Wi-Fi
DE WLAN-Kamera
PT Câmera Wi-Fi

EN FR ES DE IT PT Viyü
2
ResetReset
Viyü EN FR ES DE IT PT
3
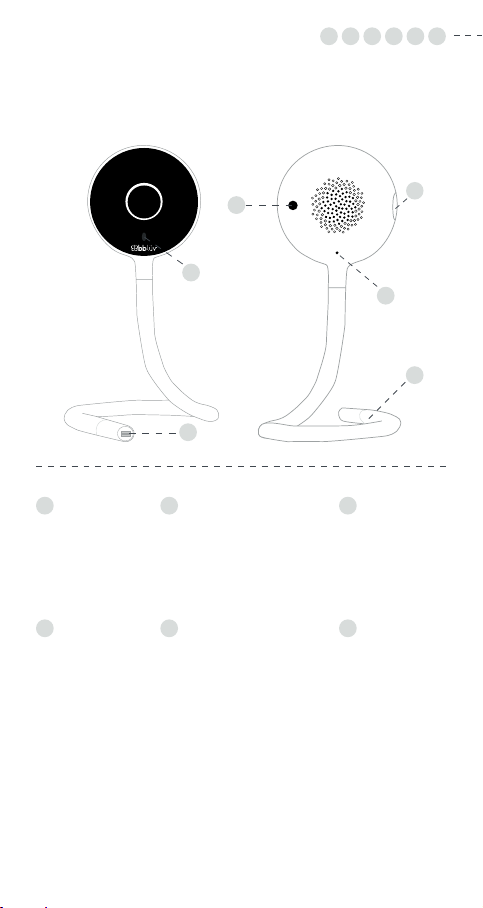
A
C
E
B
D
F
A
Power
Alimentation
Encendido
Alimentazione
Netzschalter
Alimentação
B
Status light
Voyant d’état
Luz de estado
Indicatore di stato
Statusleuchte
Luz de estado
C
Reset button
Bouton Réinitialisation
Botón Reinicio
Pulsante di ripristino
Reset-Taste
Botão reset
D
SD card slot
(SD card not included)
Logement pour carte SD
(carte SD non fournie)
Ranura para la tarjeta SD
(tarjeta SD no incluida)
Slot scheda SD
(scheda SD non inclusa)
SD-Kartensteckplatz
(SD-Karte nicht enthalten)
Ranhura para cartão SD
(cartão SD não incluído)
E
Microphone
Microphone
Micrófono
Microfono
Mikrofon
Microfone
F
Tail
Queue
Apoyo
Cavo aperto
Schwanz
Cauda

4

Viyü EN FR ES IT DE PT
Viyü
EN English ................................................................................. 6
FR Français............................................................................. 21
ES Español ............................................................................ 36
IT Italiano.............................................................................. 51
DE Deutsch............................................................................. 66
PT Português.......................................................................... 81
5

EN Viyü
6
ENGLISH
SET UP YOUR VIYÜ
Place your Viyü on a clean and stable surface or attach it to a wall
bracket that has been safely installed on your wall (the bracket
can be xed to the wall with the provided screws or adhesive
tape). To ensure good image quality, place the camera between
1 and 2.5 meters away from the baby’s head.
You can position the camera tail Fhowever you would like. You
can twist the camera rod to hang the camera on any solid vertical
structure that is out of the baby’s reach. However, make sure not
to bend the base of the camera head (the area marked with a
gold sticker). Never attach your Viyü to a crib or place it within
reach of the baby.
Your Viyü does not include a battery and must remain plugged in
at all times to operate properly.
*It is important to note that the blue light in the front of the camera is very bright.
Pay attention to the level of brightness when setting up your Viyü in the nursery.
WHAT EACH LIGHT TELLS YOU ABOUT THE DEVICE’S STATUS
LIGHT STATUS
Solid red Your Viyü is no longer connected to the
network
Red light
(blinking) Your Viyü is searching for the Wi-Fi network
Red light
(blinks
rapidly)
Your Viyü found the network and is in the
process of connecting to the Wi-Fi
Solid blue
light Your Viyü is functioning correctly.*
Blue light
(blinking) Manual Wi-Fi conguration mode is on
Blue light
(blinks
rapidly)
Your Viyü is in the process of connecting
to the Wi-Fi in manual conguration mode

Viyü EN
7
SETUP BEFORE USE
SCREW BRACKET ON THE WALL
1. Use the holes in the
mounting bracket as
markers to indicate where
the screw holes should be
situated.
2. Fix the mounting bracket
to the wall with screws or
use the included adhesive
tape.
3. Drill a hole in the surface
using a suitable tool and
place the supplied anchors
at the marked location.
4. Insert the camera into the
stand and angle it to get
the perfect view.
CONNECTING YOUR VIYÜ
Look for the app in your device’s app store, either on the Apple
App Store or Google Play Store, by searching for Viyü by bblüv.
SET UP THE ROUTER
This product only supports routers operating at 2.4 GHz. It is
important to note that your Viyü will not connect to a 5-GHz
frequency band router (also known as 5 G).
Please congure the relevant router settings BEFORE conguring
your Wi-Fi. The Wi-Fi passwords should not include these two special
characters: \ and ’. Once the device has been connected to the
Wi-Fi, make sure your mobile device and your Viyü are as close to
the router as possible to speed up the conguration process.
or

8
HOW TO REGISTER
1. Make sure your router and
Wi-Fi are functioning properly.
Open the app and click on Sign Up.
2. Enter a valid email address. Accept the Terms and Conditions
agreement by placing a checkmark, and then click Next.
3. Enter a username and your password and click Done.
You have just created your account.
To ensure easy connection, make sure your router, device, and
mobile device are nearby.
CAMERA CONFIGURATION
Before conguring your Viyü, please note the following:
• This device only supports Wi-Fi routers operating at 2.4 GHz.
Please check what you are connecting to.
• Follow the instructions and images provided in the app.
• Your Viyü can only be associated with one account.
However, the account can be linked to multiple cameras.
You can also invite people to connect to your camera feed
(for viewing only).
1. Open the app and select +. In the menu, select the
Camera option to add your Viyü.
2. Follow the Setup Guide on your device to add your Viyü on
the app.
3. Connect your Viyü. Select the Camera option on your
mobile device and then click Next when your Viyü is
plugged in.
4. Press the Reset button on the back of your Viyü, and hold it
for 5 seconds. Wait for a blinking red light to appear on the
camera. Click Next.
5. Select your Wi-Fi network and enter your password. Then
click Next again.
6. Click Next to sync your Viyü to your mobile device.
7. Scan the QR code that appears on your mobile device with
your Viyü. Make sure there is a 15 to 25 cm space between
the two devices.
8. You will hear a tone that conrms the scan is complete when
the process nishes.
9. The progress will be displayed while the app is connecting to
the network.
10.When your Viyü connects successfully to the network,
the app will display your account number. Click Next to
access your device’s menu.
EN Viyü

MENUS
DEVICE MENU
Viyü EN
2 h 55
Viyü
9

10
EN Viyü
ICON FEATURE
Press to access all devices associated to the
account (simultaneous multi-view).
Allows you to add devices to your account.
Press to access your Viyü live feeding and
the live video feed menu.
You can share access your account. Click on
and follow the instructional video.
Gives you direct access to your motion detection
alarm picture folder. A red dot appears when you
receive an alarm message.
Gives you direct access to your cloud-based
storage service.
Press to return to the device menu.
Press to access your messages folder. A red dot
appears when you receive any new message.
Press to access your personnal account menu.
Tabla de contenidos
Idiomas:


