Bandwidth Audio 22A3 Manual de usuario


22A3 Monaural Amplifier Rev 1.0 2
WARNING
Never power on the amplifier without connecting a proper load
Failure to do so will result in permanent damage to the output transformer and potentially
other components in the output stage.
This amplifier contains lethal voltages
High voltage can be stored in the power supply even if it is unplugged and not in use. Do
not remove back cover unless you are a qualified service technician. For service, contact
Bandwidth Audio.
High Vacuum Tube Temperatures
Vacuum tubes get extremely hot with bulb temperatures capable of reaching 200 degrees
Celsius. Do not touch or attempt to remove the tubes while hot.
Amplifier Bias
With the volume turned all the way down, the bias should be set between: 50 - 60mA.
This current can be read directly off of the 2 analog meters on the back of the amplifier
after power on and warm up. See Section 3.3 –Biasing.

22A3 Monaural Amplifier Rev 1.0 3
1.0 Amplifier Setup
Pre-Operation Checklist
•Connect speakers to proper load impedance output.
•Insert tubes into proper sockets. See Section 3.1 –Installing Tubes.
•Connect Mains to 120V wall outlet. Ensure a proper outlet ground connection
with a ground tester.
•Turn the volume all the way down.
•After warming up, check power tube bias without attempting to input an audio
signal.
Ensure the speaker load is connected before powering on!
See Section 3.3 –Biasing.
1.1 Amplifier Placement
For the best operation and longest life of components, the amplifier should be set up and used in
a well-ventilated area with good air circulation. Do not use the amplifier in enclosed furniture as
this may result in a fire.
Overheating can damage the amplifier and diminish tube life.
1.2 Setting The Load Impedance
Never turn on your amplifier without speakers connected to the proper output load
impedance.
Operation of the amplifier without a speaker load or open circuited loudspeaker voice
coil can permanently damage the output transformers as well as other major components.

22A3 Monaural Amplifier Rev 1.0 4
To be safe, always ensure your speakers are connected before plugging amplifiers into an outlet.
Likewise, always unplug the amplifier from the outlet before removing the speaker load.
This amplifier comes equipped with 4, 8, and 16-ohm output impedances for maximum flexibility. If
you are unsure of your speaker’s impedance, contact the manufacturer.
Connect speakers between 4, 8, or 16-ohm binding post on the back of the amplifier, based on
nominal speaker impedance, and the Comm. Binding posts.
1.3 Powering ON & OFF
The analog backlit VU meter on the front face of the amplifier illuminates when powered on.
Tube warm up time is typically 30 seconds. It will take at least this long for music to play from
speakers. Best performance is achieved after amplifier has been running for a period of time and
up to a steady temperature, typically 30 minutes.
When powering off, music may still play for a few seconds. This is normal. While the tubes are hot,
make sure not to move or knock into the amplifier since hot tubes are more susceptible to internal
damage.
1.4 Input Setup
This amplifier is designed to drive a speaker load to its full rated output power based on typical
line level input signals via the RCA connector on the back.
Depending on the input source components, an additional preamp may be needed to achieve full
output power.
See Section 3.4 –Typical Specifications.

22A3 Monaural Amplifier Rev 1.0 5
2.0 Controls and Layout
2.1 Front Features
1. Volume The volume knob controls the overall output of the amplifier by attenuating
the input signal. Rather than a normal rotational potentiometer, a stepped
attenuator is used. A stepped attenuator eliminates noise during rotation and
also maintains volume balance between a pair of amplifiers driving separate
speakers. Due to its construction, the volume knob will click into each slot,
giving precise volume control.
1. Volume 2. VU Meter 3. Power

22A3 Monaural Amplifier Rev 1.0 6
2. VU Meter
The VU meter, or Volume Unit meter, gives the user an indication of the
relative output power to the speakers. The backlight also indicates when the
amplifier is on.
The VU meter is calibrated to indicate the amplifier’s maximum clean RMS
output power (rated at approximately 5 Watts of output power) when it is
indicating +0dB.
Driving the output beyond this region will cause amplifier distortion. Although
this is not harmful to the amp, there is a significant increase in the average
output power as distortion increases. This can damage speakers rated close to
the amplifier’s maximum RMS output power.
3. Power Switch
The power switch is used to turn the amplifier on and off. On is in the up
position, and Off is in the down position.
22A3 Monaural Amplifier Rev 1.0 7
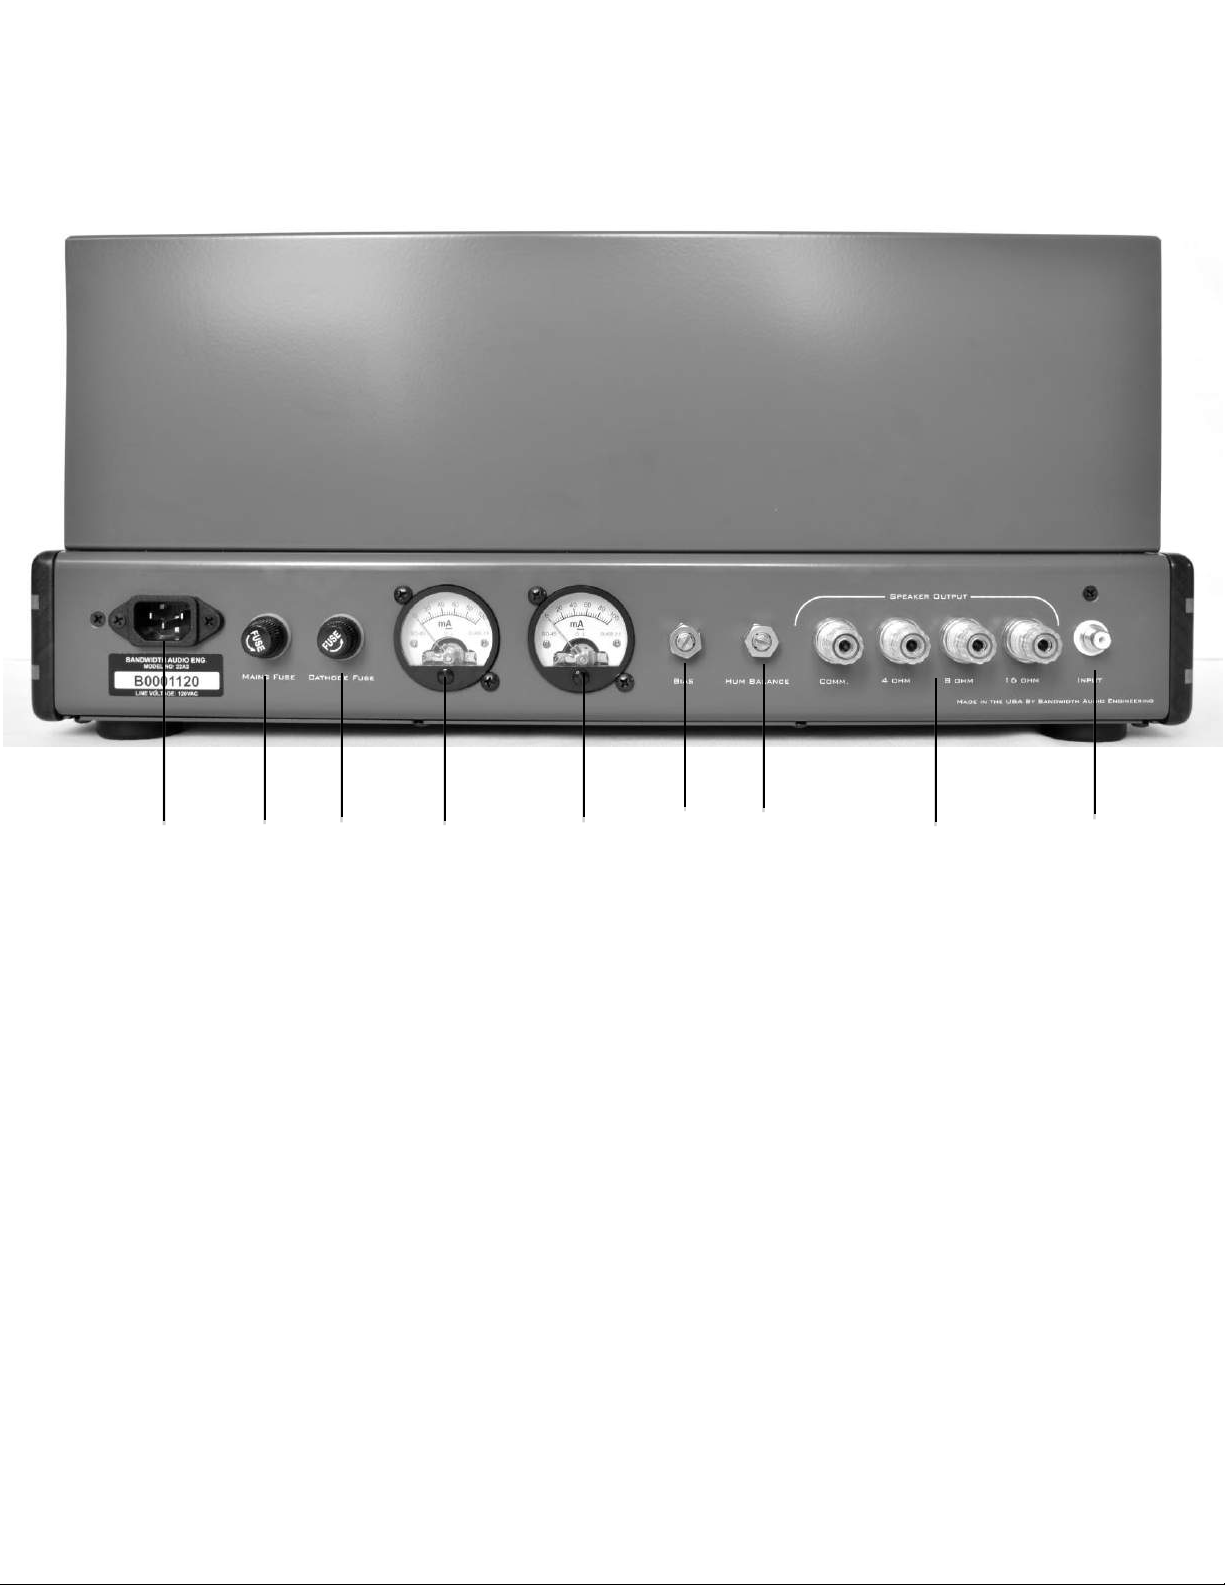
2.2 Back Features
4. Mains Input Socket to connect removable wall power cord to the amplifier.
Use only the
voltage indicated on the serial number tag below mains input.
5. Mains Fuse
Use only 2 Amp Slow Blow Fuse
. Fuse in series with the mains current to
protect the user and amplifier from various short circuit failures.
6. Cathode Fuse
Use only ¼ Amp Slow Blow Fuse.
Fuse is in series with V3 and V4 output
tubes to protect the output transformers and other circuitry from a shorted or
bad tube. If blown, check performance of the output tubes before replacing
the fuse to prevent damage from a failed tube.
4. Mains 5. Mains 6. Cathode 7. Bias Current Meters 8. Bias 9. Hum 10. Speaker Outputs 11. Input
Input Fuse Fuse Balance

22A3 Monaural Amplifier Rev 1.0 8
7. Bias Current
Meters Measures the cathode current in milliamps of each power tube (V3 and V4,
respectively). At idle, with no input signal, their value represents the power
tube bias or idle current.
8. Bias Adjustment Screwdriver-adjustable potentiometer that is used to set the bias of the power
tubes.
See Section 3.3 –Biasing.
9. Hum Balance Screwdriver-adjustable potentiometer that references the preamp tube
filaments above voltage ground to lower the AC filament noise. This is usually
set in the middle and requires no adjustment. However, if hum is discernable
through the speakers, try rotating the potentiometer clockwise and
counterclockwise from the center position to minimize it. If no change occurs,
the hum is being picked up by another source.
10. Speaker Outputs Used for connecting the speaker load to the amplifier. Makes sure the
selection matches the speaker’s impedance to avoid damage to the amplifier.
See Section 1.2 –Setting the Load Impedance.
11. Input RCA line level input jack designed to accept audio signals from common
audio components.
See Section 1.4 –Input Setup.

22A3 Monaural Amplifier Rev 1.0 9
2.3Top Features
12. Negative
Feedback Feedback switch to select between “Open Loop” mode for feedback-free
operation, or “Closed Loop” Mode for operating the amplifier with feedback.
Closed Loop Mode is suggested for higher output power close to the
amplifier’s rated output. This will reduce distortion (THD + N) and help to
maintain linearity.
12. Negative Feedback 13. Hum Balance 14. Hum Balance

22A3 Monaural Amplifier Rev 1.0 10
Note that by closing the feedback loop, the gain of the amplifier will be
reduced by 2dB. This is a side effect of all negative feedback circuits. It is
recommended to bring the volume back to normal listening levels after the
change of the switch position. The increased linearity and reduction of
distortion is not caused by the change in volume, but instead by sampling the
output and correcting for error. Increasing the volume back after moving to
“Closed Loop” mode will still realize all of the benefits of a feedback topology.
13. 14. Hum Balance Screwdriver adjustable potentiometers that form the center taps for filaments
on output tubes V3 and V4. Since the 2A3 tube is a directly heated triode, the
center tap of the firmament forms the cathode connection for signal ground.
This is tuned from the factory with the output tubes provided for lowest
noise. If 60-cycle hum is auditable, adjust this with screwdriver. This stetting
will directly impact the SNR and background noise of the amplifier.
Tabla de contenidos
Otros manuales de Amplificador de Bandwidth Audio


