AVYCON AVC LHN21SVT-A1S Manual de usuario
1
AVC
LHN21SVT-A1S
2MP AUTO-TRACKING PTZ BULLET CAMERA
QUICK START GUIDE

Package Contents.....................................................................................................................
Caution......................................................................................................................................
System Requirements...............................................................................................................
Hardware Overview...................................................................................................................
- 12x Mini (PoE) PTZ Bullet Network Camera..........................................................................
- Camera Installation..................................................................................................................
How to perform a Hardware Reset...........................................................................................
How to Connect to Alarm Interface.........................................................................................
How to Connect the Waterproof Connector..........................................................................
Accessing the Network Camera...............................................................................................
TABLE OF CONTENT
1
1
1
2
2
3
6
6
7
8
Thank you for purchasing this AVYCON IP Network Camera. This guide provides basic instructions
on installing and accessing this IP Network Camera. For more details, please refer to the User
Manual.
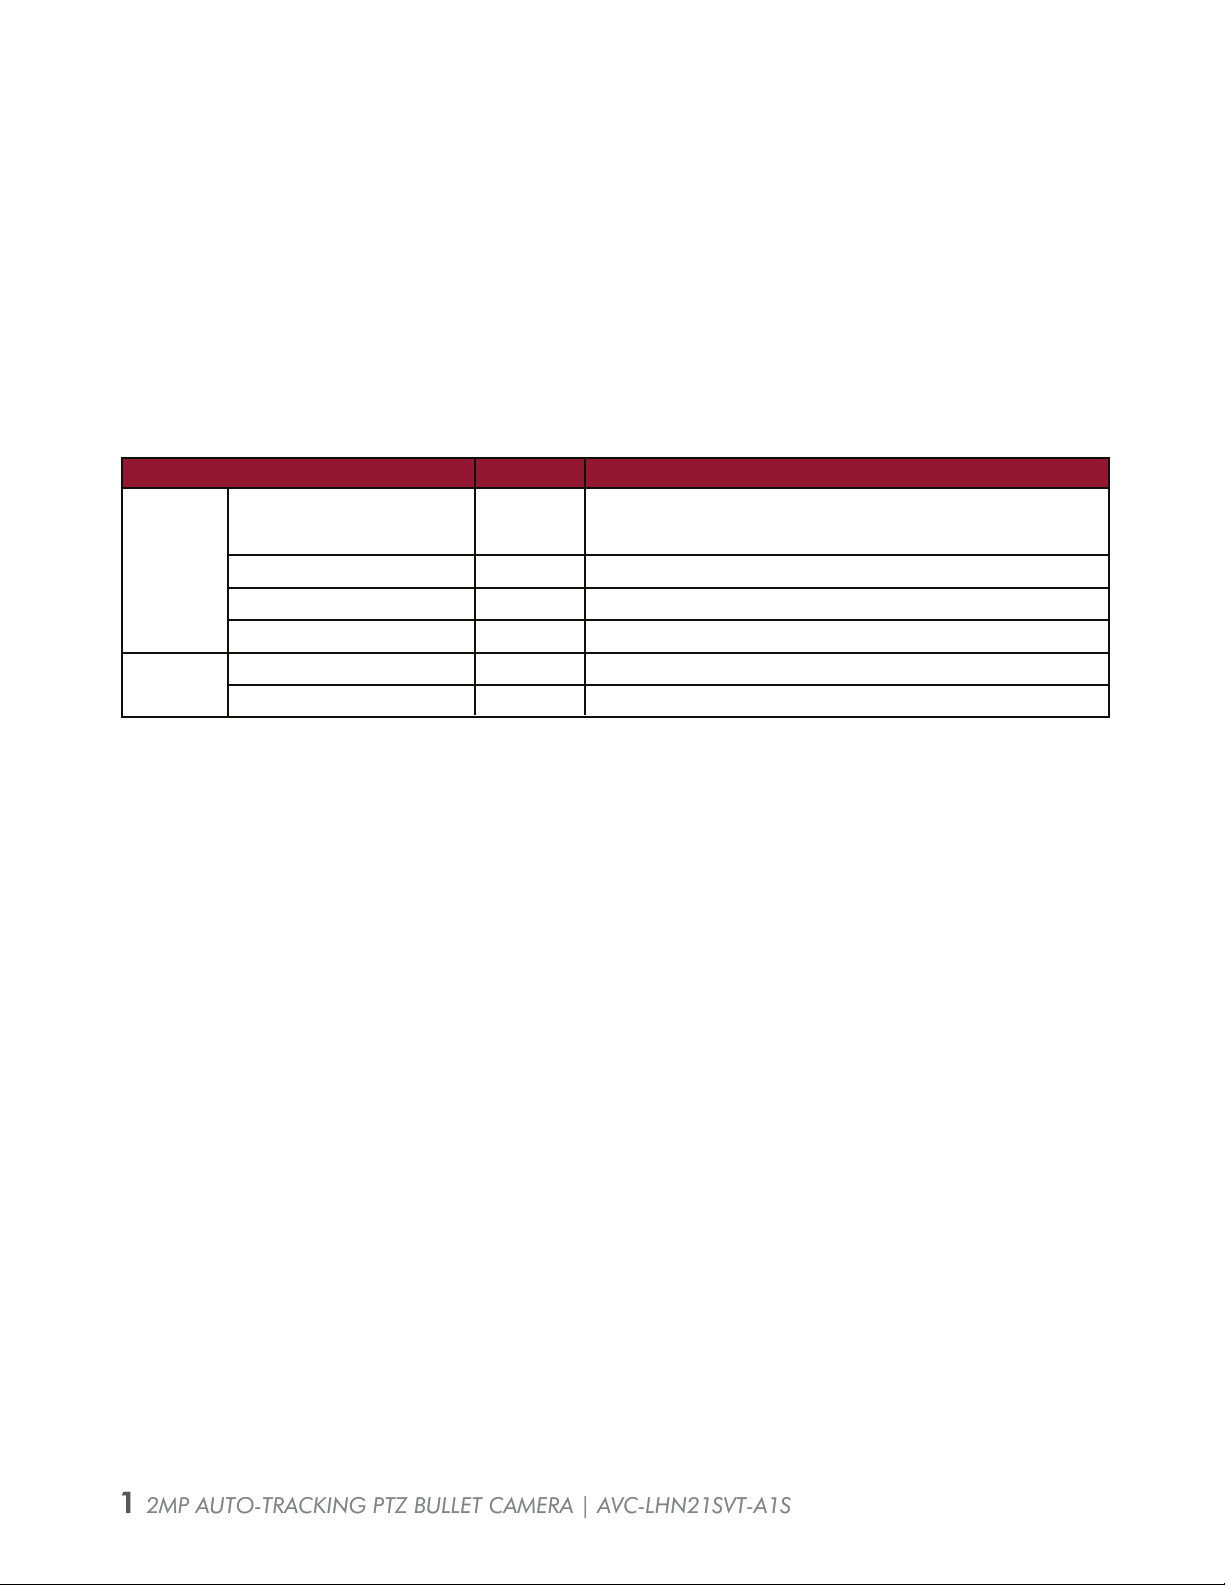
Package Contents
Before installation, please verify that all the necessary items are supplied in the box as the
package contents listed below. If any item is missing or damaged, please contact the shipper
and your Avycon Sales Representative.
ITEMS
DEFAULT
OPTIONAL
QUANTITY DESCRIPTION
Avycon Network Camera 1 Pc The purchased model
Power Adapter
Quick Start Guide
Warranty Card
Lens
Bracket & Screw Pack
1 Pc
1 Pc
1 Pc
DC 12V (Optional for part of devices)
Printed material
Printed material
If purchased
If purchased
Caution
* Do not expose the product to rain moisture
* Make sure the device is firmly fixed when mounting it on the wall or ceiling
* Make sure that the power supply voltage is correct before using ther camera
* Do not use a 3rd party Power Adapter
* Never attempt to disassemble or modify the camera
System Requirements
OPERATING SYSTEM: Windows XP / Vista / 7 / 8 /10 / Server 2000 / Server 2008
CPU: 1.66 Ghz or Higher
RAM: 1G or Higher
Graphic Memory: 128MB or more
Internet Protocol: TCP / IP (IPv4 / IPv6)
1 2MP AUTO-TRACKING PTZ BULLET CAMERA | AVC-LHN21SVT-A1S1 2MP AUTO-TRACKING PTZ BULLET CAMERA | AVC-LHN21SVT-A1S
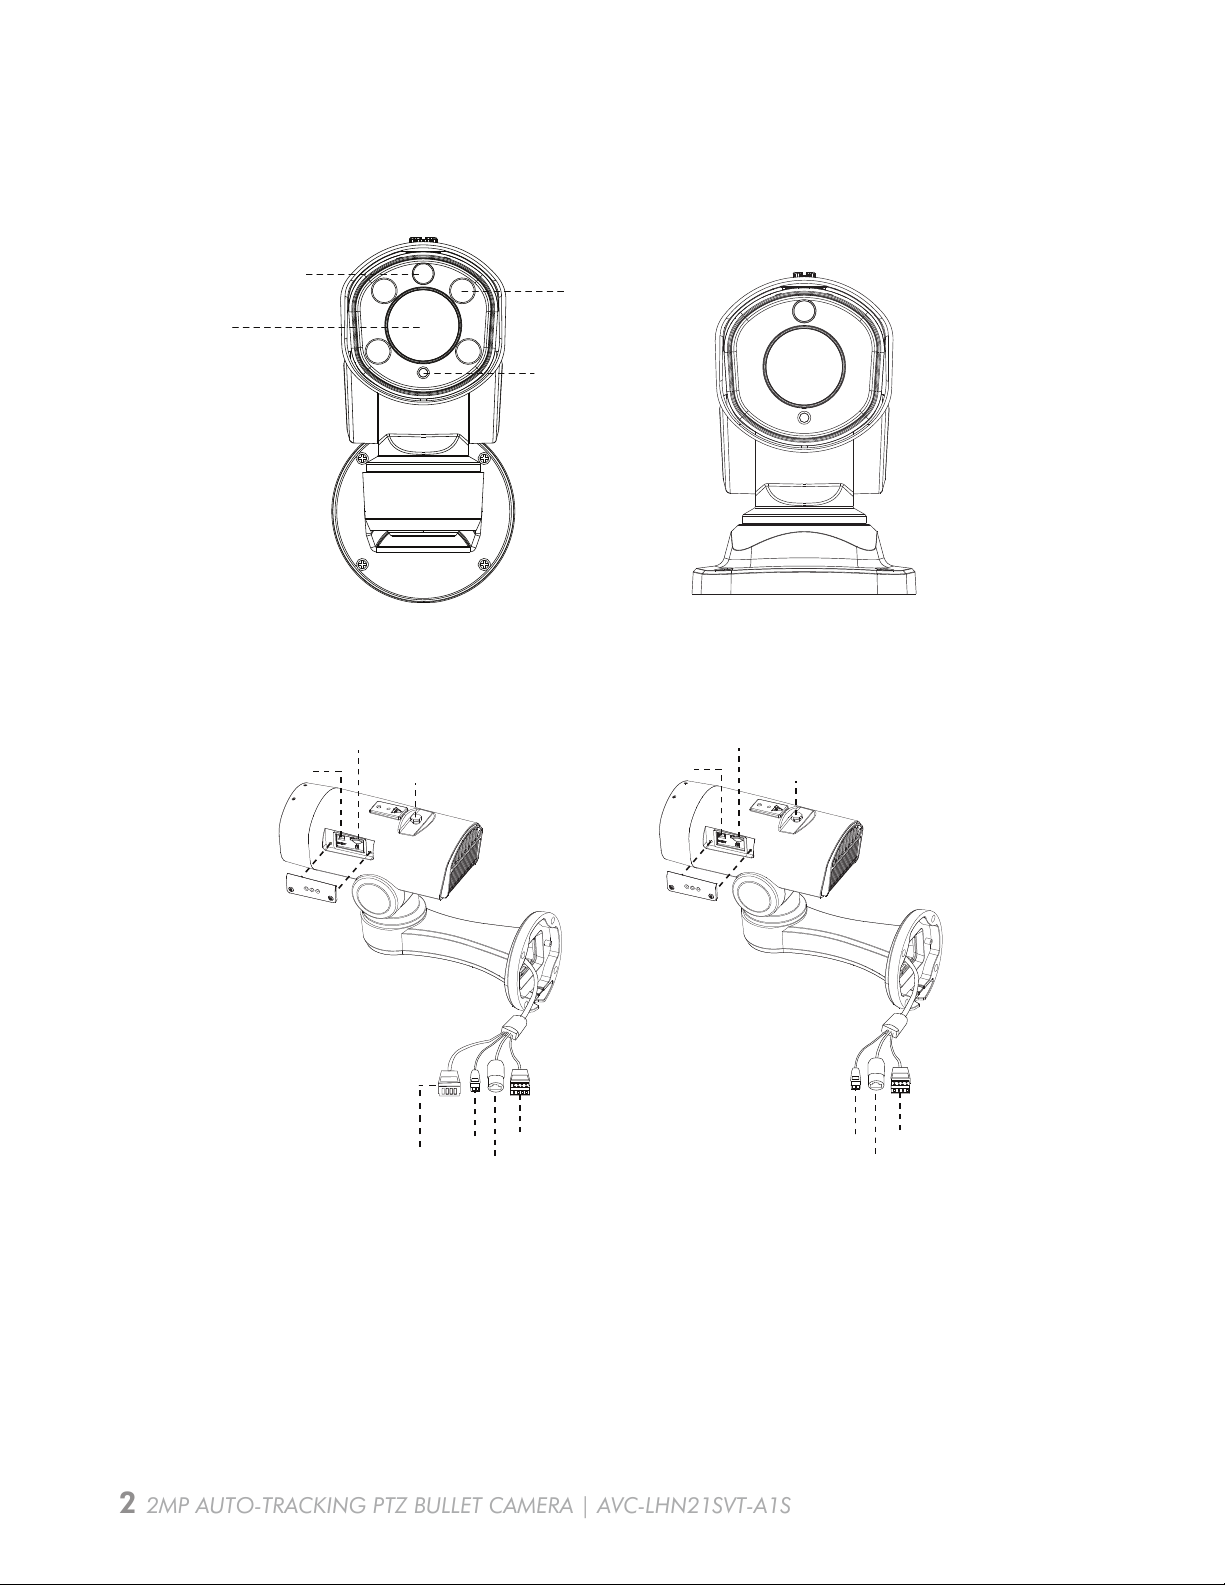
PEDESTAL MOUNTED
microSD / SDHC / SDXC Card Slot
Screw-In Vent
Reset
DC 12V Alarm In / Out
Ethernet Port
WALL MOUNTED
MINI PTZ BULLET
Light Sensor
IR LED’s
White Light LED’s
Lens
MINI PoE PTZ BULLET
Hardware Overview
AVC-LHN21SVT-A1S
NOTE: Only DC 12V is available for Mini PTZ Bullet Power Supply. DC 12V & PoE (802.3at) are
available for Mini PoE PTZ Bullet Power Supply.
microSD / SDHC / SDXC Card Slot
Screw-In Vent
Reset
DC 12V Alarm In / Out
Ethernet Port
Audio
In / Out
2 2MP AUTO-TRACKING PTZ BULLET CAMERA | AVC-LHN21SVT-A1S
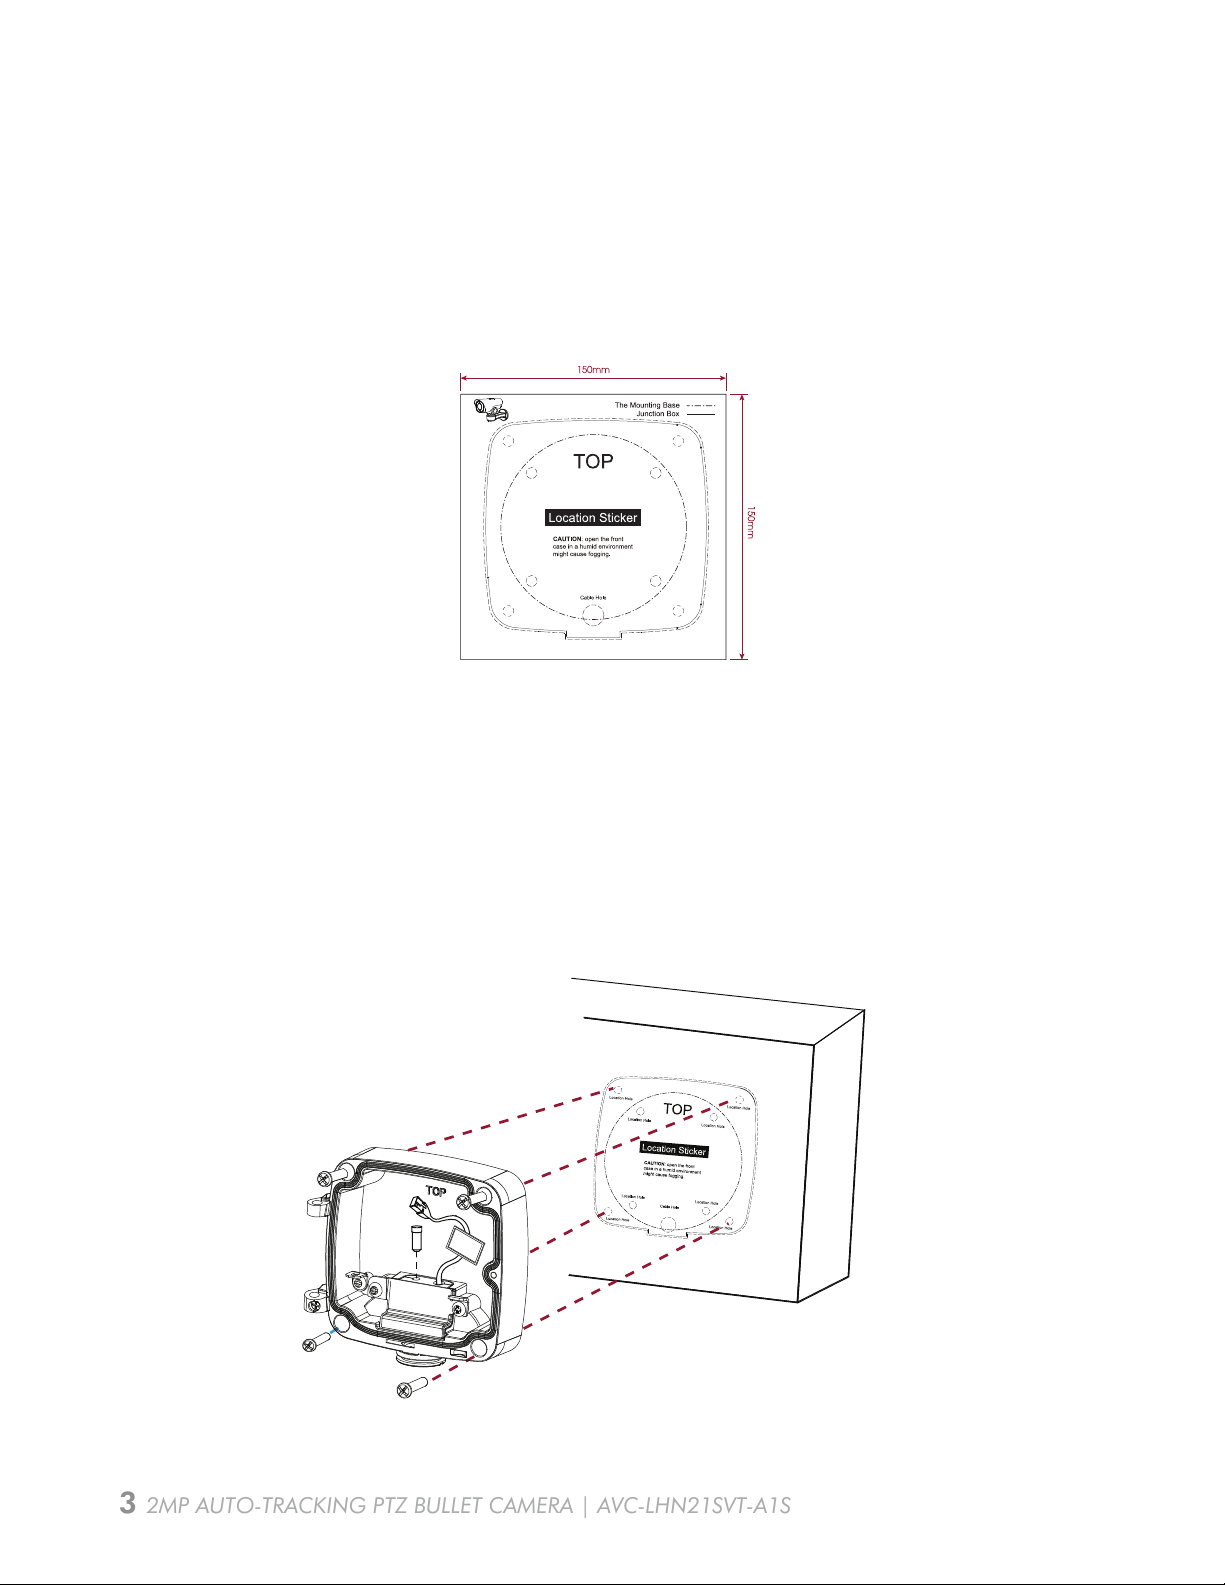
Camera Installation - Install with Junction Box
AVC-LHN21SVT-A1S
2. Unbolt the screws on the Junction Box (AVM-LDMT-W-A1*) between the front cover /
rear cover and remove the front cover. Remove the tension disc on the rear cover, and cut
an opening on the rubber plug and get cables through the opening then fasten the rear
cover to the ceiling or the wall.
1. Position the mounting template sticker in the position where the camera is intended to
be installed;
DIAGRAM 1: Optional “AVM-LDMT-W-A1” junction box
MOUNTING
HOLE
MOUNTING
HOLE
MOUNTING
HOLE
MOUNTING
HOLE
MOUNTING
HOLE
MOUNTING
HOLE
DIAGRAM 1
MOUNTING
HOLE
MOUNTING
HOLE
3 2MP AUTO-TRACKING PTZ BULLET CAMERA | AVC-LHN21SVT-A1S
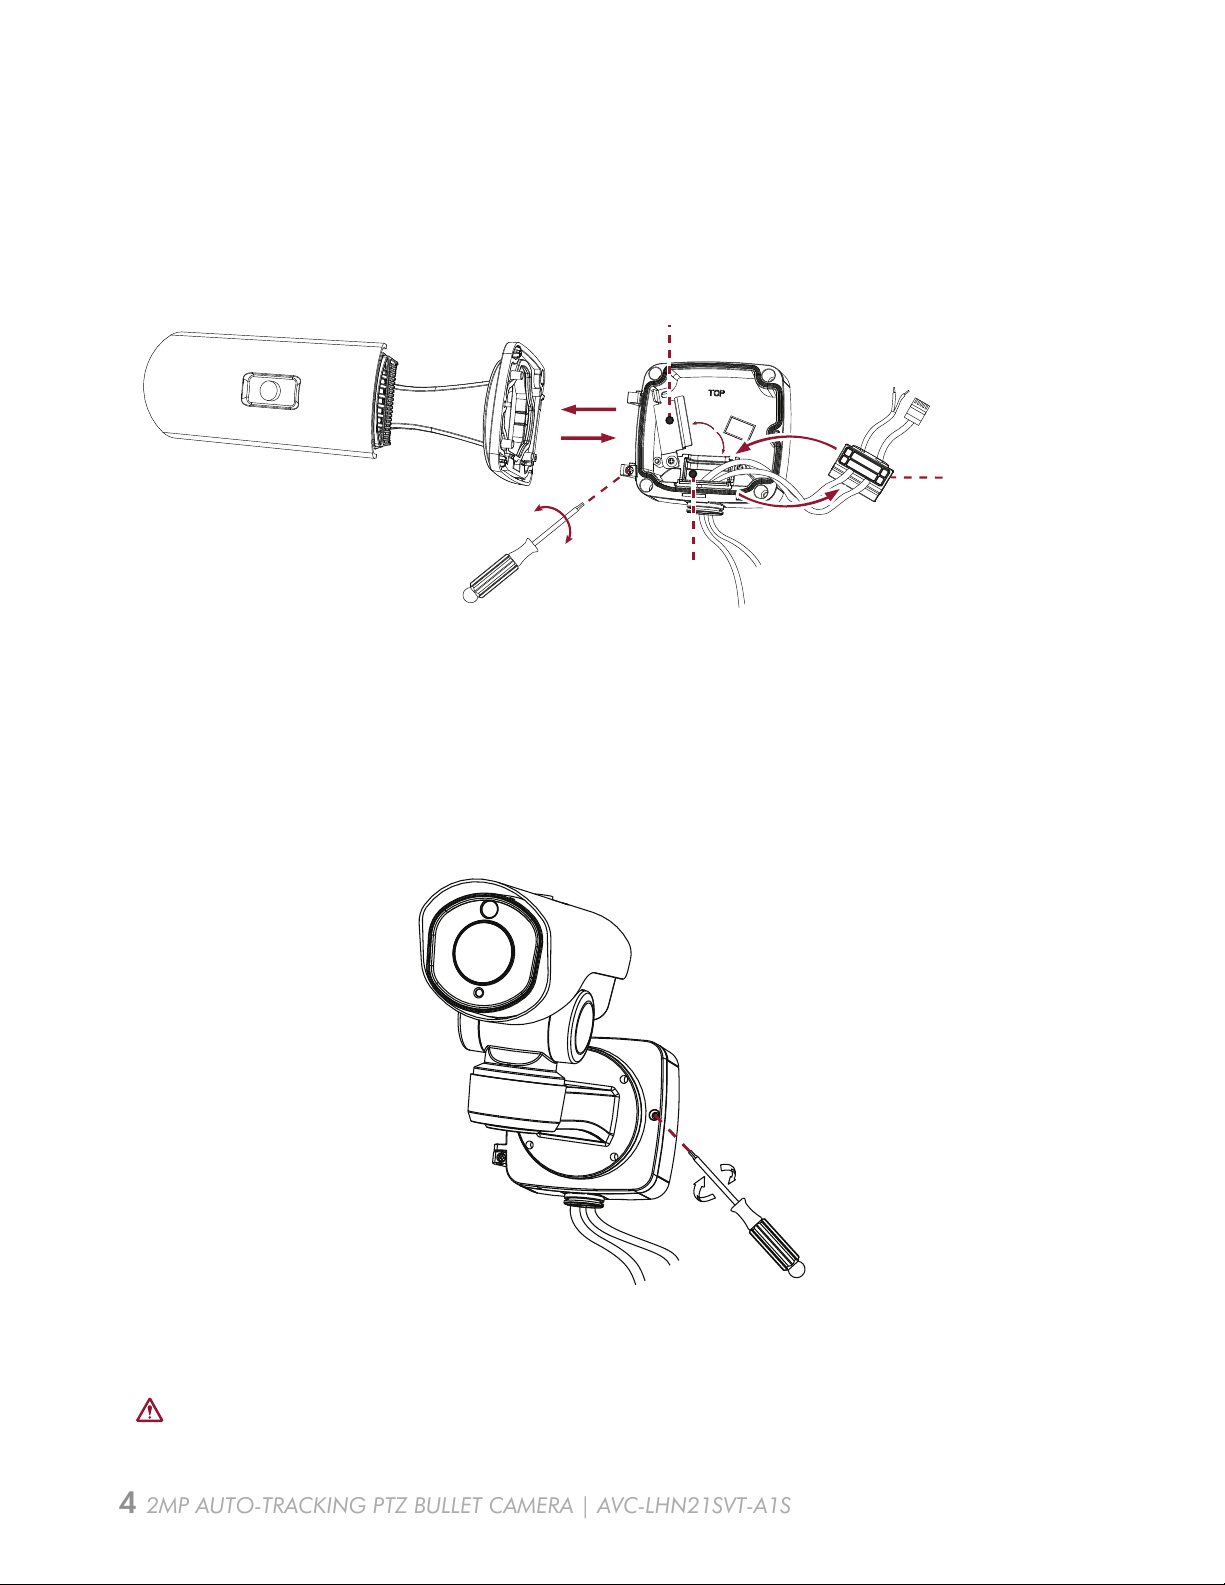
3. Secure the camera to the junction box's front cover by using 4 Torx screws and then reinstall
the junction box front cover by place at an angle near 90° to the junction box base
(see diagram below).
Tension Disc
Rubber Plug
Rubber Plug Network Cable
Power Cable
4. Adjust the cable’s lengths, connect the cables to corresponding ports/interfaces and secure
the tension disc. Close the junction box and tighten screws as the last step. Please remember
to plug the small rubber plug whenever the holes on the rubber plug are not in use.
DIAGRAM 2: Remember to fix the setscrew tightly
DIAGRAM 2
4 2MP AUTO-TRACKING PTZ BULLET CAMERA | AVC-LHN21SVT-A1S
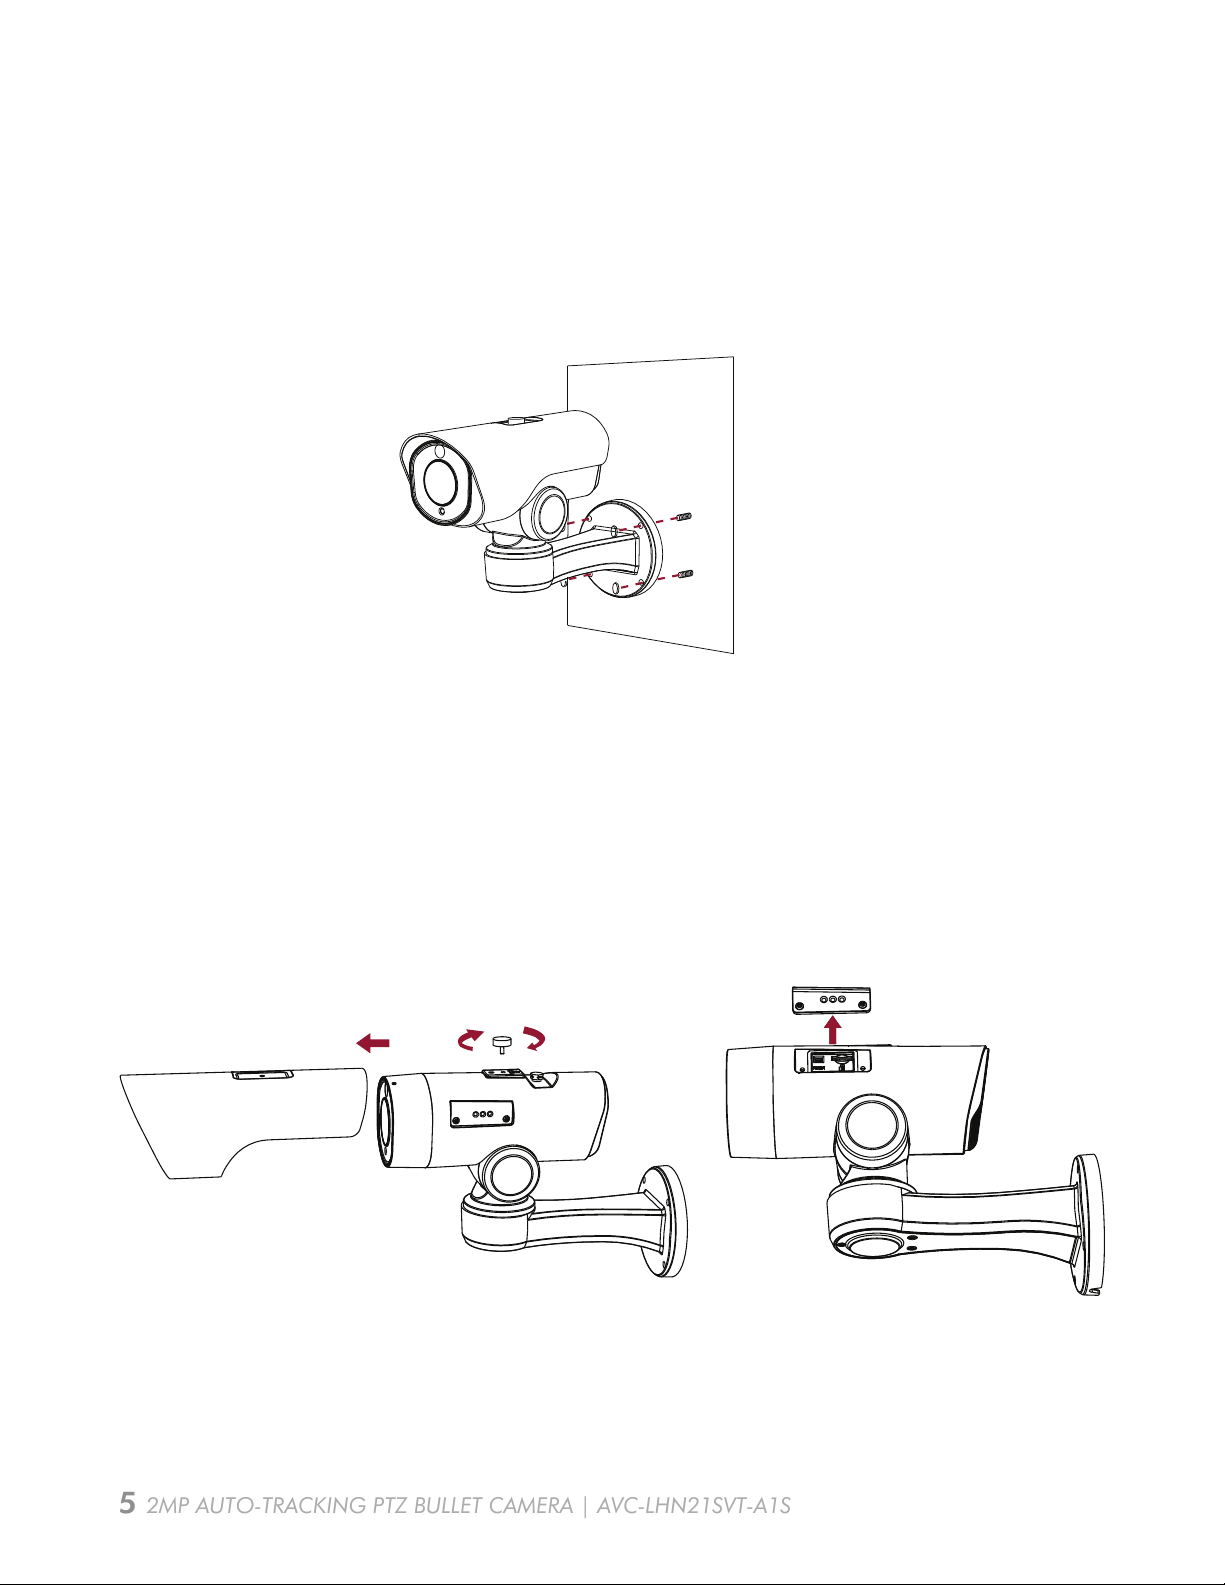
Camera Installation - Install to Wall Directly
AVC-LHN21SVT-A1S
NOTE: NOTE: If you need to use the SD card, please remove the thumbscrew holding the
sun cover and remove cover. Loosen screws on SD card cover to get access to the SD card
slot. After inserting SD card, reattach SD card cover, tighten screws and then replace sun
cover and make sure to tighten thumbscrew.
1. For use without the optional junction box (AVM-LDMT-W-A1), after making hole for passing
cables through, mark mounting holes and secure camera to wall with proper hardware.
5 2MP AUTO-TRACKING PTZ BULLET CAMERA | AVC-LHN21SVT-A1S
1. While power is off, press and hold reset button, then power on the camera and the IR LEDs
will begin to flash.
2. There are 2 hardware models of our camera. Please follow instructions for the proper
models below:
Model - A: Keep holding button until the LEDs stop flashing;
Model - B: Keep holding button until the IR LEDs stay on;
3. Release the reset button and the camera will begin the reset process, which should take 1-3
minutes to complete. After the reset process is complete, the camera will have an IP address
of 192.168.10.201. If you find that the IP address has not changed, please repeat process
from Step 1.
4. If needed, modify the IP address of the camera using the Tools utility.
How to perform a Hardware Reset
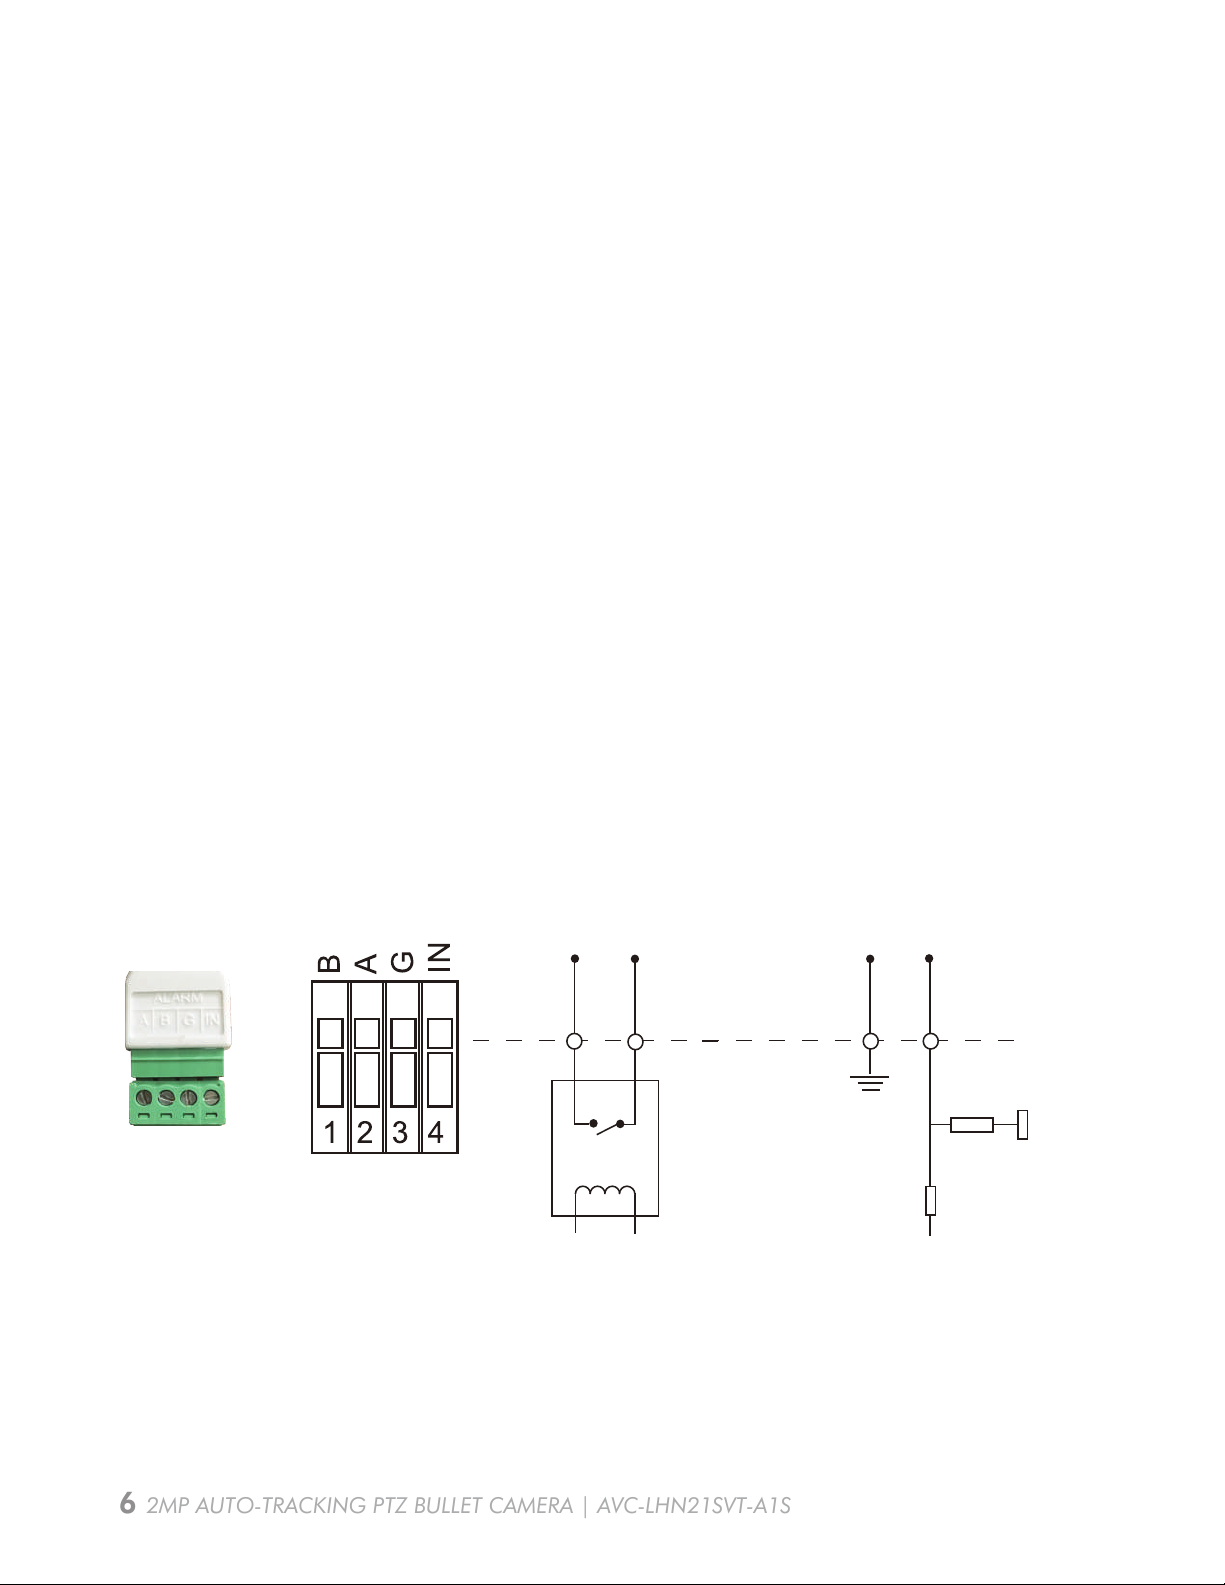
PIN1: Alarm Output NC / NO 24V DC 1A
PIN2: Alarm Output NC / NO 24V DC 1A
PIN3: Alarm Input NC / NO ≤12V
PIN4: Alarm Input NC / NO ≤12V
How to Connect to a Alarm Interface
Digital InputDigital Output
General I/O
Terminal Block
PIN2 PIN3 PIN4PIN1
6 2MP AUTO-TRACKING PTZ BULLET CAMERA | AVC-LHN21SVT-A1S
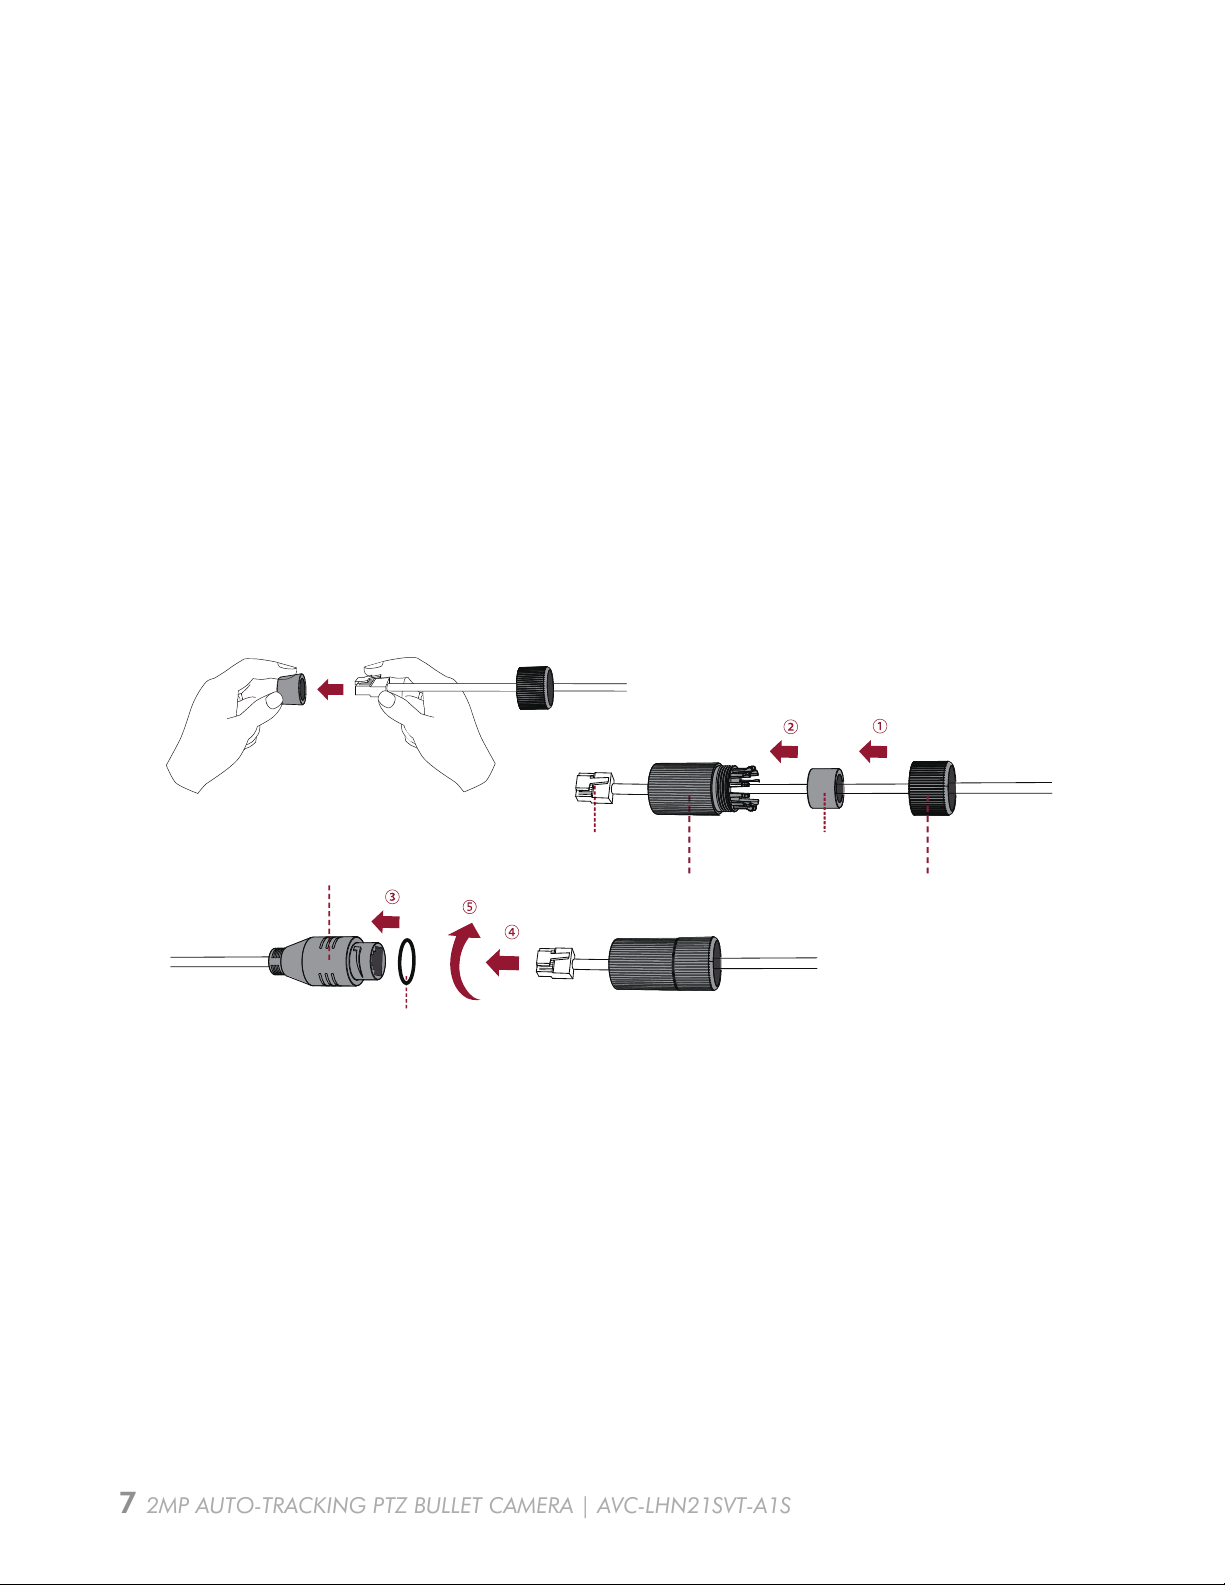
1. Insert network cable through the screw nut, rubber ring and the screw bolt.
2. Insert the rubber ring into the screw bolt;
3. Connect the screw nut to the screw bolt;
4. Place the O-Ring on the network port connector;
5. Connect the RJ45 to the network port connector, tighten the screw bolt and the connector.
NOTE: If placed in an extremely wet environment, for added protection you can wrap the
connector in electrical tape to prevent standing water to accumulate on connector.
How to Connect the Waterproof Connector
Network Port Connector LAN
Screw Bolt
Rubber Ring
Screw Nut
O-Ring
7 2MP AUTO-TRACKING PTZ BULLET CAMERA | AVC-LHN21SVT-A1S
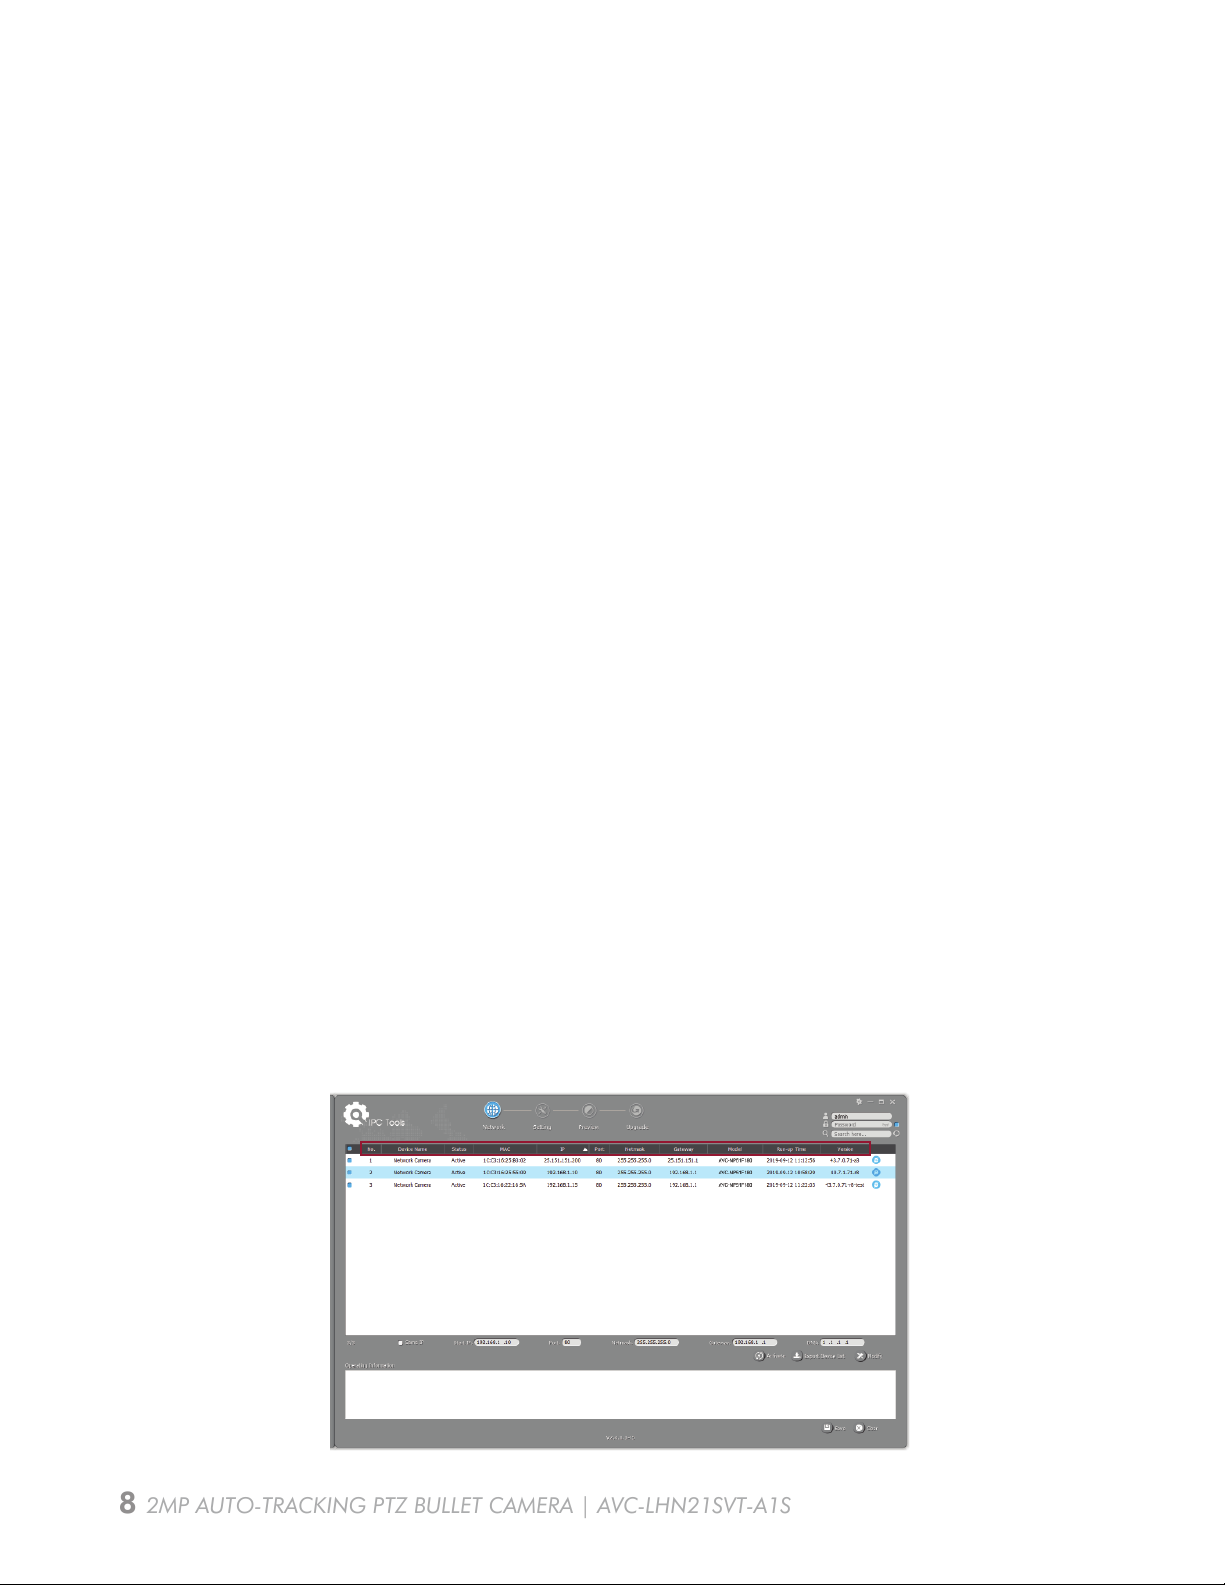
Accessing the Network Camera
The Tools utility is a software tool which can automatically detect AVYCON IP cameras on your
LAN, modify IP addresses, and manage firmware upgrades. It’s recommended to use when
assigning IP addresses for multiple cameras.
1. Install the Tools utility (This can be downloaded from our website)
2. Start Tools, then click the IPC Tools icon, and then all AVYCON IP cameras on the local
network you are connected to will be shown with information such as IP address,
MAC address, Status, Port number, Netmask, and Gateway.
Assigning an IP Address by Using Tools Utility
In order to access the camera on your network, you must assign it an IP address compatible
with your network configuration. The default address of this camera is 192.168.10.201. You
can either change the IP address of a camera using the Tools Utility or manually assign your
computer an address to communicate with the camera and log in using the browser to modify
the IP address.
Assigning an IP Address
In order to access the camera on your network, you must assign it an IP address compatible
with your network configuration.
8 2MP AUTO-TRACKING PTZ BULLET CAMERA | AVC-LHN21SVT-A1S
Tabla de contenidos
Otros manuales de Cámara digital de AVYCON


