Avigilon NVR5-RAM-16GB-B Manual de usuario

Avigilon NVR5 16 GB RAM Kit
Installation Guide
Installation Guide
NVR5-RAM-16GB-B
For
NVR5 PRM 252TB-432TB
1

© 2022,Avigilon Corporation. All rights reserved. AVIGILON, the AVIGILON logo, AVIGILON are trademarks
of Avigilon Corporation. Intel is a trademark of Intel Corporation or its subsidiaries in the U.S. and/or other
countries. Other names or logos mentioned herein may be the trademarks of their respective owners. The
absence of the symbols ™ and ® in proximity to each trademark in this document or at all is not a disclaimer of
ownership of the related trademark.
This document has been compiled and published using product descriptions and specifications available at
the time of publication. The contents of this document and the specifications of the products discussed
herein are subject to change without notice. Avigilon Corporation reserves the right to make any such
changes without notice. Neither Avigilon Corporation nor any of its affiliated companies: (1) guarantees the
completeness or accuracy of the information contained in this document; or (2) is responsible for your use of,
or reliance on, the information. Avigilon Corporation shall not be responsible for any losses or damages
(including consequential damages) caused by reliance on the information presented herein.
Avigilon Corporation
avigilon.com
20220426
2


Introduction
Avigilon provides an optional RAM Upgrade Kit for the NVR5 Premium 252-432 TB models. Up to four 16 GB
RAM Upgrade Kits (for a total of 64 GB of additional RAM) can be installed in the NVR5.
Part Number Description
NVR5-RAM-16GB-B NVR5 Premium 16 GB RAM Upgrade Kit
Note: NVR5 RAMUpgrade Kits must be installed in pairs (four DIMMs at a time). DIMMs must follow
specific configuration rules, and must be installed in the same configuration on each of the two
CPUs. See Installing Additional RAM on page7 for more information.
Confirm Package Contents
Confirm that the kit you are installing contains the following components:
l2 × 8 GB DIMMs per RAMKit
Recommended Tools
The following tools are not included in the kit package, but are needed to complete the installation:
lWrist-grounding strap connected to the ground
lESD Mat
Important: It is recommended that you always use an antistatic mat and antistatic strap while
working on components inside the system.
Introduction 4
Installing the NVR5 Premium 16 GBRAM Kit
Note: If the NVR5 is an operating part of your security system, be aware that it must be shut down to
complete this procedure.
Before starting to install the kit:
1. Log in to the ACC Client on a workstation on the same network as the NVR5 you are going to upgrade.
a. In the System Explorer, select the NVR5 you are going to upgrade.
b. In the New Task menu, click Server Analytics . Note down the number of cameras
analytics enabled connected to the NVR5 and the current resource loads. For more
information, see the Enabling Analytics topic in the ACC Client Help.
2. Turn off the NVR5, including all attached peripherals.
WARNING — Opening or removing the system cover while the system is powered on
may expose you to a risk of electric shock.
3. Disconnect the NVR5 from the electrical outlet and disconnect the peripherals.
4. Remove all network, power and peripheral cables from the NVR5.
5. If applicable, remove the system from the rack and place on a flat, level surface.
Important: Whenever you need to lift the system, get others to assist you. To avoid injury, do
not attempt to lift the system by yourself.
Installing the NVR5 Premium 16 GBRAM Kit 5

Opening the Cover
1. Remove the complete access panel.
oa. If necessary, unlock the access panel latch.
ob. Press the release button.
oc. Pull up the latch to disengage the access panel from the chassis.
od. Slide the access panel toward the rear of the server and lift it from the chassis.
2. Remove the air baffle.
Opening the Cover 6
Installing Additional RAM
Important: To prevent damage to the DIMM or memory module socket during installation:
lDo not bend or flex the DIMM.
lHandle each DIMM only by the edges to ensure that you don't touch the middle of the
memory module or the metallic contacts.
lWhen installing a DIMM, apply pressure to both ends of the memory module evenly. Do not
apply pressure to the middle.
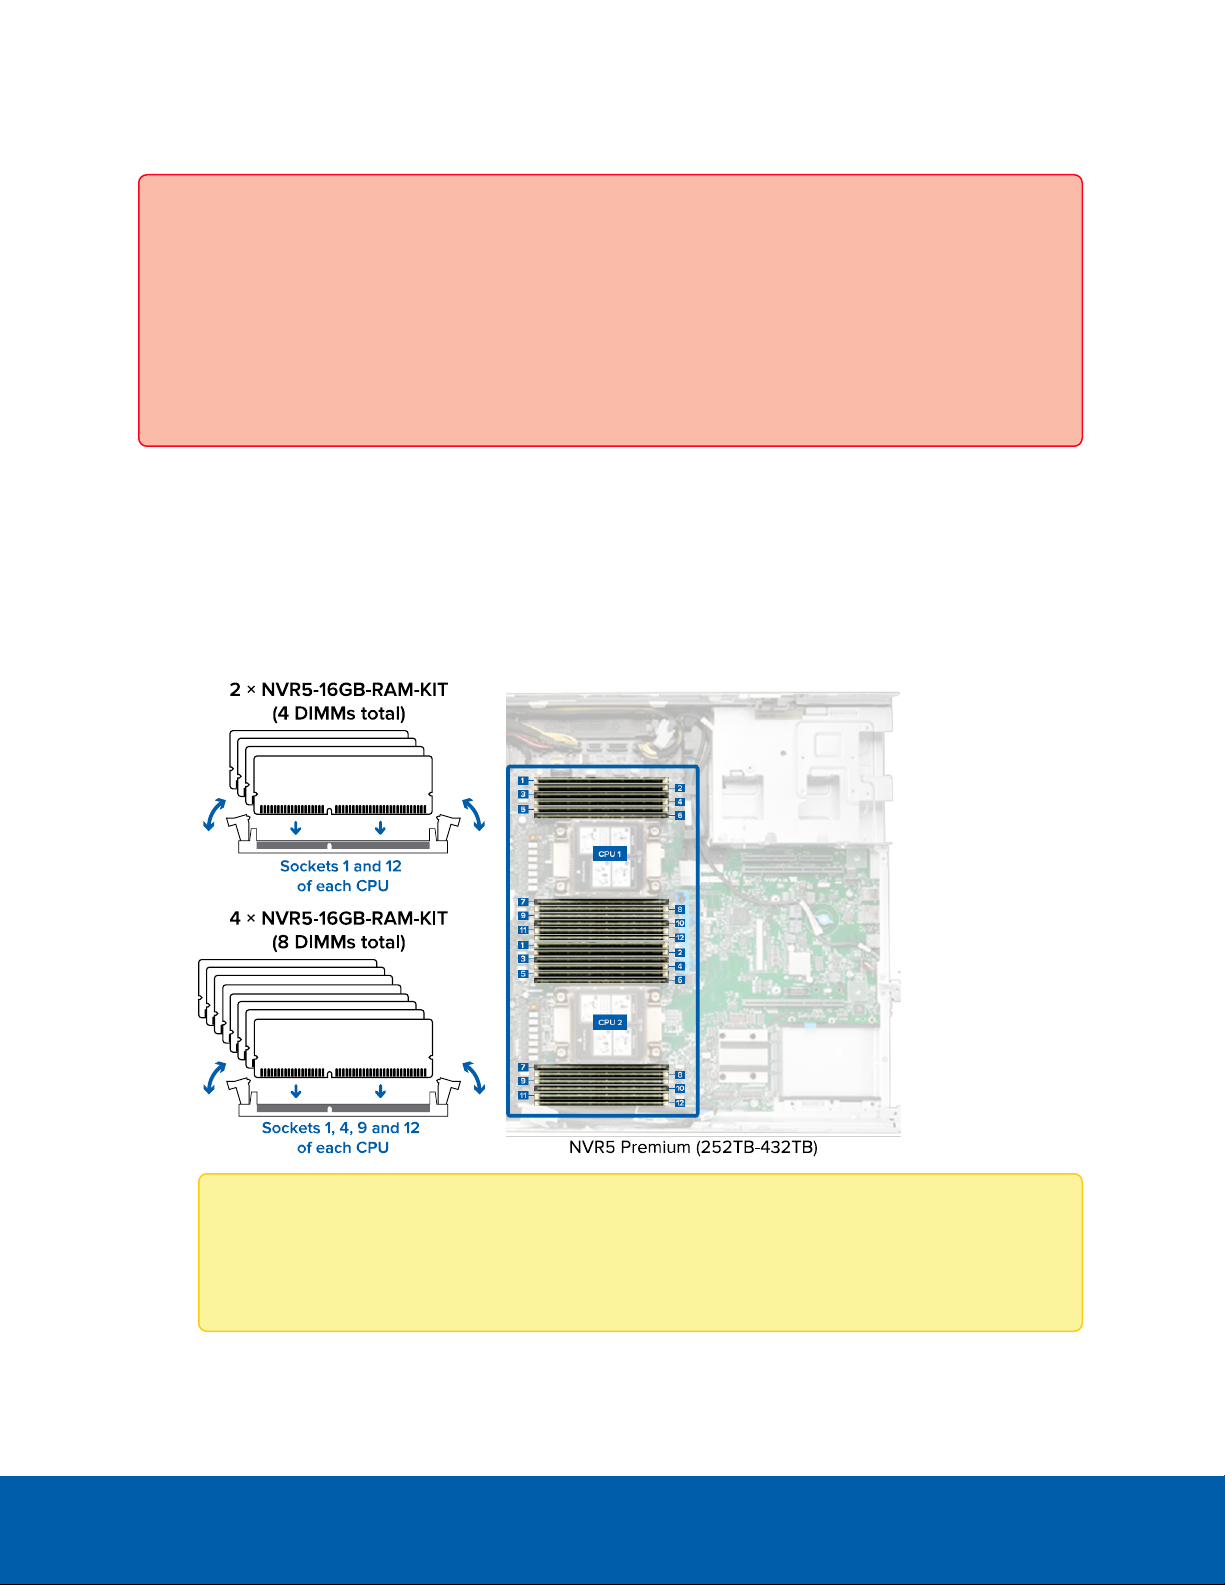
1. In the row of empty memory sockets near to each CPU, locate the sockets you will be installing the
DIMMs into using the following guidelines:
lIf you are installing 2 × RAMUpgrade Kits, install DIMMs from the first kit into sockets 1 and 12 of
CPU 1 and DIMMs from the second kit in sockets 1 and 12 of CPU 2.
lIf you are installing 4 × RAMUpgrade Kits, install DIMMs from the first and second kit into
sockets 1, 4, 9 and 12 of CPU 1 and DIMMs from the third and fourth kit in sockets 1, 4, 9 and 12
of CPU 2.
Note: Install both DIMMs provided in each kit and only in these configurations. Configurations
not following this sequence are not supported and may result in non-optimal memory
performance or other unexpected behavior.
Installing Additional RAM 7

2. Open the ejector clips on each side of the empty memory module sockets outward to allow the DIMMs
to be inserted into the sockets.
3. Align the edge connector of the DIMMs with the alignment key of the sockets and press the DIMMs
into sockets until the socket levers click into place.
Reattaching the Cover
When all the components of the kit have been installed:
1. Ensure all expansion card latches are closed and there are filler covers for all empty slots.
2. Reinstall the air baffle.
3. Close and lock the NVR5 access panel.
4. If the NVR5 was rack mounted and removed to install the kit, remount it into the rack.
5. Reconnect all the peripherals and cables.
Important: Ensure that both of the 1000W power supplies are connected to main power. The
upgraded NVR5 requires both power supplies to properly function.
6. Power on the NVR5.
Reattaching the Cover 8

Confirming the Installation
Verify the upgrade is successful:
1. Log in to the ACC Client on a workstation on the same network as the NVR5.
2. In the System Explorer, click Site Setup, and click Site to expand the site containing the upgraded
NVR5.
3. Click to select the upgraded NVR5.
4. Verify that the NVR5 has 96 GBof memory installed if one pair of kits was installed, or 128 GB if two
pairs of kits were installed:
a. In the System Explorer, select the upgraded NVR5 server.
b. In the New Task menu , click Site Health.
c. Under the General Information heading, the sum of Memory usage and System Available
Memory should be increased from the original 64 GB in increments of 16 GB depending on the
number of kits installed.
For example, memory should be 96 GB(~96,000 MB) if one pair of kits was installed.
Confirming the Installation 9

Tabla de contenidos
Otros manuales de Hardware de computadora de Avigilon


Manuales populares de Hardware de computadora de otras marcas

EMC2
EMC2 VNX Series Manual del propietario

Panasonic
Panasonic DV0PM20105 Manual de usuario

Mitsubishi Electric
Mitsubishi Electric Q81BD-J61BT11 Manual de usuario

Gigabyte
Gigabyte B660M DS3H AX DDR4 Manual de usuario

Raidon
Raidon iT2300 Manual de usuario

National Instruments
National Instruments PXI-8186 Manual de usuario


