
Aquatic AQ-MP-5BT-H Guía

InstructionDisclaimer
Dennis Kirk provides instructions to help our customers better understand how to install the
products we sell. The instructions are exact copies of what the manufacturer includes with the
product being sold.
That means the quality and accuracy of the instructions is solely dependent on what the
manufacturer produces. We do our best to make the text legible and the pictures viewable.
However, the end result depends largely on the quality of instructions the manufacturer
provides.
Therefore, you will find that some instructions are not of the highest quality. Sometimes text is
hard to read and pictures are not easy to see. At times you will find the overall look of the
instructions to be less than professional. However, we feel it is better to provide what we have
rather than provide nothing at all.
To the best of our knowledge the instructions and application information contained in the
instructions is accurate. However, Dennis Kirk assumes no liability related to any errors that
may be contained in the copy of the manufacturer’s instructions we provide. Buyers are solely
responsible to insure that product use is consistent with their application.
800-969-7501 so we can further assist you regarding additional product information or any other
business related questions.
Thank you for doing business with Dennis Kirk.

USER / INSTALLATION MANUAL
PLEASE READ THIS INSTRUCTION MANUAL BEFORE
INSTALLATION AND OPERATION
AQ-MP-5BT-H - WATERPROOF MEDIA PLAYER
for Bluetooth & MP3 devices
Replaces Factory Radio on Harley-Davidson®Motorcycles
(Models 1998-2013)
USB
charging

1 Getting Started.........................................................................................................................
1.1 Contents.............................................................................................................................
1.2 Connections........................................................................................................................
1.3 Wiring Diagram...................................................................................................................
1.4 Mounting Precautions.........................................................................................................
1.5 Installing the Media Player if no stereo is already installed................................................
1.6 Installing the Media Player if an existing factory stereo is already installed......................
1.7 Connecting Rear Speakers.................................................................................................
1.8 Handle Bar Controls............................................................................................................
1.9 Power On............................................................................................................................
2 Location of Controls.................................................................................................................
2.1 Media Player Controls..........................................................................................................
3 Listening to Devices..................................................................................................................
3.1 Listening via Bluetooth.......................................................................................................
3.1.1 Pair with Bluetooth Device...........................................................................................
3.1.2 Listening via Bluetooth Device.....................................................................................
3.2 Listening via Auxiliary Input (3.5mm Jack).........................................................................
3.3 Adjusting Volume Level.......................................................................................................
3.4 Device Charging..................................................................................................................
4 Listening to FM/AM Radio.........................................................................................................
4.1 Enter FM/AM Radio Mode....................................................................................................
4.2 Scan or Seek FM/AM Radio Channels...................................................................................
4.3 Saving Radio Channel to Memory.......................................................................................
4.4 Listening to Saved Radio Memory.......................................................................................
4.5 Switching between FM Tuning Areas...................................................................................
5 Settings Menu...........................................................................................................................
5.1 Audio Menu.........................................................................................................................
5.2 AS/PS (Auto Scan/Preset Scan)...........................................................................................
5.3 Clock Settings.....................................................................................................................
5.4 Local/Distant Tuning...........................................................................................................
5.5 Stereo/Mono........................................................................................................................
5.6 FM Tuning Area...................................................................................................................
5.7 Beep Tone...........................................................................................................................
5.8 System Reset......................................................................................................................
6 Specifications & Dimensions....................................................................................................
6.1 Specifications.....................................................................................................................
6.2 Dimensions........................................................................................................................
7 Warranty Information...............................................................................................................
3
3
3
4
5
5
6
6
7
7
8
8
9
9
9
9
9
9
9
10
10
10
10
10
10
11
11
11
11
11
11
11
12
12
13
13
13
14
Table of Contents Media Player AQ-MP-5BT-H
2www.aquaticav.com/harley

• AQ-MP-5BT-H Digital Media Player
• Four-pin Speaker Wiring Harness
• Owner’s Manual
1.1 Contents
1. 23-pin Harley-Davidson®Standard Harness Connection
The 23-pin harness supplies power and ground connections to the Media Player, the two
front channel high-level (speaker) outputs, as well as the handle bar control inputs.
2. FM/AM Radio Antenna Jack
Allows connection of FM/AM radio antenna. For best FM/AM performance make sure the
antenna is extended to the highest achievable position.
3. Auxiliary Outputs
Allows external amplifiers to be connected to power additional speakers.
4. Auxiliary Inputs
Allows an additional RCA input, from a standalone unit or another stereo source.
5. 8-pin DIN Cable
Allows connection of the wired Remote Control (AQ-WR-5F sold separately) RF receiver.
6. Power Antenna / Amplifier Remote
Provides +12V signal to turn on an external amplifier.
7. Rear Channel High-Level (Speaker) Output
High-level rear channel speaker output (see section 1.7).
1.2 Connections (see also ‘1.3 Wiring Diagram’)
Getting Started Media Player AQ-MP-5BT-H
3www.aquaticav.com/harley

4
5
1
2
3
6
No lower than a 2 Ohm load should be used
or damage may occur to the Media Player.
Make sure the polarity of speakers are
connected correctly.
1.3 Wiring Diagram
7
Getting Started Media Player AQ-MP-5BT-H
4www.aquaticav.com/harley

1. Install the unit where it does not interfere with driving.
2. Check clearances on both sides of a planned installation before drilling any holes or
installing any screws.
3. When routing RCA cables, keep them away from power cables and speaker wires.
A common source of noise in the audio system is the motorcycle ignition system. This is usually
due to the radio being located close to the ignition system (engine). This type of noise is detect-
able by a varying pitch with the speed of the engine.
Ignition noise can be removed using a high voltage radio suppression type ignition wire and a
suppressor resistor. Your motorcycle may already use this wire and resistor but it may be neces-
sary to check them to ensure they are operating correctly. Alternatively, a noise suppressor could
be installed.
1.4. Mounting Precautions
Please observe the following precautions:
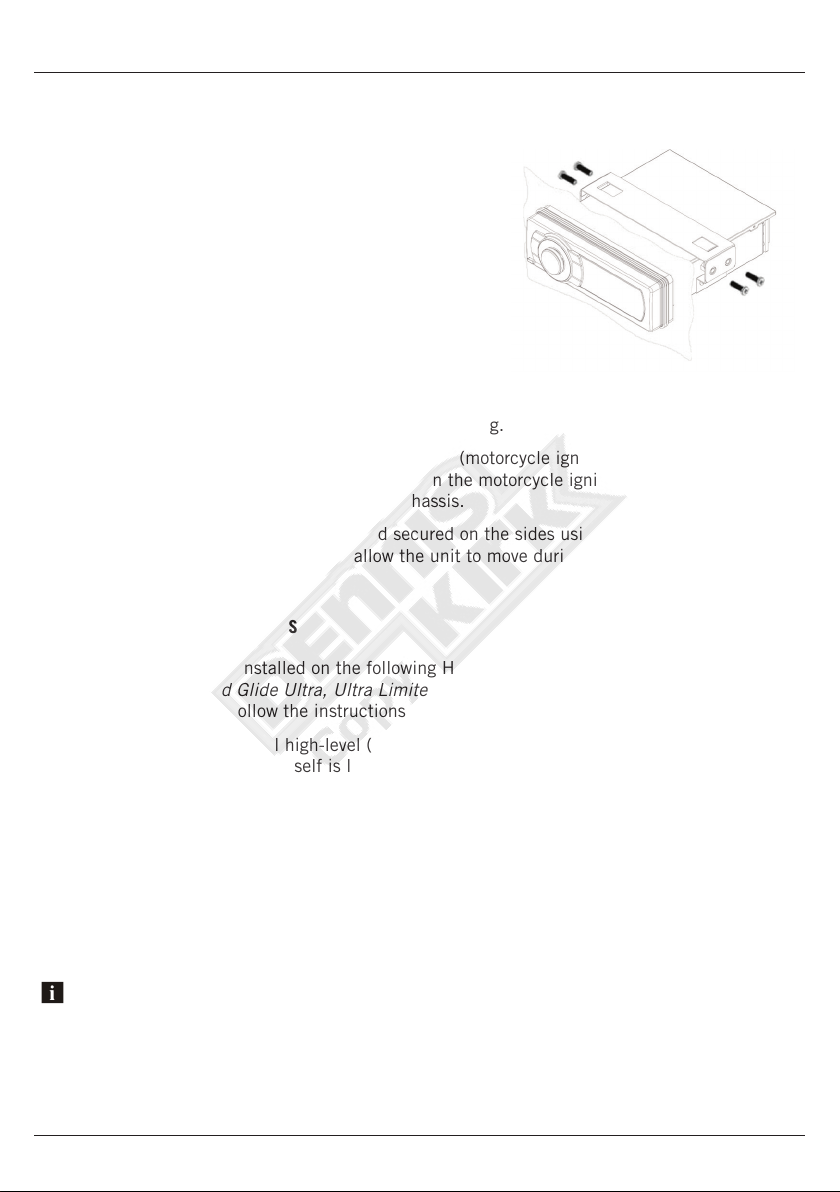
1.5 Installing the Media Player if no stereo is already installed
Use the existing Harley-Davidson®factory side mounting brackets and hardware to mount the
Media Player.
1. Position the Media Player in front of the fairing opening so the wiring can be passed
through the opening.
2. Follow the wiring diagram and ensure all connections are secure and insulated with crimp
connectors to ensure proper operation.
3. Turn the Media Player on
to confirm operation (motor-
cycle ignition switch must
be on) and once correct
operation is achieved turn the
motorcycle ignition switch off
before proceeding with the
final mounting of the chassis.
4. Ensure that the unit is
supported and secured on
the sides using the existing 4
factory screws; failure to do
so may allow the unit to move
during while riding, causing
damage to the mounting area.
Getting Started Media Player AQ-MP-5BT-H
5www.aquaticav.com/harley
1.6 Installing the Media Player if an existing factory stereo is already installed
If replacing an existing Harley-Davidson®factory stereo
use the existing Harley-Davidson®factory side mounting
brackets and hardware to mount the Media Player.
1.7 Connecting Rear Speakers
Rear speakers are usually installed on the following Harley-Davidson®Motorcycle models: Electra
Glide Ultra Classic, Road Glide Ultra, Ultra Limited. To continue using these speakers with your
Aquatic AV Media Player follow the instructions below.
After following the installation instructions above test your rear speakers for sound. If you do not have output from your
rear speakers make sure to check your rear speaker setting in the settings menu and select rear speakers ‘ON’.
1. Disconnect the radio harness and FM/AM radio
antenna from the factory stereo.
2. Remove the factory stereo and replace with the
AQ-MP-5BT-H Media Player using the existing factory
mounting hardware.
3. Plug the 23-pin radio harness plug and FM/AM radio
antenna into the AQ-MP-5BT-H media player. Only the
23-pin harness plug is utilized by the media player. Any
additional harness plugs will hang loose in your fairing.
4. Turn the Media Player on to confirm operation (motorcycle ignition switch must be
on) and once correct operation is achieved turn the motorcycle ignition switch off before
proceeding with the final mounting of the chassis.
5. Ensure that the unit is supported and secured on the sides using the existing 4
factory screws; failure to do so may allow the unit to move during while riding, causing
damage to the mounting area.
1. Locate the rear channel high-level (speaker) output (4-pin molex connector with four
speaker wires). The pigtail itself is labelled with Color Code, Function and Description.
2. Locate the rear channel speaker lines in the 35-pin radio harness plug. This plug will not
be connected to your Aquatic AV head unit. Cut the 4 speaker wires for the rear channels at
pins 1 and 24(for the right side) and pins 2 and 25 (for the left side).
3. Strip the 4-pin pigtail wires 1/4” exposing bare wires. Strip the 4 wires that you cut from
the 35-pin harness 1/4” exposing bare wires.
4. Connect and crimp using crimp caps or solder the connection, cover the soldered wires
with non conductive heat shrink tube.
Getting Started Media Player AQ-MP-5BT-H
6www.aquaticav.com/harley

Hand Control Up Hand Control Down Mode Select
AM/FM Tunes to next station Tunes to previous station Switches Mode
Bluetooth Next Track Previous Track Switches Mode
AUX Switches Mode
( + ) ( - ) Audio
AM/FM Turns volume up Turns volume down Accesses Audio menu adjustments
Bluetooth Turns volume up Turns volume down Accesses Audio menu adjustments
AUX Turns volume up Turns volume down Accesses Audio menu adjustments
The AQ-MP-5BT-H requires 12V DC to pins 10,20, and 12 in the 23-pin radio harness plug in
order to power up. Ground should be connected to pin 11.
Once all connections are made press the rotary knob and the stereo will turn ON.
1.9 Power On
The AQ-MP-5BT-H is a plug and play solution for 1998-2013 Harley-Davidson®Motorcycles.
Plug the standard Harley-Davidson®23-pin connector in to the back of the AQ-MP-5BT-H and
your speakers and hand controls will work the same as the standard factory install (some Harley-
Davidson®models may require additional steps).
Some stock Harley-Davidson®features e.g. CB radio will not be supported through the AQ-MP-
5BT-H.
Below is a matrix of what can be controlled on the AQ-MP-5BT-H via the stock Harley-Davidson®
hand controls.
1.8 Handle Bar Controls
Audio switch (left hand side) Mode switch (right hand side)
Orange/Black
Violet/Black
Brown/Black
Gray/Green
Pink/White
Violet/Black
Brown/White
Gray/White
Getting Started Media Player AQ-MP-5BT-H
7www.aquaticav.com/harley

2.1 Media Player Controls
If your music player is connected via the Auxiliary input you will not be able to control track or receive track informa-
tion.
Turn off DSP to access control of Bass and Treble
1. Front face release
2. Preset station
3. Previous/Rewind
4. Next/Fast Forward
5. Mode button
6. Band button
7. LCD screen
8. Audio/System menu
9. XBS function
10. Play/Pause
11. ESC/Info
12. DSP/Dimmer
13. Rotary Select Knob
Button FM Mode Aux In Bluetooth
Rotary Select Knob Short Press: Mute
Long Press: Power Off
In menu: Select
Mode Short Press: Switches through different modes
Long Press: No Function
Rotary Knob Clockwise When turned clockwise the volume increases
Rotary Knob Counter
Clockwise When turned counter clockwise the volume decreases
Next Short Press: Scans to the next station No Function Changes to next song
Long Press: Switches into manual seek mode No Function No Function
Previous Short Press: Scans to the previous station No Function Changes to Previous Song
Long Press: Switches into manual seek mode No Function No Function
Play/Pause Short Press: Toggles between Play and Pause
Long Press: No Function
Band Short Press: Switches between AM/FM Bands No Function No Function
Long Press: No Function No Function No Function
XBS Short Press: Toggles Bass Boost on/off
Long Press: No Function
DSP/Dimmer Short Press: Turns on EQ Preset
Long Press: Enables the two stage dimmer
ESC/Info Short Press: Return to the current mode screen, if you are in a menu. Display clock when on mode screen
Long Press: Displays info if any available No Function No Function
Preset Short Press: Advances through presets No Function No Function
Long Press: Set up new presets No Function No Function
Audio/Menu Short Press: Takes you into the audio menu
Long Press: Takes you into the system menu
73 652
14
8
101112 9
13
Location of Controls Media Player AQ-MP-5BT-H
8www.aquaticav.com/harley

1. Open the Bluetooth settings on your Bluetooth enabled device.
2. Select ‘AQUATIC AV’ from the list of available devices to pair (no password is needed).
3. A Bluetooth logo will illumiate on the Media Player LCD to verify Bluetooth is activated.
3.1.1 Pair with Bluetooth Device
Only one Bluetooth device can be paired with the Media Player at any time.
3.1 Listening via Bluetooth
3.1.2 Listening via Bluetooth Device
1. After pairing a Bluetooth enabled device, switch the Media Player to Bluetooth Mode.
2. Media played on your paired device, will be transmitted to the Media Player.
3. The PLAY/PAUSE, NEXT, and PREVIOUS buttons will control their appropriate functions
on your device.
4. A paired Bluetooth device can be controlled through the controls on the device, the
faceplate controls, or using the handle bar controls.
3.3 Adjust Volume Level
1. Turn the rotary knob clockwise increase the volume.
2. Turn the rotary knob counter clockwise to reduce the volume.
3.2 Listening via Auxiliary Input (3.5mm Jack)
1. Remove the faceplate from the stereo.
2. Connect your MP3 device to the 3.5mm connector.
3. Re-attach the faceplate.
4. Press the rotary knob to power the Media Player ON (if the faceplate was removed with the
stereo still powered on, it will power on by itself).
5. Press MODE on the Media Player or remote control to select ‘AUX-1’ mode.
Always ensure to connect and disconnect your Media Player with dry hands!
3.4 Device Charging
1. Remove the faceplate from the stereo.
2. Place your device in the storage compartment and connect your USB device to the USB
connector.
3. Re-attach the faceplate and ensure the stereo is switched on. The device battery will then
charge.
The USB connector will provide charging only. Audio content stored on your device will not be
recognized or playable by the stereo.
Listening to Devices Media Player AQ-MP-5BT-H
9www.aquaticav.com/harley
Otros manuales para AQ-MP-5BT-H
2
Tabla de contenidos
Otros manuales de Reproductor multimedia de Aquatic

Aquatic
Aquatic AQ-BC-6BT Manual de usuario

Aquatic
Aquatic AQ-MP-5BT Manual de usuario

Aquatic
Aquatic AQ-MP-5BT-H Manual de usuario

Aquatic
Aquatic AQ-MP-5UBT-S Guía

Aquatic
Aquatic AQ-DVD-3 Manual de usuario

Aquatic
Aquatic 6500-915 Manual de usuario

Aquatic
Aquatic BLUECUBE AQ-BC-5BT Manual de usuario

Aquatic
Aquatic AQ-BC-6UBT Guía

Aquatic
Aquatic AQ-BC-6UBT Guía

Aquatic
Aquatic AQ-MP-5UBT-H Guía de solución de problemas


